background image


6.3 

Zeroing 


When the weight value displayed by the indicator is less than 2%F•S, press [ZERO] to make the 

display return “0” and at the same time the “ZERO” cursor appears. While carrying through repeat 

zero, you can make the display of not more than 5%F•S return zero. When the “NET” indicating 

cursor is on,can’t carry through zeroing operation. 


6.4 

Deducting Tare


6.4.1 When the goods is placed on the scale platform and if the weight is regarded as tare to deduct, 

press [TARE],the indicator displays“0”  and at the same time“NET”  cursor appears. If you need to 

deduct tare continually, the adding weight should not be more than the Max. weighing. 


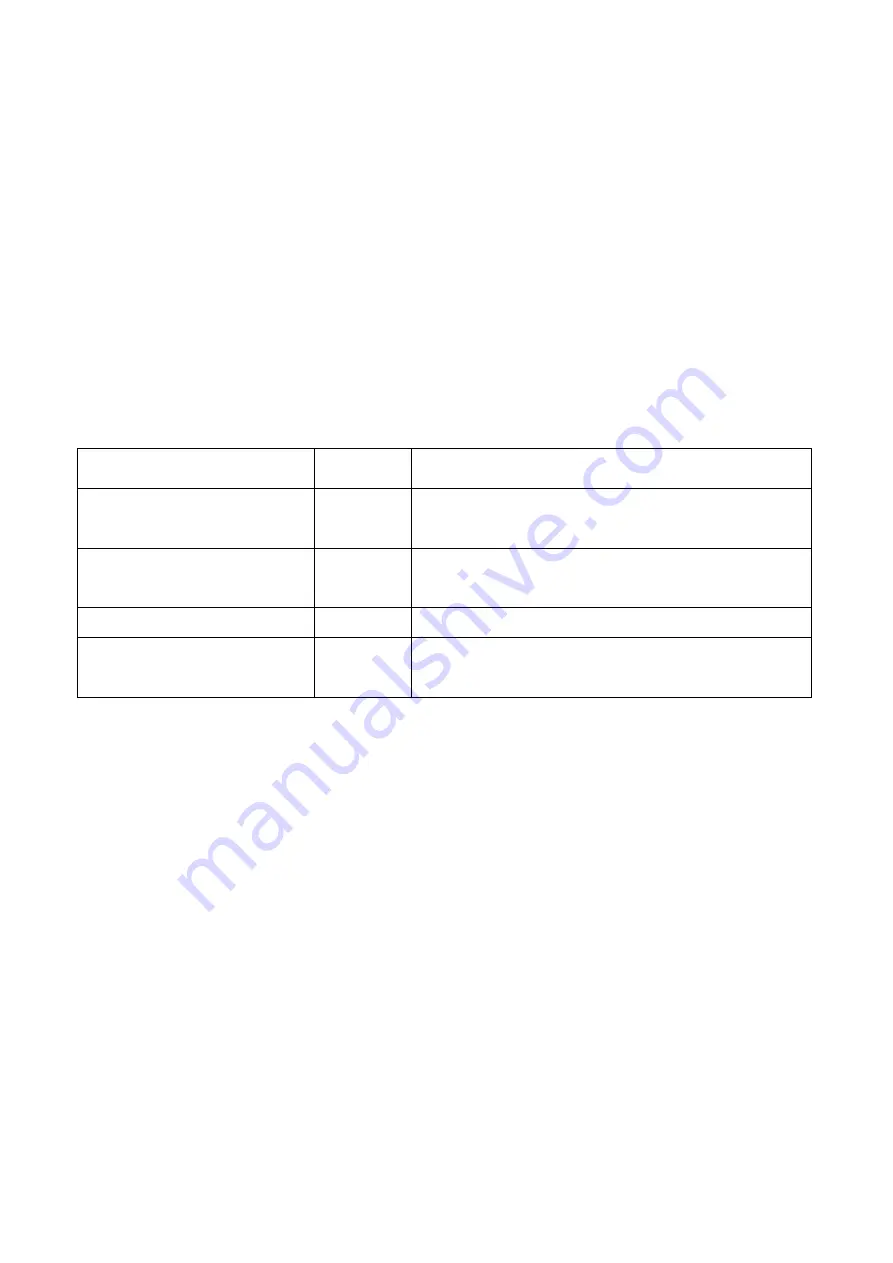
6.4.2 For the process that the negative tare appears and is cleared, see the following table. 

Steps 

Display 

Meaning 

Place goods on the scale platform   

0.50 

Which  means  the  goods  weight  is  0.5kg(can be  regarded  as 

tare). 

Press [TARE] 

0.00 

The  tare  has  been  deducted ,and  at  this  time  the  “NET” 

indicating cursor appears. 

Remove the goods 

-0.50 

The indicator displays the tare(negative value) 

Press [TARE] again 

0.00 

The  negative  tare  is  cleared, and  at  the  same  time  the  “NET” 

indicating cursor is off. 


6.5 Conversion between “kg” and “lb” 

Under weighing state, keep pressing [ZERO] for 3 seconds,the indicator automatically converts 

the weight unit between “kg” and “lb”, and at the same time the relevant “kg” or “lb” cursor is on. 


6.6 Basic Counting Mode 

Under weighing state, press [MODE], the indicator enters the sampling state. 

6.6.1 Sampling 

After entering basic counting mode, the indicator displays “PC    2”. When you press [↑],you can 

make the sample number change in 2→5→10→20→50→100→200→2 order in circle, once you decide 

on the sample number (of course, the larger the number, the better the result ), now you can place 

the sample article whose number is equal to the displayed number on the scale platform. After 

Summary of Contents for HL-2065

Page 1: ...XK3101 HL 2065 Indicator User s Manual...

Page 2: ...uction 2 4 Installation Connection 4 5 Operation Keys Instruction 4 6 Use Instruction 5 6 1 Turn on Operation 5 6 2 Turn off Operation 5 6 3 Zeroing 5 6 4 Deducting Tare 5 6 5 Conversion between kg an...

Page 3: ...drift 12 ppm 1 4 A D conversion resolution ration 300000 1 5 Display resolution ration 30000 1 6 A D conversion rate 100T S 1 7 Display shift rate 5T S 1 8 Non linearity 0 01 F S 1 9 Load cell excitin...

Page 4: ...101 HL 2065C 1 5kg 2 Main Functions 2 1 Full keyboard calibrating 2 2 Zero position auto tracking 2 3 Full range deducting tare 2 4 Over load indicating 2 5 Simple counting 2 6 Two kinds of calibratio...

Page 5: ...4 Figure 1 XK3101 HL 2065B Figure 2 XK3101 HL 2065C 3 2 Panel...

Page 6: ...icating light MODE key TARE ENTER key ZERO key PRINT ON OFF key 3 3 Cursors and their meanings There are 6 LED indicating cursors on this indicator for the names and meanings see the following table C...

Page 7: ...ween load cell and 5 core aerial pin outlet 4 2 2 If the 9 core D shape plug is used for the load cell connecting see Figure 4c Figure 4b Wire connecting between load cell and 9 core D shape plug Note...

Page 8: ...print signal MODE key a Used for converting the mode between weighing and counting b Under calibrating state you can use this key to choose the setup method or the given parameter table also use it to...

Page 9: ...goods weight is 0 5kg can be regarded as tare Press TARE 0 00 The tare has been deducted and at this time the NET indicating cursor appears Remove the goods 0 50 The indicator displays the tare negat...

Page 10: ...t the same time 6 7 RS 232 Output 6 7 1 The 3 core aerial outlet is used for RS 232 hardware interface and the outlet is mounted on the back housing of the indicator see the following drawing Figure 5...

Page 11: ...s weight D0 1 net weight State C output empty case character 6 7 3 Every frame consists of 10 digits The first is start bit 0 The ninth is stop bit 1 One of the other eight is correction bit and the o...

Page 12: ...s used for selecting digit place and the digit of the selected place will flash at this time if you press the flashing digit of the selected place will be changed in 1 2 3 9 0 1 sequence For instance...

Page 13: ...ct the setup value of the products leaving the company 7 6 Turn off its power at once if the indicator is out of order in use Non specialized manufacturer or non professional staff can t fix it withou...

Page 14: ...he weight value on arbitrary point 8 2 Entering calibration or ambient data group CAL X refers to fixed point calibration arbitrary point calibration no calibration you can use to select the calibrati...

Page 15: ...IV data for about 2 seconds At this time you can press to select the division and then press ENTER to confirm After the operation is finished the indicator enters zero load adjustment state For the ra...

Page 16: ...Ad LD Load the weights on the scale platform after the indicator display Ad LD for 2 seconds Await 10 seconds make sure that the indicator is fully stable then press ENTER to confirm at this time the...

Page 17: ...etup F2 X refers to auto zero tracking range X 0 5 1 0 2 0 3 0 d The auto zero tracking function can auto compensate the zero point change caused by the factor that a little material to be weighed dro...

Page 18: ...e wave filtering strength the quicker the indicator response speed and the less stably the indicator works On the other hand the higher the wave filtering strength the slower the indicator response sp...

Page 19: ...he indicator enters F9 setup F9 X refers to user s setup confirming or return to factory setup data X 0 confirm the user s setup data X 1 return to the factory setup data See the following table for t...

Page 20: ...icator displays 0 000 00 the flashing 0 at the first digit on the last left is the selected digit Load 20kg rectification weights on the scale platform press twice to select the digit input place the...

Reviews: