XGN Handbook
Page 14
Use the (-) key to move the display backwards from
P0.
To alter the value of any gas setting, move to the
required display point (P9,P1 or P0) and use the
(1) key in conjunction with the (+) or (-) keys.
To alter the value of any air setting, repeat the
above procedure but using the (2) key in
conjunction with the (+) or (-) keys.
The Low Flame point P1 cannot be set at a higher
value than the High Flame point P9.
The initial burner setup is now complete.
Table of Available Gas and Air Settings.
Firing the burner
Scroll through to the GAS EL display by pressing
(+), close the burner control circuit. The burner
will now start.
The display will show a number scrolling down
whilst pre-purge takes place, eventually the burner
will fire at position P0 and will remain at this
position until further actions take place.
Switch the burner off and check the fan motor
rotation, which should be anticlockwise, viewed
from the motor end. If the rotation is incorrect,
please refer to
‘Fault Finding’
to correct it.
Restart a fresh from entering the pass code and
allow the burner to fire at position P0.
•
Press (+) to move the control point to P1,
the Low Fire position.
•
Check that the gas pressure is not excessive.
•
Visually check for a clean, safe and stable
flame, adjusting the air damper to suit if
necessary.
Press key (2) to move to the next number, the
second line will start to flash. To enter this number,
(nine) in this illustration, press (+) key nine times,
or the (-) key once (10-9)=1. Again the flashing
line will drop to indicate it has been recorded.
Press key (2) to move to the next number, zero,
the third line will start to flash. Zero requires no
action therefore move to the next number, (four).
Continue this procedure until all the numbers have
been entered.
When the last number has been recorded, press
the acknowledgement key. The procedure is
complete.
If required, pressing key number (1) will return the
flashing line to the previous position.
Commissioning Procedure
The Nu-way XGN burner has been delivered with
initial gas and air settings. These have been applied
to the burner during the test and inspection phase
of its manufacture. Whilst these settings may
enable the burner to operate, they are not
intended to be final settings.
The commissioning procedure consists of the
following: -
•
Entering the pass code.
•
Reviewing the air and gas set points.
•
Firing the burner.
•
Commissioning the burner.
•
Completing the procedure.
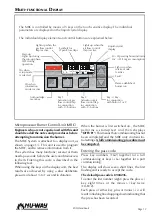
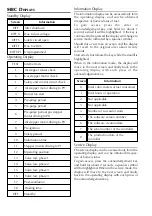
Refer to page 13 for a functional description of the
Display unit.
Enter the pass code.
Initial settings for air and gas.
The MBC will calculate values for the intermediate
points P2 to P8.
Use the (+) key to move the display forwards from
P9 through P1 to P0.
Point
Maximum Angle Minimum Angle
P0
P1+25.5°
0 or P1-25.5°
P1
P0+25.5° or P2
0 or P0-25.5°
P2
P1+25.5° or P3
P1
The same formlula applies to points P3 to P8
P9
P8+25.5° or 90° P8
Bu
P1
Bo
Bo
P9
Bu
Set
Point
Combus-
tion Air
Gas
Firing Rate
P9
65°
90°
High Fire
P1
15°
10°
Low Fire
P0
10°
5°
Ignition Position
Summary of Contents for XGN Series
Page 4: ...XGN Handbook Page 4...
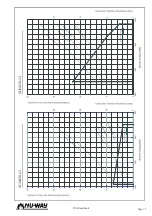
Page 23: ...Page 23 XGN Handbook XGN450 23 XGN650 23...
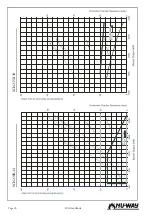
Page 24: ...XGN Handbook Page 24 XGN1000 25 XGN1150 38...
Page 30: ...XGN Handbook Page 30 NOTES...
Page 31: ...Page 31 XGN Handbook NOTES...

