background image

N

ORTEL

 TPS 3D S

ENSOR


AND

 D

EFENSE

 C

ENTER

 I

NSTALLATION

 G

UIDE

R

ELEASE

 4.7.0

PAGE

 50

Chapter 3: Hardware specification

TPS 2070 DC

TPS 2070 DC

The Nortel TPS 2070 DC is designed to maximize performance in a 1U format.

See the following sections for a complete description of the TPS 2070 DC:

”Chassis back I/O ports and features”

“Chassis Front Features” on page 51

“Chassis dimensions” on page 52

“System operating environment” on page 52

“Rack and cabinet mounting options” on page 52

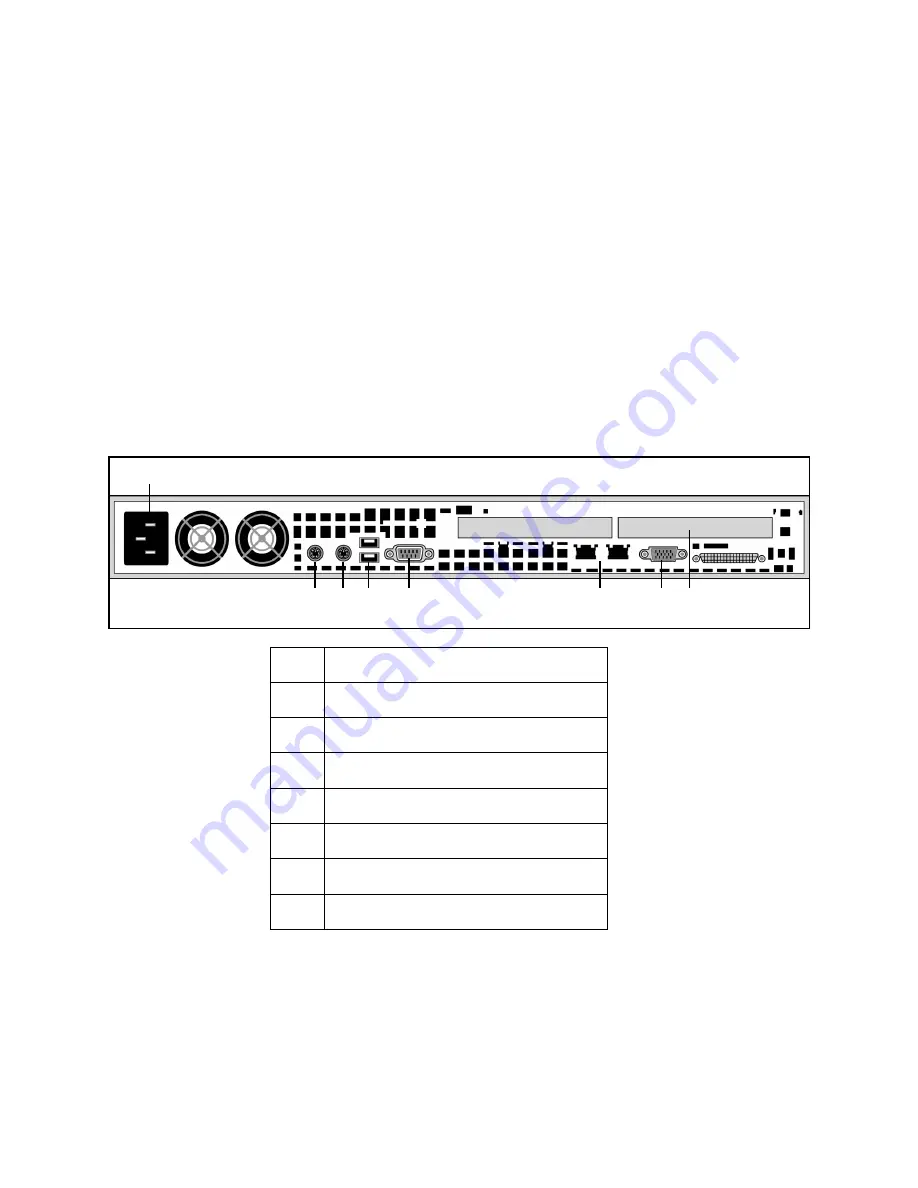
Chassis back I/O ports and features

Figure 13

 shows the ports on the back of the Nortel TPS 2070 DC chassis.

Figure 13 TPS 2070 DC chassis rear view

A

Power connector 

B

Keyboard connector

C

Mouse connector

D

USB connectors

E

DB-9 serial connector

F

10/100/1000 RJ-45 Ethernet connectors

G

Video connector

H

Expansion slot

A

B

E

C D

F

G

H

Summary of Contents for Softphone 2050

Page 1: ...D Sensors 2050 TPS 2150 TPS 2070 TPS 2170 and Defense Center TPS 2070 DC Santa Clara California 95054 USA Nortel TPS 3D Sensor and Defense Center Installation Guide Release 4 7 0 Part No NN47240 300 320737 B ...

Page 2: ...e property of their respective owners U S Government End Users This document is provided with a commercial item as defined by FAR 2 101 Oct 1995 and contains commercial technical data and commercial software documentation as those terms are used in FAR 12 211 12 212 Oct 1995 Government End Users are authorized to use this documentation only in accordance with those rights and restrictions set fort...

Page 3: ...derstanding detection engines and interface sets 18 Connecting sensors to your network 20 Using a Nortel Defense Center 23 Chapter 2 Installation 24 TPS 2070 DC 25 Security considerations 25 Installing the Defense Center DC 2070 25 Setting the IP Address for the Management interface 26 Performing the initial setup 27 Console output 32 3D SENSOR 2x50 2x70 33 Security considerations 33 Installing th...

Page 4: ...s back I O ports and features 47 Chassis front features 48 Chassis dimensions 49 System operating environment 49 Power supply 49 Rack and cabinet mounting options 49 TPS 2070 DC 50 Chassis back I O ports and features 50 Chassis Front Features 51 Chassis dimensions 52 System operating environment 52 Power supply 52 Rack and cabinet mounting options 52 Appendix A Safety and regulatory information 53...

Page 5: ... 3D System User Guide You can install a 3D Sensor with the IPS component as a standalone appliance but if you want to use RNA or RUA you must use the 3D Sensor with a Defense Center Note that some models of the 3D Sensor do not support every combination of components See Understanding detection engines and interface sets on page 18 for more information Before you install a Nortel 3D Sensor you sho...

Page 6: ...ith IPS you should consider how your network is configured and how you want to deploy the various components of the Nortel TPS 3D System within it Every network architecture is different and every enterprise has different security needs This section lists some of the factors you should consider as you formulate your deployment plans and includes a description of how the Nortel TPS 3D System can he...

Page 7: ...figuration factors such as firewall placement VPN deployments and how you will use a Nortel Defense Center to aggregate and correlate RNA events Monitoring network changes with RNA can help you realize a variety of goals Clarifying your network discovery and vulnerability assessment goals can guide your deployment choices This section examines some general goals that can influence a deployment of ...

Page 8: ...lacement outside the firewall gives you a clear picture of all the traffic traversing your network via this gateway Generally this location is appropriate for IPS only Most enterprises would not need to identify user identities or employ host and vulnerability detection capabilities in this area Placement in the DMZ provides you with useful information about attacks on outward facing servers Gener...

Page 9: ...k unwanted packets this is not typically used to secure the network segment between the router and the firewall Placing the 3D Sensor here can help you detect attacks made against your network as well as attacks from your network to another Deploying the 3D Sensor on this segment of your network for a week or two can help you understand what kinds of attacks reach your firewall and where they orig...

Page 10: ...wall In this network configuration the servers in the DMZ also provide services such as mail relay and web proxy to users on the internal network A 3D Sensor with IPS on this segment can provide useful information about the kinds of attacks on outward facing servers as well as detect attacks directed to the Internet that originate from a compromised server in the DMZ Adding RNA to the sensor on th...

Page 11: ...ect attacks that originate from hosts on the internal network For instance attaching one 3D Sensor to a mirror or span port on a switch helps you identify attacks from one computer on the internal network directed against other computers on the internal network if the attack traffic traverses the switch Similarly if a host on your network is compromised from within RNA can immediately identify bot...

Page 12: ...or offer multiple sensing ports on an adapter card You can use the multi port 3D Sensors in either of two ways to recombine the separate connections from a network tap to capture and evaluate traffic from different networks IMPORTANT Although each port is capable of receiving the full throughput for which the sensor is rated the total traffic on the 3D Sensor cannot exceed its bandwidth rating wit...

Page 13: ...ansmits incoming and outgoing traffic through separate ports When you connect the multi port adapter card on the 3D Sensor to the tap the 3D Sensor is able to combine the traffic into a single data stream so that it can be analyzed Note that with a gigabit optical tap as shown in the illustration below both sets of ports on the 3D Sensor are used by the connectors from the tap ...

Page 14: ...14 Chapter 1 Before you begin If your 3D Sensor supports multiple detection engines you can also create interface sets to capture data from separate networks The following illustration shows a single sensor with a dual port adapter and two interface sets connected to two networks ...

Page 15: ...hen the packet arrives at its destination network the payload is decrypted and the packet is directed to the proper host Because network appliances cannot analyze the encrypted payload of a VPN packet placing 3D Sensors outside the terminating endpoints of the VPN connections ensures that all packet information can be accessed The following diagram illustrates how 3D Sensors can be deployed in a V...

Page 16: ...ates events from 3D Sensors deployed throughout the organization s many locations Unlike deploying multiple 3D Sensors and Defense Centers in the same geographic location on the same network when deploying 3D Sensors in disparate geographic locations you must take precautions to ensure the security of the 3D Sensors and the data stream To secure the data you must isolate the 3D Sensors and Defense...

Page 17: ...e complex network topologies than a simple multi sector network This section describes the issues surrounding network discovery and vulnerability analysis when deploying RNA in environments where proxy servers NAT devices and VPNs exist in addition to information about using the Nortel Defense Center to manage multiple 3D Sensors and the deployment and management of 3D Sensors in a multi site envi...

Page 18: ...lteration has been made to the TCP IP stack of the host being identified RNA may not be able to accurately identify the host operating system In some cases this is done to improve performance For instance administrators of Windows hosts running the Internet Information Services IIS Web Server are encouraged to increase the TCP window size to allow larger amounts of data to be received thereby impr...

Page 19: ...le IPS detection engines on a single 3D Sensor can provide you with more flexibility in deploying 3D Sensors throughout your network A detection engine is like a virtual sensor within a sensor When you create a detection engine on a 3D Sensor you specify which of the sensor s sensing interfaces it uses and what portion of the sensor s detection resources it can use You can then create and apply an...

Page 20: ...terface set has the same properties as an inline interface set with one exception You can only use an inline with fail open interface set with fail open network interface cards If a 3D Sensor with a fail open card should fail for some reason power failure hard drive failure and so on traffic is not blocked by the sensor and your network continues to function Connecting sensors to your network Ther...

Page 21: ...ns If the span port can handle 200 Mbps and each of three mirrored ports can handle up to 100 Mbps then the span port is likely to become oversubscribed and drop packets lowering the effectiveness of the 3D Sensor Using a network tap Network taps allow you to passively monitor traffic without interrupting the network flow or changing the network topology Taps are readily available for different ba...

Page 22: ...ossover cable between the sensor and the router When the sensor switches to bypass mode the internal crossover and the crossover cable between the router and the sensor combine to create a straight through cable allowing normal operation of the connection Between a Switch and a Firewall When you deploy an inline 3D Sensor between a switch and a firewall use a straight through cable between the swi...

Page 23: ...be installed on a protected internal network Although the Defense Center is configured to have only the necessary services and ports available you must make sure that attacks cannot reach it from outside the firewall If the 3D Sensor and the Defense Center reside on the same network you can connect the management interface on the 3D Sensor to the same protected internal network as the Defense Cent...

Page 24: ...R INSTALLATION GUIDE RELEASE 4 7 0 PAGE 24 CHAPTER 2 INSTALLATION This chapter describes the installation requirements for the following TPS appliances TPS 3D Sensor 2050 TPS 3D Sensor 2070 TPS 3D Sensor 2150 TPS 3D Sensor 2170 TPS 2070 DC ...

Page 25: ...nsider the following Locate your Defense Center in a lockable rack within a secure location that prevents access by unauthorized personnel If you are installing a desktop model make sure you place it within a secure location that prevents access by unauthorized personnel Allow only trained and qualified personnel to install replace administer or service the Defense Center Always connect the manage...

Page 26: ...t up the network interface that you will use later to administer the Defense Center To configure the interface 1 Connect to the Defense Center in one of the following ways Connect a monitor and a keyboard to the Defense Center and set the management interface to an IP address on the same subnet as the administration system or Create an alias on the administration system that is on the same subnet ...

Page 27: ... gw 192 168 10 1 8 Continue with Performing the initial setup on page 27 Performing the initial setup After you physically install the Defense Center and set up the IP address for the management interface you must log into the Defense Center s web interface and continue the setup process After you perform the initial setup refer to your user guide for information about the next steps you need to t...

Page 28: ...3 Click Change The password is changed and you can continue with Configuring the network settings on page 28 TIP You can obtain online help for each of the initial setup pages by clicking the Help icon at the top of the page Configuring the network settings You can choose to use DHCP network settings or static network settings for the Defense Center If you specify the DHCP option the Defense Cente...

Page 29: ...If you made any changes to the network settings or proxy configuration click Reconfigure The configuration is changed based on your settings If necessary you can log in again with the admin account and continue with Setting up the base license on page 30 Network settings Settings Description Management Interface and Netmask The IP address and network mask for the management interface In most insta...

Page 30: ...gement The Defense Center uses a range of internal network IP addresses to transmit third party communications such as NTP to managed sensors and in high availability deployments to its Defense Center peer The default address range is 172 16 0 0 16 If the IP address range or the port conflicts with other communications on your network you can specify different values The default port for all commu...

Page 31: ...rrupted during transmission 2 Under Updates select the update that you want to apply and click Install If you are installing an update that requires a system reboot you must confirm that you want to restart the system The update is installed and you can click Continue to continue with Importing SEUs and rule files on page 31 Importing SEUs and rule files If you licensed the IPS component you can i...

Page 32: ...ring transmission The SEU is updated and you can click Continue to continue with Configuring a system policy on page 32 Configuring a system policy A system policy controls various aspects of an appliance As part of the initial setup you can configure the default system policy and automatically apply it to your Defense Center TIP To use the default settings click Skip to complete the initial setup...

Page 33: ...alling a 3D Sensor Security considerations on page 33 Installing the 3D Sensor 2x50 2x70 on page 33 Setting the IP Address for the Management Interface on page 35 Performing the initial setup on page 36 Console output on page 42 Security considerations Before installing the 3D Sensor 2x50 2x70 Nortel recommends the following Place the 3D Sensor in a lockable rack within a secure location that prev...

Page 34: ... protected network segment The default IP address of the management interface is 192 168 45 45 with a Netmask of 255 255 255 0 4 Turn on the 3D Sensor and continue with the next section Setting the IP Address for the Management Interface on page 35 Figure 7 TPS 3D Sensor 2x50 rear view Figure 8 TPS 3D Sensor 2x70 rear view IMPORTANT The Management Interface corresponds to the eth2 Linux software i...

Page 35: ...WARNING Nortel strongly recommends that you change this password before installing the 3D Sensor in a production environment 4 To change the password type passwd then enter the new password for root Be sure to document the new password 5 To determine the name of the management interface enter the following command grep MANAGEMENT etc sf ims conf 6 To configure the management interface enter the fo...

Page 36: ...te management on page 39 Installing software updates on page 39 Importing SEUs and rule files on page 40 Choosing default or custom interface sets and detection engines on page 41 Creating an intrusion policy on page 41 Applying an intrusion policy on page 42 Configuring a system policy on page 42 Accessing the web interface 1 Connect to the management interface securely to access the GUI To acces...

Page 37: ...at the top of the page Configuring the network settings You can choose to use DHCP network settings or static network settings for the Defense Center If you specify the DHCP option the 3D Sensor will automatically retrieve its network settings from a local DHCP server If you specify the Static option you must manually configure all network properties If the 3D Sensor is not directly connected to t...

Page 38: ...The configuration is changed based on your settings If necessary you can log in again with the admin account and continue with Setting Up the Base License If you are using DHCP to specify your network settings click Skip Configuration Your settings are saved and you can continue with Setting Up the Base License IMPORTANT If you restored your appliance to factory specifications but you were able to...

Page 39: ...type the one time use registration key that you want to use to set up a communications channel between the sensor and the Defense Center 4 Click Save The sensor will begin communicating with the Defense Center After you finish setting up the sensor configure Remote Access to the Defense Center to set up the communications from the Defense Center to the sensor Continue with setting up the managemen...

Page 40: ...bject rules that you can use to detect potential attacks against your network and its assets In addition an SEU can also provide IPS with an updated version of Snort as well as features such as new preprocessors and decoders IMPORTANT SEUs can contain new binaries Make sure your process for uploading and installing SEUs complies with your security policies TIP If no SEU update is available click C...

Page 41: ...set for all 3D Sensor interfaces Inline with Fail Open with RNA to build paired fail open IPS interface sets on all 3D Sensor interfaces Inline with Fail Open without RNA to build paired fail open IPS interface sets on all 3D Sensor interfaces Click Save when your choice is made Creating an intrusion policy Two default passive policies and three default inline intrusion are delivered with the Nort...

Page 42: ...ick Apply next to the policy you want to use Configuring a system policy A system policy controls various aspects of an appliance As part of the initial setup you can configure the default system policy and automatically apply it to your 3D Sensor TIP To use the default settings click Skip to complete the initial setup and display the start page for your Defense Center To configure the default sys...

Page 43: ...NSTALLATION GUIDE RELEASE 4 7 0 PAGE 43 CHAPTER 3 HARDWARE SPECIFICATION This chapter provides the hardware specifications for the following TPS appliances TPS 3D Sensor 2050 TPS 3D Sensor 2070 TPS 3D Sensor 2150 TPS 3D Sensor 2170 TPS 2070 DC ...

Page 44: ...nd the TPS 3D Sensor 2150 Chassis back I O ports and features Chassis front features on page 45 Chassis dimensions on page 45 System operating environment on page 46 Rack and cabinet mounting options on page 46 Chassis back I O ports and features Figure 9 shows the ports on the back of the TPS 3D Sensor 2050 and TPS 3D Sensor 2150 chassis Figure 9 TPS 2x50 3D Sensor chassis rear view A Power conne...

Page 45: ...e dimensions of the sensor chassis A System status indicator The amber system status LED lights up when the system needs attention due to a problem with power supplies fans system temperature or hard drives B Hard drive status indicator This LED blinks when activity is detected on the hard disk drive C Reset button D Power button E Power LED This LED is green when the power supply is turned on A B...

Page 46: ...meters table Power supply The sensor power supply is rated for 300 watts Rack and cabinet mounting options The TPS 3D Sensor 2050 or the TPS 3D Sensor 2150 can be used in racks and server cabinets that are 19 inches wide and up to 30 inches deep The sensor comes with a rack mount kit Refer to the instructions that are supplied with the sensor for more information about correctly mounting the chass...

Page 47: ...s and features Chassis front features on page 48 Chassis dimensions on page 49 System operating environment on page 49 Rack and cabinet mounting options on page 49 Chassis back I O ports and features Figure 11 shows the ports on the back of the Nortel TPS 3D Sensor 2070 and the Nortel TPS 3D Sensor 2170 chassis Figure 11 TPS 2x70 3D Sensor chassis rear view A Power connector B Keyboard connector C...

Page 48: ...rheat indicator This LED is red when the system overheats B NIC 2 indicator This LED is steady green when linked and blinks to show network activity C NIC 1 indicator This LED mirrors the state of the Link Act LED of the Management port It is steady green when linked and blinks to show network activity D Hard drive status indicator This LED is amber and blinks when activity is detected on the hard...

Page 49: ...rs table Power supply The sensor power supply is rated for 400 watts Rack and cabinet mounting options The TPS 3D Sensor 2070 or the TPS 3D Sensor 2170 can be used in racks and server cabinets that are 19 inches wide and up to 30 inches deep The sensor comes with a rack mount kit Refer to the instructions that are supplied with the sensor for more information about correctly mounting the chassis i...

Page 50: ...ports and features Chassis Front Features on page 51 Chassis dimensions on page 52 System operating environment on page 52 Rack and cabinet mounting options on page 52 Chassis back I O ports and features Figure 13 shows the ports on the back of the Nortel TPS 2070 DC chassis Figure 13 TPS 2070 DC chassis rear view A Power connector B Keyboard connector C Mouse connector D USB connectors E DB 9 ser...

Page 51: ...s A Overheat indicator This LED is red when the system overheats B NIC 2 indicator not used C NIC 1 indicator This LED mirrors the state of the Link Act LED of the Management port It is steady green when linked and blinks to show network activity D Hard drive status indicator This LED is amber and blinks when activity is detected on the hard disk drive E Power LED This LED is green when the power ...

Page 52: ...y The sensor power supply is rated for 400 watts Rack and cabinet mounting options The TPS 2070 DC can be used in racks and server cabinets that are 19 inches wide and up to 30 inches deep The sensor comes with a rack mount kit Refer to the instructions that are supplied with the sensor for more information about correctly mounting the chassis in a rack Chassis Dimensions Dimension Metric Imperial...

Page 53: ...al conductor To reduce the risk of electric shock do not plug Nortel products into any other type of power system Contact your facilities manager or a qualified electrician if you are not sure what type of power is supplied to your building CAUTION Not all power cords have the same ratings Household extension cords do not have overload protection and are not meant for use with computer systems Do ...

Page 54: ...ccordance with the instructions may cause harmful interference to radio communications However there is no guarantee that interference will not occur in a particular installation Operation of this equipment in a residential area is likely to cause harmful interference In such a case the user will be required to correct the interference at his own experience Do not make mechanical or electrical mod...

Page 55: ...5 Appendix A Safety and regulatory information Regulatory compliance CE notice The CE mark on this equipment indicates that this equipment meets or exceeds the following technical standards EN50082 1 EN55022 EN60555 2 EN61000 4 1 EN61000 4 2 EN61000 4 3 EN61000 4 4 and EN61000 4 5 ...

Page 56: ......

Page 57: ...rt a problem in this document go to www nortel com documentfeedback The information in this document is subject to change without notice The statements configurations technical data and recommendations in this document are believed to be accurate and reliable but are presented without express or implied warranty Users must take full responsibility for their applications of any products specified i...

Reviews: