background image

10

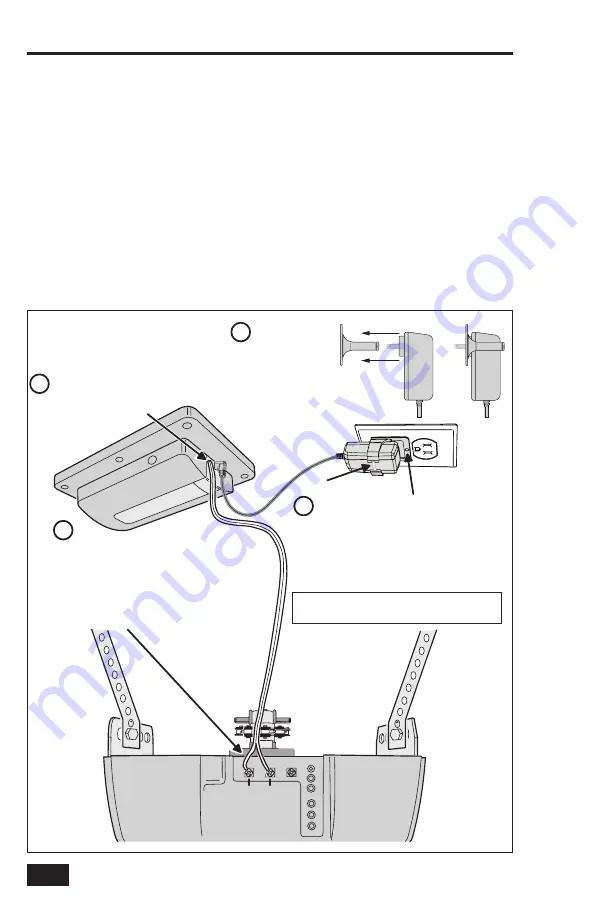
Wiring the Controller to the Opener

The Garage Door Controller wires to the garage door opener with a two wire connection.

1. 

Connect the GD00Z-8-ADT connection wires to the two pushbutton terminals on the garage door 
opener. The terminals on various models may have different names. Either wire can connect to 
either terminal.


IMPORTANT!


Be sure the wires clear all moving parts of the door and opener.

Connecting the Power Supply

2. 

Plug the Power Supply’s cord into the jack on the Garage Door Controller.

3. 

Join the Power Supply with the Adapter.

4. 

Remove the outlet faceplate screw. Plug the Power Supply and bracket into a 115 VAC outlet. 
Align the bracket hole to the outlet hole and secure. 

Be sure the outlet is powered at all times 

and not controlled by a switch

 .


Secure the bracket with the provided zip tie strap.


IMPORTANT!


Do not disconnect any wires currently connected to the Garage Door Opener.

Controller Connections

Figure 6. Controller Mounting

PU

SH

BU

TT

ON

PU

SH

BU

TT

ON

GARAGE

DOOR

OPENER

Connect the GD00Z-8-ADT connection

wires to the push-button wall console

terminals on the garage door opener.

The terminals may be named "PWC", "WC",

"PB", "PUSHBUTTON", or "RED and WHITE". 

Terminal names and locations vary by model.

DO NOT DISCONNECT ANY WIRES CURRENTLY

CONNECTED TO THE GARAGE DOOR OPENER.

Remove the screw from 120 VAC

outlet faceplate. Plug in the adapter. 
Secure the power adapter to the faceplate 

with the provided screw. 
Feed the zip tie through the two holes in the 
bracket and secure.

USE WIRE TIES TO SECURE
EXCESS WIRING CLEAR
OF ALL MOVING PARTS
OF THE GARAGE
DOOR AND OPENER

Either wire can

connect to either

terminal

Plug the power cord

Carefully join the 
power suppy with 
the bracket. 

into the power input

jack on the GD00Z-8-ADT

2

1

4

3

Summary of Contents for ADT Pulse GD00Z-8-ADT

Page 1: ...GARAGE DOOR OPENER REMOTE COMMAND CONTROLLER with TILT SENSOR or dial Installation Instructions GD00Z 8 ADT...

Page 2: ...e si le brouillage est susceptible d en compromettre le fonctionnement Regulatory Information NOTICE TO USERS IN CALIFORNIA CR COIN CELL LITHIUM BATTERY INFORMATION THIS PRODUCT CONTAINS A CR COIN CEL...

Page 3: ...ng the Garage Door Controller 8 To reset a Garage Door Controller 8 To remove a Garage Door Controller 8 Controller Mounting 9 Mounting the Controller in the Garage 9 Controller Connections 10 Wiring...

Page 4: ...must be assigned the Node ID of the controller to which unsolicited notifications from the Controller will be sent The ADT Pulse should set this association automatically after inclusion NOTIFICATION...

Page 5: ...n of the garage door and sends the status to the Controller The Power Supply The Power Supply provides low voltage power to the Controller Package Contents Figure 2 Package Contents GD00Z 8 ADT GARAGE...

Page 6: ...tach the mounting plate 4 If the plate was removed for screw mounting snap the Tilt Sensor on to the mounting plate NOTE Be sure the arrow on the side of the Tilt Sensor points UP Tilt Sensor Installa...

Page 7: ...pressing the Include button 5 times Location of Include button is shown in Figure 2 on Page 3 A quick beep followed by a longer beep will indicate proper reset of the GD00Z 8 ADT To add a Garage Door...

Page 8: ...7 Press and hold the Garage Door Controller s include button for 1 second See page 3 Figure 2 for the location of the include button 8 Wait while the system finds the GD00Z 8 ADT Device NOTE Adding th...

Page 9: ...recognized the Z Wave Device Details screen opens Enter a name for the device and then click Save at the upper right 10 Click Go Back and then Close the exit Manage Devices 11 Click Close again to con...

Page 10: ...can be heard Click Go Back and then Close to exit Manage Devices 6 Click Close again to confirm To remove a Garage Door Controller 1 In the web portal click the System tab 2 Click Manage Devices The M...

Page 11: ...onents The GD00Z 8 ADT can also be attached to the opener s hardware using the adjustable mounting bracket The optional adjustable mounting bracket fits 3 ways on the controller The bracket snaps onto...

Page 12: ...ket with the provided zip tie strap IMPORTANT Do not disconnect any wires currently connected to the Garage Door Opener Controller Connections Figure 6 Controller Mounting P U S H B U T T O N P U S H...

Page 13: ...s of the garage door System Operation Figure 7 Controller Mounting FLASH FLASH FLASH BEEP BEEP BEEP Use the ADT pulse touch screen or mobile app to control your garage door view status and add your ga...

Page 14: ...Battery Replacement When The Tilt Sensor Battery Gets Low The system will notify you when the Tilt Sensor battery gets low and needs replacing 1 Use a small screwdriver to open the Tilt Sensor case 2...

Page 15: ...he proper terminals on the garage door opener Trace the wires from the garage door opener s pushbutton wall console to the door opener This is where the GD00Z 8 ADT connection wires should be connecte...

Page 16: ...Copyright 2020 Nortek Security Control 10025370 Rev B...

Reviews: