


74
H5 NVR Series
Users Manual
Chapter 11:
Troubleshooting
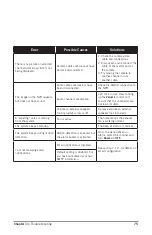
If a problem occurs, you may be able to easily correct it yourself. The following
table describes some common issues and their most likely solutions. Please refer
to the table before calling technical support.
Error
Possible Causes
Solutions
System is not receiving power,
or is not powering up.
Cable from power adapter is
loose or is unplugged.
1. Confirm that all cables are
connected correctly.
2. Confirm that the power
adapter is securely connected
to the back of the unit.
Cables are connected, but
system is not receiving sufficient
power.
1. Confirm that the system is
powered ON (LED indicators
on the front should be ON).
2. If the unit is connected
through a power bar or surge
protector, try bypassing the
bar and connecting the power
directly to the wall outlet.
3. Confirm that there is power at
the outlet.
4. Connecting the power cable
to another outlet.
5. Test the outlet with another
plugged device (such as a
phone charger).
Remote control is not detected
by the system.
Battery in the remote control is
drained.
Install two fresh AAA alkaline
batteries in the remote control.
There are no batteries in the
remote control.
Hard drive is not detected by
the system.
Hard drive cables are loose or
not properly connected.
Remove the cover and check
that the hard drive cables are
firmly connected.
There is no hard drive in the
system.
Open the cover and install a
3.5” SATA hard drive.
Hard drive is full (0%) and the
unit is no longer recording.
Overwrite is not enabled.
Go to the Device Menu > HDD
and ensure that
Overwrite
is set
to
Auto
.
Mouse not detected by system.
Mouse cable is not firmly
connected to the system.
Firmly connect the mouse cable
to the USB Mouse port on the
front panel.
Mouse is not connected to the
system.
System needs to be reset.
Power off the system
(disconnect power cable). Firmly
connect a USB mouse to the
USB Mouse port on the front
panel of the system. Reconnect
the power cable to the DC 19V
port on the real panel.
Summary of Contents for H5 NVR SERIES
Page 1: ...www NightOwlSP com USER MANUAL H5 NVR SERIES 8 32 CHANNEL...
Page 3: ...3 Table of Contents TABLE OF CONTENTS...
Page 7: ...7 Chapter 1 FCC Warnings CHAPTER 1 FCC WARNINGS...
Page 9: ...9 Chapter 2 Safety Instructions CHAPTER 2 SAFETY INSTRUCTIONS...
Page 11: ...11 Chapter 3 Specifications images may vary CHAPTER 3 SPECIFICATIONS...
Page 16: ...16 H5 NVR Series Users Manual REMOTE...
Page 17: ...17 Chapter 4 Camera Installation images may vary CHAPTER 4 CAMERA INSTALLATION SUPPORT VIDEOS...
Page 21: ...21 Chapter 5 NVR Installation images may vary CHAPTER 5 NVR INSTALLATION SUPPORT VIDEOS...
Page 25: ...25 Chapter 6 Getting Started CHAPTER 6 GETTING STARTED SUPPORT VIDEOS...
Page 31: ...31 Chapter 7 Menus and Settings CHAPTER 7 MENUS AND SETTINGS SUPPORT VIDEOS...
Page 58: ...58 H5 NVR Series Users Manual CHAPTER 8 REMOTE ACCESS SUPPORT VIDEOS...
Page 68: ...68 H5 NVR Series Users Manual CHAPTER 9 GLOSSARY SUPPORT VIDEOS...
Page 70: ...70 H5 NVR Series Users Manual CHAPTER 10 WARRANTY SUPPORT VIDEOS...
Page 73: ...73 Chapter 11 Troubleshooting CHAPTER 11 TROUBLESHOOTING SUPPORT VIDEOS...
Page 76: ...76 H5 NVR Series Users Manual CHAPTER 12 CUSTOMER SUPPORT SUPPORT VIDEOS...
Page 78: ...78 H5 NVR Series Users Manual CHAPTER 13 USER INFORMATION SUPPORT VIDEOS...
Page 80: ...www NightOwlSP com...


