


English
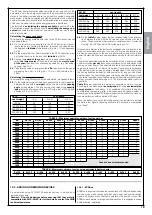
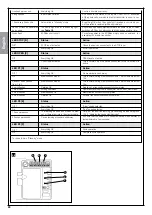
TABLE 9
21
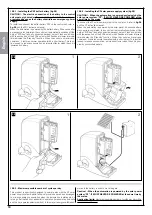
10.4 - MEMORIZING ALL RADIO TRANSMITTERS
The control unit contains a radio receiver for GTX4 transmitters; the trans
-
mitter included in the box is already memorised and ready to use.
There are two ways of memorising a new transmitter:
• Mod
e 1:
in this “mode” the radio transmitter is used as a whole, i.e. all
the keys carry out a preset command (the transmitter supplied with the
SL1S-SL10S is memorised using Mode 1). Obviously a radio transmitter
in mode 1 can only control one single automation; that is:
• Mod
e 2:
each key can be associated to one of the four commands
available. If this mode is used appropriately 2 or more different automa
-
tions can be controlled, for example:
Obviously each transmitter is treated separately and for one single control
unit there can be some transmitters memorised in mode 1 and others in
mode 2.
The overall maximum memory capacity is of 150 units; mode 1 memori
-
sation occupies one unit per transmitter while mode 2 occupies one unit
per key.
Caution! – As memorisation procedures have a time limit (10 s), it
is im portant to read the instructions in the next paragraphs before
starting.
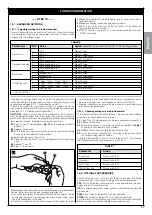
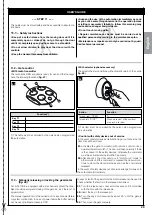
10.4.1 - Memorisation mode 1
01.
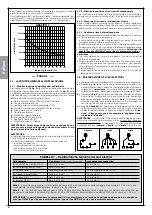
Press key P1 [B] (
fig. 43
) for at least 3 s. When the LED P1
[A]
(
fig.
43
) switches on release the key.
02.
Within 10 s press any one key on the transmitter for at least 3 s to
memorise it. If the memorisation procedure is successful, the LED P1
will emit 3 flashes.
03.
If there are other transmitters to be memorised repeat step 2 within the
next 10 s otherwise the memorisation phase will end automatically.
10.4.2 - Memorisation mode 2
With Mode 2 memorisation each key can be associated with any one of
the four commands: “OPEN”, “Partially open”, “Only open” and “Only
close”.
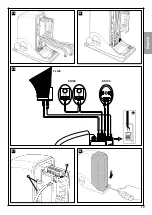
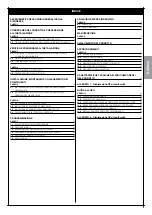
External photocell h=50cm;
triggered on closure
External photocell triggered
on opening
Internal photocell triggered on
opening
External photocell h=100 cm;
triggered on closure
Internal photocell h=100 cm;
triggered on closure
Single photocell that covers
the entire automation and
is triggered on closure and
opening
Photocell
Jumpers
A
B
C
G
D
Internal photocell h=50 cm;
triggered on closure
F
E
Photocell
Jumpers
Note: normally there are no restrictions to the position of the two
elements that make up the photocell (TX-RX).
Only if photocell G is used with photocell B it is necessary to follow
the positions shown in
fig. 41
.
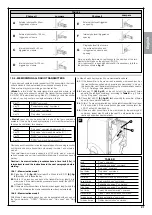
Key T1
“OPEN” command
Key T2
“Pedestrian opening” command
Key T3
“Only open” command
Key T4
“Only close” command
Key T1
“Only open” command Automation N° 1
Key T2
“Only close” command Automation N° 1
Key T3
“OPEN” command Automation N° 2
Key T4
“OPEN” command Automation N° 3
43
B
A
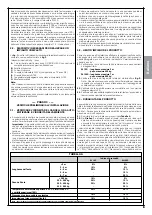
TABLE B
once
“Open” command
twice
“Pedestrian opening” command
three times
“Only open” command
Four times
“Only close” command
Five times
“Stop” command
Six times
“Apartment block” open command
Seven times
“High priority open” command
Eight times
“Pedestrian opening 2” command
Nine times
“Pedestrian opening 3” command
Ten times
“Open+ block automation” command
Eleven times
“Close + block automation” command
Twelve times
“Block automation” command
Thirteen times
“Unblock automation” command
In Mode 2 each key requires its own memorisation phase.
01.
If the transmitter to be memorised is already memorised (such as
the transmitters supplied which are already memorised in mode I)
the transmitter must be deleted following the procedure described in:
“10.4.4 - Deleting a radio transmitter”.
02.
Press key P1
[B]
(
fig. 43
) on the control unit the number of times
equal to the required command, according to
Table B
(e.g. 3 times
for the “Only open” command”)
.
03.
Check that LED P1
[A]
(
fig. 43
) flashes quickly for a number of times
equal to the command selected.
04.
Within 10 s press the required key on the radio transmitter for at least
2 s to memorise it. If the memorisation procedure is successful, the
LED P1 will emit 3 slow flashes.
05.
If there are other transmitters to be memorised for the same type of
command, repeat step 03 within the next 10 s otherwise the memo
-
risation phase will end automatically.
Summary of Contents for MhouseKit SL10S
Page 2: ......
Page 7: ...Fran ais 7 2 300 163 295 84 4 E D A F D B D C D 3 i d e g h a d b b c f l 1 A C D E F B G...
Page 9: ...Fran ais 9 5 7 8 9 10 0 50 moteur fix gauche moteur fix droite 6 36 50 0 50 50...
Page 10: ...Fran ais 10 11 12 14 13 170 170 1 200 200...
Page 11: ...Fran ais 60 11 16 18 19 17 10 0 50 0 50 10 moteur fix gauche moteur fix droite 15 A...
Page 13: ...Fran ais 21 A B 6 mm x4 A B A B A B B B B 1 2 3 4 1 2 3 4 20 B C A 13 5 D E F 6...
Page 14: ...Fran ais 14 22 23 21 A B A B A B A B A B A B 5 6 7 8 9 11 12 10 A B A B 6 mm x4 A A A A 4...
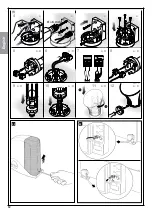
Page 15: ...Fran ais 15 24 25 TX RX 26 FL100 PH100 KS100 A 28 27 A B...
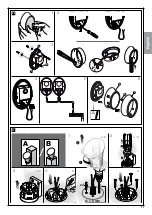
Page 17: ...Fran ais 17 31 B A C 34 32 A A B 35 A B 30 A B 33 T1 T2 T3 T4...
Page 34: ......
Page 39: ...English 5 2 300 163 295 84 4 E D A F D B D C D 3 i d e g h a d b b c f l 1 A C D E F B G...
Page 41: ...English 7 5 7 8 9 10 0 50 motor fixed on left motor fixed on right 6 36 50 0 50 50...
Page 42: ...English 8 11 12 14 13 170 170 1 200 200...
Page 43: ...English 9 18 19 60 17 10 0 50 0 50 10 motor fixed on left motor fixed on right 15 A 16...
Page 45: ...English 11 21 A B 6 mm x4 A B A B A B B B B 1 2 3 4 1 2 3 4 5 20 6 B C A D E F...
Page 46: ...English 12 22 23 21 A B A B A B A B A B A B 5 6 7 8 9 11 12 10 A B A B 6 mm x4 A A A A 4...
Page 47: ...English 13 24 25 TX RX 26 FL100 PH100 KS100 A 28 27 A B...
Page 49: ...English 15 31 B A C 34 32 A A B 35 A B 30 A B 33 T1 T2 T3 T4...
Page 66: ......
Page 71: ...Italiano 5 2 300 163 295 84 4 E D A F D B D C D 3 i d e g h a d b b c f l 1 A C D E F B G...
Page 73: ...Italiano 7 5 7 8 9 10 0 50 motore fissato a sinistra motore fissato a destra 6 36 50 0 50 50...
Page 74: ...Italiano 8 11 12 14 13 170 170 1 200 200...
Page 77: ...Italiano 11 21 A B 6 mm x4 A B A B A B B B B 1 2 3 4 1 2 3 4 20 B C A 5 D E F 6...
Page 78: ...Italiano 12 22 23 21 A B A B A B A B A B A B 5 6 7 8 9 11 12 10 A B A B 6 mm x4 A A A A 4...
Page 79: ...Italiano 13 24 25 TX RX 26 FL100 PH100 KS100 A 28 27 A B...
Page 81: ...Italiano 15 31 B A C 34 32 A A B 35 A B 30 A B 33 T1 T2 T3 T4...
Page 98: ......
Page 103: ...5 2 300 163 295 84 4 E D A F D B D C D 3 i d e g h a d b b c f l 1 A C D E F B G...
Page 106: ...8 11 12 14 13 170 170 1 200 200 Polski...
Page 109: ...11 21 A B 6 mm x4 A B A B A B B B B 1 2 3 4 1 2 3 4 20 B C A 5 D E F 6 Polski...
Page 110: ...12 22 23 21 A B A B A B A B A B A B 5 6 7 8 9 11 12 10 A B A B 6 mm x4 A A A A 4 Polski...
Page 111: ...13 24 25 TX RX 26 FL100 PH100 KS100 A 28 27 A B Polski...
Page 113: ...15 31 B A C 34 32 A A B 35 A B 30 A B 33 T1 T2 T3 T4 Polski...
Page 130: ......
Page 131: ......


