2
– English
EN
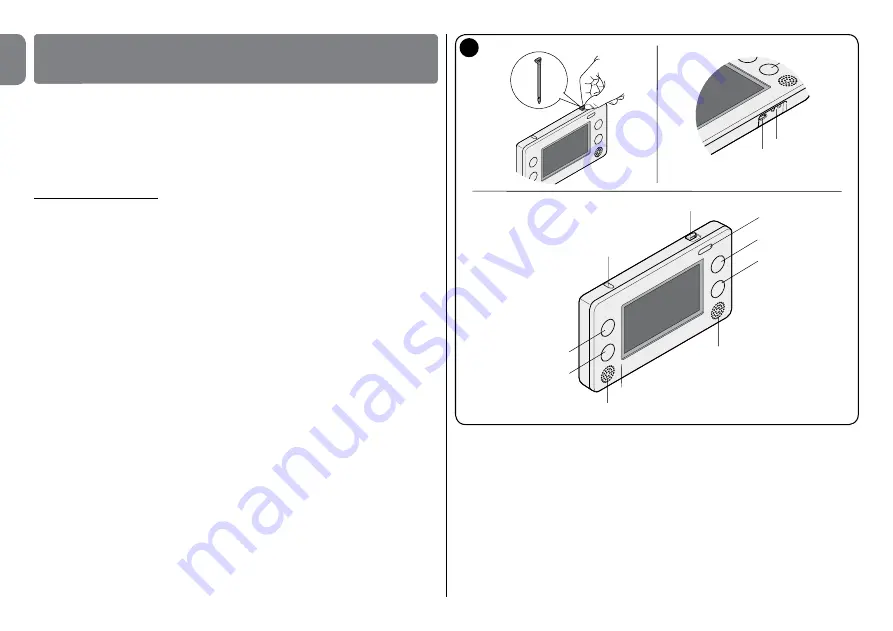
It has an on/off key (
fig. 2
) and an auto-off function to minimise battery con-
sumption; after a few seconds from the display being touched, the device
switches off automatically (the time can be adjusted). To reactivate it just touch
the display directly or move the device (it has a motion sensor). If the terminal is
turned off via the on/off key, it may be turned on only using the latter.
To use it just touch the display with your finger, applying only a little pressure,
without pressing hard!
It is only when the graphic keypad is used that may it be necessary to use the
stylus provided to achieve greater precision (
fig. 2-b
).
Description of
figure 2
:
a
- on/off key
b
- stylus
c
- loudspeaker
d
- microphone
e
- sensor for transponder
f
- USB port
g
- battery charger support contacts
h
- (4) shortcut keys
i
- LED signalling the following indications:
· Red LED
= signals when the batteries are almost discharged
· Orange LED
= signals the recharging phase; it is visible when HSTS2 is
inserted on the HSTSA1 support or directly connected to the battery charg-
er through the USB port
· Green LED
= signals the end of the battery recharging
· Blue LED
= signals the sending of the commands to the automation units
and the alarm system control unit.
USING THE TOUCH SCREEN KEYPAD
3
3.1 - Initial start-up
To perform the initial start-up proceed as follows (
fig. 3
):
01.
Open the lid: press on point 1 and then push the bottom upwards (point 2);
02.
Check that memory board A is there; if not insert it in the suitable slot (point
3);
03.
Insert the batteries, observing the polarity shown (point 4);
04.
Replace the bottom.
Upon start-up, the main screen appears on the display (
fig. 4
) which has three
icons from where you can access the respective sub-menus.
2
f
g
b
h
h
h
h
a
b
d
e
c
i
Summary of Contents for HSTS2
Page 2: ......
Page 93: ......
Page 94: ...www niceforyou com Nice SpA Oderzo TV Italy info niceforyou com IS0028A00MM_23 04 2014 ...


