TRACE
MATE II-CTR
Chapter 5 TESTING
5.1
Troubleshooting/System Integrity
A major concern in heat tracing is knowing that the
control and heater cable are functioning normally. On
systems that sit idle for long periods, such as freeze
protection, faults usually show up when the system is
needed most. Users often perform an annual check on
mechanical thermostats to ensure that problems have not
developed. This is a tedious task because the controls are
often high off the ground in inaccessible areas.
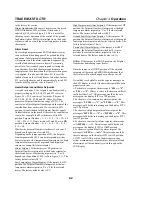
Since the TraceMate II-CTR control uses RTDs, it can be
mounted in a convenient ground level location near other
controls for easy access. Indicator lights for HEATER ON
and POWER indicate the system status. If an RTD sensor
or wiring goes open/short circuit, an RTD Fail on HTRx
alarm message appears on the LCD display and the RTD
FAIL LED comes on indicating a fault. For this condition
the actual temperature output indicates a value out of the
temperature measurement range, i.e. [-50°C-500°C] or
[-58°F-932°F].
The control can be forced on or off easily by changing the
heater setpoint switches to be above or below the actual
process temperature, noting the HTR ON LED and heater
current with a clamp-on ammeter.
Calibration
Although the TraceMate II-CTR control is constructed
with precision components and should give long service
without any recalibration necessary, users however may
wish to perform periodic calibration checks. When the
TraceMate II-CTR control is first installed, or for periodic
maintenance checks, system operation can be verified by
adjusting the heater setpoint 2°C above and below a
known temperature on the RTD input to see if the heater
turns on and off. For example, if the RTD input
temperature is 25°C, setting the heater setpoint to 27°C
will force the heater on and conversely a 23°C setpoint
will force the heater off.
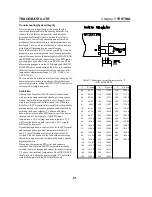
By substituting a known resistor value for the RTD sensor
and looking up the equivalent temperature in tables 5.1
and 5.2, the calibration accuracy of the control can be
verified. This can be done in the field without removing
the control using a resistance simulator box and a quality
digital multimeter.
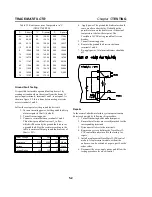
Disconnect the incoming RTD wires and connect a
resistance box. Simulate an RTD temperature using the
variable resistor or decade box and set the heater setpoint
2°C above the simulated temperature. The HTR ON LED
should turn on. Setting the heater setpoint 2°C below the
simulated temperature, the LED should turn off.
Table 5.1 Resistance versus Temperature in °F
(DIN 43760 RTD)
°F
R (ohms)
°F
R (ohms)
°F
R (ohms)
-40
84.27
160
127.50
360
169.29
-30
86.47
170
129.62
370
171.34
-20
88.66
180
131.74
380
173.39
-10
90.85
190
133.86
390
175.43
0
93.03
200
135.97
400
177.48
10
95.22
210
138.08
410
179.51
20
97.39
220
140.18
420
181.55
30
99.57
230
142.29
430
183.58
40
101.74
240
144.38
440
185.61
50
103.90
250
146.48
450
187.63
60
106.06
260
148.57
460
189.65
70
108.22
270
150.66
470
191.67
80
110.38
280
152.74
480
193.68
90
112.53
290
154.82
490
195.69
100
114.68
300
156.90
500
197.69
110
116.83
310
158.97
120
118.97
320
161.04
130
121.10
330
163.11
140
123.24
340
165.17
150
125.37
350
167.23


