background image

6 - CONTROL BY VOICE COMMANDS

You can use this procedure to associate a “OneSmart” account with a Google or Alexa account to enable the voice 

commands.

6.1 - CONNECTION TO “GOOGLE HOME”

PROCEDURE

WARNING: before proceeding with this procedure, you must have set up the “OneSmart” account, see paragraph 6.

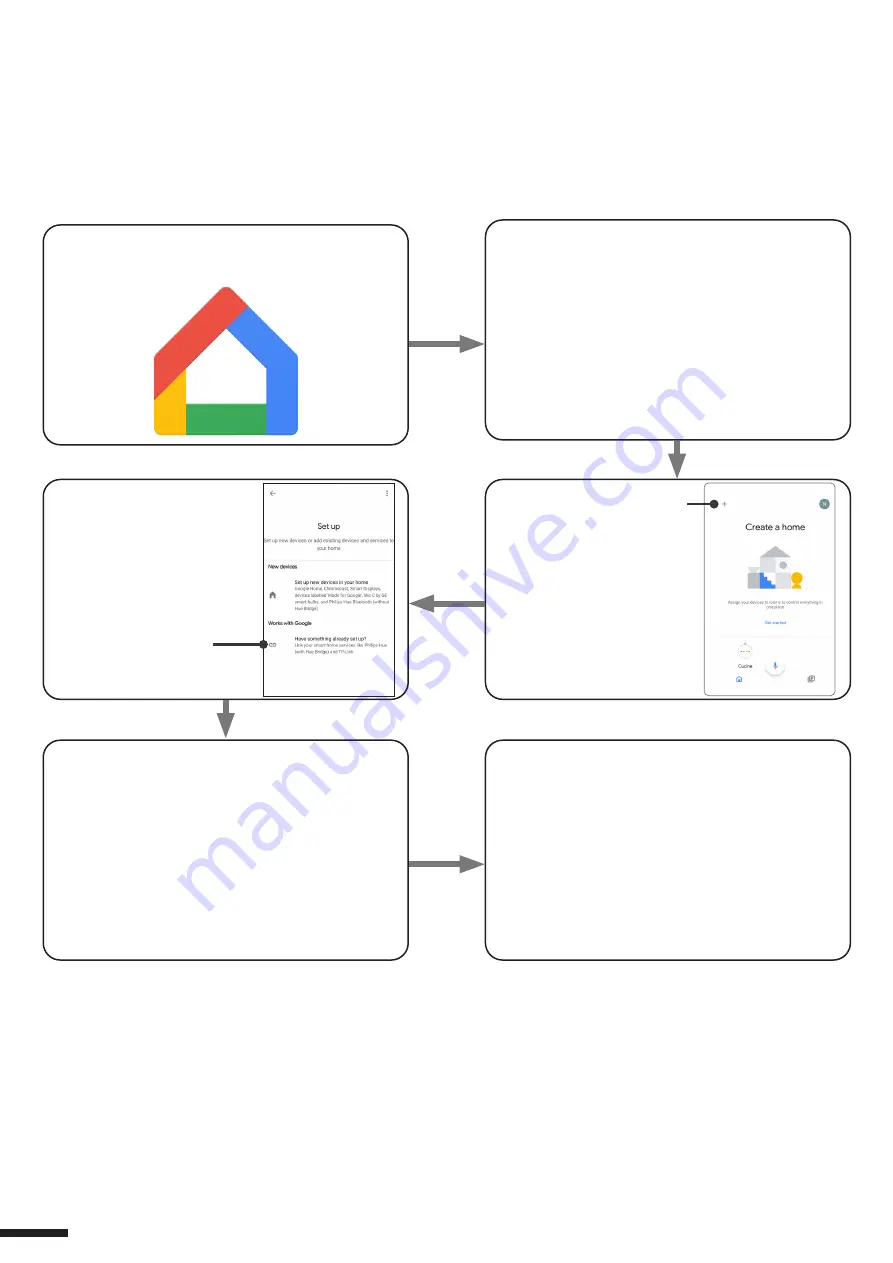
1. Download the App “Google Home” 

2. After starting the application, you will need to 

create an account Google.

Complete the procedure.

4. Select “Have something 

already set up?” and then 

select “Smart Life” from the 

list of proposed accounts.

Insert the account data

“OneSmart” created in

paragraph 6. 


5. Once the procedure has been completed, all 

devices connected to the “Smart Life” account will 

appear in the home page of Google application 

(at the bottom of the home under the “Other cast 

device”).

NOTES:

If you add other devices to your OneSmart application, they will automatically be added to the Google Home page. 

To use them with voice control, you need to add them to a room in the Google Home application, see step 6 of the 

procedure.

If devices are not added automatically, disconnect and reconnect your account from step 3 of this procedure from Google 

Home.

3. Press the “+” icon in 

top left position, then 

press “Set up device”.

6. Now the voice commands can control the 

control unit

12

Summary of Contents for LOGIC-400-ONE

Page 1: ...with On and Off function for 4 230V loads Power supply 230Vac Output max 3000W for channel and max 6000W total Integrated 433 92 MHz radio receiver for remote controls WiFi connection for OneSmart App...

Page 2: ...2...

Page 3: ...outputs 230V max 3000W for line max 6000W total Command inputs 4 input settable as a button or switch N of programmable transmitters 30 RF receiver frequency 433 920MHz WiFi frequency 2 4GHz Protecti...

Page 4: ...rical and safety regulations All connections shall be operated without electrical voltage Use proper cables Don t cut the antenna Provide in the power line twith an appropriate disconnection device Di...

Page 5: ...00W in total The input could be set as a push button or switch default push button USE VIA WIRE INPUT P1 On Off OUT1 INPUT P2 On Off OUT2 INPUT P3 On Off OUT3 INPUT P4 On Off OUT4 5 1 2 3 4 FUSE OUT1...

Page 6: ...e commands The installation can operate with only radio controls or application only Instead to use voice commands at least the App configuration must be completed NEXTA CONTROL UNIT VOICE CONTROL CON...

Page 7: ...nd therefore must carry out the association procedure see paragraph 4 3 4 USE VIA SMARTPHONE APP ONESMART The configuration procedures described in paragraph 5 above must be followed to control the li...

Page 8: ...es HB80 1C HB80 1DIM HB80 2L HB80 30D HB80 30RGBW HB80 4C HB80 4DIM HB80 4L HB90 6LT ROUND 1SP SENSA M SENSA P SENSA R35M SENSA R35P SENSA R35T SENSA T TOUCH 1 TOUCH 1CCT TOUCH 1DIM TOUCH 1SP TOUCH 1L...

Page 9: ...x 3 seconds The LED on the receiver starts to Flash STEP 2a Within 5 seconds make a transmission with the remote control that you want to delete The LED on the receiver will Flash rapidly and stay on...

Page 10: ...one through the application and to control the system remotely 5 1 APP CONNECTION This procedure connects the control unit Plano One to the application It shall be repeated for each control unit on th...

Page 11: ...this menu you can add members to the home for sharing device management or creating new houses PROCEDURE PFOR ADDING NEW USERS MEMBERS 1 From the ME menu 5 select Home Management 7 and then go to the...

Page 12: ...t the account data OneSmart created in paragraph 6 5 Once the procedure has been completed all devices connected to the Smart Life account will appear in the home page of Google application at the bot...

Page 13: ...r lights DIMMER RGB W CCT TUNABLE WHITE OK Google Turn on Turn Off name of the device or name of the room OK Google Turn on Turn Off the lights OK Google turn off all the lights to use these commands...

Page 14: ...e of the OneSmart account created using paragraph 6 4 Complete the procedure by entering the OneSmart account data created in paragraph 6 You can then start searching for devices by pressing the Disco...

Page 15: ...hone inside the Amazon Alexa application If you want to add a voice control device like Echo Dot or Echo Plus follow the procedures to match it to the house you created and then they will be associate...

Page 16: ...on which to set the type of load see following table DISPLAY FUNCTION 1 Out 1 2 Out 2 3 Out 3 4 Out 4 STEP 4 Short presses on key B let you choose the type of output that you want to set shown on disp...

Page 17: ...2 3 Out 3 4 Out 4 STEP 3 Short presses on key B let you choose the type of output that you want to set shown on display b based on following table DISPLAY FUNCTION 1 Multifunction transmitter 2 Gener...

Page 18: ...programming The LED on the receiver lights up STEP 3 Short presses on key B let you choose the type of output that you want to set shown on display b based on following table DISPLAY USCITA ABBINATA...

Page 19: ...19...

Page 20: ...MNLPLN ONEENV1 0 Nexta Tech company brand of Team srl via G Oberdan 90 33074 Fontanafredda PN Italy Ph 39 0434 998682 Email info nexta tech com Web www nexta tech com...

Reviews: