background image

3

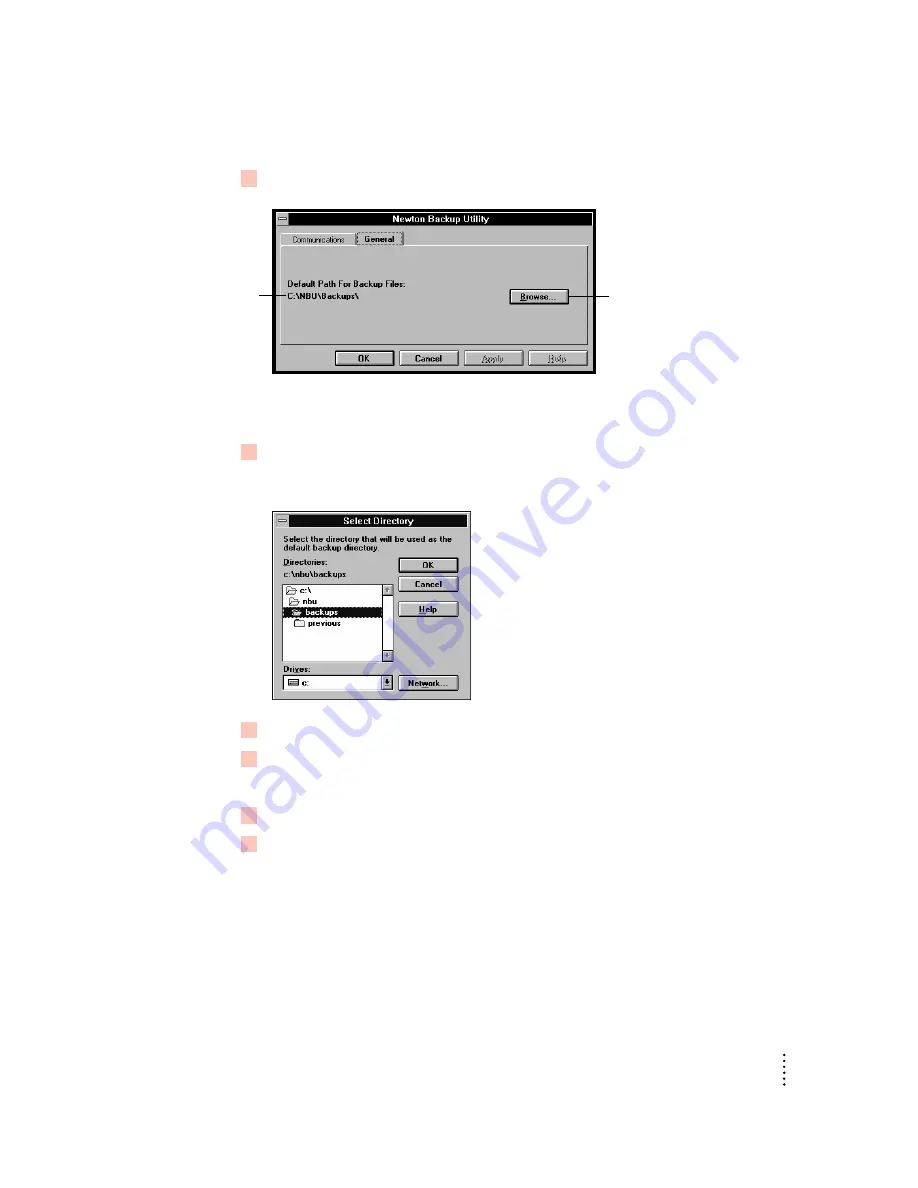
Click the General tab.

This window now shows the directory path set for backing up your Newton PDA
information.

4

To change the directory, click Browse.

A window appears.

5

Select a new location for your BACKUPS directory.

6

Click OK.

The new location you specified is saved and the window disappears.

7

Establish a connection from your Newton PDA.

8

Click the Backup button and back up all information and packages on your Newton PDA.

For more information, see “Backing Up All Information and Packages” earlier in
this chapter.

A new BACKUPS directory with backup files appears in the location you specified.

Note: To avoid confusion with previous backups, you may want to remove older
backup files you’ve created in other locations.

17

Backing Up and Restoring Information

Shows the current

location of the 

BACKUPS directory.

Click to change the location 
of the BACKUPS directory.

Summary of Contents for Newton Backup Utility

Page 1: ...Newton Backup Utility User s Guide for the Windows Operating System...

Page 2: ...sponsible for printing or clerical errors Apple Computer Inc 1 Infinite Loop Cupertino CA 95014 2084 408 996 1010 Apple the Apple logo the light bulb logo Macintosh MessagePad Newton and PowerBook are...

Page 3: ...ng the cable 3 Installing the Newton Backup Utility 3 Preparing your computer 5 Opening the Newton Backup Utility 5 Selecting the type of connection on your computer 5 Preparing your Newton PDA 6 Sele...

Page 4: ...ormation and packages 18 Tips on managing backups 20 3 Installing Packages 21 Installing a package onto your Newton PDA 21 Installing packages by dragging 22 Installing a package onto a storage card 2...

Page 5: ...ter m Install packages applications system updates and so on on your Newton PDA m Restore backed up information to your Newton PDA The Newton Backup Utility works with the Newton 2 0 operating system...

Page 6: ...Connecting A Newton PDA to Your Computer next for more information about obtaining a cable IMPORTANT If you re upgrading your Newton PDA to the Newton 2 0 operating system make sure you read the inst...

Page 7: ...ou ve connected your Newton PDA to your computer Installing the Newton Backup Utility Before your computer can communicate with your Newton PDA you need to install the Newton Backup Utility on your co...

Page 8: ...t button and choose Run A window appears 3 Type A SETUP and click OK If you are using the B drive type B SETUP instead 4 Follow the on screen instructions Depending on the version of Windows that you...

Page 9: ...ility window appears on your computer and a message appears asking you to select a communications port See Selecting the Type of Connection on Your Computer next for more information Selecting the typ...

Page 10: ...y you need to tell your Newton PDA how it is connected to the computer Note The instructions in this section apply to Newton PDAs that use the Newton 2 0 operating system If you have a Newton PDA that...

Page 11: ...s The type of connection you select is saved and remains set until you change it Establishing a connection After you select the type of connection you need to establish a connection between your Newto...

Page 12: ...system a backup is created automatically as soon as you establish a connection from your Newton PDA You don t need to click Backup Because this is your first backup the Newton Backup Utility creates...

Page 13: ...up Utility m Choose Exit from the File menu The connection is ended and the Newton Backup Utility window disappears You can also end a connection from your Newton PDA by tapping the close box marked b...

Page 14: ......

Page 15: ...istake With the Newton Backup Utility you can back up all information on your Newton PDA or just selected information The first time you create a backup the Newton Backup Utility backs up all informat...

Page 16: ...our BACKUPS directory For example if your Newton PDA is named Newton the Newton Backup Utility creates a file named NEWTON NBK the first time you back up The next time you back up the Newton Backup Ut...

Page 17: ...ackages Before you begin make sure your Newton PDA is connected to your computer For instructions see Connecting a Newton PDA to your Computer in Chapter 1 To back up all information on your Newton PD...

Page 18: ...ever if you ve only added information to one or two applications you can specify which applications and application information should be backed up For example you can just back up information in your...

Page 19: ...backup is in progress Messages in the window show what information is being backed up After a few minutes the window disappears and the information you selected is added to the latest backup file Back...

Page 20: ...o back up from the list 5 Click Backup After a few minutes the card is backed up and a backup file with the name of the card appears in your BACKUPS directory Changing the location of the BACKUPS dire...

Page 21: ...ewton PDA 8 Click the Backup button and back up all information and packages on your Newton PDA For more information see Backing Up All Information and Packages earlier in this chapter A new BACKUPS d...

Page 22: ...ation from storage cards you ve backed up Before you begin make sure your Newton PDA is connected to your computer For instructions see Connecting a Newton PDA to Your Computer in Chapter 1 1 Open the...

Page 23: ...x next to it until you see an X WARNING If you selectively back up be careful when you restore information You may remove information that has not yet been backed up You should restore information onl...

Page 24: ...is not restored You ll need to reassign a PIN number For more information on assigning a PIN number see the handbook that came with your Newton PDA Tips on managing backups The following tips can help...

Page 25: ...Newton PDA to Your Computer in Chapter 1 IMPORTANT The package you install is added to the information already on your Newton PDA Nothing is erased 1 Insert the floppy disk containing the package int...

Page 26: ...allation the connection between your Newton PDA and your computer is broken You ll need to re establish the connection from your Newton PDA Installing packages by dragging You can also install one or...

Page 27: ...memory 1 Insert the card in your Newton PDA 2 In the slip that appears select Save new info and packages on this card 3 Follow the steps described in the previous section Installing a Package On Your...

Page 28: ......

Page 29: ...your Newton PDA establish a connection to your computer See Chapter 1 for instructions The Newton Backup Utility buttons appear on your Newton screen You can use these buttons to back up and restore...

Page 30: ...o close the Newton Backup Utility slip and end the connection You cannot change connection preferences while a connection is established between your Newton PDA and your computer 2 On your Newton scre...

Page 31: ...connection applications 5 Select the desired connection preferences 6 Tap X to close the slip Your connection preferences are saved and will be used when you connect your Newton PDA to your computer...

Page 32: ......

Page 33: ...PDA m Check your connection cables to make sure they re connected properly See Connecting a Newton PDA to Your Computer in Chapter 1 m Make sure you ve selected the correct type of connection on your...

Page 34: ...ystem and the storage card is formatted for an earlier version of the Newton operating system If the storage card is formatted for the Newton 2 0 operating system packages are backed up I can t restor...

Page 35: ...s tab Choose 9600 bps for the port speed and then click OK On your Newton PDA open the Extras drawer and tap Connections In the slip that appears tap Connect Via Select the Serial 9600 Windows connect...

Page 36: ......

Page 37: ...if they are not already on Turning on file sharing To turn on file sharing edit your AUTOEXEC BAT file Using an editor such as Edit open the AUTOEXEC BAT file and add the following line Share When the...

Page 38: ...to turn it on 1 In the Main window on your computer double click the Control Panel icon 2 In the Control Panel window double click the 386 Enhanced icon The 386 Enhanced window appears on your comput...

Page 39: ...he currently selected hard disk drive or select a different drive from the Drive drop down list and click OK A message appears asking you to confirm that you want to change your settings 6 Click Yes A...

Page 40: ......

Page 41: ...ow 35 in Newton Backup Utility window 7 on Newton PDA Connection screen 8 problems clicking 20 Restart 20 Virtual Memory 386 Enhanced window 34 C cable See serial cable card backing up 12 15 16 instal...

Page 42: ...34 35 menu commands problems choosing 29 N names entering 6 restoring 19 NBU directory 4 5 11 NBU EXE program file 4 5 Newton Backup Utility exiting 9 installing 3 4 NBU EXE file 4 5 opening 5 uses 1...

Page 43: ...18 20 R RAM random access memory 2 30 README file 3 29 Restart button Newton PDA 20 restarting Windows 35 Restore button Newton Backup Utility window 7 18 restoring information and packages from back...

Reviews: