© 2021 Copyright Newmar Corporation. All rights reserved. For the most up-to-date version of this content, and for more product-specific information, please refer to Newgle.
94
ELECTRONICS
This monitor is an optional component and is not
installed in all coaches with the XSG4 system.
NOTICE
!
Function
Description
1
Bluetooth Microphone
2
LDR (Light Dependent Resistor)
and IR (Infra-red Receiver)
•
LDR is used for the dimming of the
display and is active when Auto dim in
System Settings is set to Sensor.
•
IR receiver is used with remote control
operations.
3
Menu
•
Tap MENU button once to go to the
Main Menu (or Home Page).
•
When in the Main Menu, you can either
use the touch screen to select the
desired icon (source) or you can keep
tapping the Menu button to select
different icons on the screen. When icon
is highlighted for more than 1 second,
the system will automatically open that
icon.
•
You can also access the Main Menu
from any screen by tapping the function
icon in the top left corner of the current
screen.
•
Note: When viewing video in full screen,
touch the screen once to bring up
the icon header which will display the
function icon. Tap the icon to return to
the Main Menu.
4
Navi
•
Press the NAVI button once to go to the
navigation system.
•
While viewing the navigation press
the NAVI button to return to the active
source (Radio, or SXM, etc.). If the
navigation route is running, navigation
audio voice prompts will continue to be
heard over the speakers according to
the Navigation audio settings you have
selected in the Settings menu.
•
To hear only the navigation audio voice
prompts, press and hold NAVI button
for 2 (two) seconds. This will mute
the active source until you leave the
navigation screen.
5
Cam
•
Press CAM button to directly go to
Camera Control page.
6
Fav
•
Your Infotainment Center is equipped
with a favorite source hotkey. Press the
FAV button once to directly access your
favorite audio source.
•
Favorite audio source is defaulted to
Sirius XM, and it can be changed by
going to Setup -> System -> Favorite
Mode.
7
Volume/Power Rotary
Button
•
Turn on the ignition to power up the
Infotainment Center. When powered up,
it will immediately go to the last mode
(memory on playback) before it was
turned off.
•
In order to put the unit in standby mode,
press and hold the rotary button once.
During standby, your vehicles graphics
together with date and time will be
displayed.
•
Press and hold the rotary button again
to turn the unit on.
•
Turn the rotary button left / right to
adjust the volume to the desired level.
A short press of the rotary button will
Mute the audio.
•
Note: When in standby mode,
Infotainment Center consumes power.
To completely turn the system on,
remove the ignition key and / or ensure
any auxiliary battery power to the
system is turned off.
8
LDR (Light Dependent Resistor)
and IR (Infra-red Receiver)
•
LDR is used for the dimming of the
display and is active when Auto dim in
System Settings is set to Sensor.
9
Power Button
•
Turns the Monitor On or Off.
10
Up Arrow
•
Adjust settings up.
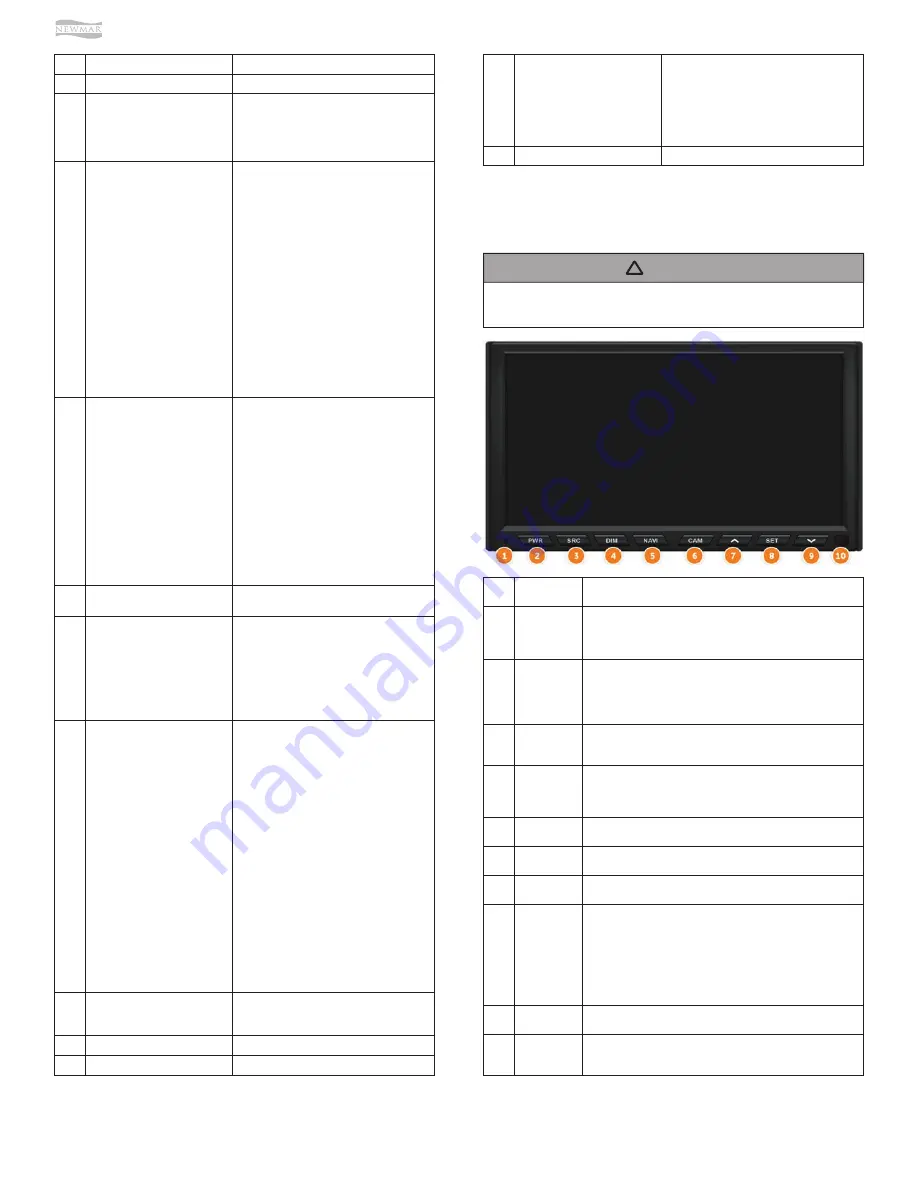
Function
Description
1
Status LED
•
No light means power to the monitor is off.
•
Red Light indicates that unit is in sleep mode.
•
Green Light indicates that unit is powered on and working.
2
PWR
•
If the status LED is red, press the PWR button once to turn
the monitor on.
•
If the status LED is green, press and hold PWR to turn the
monitor off.
3
SRC
•
Press SRC button to change the video source displayed
on monitor.
4
DIM
•
Press DIM to change the brightness of the screen (1 to 5).
•
Set to SYNC for the brightness to be controlled by the
Main Monitor.
5
NAVI
•
Press NAVI button to enter / exit Navigation Menu.
6
CAM
•
Press CAM button to directly go to camera view.
7
Up Arrow
•
Up and Down Arrows work in combination with SET button.
8
SET
•
Press SET button to adjust screen display.
•
Use this button in combination with arrow buttons.
•
Available options are:
◉
Brightness (-10 to +10)
◉
Contrast (-10 to +10)
◉
Tint (-10 to +10)
◉
Touch Adjustment for touchscreen calibration
9
Down Arrow
•
Up and Down Arrows work in combination with SET button.
10
IR Receiever
•
IR receiver is used with remote control operations
(optional).
11
Set Button
•
Press SET button to adjust screen
display. Use this button in combination
with arrow buttons.
•
Available options are: Brightness (-10
to +10), Contrast (-10 to +10), Tint (-10
to +10), and Touch Adjustment for
touchscreen calibration.
12
Down Arrow
•
Adjusts settings down.
7” Secondary (Passenger)
Monitor
Summary of Contents for Mountain Aire 2022
Page 1: ...SM 2022...


