NB-SEMS-FRT User Manual Ver.1.0
Copyright © 2020 Newbridge Technologies Int. Ltd. All rights reserved.
44
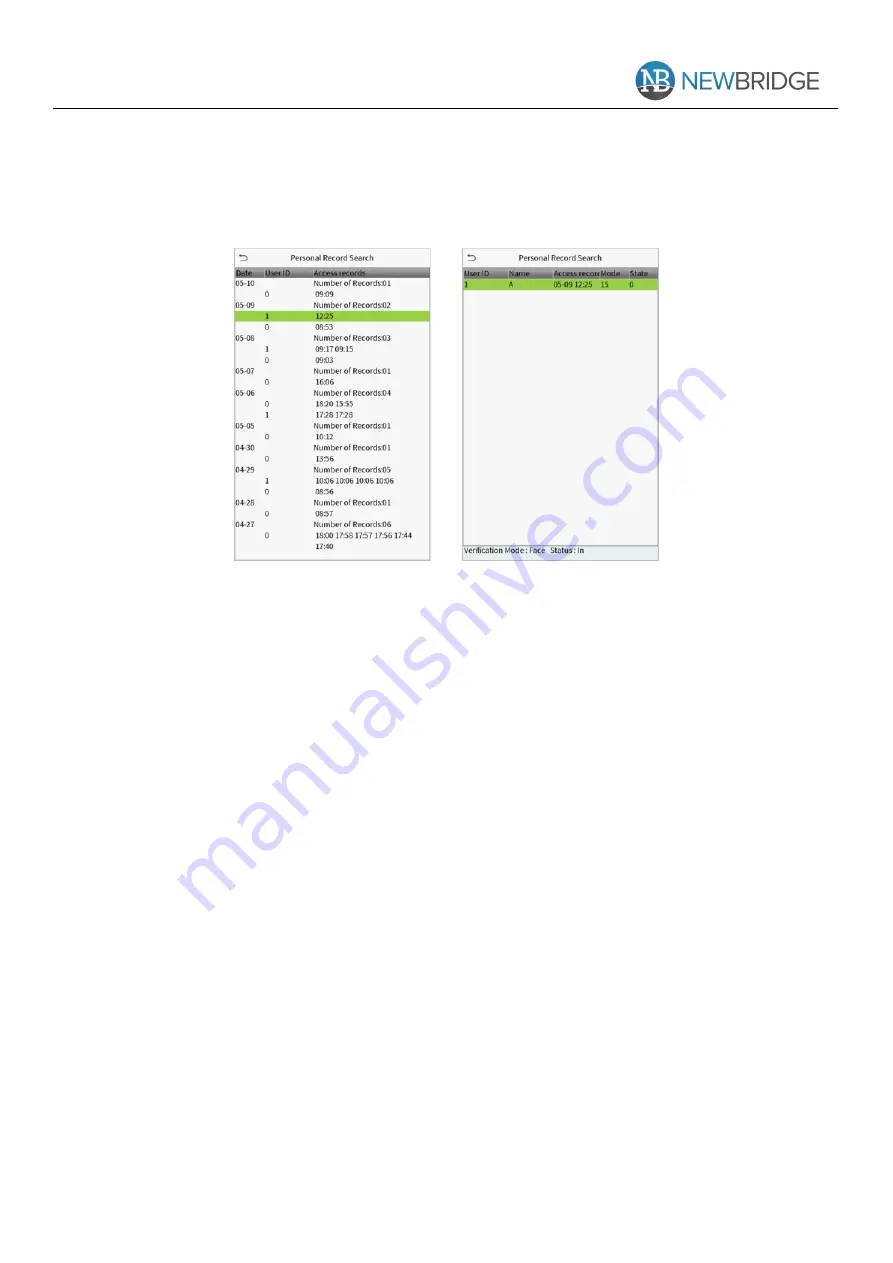
3.
The record search succeeds. Click the record in green to view its details.
4.
The below figure shows the details of the selected record.
Page 1: ...SEMS USER MANUAL NB SEMS FRT Secure Your Entrance Today Contactless Contact Tracing Check in out with the QR Code...
Page 2: ...ly Figures in this manual may not be exactly consistent with the actual products DISCLAIMER This manual contains information on the operation and maintenance of the Newbridge product The copyright in...
Page 3: ...SEARCH FOR USERS 15 3 3 EDIT USERS 16 3 4 DELETE USERS 16 4 USER ROLE 17 5 COMMUNICATION SETTINGS 19 5 1 NETWORK SETTINGS 19 5 2 PC CONNECTION 20 5 3 CLOUD SERVER SETTING 20 5 4 WIEGAND SETUP 21 6 SY...
Page 4: ...NGS 40 9 5 ANTI PASSBACK SETUP 41 9 6 DURESS OPTIONS SETTINGS 42 10 ATTENDANCE SEARCH 43 11 AUTOTEST 45 12 SYSTEM INFORMATION 46 13 CONNECT TO AWDMS SOFTWARE 47 13 1 SET THE COMMUNICATION ADDRESS 47 1...
Page 5: ...ion Our company assumes no liability for recognition issues that may result from the incorrect usage of the product We reserve the right of the final interpretation and modification concerning this po...
Page 6: ...c o If you do not follow the instructions on the screen the face registration may take longer or may fail o Be careful not to cover the eyes or eyebrows o Do not wear hats masks sunglasses or eyeglass...
Page 7: ...inistrator the first time you use the device o The switch of punch state can be done directly by using the screen shortcut keys Click anywhere on the screen without icons and six shortcut keys appear...
Page 8: ...ace verification mode and place the palm in the area that can be collected by the palm collector and the device will automatically detect the palm verification mode o 1 1 Palm Verification mode Click...
Page 9: ...er onto the fingerprint scanner Please follow the correct way to place your finger onto the sensor For details please refer to section 1 1 Finger Positioning o 1 1 fingerprint verification mode Compar...
Page 10: ...r Select the fingerprint icon to enter fingerprint verification mode 2 Press the fingerprint to verify 3 Verification is successful 4 Verification is failed Facial Verification o 1 N Facial Verificati...
Page 11: ...e After successful verification the prompt box successfully verified will appear If the verification is failed it will prompt Please adjust your position Password Verification Compare the entered pass...
Page 12: ...verification methods There are several types of verification combinations can be used as shown below Note o means or and means and o You must register the required verification information before usi...
Page 13: ...ed to the system including date time attendance access logs setting face palm parameter resetting to factory settings and detection management Personize This includes user Interface voice bell punch s...
Page 14: ...you can modify your ID which cannot be modified after regis tration o If a message Duplicated ID pops up you must choose another ID Setting the User Role There are two types of user accounts the norm...
Page 15: ...1 7 Verification Method Register palm Click Palm to enter the palm registration page Select the palmto be enrolled Register face Click Face to enter the face registration page Please face the camera a...
Page 16: ...ll automatically set the picture captured as the default photo Access Control Role User access control sets the door unlocking rights of each person including the group and the time period that the us...
Page 17: ...operation of editing a user is the same as that of adding a user except that the user ID cannot be modified when editing a user Operation method refers to 3 1 Adding users 3 4 DELETE USERS Choose a u...
Page 18: ...enu You may set the permission scope of the custom role up to roles and enroller that is the permission scope of the operation menu Click User Role on the main menu interface 1 Click any item to set a...
Page 19: ...on the left and its sub menus are on the right You only need to select the features in sub menus If the device has a role enabled you may assign the roles you set to users by clicking User Mgt New Use...
Page 20: ...ss The factory default value is 192 168 1 201 Please adjust it according to the actual network situation Subnet Mask The factory default value is 255 255 255 0 Please adjust it according to the actual...
Page 21: ...ice which ranges between 1 and 54 If the communication method is RS232 RS485 you need to input this device ID in the software communication interface 5 3 CLOUD SERVER SETTING This represents settings...
Page 22: ...he default value is 1 000 microseconds which can be adjusted within the range of 200 to 20 000 microseconds ID Type Select between User ID and badge number Definitions of various common Wiegand format...
Page 23: ...the 2nd to 18th bits while the 36th bit is the odd parity bit of the 19th to 35th bits The 2nd to 19th bits are the device codes and the 20th to 35th bits are the card numbers Wiegand37 OMMMMSSSSSSSS...
Page 24: ...output digits in the Wiegand format Failed ID If the verification is failed the system will send the failed ID to the device and replace the card number or personnel ID with the new ones Site Code It...
Page 25: ...1 You can manually set date and time and click Confirm to save 2 Click 24 Hour Time to enable or disable this format and select the date format When restoring the factory settings the time 24 hour and...
Page 26: ...evice will automatically display a remaining record memory warning Users may disable the function or set a valid value between 1 and 9999 Circulation Delete Access Records When access records have rea...
Page 27: ...in the device is greater than the set value The valid value ranges from 55 to 120 The higher the thresholds the lower the misjudgement rate the higher the rejection rate and vice versa The default val...
Page 28: ...a camera s field of view that qualifies as potential motion detection that wakes up the terminal from standby to the comparison interface The larger the value the more sensitive the system would be i...
Page 29: ...of fingerprint acquisition It is recommended to use the default level Medium When the environment is dry resulting in slow fingerprint detection you can set the level to High to raise the sensibility...
Page 30: ...verifying palm and the user s registered palm is greater than this value can the verification succeed Palm 1 N Matching Threshold Under 1 N Verification Method only when the similarity between the ver...
Page 31: ...matically go back to the initial interface You can disable the function or set the value between 60 and 99999 seconds Idle Time To Slide Show s When there is no operation and the time exceeds the set...
Page 32: ...lue 0 100 7 3 BELL SCHEDULES Click Bell Schedules on the Personalize interface Add a bell Click New Bell Schedule to enter the adding interface Back to the Bell Schedules interface click All Bell Sche...
Page 33: ...ppings menu will become invalid Manual Mode To switch the punch state key manually and the punch state key will disappear after Punch State Timeout Auto Mode After this mode is chosen set the switchin...
Page 34: ...ved 33 7 5 SHORTCUTS KEYS MAPPINGS Users may define shortcuts as attendance status or functional keys On the main interface when the shortcut keys are pressed the corresponding attendance status or fu...
Page 35: ...dance photos of designated personnel Delete Blacklist Photo To delete the photos taken during verifications which are failed Delete All Data To delete information and attendance logs access records of...
Page 36: ...d 35 Note When deleting the access records attendance photos or blacklisted photos you may select Delete All or Delete by Time Range Selecting Delete by Time Range you need to set a specific time rang...
Page 37: ...o gain access the registered user must meet the following conditions 1 The current door unlock time should be within any valid time zone of the user time period 2 The user s group must be in the door...
Page 38: ...or Sensor Delay an alarm will be triggered The valid value of Door Sensor Delay ranges from 1 to 55 seconds Door Sensor Type There are three types None Normal Open and Normal Closed None means door se...
Page 39: ...time period master device and alarm However erased access control data in Data Mgt is excluded 9 2 TIME SCHEDULE The entire system can define up to 50 time rules Each time rule represents ten time zo...
Page 40: ...all day 00 00 23 59 or when the ending time is later than the starting time such as 08 00 23 59 3 The default time zone 1 indicates that door is open all day long 9 3 HOLIDAY SETTINGS Whenever there i...
Page 41: ...of the combined number N is 0 N 5 and the number of members N may all belong to one access group or may belong to five different access groups Click Combined Verification on the Access Control interf...
Page 42: ...ollowed by some persons to enter the door without verification resulting in security problem So to avoid this situation Anti Passback option is developed Once it is enabled the check in record must ma...
Page 43: ...can check out again otherwise the alarm will be triggered 9 6 DURESS OPTIONS SETTINGS If a user activated the duress verification function with specific authentication method s when he she is under c...
Page 44: ...ndance Search on the main menu interface The process of searching for attendance and blacklist photos is similar to that of searching for access records The following is an example of searching for ac...
Page 45: ...anual Ver 1 0 Copyright 2020 Newbridge Technologies Int Ltd All rights reserved 44 3 The record search succeeds Click the record in green to view its details 4 The below figure shows the details of th...
Page 46: ...k whether the screen displays colours normally Test Voice To automatically test whether the audio files stored in the device are complete and the voice quality is good Test Fingerprint Sensor To test...
Page 47: ...em Info on the main menu interface Items Descriptions Device Capacity Displays the current device s user storage palm password and face storage administrators access records attendance and blacklist p...
Page 48: ...ress should be able to communicate with the AWDMS server preferably in the same network segment with the server address 2 In the main menu click COMM Cloud Server Setting to set the server address and...
Page 49: ...is as follows 1 Click Access Control Device Search Device to open the Search interface 2 Click Search and it will prompt Searching 3 After searching the list and total number of access controllers wi...
Page 50: ...ck Prevention Epidemic Real time monitoring to view all the events include the user whose temperature is over the range When the Alarm temperature setting has set the abnormal body temperature will be...
Page 51: ...r registration 4 Please show your face and forehead and do not cover your face and eyebrows with your hair 5 It is recommended to show a plain facial expression Smile is acceptable but do not close yo...
Page 52: ...eyes and should not reflect light For persons with thick eyeglasses frame it is recommended to capture two images one with eyeglasses and the other one without Face Complete face with clear contour r...