background image


8


STORE CYLINDER IN A WELL VENTILATED AREA OUT OF REACH OF CHILDREN 


When the gas cylinder is disconnected, replace the plug or cap on the valve outlet. 
For extended storage it is suggested that the primary air port of the burners be covered against the 
penetration of insects or vermin.  Spiders and small insects can spin webs or nest in the burner rails/tubes, 
which could lead to obstruction in the gas and air flow, resulting in a fire in an around the burner rails/tubes.  
This type of fire is called a flash-back and can cause serious damage to your barbecue and create an unsafe 
operating condition.  To prevent this, regularly inspect and clean the burners.   A barbecue cover can be 
placed over the appliance for extra protection, and to reduce this. 


To extend the life of your barbecue and trolley and to keep it looking great, we recommend using a 
Weatherproof Cover. 

GAS SUPPLY 

1.


Inspect the gas supply hose for any deterioration and replace it if necessary. 

2.


Test the gas circuit for leaks and remedy any found.  See leak testing instruction. 

TROLLEY 

1.


Check all fasteners for tightness and re tighten where necessary to ensure rigidity of the structure. 

2.


Wipe over barbecue trolley with a clean cloth. 


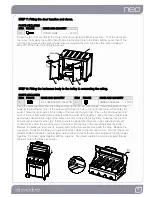
OPERATING INSTRUCTIONS FOR WOK BURNER 


GAS CONNECTION  

Attach small hose from wok burner gas valve to barbecue manifold. Connect gas hose and 
regulator to the cylinder.  Before turning gas cylinder on please ensure that the gas valves on the 
barbecue and wok burner are in the off position. 

Turn gas supply on and check for leaks by applying a soap solution to all connections with a brush.  
If a leak is detected, retighten the connection and test for leaks again.  Never check for leaks with 
the use of a flame. 


  BEFORE IGNITING THE BARBECUE ENSURE THAT ALL VALVES ON THE  

BARBECUE AND THE WOK BURNER ARE IN THE OFF POSITION. 


LIGHTING INSTRUCTIONS 

Important: The lid must be open when lighting the burner and during normal operation. 

1.


Push in and turn the control knob to HIGH. 

2.


The built-in ignitor will light the burner. 

3.


If burner does not light, return knob to the OFF position and retry 5 times. 

4.


If the burner does not light, leave the knob in the OFF position, and wait 5 minutes before retrying. 
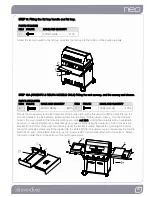
 

CARE AND CLEANING 

Before cleaning, ensure the appliance has cooled down and is safe to touch.  Remove the trivet plate and 
wipe down the burner and spill bowl with a clean damp cloth.  Do not use harsh detergents or scourers as 
damage may occur to the surfaces. 


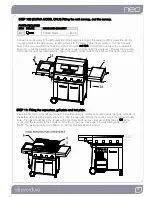
ESEE LIGHT SYSTEM INSTRUCTIONS 


Check that the barbecue wiring is connected to the power pack (screwed onto the top of the power pack). 
Check that the lighting switch is off, and plug the power pack into the power supply.  With the power 
supply on, the lighting switch at the front right hand corner of the barbecue can be used to turn the lights 
on and off.  When not in use, the unit should be disconnected from the power supply and all cords stored 
within the trolley.

Summary of Contents for argento esee

Page 1: ...1 ASSEMBLY OPERATION MAINTENANCE INSTRUCTIONS NEO ARGENTO ESEE FIGURA ESEE CURVA ESEE FOR OUTDOOR USE ONLY where barbecuing meets art...

Page 2: ...ons 3 Appliance Details 4 Gas Connections 4 Outdoor Installation Guide 5 Operating Instructions for Barbecue 6 Lighting Procedure 6 Cooking 7 Cleaning Storage 7 Operating Instructions for Wok Burner 8...

Page 3: ...strong wind if this cannot be avoided always check that the burners remain alight if operating the barbecue in windy conditions 15 This appliance is not intended for use by young children or infirm p...

Page 4: ...rformed by an authorised person in accordance with AS5601 AG601 and local gas regulations Note The burner pressure as noted on the appliance details MUST be checked after installation by turning on an...

Page 5: ...ve to heat Do not block obstruct the flow of air and combustion around the barbecue housing while in use Any enclosure in which the appliance is used shall comply with one of the following An enclosur...

Page 6: ...RAY LIGHTING PROCEDURE READ ALL OPERATING INSTRUCTIONS BEFORE LIGHTING MAKE SURE ALL GAS CONTROL KNOBS ARE IN THE OFF POSITION AND OPEN CYLINDER VALVE LIGHTING THE BARBECUE The 4 burner barbecue has a...

Page 7: ...will drip through to the drip tray Do not allow excess fat to build up in the drip tray Clean the drip tray and replace the aluminium foil before use This is a general guide for roasting only please c...

Page 8: ...e cylinder Before turning gas cylinder on please ensure that the gas valves on the barbecue and wok burner are in the off position Turn gas supply on and check for leaks by applying a soap solution to...

Page 9: ...r to leak testing instructions Hose has deteriorated Replace hose and leak test after replacement Gas valve is faulty Contact an authorised service centre Threads are damaged Contact an authorised ser...

Page 10: ...IDE PANEL 23 WOK SERVERY 22 REAR PANEL 24 MATCH HOLDER 27 SERVERY BRACKET 25 BURNERS 26 POWER ADAPTOR PARTS REQUIRED INVENTORY Make sure you thoroughly inspect parts before assembly and do not assembl...

Page 11: ...4 MATCH HOLDER 23 WOK SERVERY 26 POWER ADAPTOR PARTS REQUIRED INVENTORY Make sure you thoroughly inspect parts before assembly and do not assemble or operate a barbecue that appears damaged The use of...

Page 12: ...el over the mounting bracket and fix in place using two M3 screws and two M3 nuts Repeat for the trolley top panel STEP 1 Fitting the wheels and castors to the trolley bottom plate PARTS REQUIRED ITEM...

Page 13: ...the top front corner on top of the left hand edge of the trolley bottom panel and in front of the trolley rear panel Fix into place using four M5 screws Repeat for the right hand trolley side panel T...

Page 14: ...s firmly Place the trolley top panel door magnet to the front on a protected surface and align the rest of the trolley on top of it NOTE The wiring holes should both end up on the right hand side see...

Page 15: ...dy to help the fat tray slide Take the four cast iron burners and remove the wire clips Fit the burners by placing its throat over a gas valve behind each control knob Lower the tab at the rear of the...

Page 16: ...ach the servery bracket to the bottom of the right hand servery using the two M4 screws Repeat the mounting method for the right hand side servery and fit the drawer into the slides NOTE The drawer ca...

Page 17: ...t hand servery Place the hot plate on the left hand side of the barbecue body and the vapouriser inside the right hand side of the barbecue body with the grill plate over it Run the gas hose through t...

Page 18: ...18 Fully Assembled Product Argento...

Page 19: ...19 Fully Assembled Product Figura...

Page 20: ...20 All Service Assembly and Warranty Enquiries Telephone 1300 766 066 Neo by Everdure A division of Shriro Australia Pty Ltd 23 27 Chaplin Drive Lane Cove NSW 2066 Telephone 1300 766 066...

Reviews: