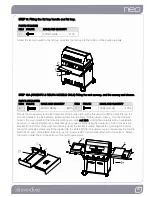
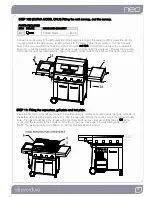
background image


10


BARBECUE ASSEMBLY 

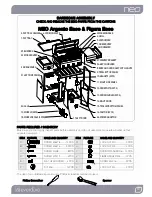
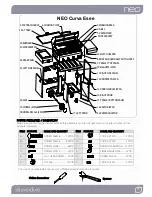
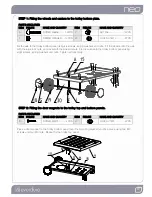
CHECK AND REMOVE THE BBQ PARTS FROM THE CARTONS 


NEO Argento Esee & Figura Esee 

6.COOKING PLATE

11.RIGHT SIDE PANEL

8.BODY AND HOOD ASS'Y WITH LIGHTS

5.VAPOURISER

4.GRILL

3.WARMING RACK

7.SIDE SERVERY

  AND DRAWER

1.FAT TRAY


2.FAT TRAY HANDLE
  

12.DOORPOSTS (2PCS)

13.DOOR HANDLES (2PCS)

14.RIGHT DOOR

15.TROLLEY BOTTOM PANEL

16.CASTOR (2PCS)

9.TROLLEY TOP PANEL 

10.MAGNETS (2PCS)

17.LEFT DOOR

19.WHEELS (2PCS)

18.WHEEL DECALS (2PCS)

20.AXLE

21.LEFT SIDE PANEL 

23.WOK SERVERY 

22.REAR PANEL 

24.MATCH HOLDER 

27.SERVERY BRACKET 

25.BURNERS 

26.POWER ADAPTOR


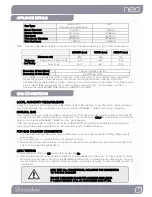
PARTS REQUIRED / INVENTORY


Make sure you thoroughly inspect parts before assembly and do not assemble or operate a barbecue that 
appears damaged.  


The use of an adjustable spanner and a Phillips screwdriver will be required.
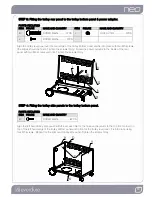


ITEM  PICTURE 

NAME AND QUANTITY 

ITEM 

PICTURE 

NAME AND QUANTITY 


SCREW M6X16…......14PCS


LOCK NUT M10….…...…2PCS


SCREW M5X15….…..32PCS


LOCK NUT M3……....…..4PCS


SCREW M4X8…….......8PCS


SPRING WASHER D6.....14PCS


SCREW M3X12….…....4PCS


FIBRE WASHER M5.........4PCS 


FLAT HEAD SCREW.....4PCS


SCREW M4X15……........2PCS 


NUT M6..................... 14PCS L 


LOCK NUT M4……....…..2PCS

Phillips Screwdriver


  Spanner


Summary of Contents for argento esee

Page 1: ...1 ASSEMBLY OPERATION MAINTENANCE INSTRUCTIONS NEO ARGENTO ESEE FIGURA ESEE CURVA ESEE FOR OUTDOOR USE ONLY where barbecuing meets art...

Page 2: ...ons 3 Appliance Details 4 Gas Connections 4 Outdoor Installation Guide 5 Operating Instructions for Barbecue 6 Lighting Procedure 6 Cooking 7 Cleaning Storage 7 Operating Instructions for Wok Burner 8...

Page 3: ...strong wind if this cannot be avoided always check that the burners remain alight if operating the barbecue in windy conditions 15 This appliance is not intended for use by young children or infirm p...

Page 4: ...rformed by an authorised person in accordance with AS5601 AG601 and local gas regulations Note The burner pressure as noted on the appliance details MUST be checked after installation by turning on an...

Page 5: ...ve to heat Do not block obstruct the flow of air and combustion around the barbecue housing while in use Any enclosure in which the appliance is used shall comply with one of the following An enclosur...

Page 6: ...RAY LIGHTING PROCEDURE READ ALL OPERATING INSTRUCTIONS BEFORE LIGHTING MAKE SURE ALL GAS CONTROL KNOBS ARE IN THE OFF POSITION AND OPEN CYLINDER VALVE LIGHTING THE BARBECUE The 4 burner barbecue has a...

Page 7: ...will drip through to the drip tray Do not allow excess fat to build up in the drip tray Clean the drip tray and replace the aluminium foil before use This is a general guide for roasting only please c...

Page 8: ...e cylinder Before turning gas cylinder on please ensure that the gas valves on the barbecue and wok burner are in the off position Turn gas supply on and check for leaks by applying a soap solution to...

Page 9: ...r to leak testing instructions Hose has deteriorated Replace hose and leak test after replacement Gas valve is faulty Contact an authorised service centre Threads are damaged Contact an authorised ser...

Page 10: ...IDE PANEL 23 WOK SERVERY 22 REAR PANEL 24 MATCH HOLDER 27 SERVERY BRACKET 25 BURNERS 26 POWER ADAPTOR PARTS REQUIRED INVENTORY Make sure you thoroughly inspect parts before assembly and do not assembl...

Page 11: ...4 MATCH HOLDER 23 WOK SERVERY 26 POWER ADAPTOR PARTS REQUIRED INVENTORY Make sure you thoroughly inspect parts before assembly and do not assemble or operate a barbecue that appears damaged The use of...

Page 12: ...el over the mounting bracket and fix in place using two M3 screws and two M3 nuts Repeat for the trolley top panel STEP 1 Fitting the wheels and castors to the trolley bottom plate PARTS REQUIRED ITEM...

Page 13: ...the top front corner on top of the left hand edge of the trolley bottom panel and in front of the trolley rear panel Fix into place using four M5 screws Repeat for the right hand trolley side panel T...

Page 14: ...s firmly Place the trolley top panel door magnet to the front on a protected surface and align the rest of the trolley on top of it NOTE The wiring holes should both end up on the right hand side see...

Page 15: ...dy to help the fat tray slide Take the four cast iron burners and remove the wire clips Fit the burners by placing its throat over a gas valve behind each control knob Lower the tab at the rear of the...

Page 16: ...ach the servery bracket to the bottom of the right hand servery using the two M4 screws Repeat the mounting method for the right hand side servery and fit the drawer into the slides NOTE The drawer ca...

Page 17: ...t hand servery Place the hot plate on the left hand side of the barbecue body and the vapouriser inside the right hand side of the barbecue body with the grill plate over it Run the gas hose through t...

Page 18: ...18 Fully Assembled Product Argento...

Page 19: ...19 Fully Assembled Product Figura...

Page 20: ...20 All Service Assembly and Warranty Enquiries Telephone 1300 766 066 Neo by Everdure A division of Shriro Australia Pty Ltd 23 27 Chaplin Drive Lane Cove NSW 2066 Telephone 1300 766 066...

Reviews: