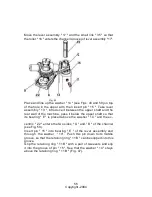
HOW TO DISMANTLE THE UPPER GROUP OF THE ZIG-ZAG
MECHANISM (FIGS. 46 AND 47)
Remove the top cover.
Remove the mounting plate for the “Automatic " device.
Remove the zig-zag mechanism cover plate and open the
face
plate of the machine.
Remove the needle positioning rod " 7 " (Fig. 46) in the following
order:
Remove retaining ring " 8 ".
Loosen screw " 6 " which holds left end of the rod " 7 ".
Remove pin " 5 " by pulling it upward.
Loosen screw " 29 " at right-hand end of rod " 7 ".
Remove the needle bar positioning rod " 7 " by pulling it out
of the machine from the face plate side.
The needle bar positioning lever assembly " 13 " is now free for
removal which shall be done in the following order (see Fig. 46):
Loosen screw " 33 " which holds the pin " 34 " (underneath
the bed plate).
Remove spring " 10 " (from the left side).
Remove retaining ring " 11A" which is slipped on top of
pin " 15 ".
Remove the needle bar positioning lever " 12 " by pulling it
backward and then upward out of the machine.
Remove spring " 30 " (toward the right).
/) Loosen screw " 25 " and remove zig-zag width regulating
lever " 32 ".
51
Copyright -2004
Summary of Contents for Supernova
Page 1: ...Instructions For Servicing The Necchi Supernova Sewing Machine 1 Copyright 2004...
Page 15: ...15 Copyright 2004...
Page 17: ...Fig 11 Fig 12 Fig 13 17 Copyright 2004...
Page 23: ...False needle Fig 18 False needle Fig 19 23 Copyright 2004...
Page 43: ...Fig 38 43 Copyright 2004...
Page 49: ...49 Copyright 2004...


