background image


 Using Your NEC Versa   4-29

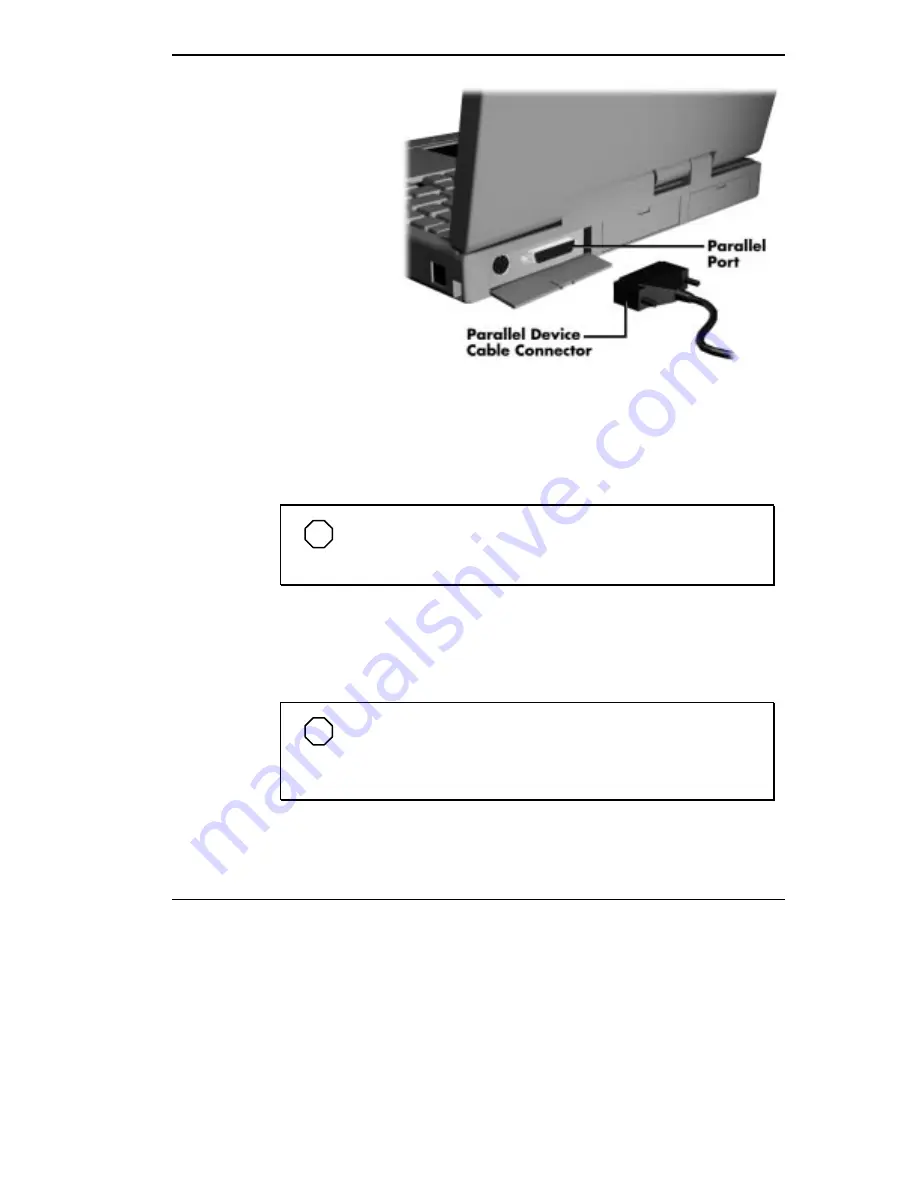
 Connecting a parallel device

5. 

Connect the power cable to the device and a properly grounded wall   
outlet.

6. 

Turn on power to the system and the device.


NOTE

Check that the device is online before you try to use it. See

the instructions that came with the device for more information.

Serial Devices


To install a serial device, such as a printer or an external modem, you need a
cable with a female 9-pin connector.


NOTE

When you connect a printer, be sure to install the appropriate

printer driver through the Windows for Workgroups Control Panel,
the Windows 95 Start menu or via the Windows NT Start menu.


Follow these steps to connect a serial device to your NEC Versa system.


Summary of Contents for VERSA 6060 WINDOWS 98 - UPGRADE INFORMATION

Page 1: ... Massachusetts Avenue Boxboro MA 01719 508 264 8000 declare that the product NEC V6060 Series is in conformity with part 15 of the FCC Rules Operation of this product is subject to the following two conditions 1 this device may not cause harmful interference and 2 this device must accept any interference received including interference that may cause undesired operation ...

Page 2: ...the Warranty Statement accompanying each product However actual performance of each such product is dependent upon factors such as system configuration customer data and operator control Since implementation by customers of each product may vary the suitability of specific product configurations and applications must be determined by the customer and is not warranted by NECCSD To allow for design ...

Page 3: ...eatures and functionality You ll also master procedures for connecting external options like headphone microphone or speakers Chapter 5 Using Multimedia for steps on integrating video and sound clips into impressive presentations Chapter 6 Traveling with Your NEC Versa lists valuable tips for getting the most out of your system while on the road Chapter 7 Solving Problems provides simple solutions...

Page 4: ...nt information about whatever is being described Names of keys are printed as they appear on the keyboard for example Ctrl Alt or Enter Text that you must type or keys that you must press are presented in bold type For example type dir and press Enter RELATED DOCUMENTS See the following documents for additional information on your NEC Versa 6060 notebook computer Your NEC Versa 6060 Quick Setup sh...

Page 5: ... the System Left Side 1 11 Around the System Right Side 1 12 Around the System Bottom 1 14 Power Sources for Your NEC Versa 1 15 Using the AC Adapter 1 15 Powering On 1 17 Using the Main Battery Pack 1 17 Determining Battery Status 1 18 When to Replace the Battery 1 19 Battery Handling 1 19 Replacing the Battery Pack 1 20 Battery Precautions 1 23 Recharging Battery Precautions 1 24 Optional Second...

Page 6: ... Customize Utility 2 7 HDPREPEZ Utility 2 7 Other Software 2 7 Client Manager 2 8 LapLink 2 8 How to Use LapLink 2 9 McAfee VirusScan 2 10 McAfee WebScan 2 10 MediaMatics Arcade MPEG Player 2 11 Xing MPEG Player 2 11 3 Using Setup Setup Utility 3 1 How to Enter Setup 3 1 Setup Utility Main Menu 3 2 How to Use Setup 3 2 Looking at Screens 3 3 Using Keys 3 4 Checking Setting System Parameters 3 4 Se...

Page 7: ...om Windows for Workgroups 4 15 Removing a PC Card from Windows 95 4 16 Removing a PC Card from Windows NT 4 16 IR Port 4 17 Increasing System Storage and Memory 4 18 Hard Disk Drive 4 18 Installing a Memory Module 4 21 Installing Options 4 25 External Monitor 4 26 Printer 4 28 Parallel Devices 4 28 Serial Devices 4 29 External Keyboard Mouse 4 31 External Bar Code Scanner 4 32 External Audio Optio...

Page 8: ...ital Video Files 5 7 Using Animation Files 5 8 Multimedia Applications 5 8 VideoSaver 5 8 6 Traveling with Your NEC Versa Power Connections 6 1 Checklists 6 2 What to Take 6 2 Preparing Your NEC Versa for Travel 6 3 7 Solving Problems Problem Checklist 7 1 Start Up Problems 7 3 POST Error Messages 7 4 Using the Restore CD 7 6 Supplemental CD for Windows NT 7 7 If You Need Assistance 7 8 Getting He...

Page 9: ...aking Your Computer Work For You A 1 Arrange Your Equipment A 2 Adjust Your Chair A 2 Adjust Your Input Devices A 3 Adjust Your Screen or Monitor A 4 Vary Your Workday A 5 Pre Existing Conditions and Psychosocial Factors A 5 B Specifications Glossary Index ...

Page 10: ...pendix A Setting Up a Healthy Work Environment for guide lines that help you use your computer productively and safely Informa tion includes how to set up and use your computer to reduce your risk of developing nerve muscle or tendon disorders Take the online System Tour to get acquainted with your NEC Versa The System Tour is in the Windows NEC Information group under the NEC Versa 6060 Help Cent...

Page 11: ...ultimately providing more distinct sound and visuals for your presenta tions More advantages include increased floating point performance and a more efficient bus In addition your system provides a high performance hard disk drive disk ette drive or VersaBay II SuperDisk LS 120 drive interchangeable 20X CD ROM reader and Personal Computer Memory Card International Asso ciation PCMCIA also known as...

Page 12: ...a LCD features LCD Your NEC Versa system comes with a color LCD that you can adjust for a comfortable viewing position The LCD is a 12 1 inch Thin Film Transistor TFT Super Video Graphics Array SVGA display Additional LCD panel features include Built in Stereo Speakers provide stereo sound for your multimedia presentations or listening pleasure Brightness Control a slide switch that adjusts screen...

Page 13: ...at battery power is low Suspend Resume S R Button press the S R button to put the unit into Suspend mode when you need to be away from your system for a short period of time and want to return to where you left off Press the S R button again to bring your NEC Versa system out of Suspend mode and back to where you where before entering Suspend Specifically Suspend mode shuts down all devices in the...

Page 14: ...tatus via ten status icons See the following figure and list for each icon s meaning Reviewing status icons Suspend appears when the system is in Suspend mode Suspend mode conserves system power by shutting down all devices in the system while retaining data and system status Power Management shows the current power management mode in use including Off Custom High Performance or Longest Life Diske...

Page 15: ...I See Optional Second Battery later in this chapter for more information Keyboard The NEC Versa keyboard uses 83 keys 79 keys for international systems with the standard QWERTY key layout See Chapter 4 Using the Key board for complete details You can also refer to the online information in the NEC Versa 6060 Help Center NEC VersaGlide The NEC VersaGlide works like a standard computer mouse Simply ...

Page 16: ...saBay II and replace it with the 20X CD ROM reader that also ships with your system It s your choice The VersaBay II lets you add options including a second Li Ion battery or an additional hard disk drive see Customizing Your System with the Ver saBay II in Chapter 4 WARNING Remember to power off or suspend your system before installing an option Hot swapping is not supported although warm swappin...

Page 17: ... that supports IR tech nology and a built in microphone for recording with your NEC Versa For an understanding of each feature see the descriptions that follow the figure Built in Microphone allows you to record monophonic sound directly into your notebook computer You do not have to speak directly into the microphone Feel free to speak into the microphone at a comfortable dis tance ...

Page 18: ...fer files between your NEC Versa and an IR equipped desktop or notebook computer You can also print to an IR equipped printer without using cables Your NEC Versa will support either FIR Windows 95 only MIR or SIR transfer rates IR Port and Built in Microphone ...

Page 19: ...2 style keyboard to the system With an optional Y adapter you can connect both a mouse and a keyboard at the same time Parallel Port Use this port to connect a parallel printer or other paral lel device The port is an Extended Capabilities Port ECP The ECP standard provides you with a greater processing speed than the conven tional parallel port It also supports bi directional and unidirectional a...

Page 20: ...modem or other serial device This port does not support serial pointing devices AROUND THE SYSTEM LEFT SIDE The left side of your NEC Versa has two slots for inserting two Type II PC cards formerly called PCMCIA cards You can also insert one Type III PC card The battery bay cover release is also located on the left side of the unit The battery bay contains a Lithium Ion Li Ion battery that lets yo...

Page 21: ...audio system to your NEC Versa system Using this port disables the built in system speakers Line In Lets you use another audio system like a home stereo as an input source Use a the cable to connect to the Line Out port on the other audio system to record or play Microphone MIC Allows you to connect an external microphone for monophonic recording or amplification through the unit Plugging in an ex...

Page 22: ...t The Universal Serial Bus USB allows the connection of up to 127 peripheral devices printers monitors scanners etc to your NEC Versa Fan Exhaust Port This port provides air flow from the interior of the computer to assist in keeping the system running at optimal performance AC Power Port Use the power jack to attach the NEC Versa to a DC power source such as the AC adapter or the optional DC car ...

Page 23: ...s standard hard disk drive Also if you remove the hard disk drive you ll see two connectors for in stalling one additional memory module The hard disk drive bay also contains six dip switch settings These are explained in Chapter 4 Us ing Your NEC Versa NEC VersaBay II Release Latches These latches let you remove the option currently installed in the bay Battery Bay Contains the system s main batt...

Page 24: ...adapter connected to a car cigarette lighter Read the following sections for specific steps on powering on the system Using the AC Adapter Use the AC adapter and power cable that came with your NEC Versa to run your computer on AC power or to recharge the battery pack Use the AC adapter whenever a wall outlet is nearby Keep the adapter connected whenever possible The AC adapter charges the battery...

Page 25: ...1 Connect the AC adapter cable to the power port on the right side of your NEC Versa system 2 Plug one end of the AC power cable into the AC adapter and the other end into a properly grounded 120 or 240 volt wall outlet NOTE The AC power cable type that your system uses depends on the country you re using it in Contact the local dealer to purchase the correct power cable Connecting the AC adapter ...

Page 26: ...r system on battery power for approximately one to three hours with power management features enabled It s easy to in stall and remove Your NEC Versa system integrates status icons in the LCD Status Bar that appear in the window panel located above your keyboard Two battery icons display to help you keep track of the main battery or second battery if in stalled power level See the Status Icons sec...

Page 27: ...ry charger designed for your NEC Versa battery type Different NEC Versa models require different batteries and battery chargers WARNING To prevent accidental battery ignition or explosion adhere to the following Keep the battery away from extreme heat Keep metal objects away from the battery terminals to prevent causing a short circuit Make sure the battery is properly installed in the battery bay...

Page 28: ...y low the number icon blinks rapidly When to Replace the Battery The following symptoms indicate that battery life is nearing an end Replace batteries that display these symptoms shorter work times discoloration warping hot to the touch strange odor Battery Handling Keep the following in mind when removing or replacing a battery Use Li Ion batteries only in the NEC Versa computer for which they ar...

Page 29: ... batteries in the NEC Versa computer for which they are designed Installing another manufacturer s battery or using a combination of very old and new batteries can deteriorate battery and equipment performance 1 Save your files exit Windows and press the Suspend button or turn off system power 2 Close the LCD Panel and turn the system over 3 Release the battery cover latch and slide the battery ba...

Page 30: ...21 4 Place a finger in the notch on the battery and lift the battery out of the system WARNING Always lift the battery out of the system by the notch Failure to do so can damage the battery terminals Removing the battery ...

Page 31: ...oves with the projections inside the battery bay Lower the notched end of the battery into the battery compartment Inserting the battery pack 6 Replace the battery bay cover as follows Align the tabs on the bay cover with the grooves on the system chassis Lower the cover onto the bay and slide it into place until the release latches lock ...

Page 32: ...injury and property damage read these battery precautions on handling charging and disposing Li Ion batteries Keep the battery away from heat sources including direct sunlight open fires microwave ovens and high voltage containers Temperatures over 140º F 60ºC may cause damage Do not drop or impact the battery Do not disassemble the battery Do not solder the battery Do not puncture the battery ...

Page 33: ...re There is a danger of ignition or explosion Recharging Battery Precautions Adhere to the following precautions when recharging the Li Ion battery Use only the NEC battery charger designed for your NEC Versa battery type Different NEC Versa models require different batteries and battery chargers Charge the battery for the specified charge time only During charging keep the environmental temperatu...

Page 34: ... that your system offers within Advanced Topics in the NEC Versa 6060 Help Center Other important topics to view in the online docu ment include Maximizing Battery Life Battery Charging and Disposal Using the DC Car Adapter Another way to power your NEC Versa system is via car battery power us ing the optional DC car adapter Connect your system to the optional DC car adapter as follows 1 Disconnec...

Page 35: ...or the dealer nearest you Bridge Battery The internal 7 2 volt bridge battery saves your system status in Suspend mode for up to five minutes Suspend mode is a feature that halts all system operations temporarily when you need to be away from your NEC Versa for a short period This gives you time to install a fully charged battery or plug in AC power when your battery charge becomes low An authoriz...

Page 36: ...r extended periods in direct sunlight Avoid using the system in humid or dusty environments Turn computer power off before cleaning it Avoid exposing the NEC Versa computer or AC adapter to extreme changes in temperature or humidity If it is unavoidable allow your NEC Versa to adjust to room temperature before using When cleaning the system use a soft clean dry cloth Avoid wiping the display surfa...

Page 37: ...ts components away from organic solvents or cor rosive gases Avoid leaving the system and its components in direct sunlight or near heat sources Routine Cleaning Clean or dust your system as follows CAUTION Never use harsh solutions household cleaners or spray cleaners that contain caustic materials on your NEC Versa computer These cleaners are usually high in alkalinity which is measured in pH Us...

Page 38: ...ups operating system with MS DOS Online Help NEC Utilities Setup NEC Customize Utility HDPREPEZ Utility Other Software Intel LANDesk Client Manager LapLink McAfee VirusScan McAfee WebScan MediaMatics Arcade MPEG Player XingMPEG Player The software listed here is current as of July 1997 The list is subject to change without notice The software on your system is predicated by the operating system th...

Page 39: ...With Windows 95 the following icons are loaded on your desktop My Computer provides access to drives printers the control panel and network features Inbox lets you access the Microsoft fax and mail software as well as Microsoft network services Internet Explorer provides an Internet browser for those systems with Internet access via an optional modem or network PC card Recycle Bin gives you a tras...

Page 40: ...ws NT extends these benefits with additional performance security and fault protection in a powerful platform of client server computing Windows NT allows you to run applications created specifically for Win dows NT and Windows 95 You can also run applications created for other versions of Windows MS DOS and character based MS OS 2 1 x as well as POSIX compliant applications Windows NT gives you t...

Page 41: ...rkstation Service Pack From the Windows NT 4 0 Work station desktop press Start select Run and type C sp3 update exe click on OK Follow the on screen instructions to complete the update Windows for Workgroups Windows for Workgroups offers the well established Windows interface Application icons are placed in groups which are represented by group icons To start an application highlight and double c...

Page 42: ...S refer to the online book MS DOS 6 22 QuickStart in the NEC Versa InfoCenter program group Guide to Online Help The NEC Versa 6060 has plenty of information for you online The NEC Versa 6060 InfoCenter group contains information about your NEC Versa 6060 warranty coverage and customer services For Windows for Work groups see the printed documentation provided with your system NEC VERSA HELP CENTE...

Page 43: ...on in the Versa Tools Catalog is only appli cable for North America Additional Online Topics In addition to the Help Center your NEC Versa also contains the following online help Customer Support Guide The NEC Customer Support Guide discusses the various levels of sup port NEC offers you our customer We provide lots of information to help you become self sufficient with your NEC Versa but if you n...

Page 44: ...essages F2 for Setup See Chapter 3 Using Setup and Advanced Topics for a discussion of the Setup utility In addition online help assists you in making appropriate settings NEC Customize Utility In Windows 95 systems the NEC Customize utility installs NEC designed desktop features including custom wallpaper the latest VersaGlide software controls and the automatic running of McAfee AntiVirus softwa...

Page 45: ...nd press the VersaGlide selection button or tap the VersaGlide pad once 2 Highlight HELP press the VersaGlide selection button or tap the VersaGlide pad once 3 Highlight Contents press the VersaGlide selection button or tap the VersaGlide pad once 4 This section introduces and guides you through the capabilities features and instructions on using LANDesk Client Manager LapLink LapLink helps you st...

Page 46: ...follows In Windows for Workgroups locate and double click the LapLink group icon Select LapLink for Windows In Windows 95 press Start slide the cursor over to Programs and locate the LapLink for Windows 95 folder In the folder highlight the LapLink line and press the VersaGlide selection button or tap the VersaGlide pad once If you do not have a port enabled LapLink prompts you to enable one Press...

Page 47: ...n software is set up to scan your system daily You can change these settings through the VShield Configuration Manager for Windows 95 and Windows for Workgroups If your operating system is Windows NT access the McAfee VirusScan NT Console 1 From the McAfee VirusScan95 in Windows 95 or McAfee VirusScan in Windows for Workgroups program group highlight the VShield Con figuration Manager and from Win...

Page 48: ...EG Playback software for Windows 95 See Chapter 5 Using Multimedia for instructions on using this application Xing MPEG Player Provides MPEG Playback software for Windows for Workgroups and Windows NT See Chapter 5 Using Multimedia for instructions on using this application ...

Page 49: ... your performance needs with power conservation How to Enter Setup Access Setup at power on Just press F2 when the following prompt ap pears Press Esc for Boot Messages F2 for Setup When you press F2 to enter Setup the system automatically detects current parameter settings with the Power On Self Test POST If the system detects an error during POST it prompts you with a double beep and a message P...

Page 50: ...following sections describe how to use Setup including these topics Looking at screens Using keys Checking setting system parameters C 1996 American Megatrends Inc All Rights Reserved AMIBIOS HIFLEX SETUP UTILITY VERSION 1 05 Advanced CMOS Setup Power Management Setup Peripheral Setup Change User Password Change Supervisor Password Auto Configuration with Defaults Save Settings and Exit Exit Witho...

Page 51: ...lists alternate settings Key Legend The bottom right corner of the screen These lines display the keys that move the cursor and select parameters AMIBIOS SETUP ADVANCED CMOS SETUP C 1996 American Megatrends Inc All Rights Reserved Plug and Play Aware O S NumLock at BOOT Keyboard Auto repeat Rate Keyboard Auto repeat Delay Password Check Available Options BootUp Sequence A C Auto Off 30 sec 1 2 sec...

Page 52: ...d parameters PgUp PgDn Modifies the current parameter settings F3 F4 Changes the screen color F10 Save changes and exit works only from main menu Checking Setting System Parameters See the following table for a list of parameters their factory default settings and alternate settings A description of each setting follows the table To reset all parameters to the default settings select Auto Configur...

Page 53: ...1 2 1 2 MB 5 1 4 1 44MB 3 1 2 Not Installed Disabled Enabled Int Master Auto Not Installed BIOS Defined User Defined Auto CD ROM LS 120 Int Slave Auto Not Installed BIOS Defined User Defined Auto CD ROM LS 120 Docking Station Hard Drives Enabled Disabled Enabled Ds Master Auto Not Installed BIOS Defined User Defined Auto CD ROM LS 120 DS Slave Auto Not Installed BIOS Defined User Defined Auto CD R...

Page 54: ...s Level Hard Disk Timeout Video Timeout Peripheral Timeout Audio Device Timeout Standby Timeout Auto Suspend Timeout Suspend Option Auto Save To File Panel Backlight Suspend Warning Tone Modem Ring Resume Off Longest Life 2 min 2 min ON On 4 min 10 min Suspend Enable Auto On On On Off Off Custom High Perform Longest Life Off 5 30 or 45 sec 1 2 4 6 8 10 15 min Off 30 or 45 sec 1 2 4 6 8 10 or 15 mi...

Page 55: ...4 COM2 IRQ3 COM3 IRQ4 COM4 IRQ3 Auto PnP OS Setup Disabled LPT1 LPT2 Auto PnP OS Setup Uni Directional Bi Directional EPP ECP Disabled COM2 IRQ3 COM3 IRQ9 COM4 IRQ3 Auto PnP OS Setup SIR MIR FIR Disabled IO address 220h 240h 260h 280h Auto PnP OS Setup 5 7 9 10 11 DMA 0 DMA 1 DMA 3 DMA 0 DMA 1 DMA 3 Disabled 300h 310h 320h 330h Disabled Auto PnP OS Setup Only visible when cold docked When the port...

Page 56: ...each field To set the time enter the current hour minute and second in hr min sec 24 hour format Use the Tab key to move from field to field Use the Pg Up or Pg Dn key to change the numbers within each field Drives The drives parameter let you check and change settings for your drives including internal hard drives diskette drives and CD ROM reader This parameter also lets you check the docking st...

Page 57: ...lowing NOTE Some operating systems such as Windows for Workgroups Windows 95 and Windows NT have their own power management software which overrides CMOS settings In this case be sure to set your desired power management settings accordingly Power Management Under AC Normally whenever AC power is connected to your NEC Versa system power management is disabled If you enable this parameter the syste...

Page 58: ...has occurred for the specified timeout the system will enter the selected Suspend Option Suspend Option Suspend mode is the default power management mode When you select Suspend after a specified amount of inactivity your NEC Versa shuts down all devices as specified by the user in Setup or applies default timeouts All your data is automatically recovered from where you left off when you Resume Au...

Page 59: ...e IR transfer rate Sound Sound IRQ SB compatible DMA Full duplex Mode DMA Docking Station Midi MPU 401 Select the sound parameter to user defined disabled or Auto Change ad ditional sound related items as needed Docking Station Joystick Select the parameter to Disabled Auto or Plug and Play Operating Sys tem as needed Change User Password You must set the Supervisor password first Then you can set...

Page 60: ...ces High Perform Provides best performance and good battery life Use while on the road traveling short distances Custom You decide Set power management levels according to your own needs and present environment Off Office environment using AC power See the online documentation in the Windows NEC Information group under the NEC Versa 6060 Help Center for a lengthier discussion of Power Man agement ...

Page 61: ...pend buttons simultaneously be fore you leave your NEC Versa This function initiates STF on demand NOTE When the status bar reads that there is only 3 power re maining in the system the NEC Versa automatically performs a STF STF Benefits Using STF can benefit you in the following ways When in STF there is minimum battery drain Preserves the life of your NEC Versa Saves you time When you return fro...

Page 62: ...eader the PC card slots the IR port In addition this chapter focuses on installing options expanding hard disk space and memory and if appropriate updating the system Basic In put Output System BIOS LCD When you open your NEC Versa notebook LCD you ll notice the bright ness control and speakers Slide the brightness control up to make your screen brighter Slide the brightness control down to make y...

Page 63: ...tions are described after the figure Keyboard Function keys Twelve function keys F1 through F12 are available on your NEC Versa keyboard These keys work together with the Fn key to activate special functions Six keys are preprogrammed with dual functions which are printed in blue on the key Function keys are application driven See the specific application s user guide for information about how eac...

Page 64: ...nction key combinations are pre programmed for your NEC Versa system Windows 95 keys If you have Windows 95 you can use the following two key combinations to facilitate your work Fn x Quick access to shortcut menus Fn y Display the Start menu ...

Page 65: ...n and Shift are controls used in conjunction with other keys to change their functions To use control keys press and hold the control key while pressing another key For example press Ctrl c means to hold down the Ctrl key and type the letter c How the key combination works depends on the applications you are running Typewriter keys The typewriter keys also called alphanumeric keys are used to ente...

Page 66: ...lt driver the double tap capability may be lost You will have to rein stall the VersaGlide driver located on your Restore CD to get double tap back Making VersaGlide Adjustments The NEC VersaGlide offers a number of options that let you customize how it functions with the cursor To access these options locate the Control Panel and double click on the VersaGlide icon In Windows for Work groups look...

Page 67: ... exercises to relax your fingers hands wrists forearms and shoulders See Appendix A Setting Up a Healthy Work Environment for more information NEC VERSABAY II The NEC VersaBay II is the drive bay located below the VersaGlide Your NEC Versa system ships with a standard 3 5 inch 1 44 MB diskette drive or SuperDisk LS 120 drive installed in the bay However if you choose you can remove the drive and i...

Page 68: ... dealer for details about these VersaBay II options Removing a Device from the VersaBay II Use the following steps to remove the standard diskette drive or other de vice from the VersaBay II 1 Make sure the NEC Versa is powered off or in Suspend mode all op tions are disconnected and the LCD panel is closed 2 Turn the system upside down with the front facing you 3 Locate the VersaBay II release la...

Page 69: ...5 Push the middle latch towards you until the drive pops part way out of the unit 6 Continue to hold the latch near the front of the system to the left and pull the device the rest of the way out of the system NOTE If you release the front latch before completely removing the device the device casing may catch on the inside of the latch ...

Page 70: ... model E V M or P in the Ver saBay II it becomes the master drive from which the system will boot Your system must be powered off or placed in suspend mode before remov ing or inserting devices in the VersaBay II NOTE To use a hard disk drive in the VersaBay II the drive must be connected to the appropriate adapter See the NEC Versa Tools Catalog or your authorized NEC dealer for details about the...

Page 71: ...efault setting is S Keep this default setting even if you are booting to a bootable CD ROM 3 Align the CD ROM reader in the VersaBay II and push it in until it locks into place Inserting the CD ROM reader 4 Power on the system or return from Suspend mode ...

Page 72: ...he system boots Add another hard disk drive or second Li Ion battery pack as follows 1 Remove the standard diskette drive or CD ROM reader from the Ver saBay II as described earlier steps 1 through 4 2 Prepare your option for installation as follows To install a battery pack first connect it to the bay adapter that came with the battery Follow the instructions that came with the battery pack To in...

Page 73: ... technology The CD ROM reader is assigned the next available drive letter Use the CD ROM reader to load and start programs from a compact disc CD You can also use the CD ROM reader to play your audio CDs see CD ROM Input in Chapter 5 The CD ROM readers are fully compati ble with Kodak Multisession Photo CDs and standard audio CDs The CD ROM reader operates at different speeds depending on whether ...

Page 74: ...curs To remove a disc insert the end of a paper clip into the eject hole and push in until you hear a click Now you can manually open the drawer Status LED lights during data read operations Do not eject the CD or turn off the NEC Versa when this indicator is lit CD Loading To insert a CD into the CD ROM reader follow these steps 1 Press the release button The CD tray emerges from the reader door ...

Page 75: ...ge cards For details on how to obtain these options see the online NEC Versa Tools Catalog Also for more information on PC card technology see the online Advanced Topics in the NEC Versa 6060 Help Center Inserting a PC Card To insert a PC card open the slot cover and follow these steps NOTE We recommend that you keep the PC card slot cover open when using PC cards especially if using the card in a...

Page 76: ...ot availability For example look for the SystemSoft icon on the Windows Program Manager or the PC Card icon in the Con trol Panel on Windows 95 and Windows NT operating systems It shows which slot contains a PC card and which is empty Removing a PC card from Windows for Workgroups To remove a PC card follow these steps 1 To remove a PC card press the button on the side of the slot A double tone so...

Page 77: ... that card are closed then services for that card will be shut down and you will get a message telling you it is safe to remove the card 4 Press the button on the side of the PC Card in the slot 5 Pull the card firmly out of the slot Removing a PC card from Windows NT 1 From the screen select My Computer then Control Panel 2 Select the PC Card PCMCIA icon 3 Select the PC card to remove and select ...

Page 78: ...puter or print to an IR equipped printer without using cables There are three transfer rates for the IR port on your NEC Versa FIR Fast Infrared 4 0 Mbit sec MIR Medium Infrared 1 152 Mbit sec and SIR Serial Infrared Standard 2 4 Kbit sec Windows 95 supports FIR For the infrared technology to work you need to follow these guidelines position the NEC Versa no more than three feet way from the infra...

Page 79: ...he system s storage capacity by replacing the standard hard disk drive or adding a second hard disk drive in the VersaBay II Adding a second hard disk drive is described in the section Customizing Your System with the VersaBay II NOTE NEC Versa 6060 model hard disk drives can be used in other NEC notebook computers such as the NEC Versa 2000 and 4000 Series systems However hard disk drives from ea...

Page 80: ...e cover up and off the system Removing the hard disk drive bay cover 4 Remove the hard disk drive as follows Using your fingers press down on the hard disk drive at the end clos est to the connector While maintaining pressure slide the drive towards the front of the system CAUTION Do not lift the drive out of the system before releasing it from the system connector Doing so can damage the connecto...

Page 81: ... drive is disconnected lift the drive up and out of the system Removing the hard disk drive 5 Lower the new drive into the drive bay and align its connector with the hard disk drive connector in the system Inserting the hard disk drive ...

Page 82: ...the center of the unit Gently push the cover until it snaps into place Replacing the drive bay cover 8 Turn the system over power on and run Setup to check the new configu ration Installing a Memory Module Your NEC Versa system comes standard with 16 megabytes MB of ran dom access memory RAM You can increase system memory to a maxi mum of 80 MB by installing one of the following memory modules in ...

Page 83: ... 64 MB memory module Use the following steps to install a memory module 1 Follow steps 1 through 4 in the preceding section Hard Disk to re move the hard disk drive 2 Locate the two memory module connectors in the drive bay Locating the connector ...

Page 84: ... 4 Press the module into the connectors CAUTION Only press the module directly over the connectors Pressing else where can damage the module 5 Replace the hard disk drive in the bay as follows Lower the hard disk drive into the drive bay and align its connector with the connector in the system Push the hard disk drive firmly to secure the connection ...

Page 85: ...sa Inserting the hard drive 6 Replace the cover as follows Align the tabs on the drive cover with the slots on the system chassis Slide the cover towards the center of the unit Gently push the cover until it snaps into place ...

Page 86: ...nstalled INSTALLING OPTIONS Your NEC Versa notebook provides industry standard connectors so that you can integrate the following External monitor Printers parallel and serial External keyboard External mouse External bar code scanner External audio options In addition NEC offers the following optional equipment developed to work with your NEC Versa NEC Versa Docking Station 6000 Plus ...

Page 87: ...ou can add a standard external monitor to your NEC Versa system You need a display signal cable usually provided with the monitor One end of the cable must have a 15 pin connector for the system Follow these steps to connect an external monitor to your NEC Versa sys tem 1 Check that the NEC Versa is in Suspend mode or powered off and the monitor power switch is turned off NOTE The NEC Versa must b...

Page 88: ...provided Connecting a monitor 4 Connect the monitor power cable and plug it into a properly grounded wall outlet 5 Follow any setup instructions in the monitor s user s guide 6 Turn on power to the monitor 7 Press the Suspend button to resume Active mode or power on your NEC Versa system Press the Fn F3 function key combination to toggle between the LCD CRT or simultaneous display on both ...

Page 89: ...ector NOTE When you connect a printer be sure to install the appropriate printer driver through the Windows Control Panel the Windows 95 Start menu or via the Windows NT Start menu Connect a parallel device to your NEC Versa system as follows 1 Check that both the NEC Versa and parallel device power are off 2 Open the port cover on the back of the system and locate the parallel port 3 Align and co...

Page 90: ...instructions that came with the device for more information Serial Devices To install a serial device such as a printer or an external modem you need a cable with a female 9 pin connector NOTE When you connect a printer be sure to install the appropriate printer driver through the Windows for Workgroups Control Panel the Windows 95 Start menu or via the Windows NT Start menu Follow these steps to ...

Page 91: ...stem Secure the connection with the screws provided 4 Align and connect the other end of the cable to the appropriate port on the device Secure the connections with the screws provided Connecting a serial device 5 Connect the power cable to the device and a properly grounded wall out let 6 Turn on power to the system and the device NOTE Make sure your printer is online before trying to print See t...

Page 92: ...ng information see the online NEC Versa Tools Catalog Follow these steps to connect an external keyboard mouse to your system 1 Press the Suspend button on the NEC Versa Check that the system is in Suspend mode CAUTION Make sure the NEC Versa is in Suspend mode look for the moon icon on the Status Bar or Powered off whenever you add or remove the keyboard Connecting an external keyboard to the sys...

Page 93: ... the internal keyboard will not work in this configuration NOTE For instructions on connecting an external keyboard or external mouse to a docking station see the user s guide that came with your docking station External Bar Code Scanner You can use an external bar code scanner using a PS 2 style connector with your NEC Versa system s Plug and Play feature You can still use the sys tem keyboard wh...

Page 94: ...udio ports as follows 1 Locate the audio port that you want to use 2 Plug the jack into the port on the right side of the NEC Versa Audio ports NOTE If you are using external speakers or an external microphone and experience sound distortion or feedback lower the volume Some feedback is caused by having the microphone and speakers too close to each other so moving the external audio option away fr...

Page 95: ...ation 6000 Plus User s Guide for instruc tions on connecting and using the docking station NOTE Follow the instructions for installing the NEC Versa Docking Station Software Setup Utility provided with your docking station See the user s guide that came with your docking station for detailed installation instructions NEC Versa MiniDock 6000 The NEC Versa MiniDock 6000 provides the following ports ...

Page 96: ...nal Diskette Drive Port Parallel Port Serial Port Keyboard Port Mouse Port Line Out Port DC In Port Keep the PortBar 6000 in your office connected to peripherals while you take your NEC Versa on the road See the instruction sheet that comes with the PortBar or the online Advanced Topics for details about installing and using the PortBar Floppy Disk Drive FDD Connector Kit The NEC Versa 6000 Series...

Page 97: ...OS flash memory See Updating the System BIOS to complete this procedure Switch 2 Password Override Switch The default setting is OFF For example if you forget your password and cannot access the data on your NEC Versa change the setting to ON to erase this password and requires you to enter a new one To enter a new password reset the switch to OFF and follow the in structions in Chapter 3 Using Se...

Page 98: ... upgrade you can receive a copy of the BUD by contacting the NEC Versa Diskette Fulfillment Center at 800 842 6446 or NEC Customer Service and Support 800 632 4525 Fax 508 635 4666 You can also download from NEC s BBS at 508 635 4706 You must use only the BIOS upgrade diskette for your specific model NOTE If you purchased and are using this computer outside the U S please contact a local NEC offic...

Page 99: ...BIOS Update diskette into diskette drive A 7 Power on the computer with the BUD diskette in drive A The computer boots and automatically loads the utility A message similar to the fol lowing appears The NEC BIOS Update Utility should not be used to modify the BIOS in a Versa system which is docked If your Versa is docked please exit the BIOS Update Utility power down and undock your Versa before r...

Page 100: ...ge Your system has been updated To complete the flashing procedure you should power off your system this insures proper application operation on the next power cycle 13 After reading this message power off your computer The next time you power on you will see the following message during the Power On Self Test POST CMOS Checksum Bad RUN SETUP Press F1 to Resume This message simply means the previo...

Page 101: ...les and analog audio sources This means the NEC Versa 6060 recognizes WAV MID and AVI files The system is 3D stereo Sound Blaster PRO compatible Recording All information on a computer must be stored in digital form Analog audio signals from sources such as tape cassettes or music CDs must be digitized before being recorded and stored on disk You can make recordings from two classes of audio input...

Page 102: ...or from file start with step 2 2 From Window for Workgroups open the AudioRack program group and start the AudioRack program in Windows 95 and Windows NT this is called AudioRack32 The AudioRack control panel similar to the fol lowing appears on your screen The control panel provides six different panels for Windows 95 and Windows NT Windows for Workgroups provides five panels If your control pane...

Page 103: ...details To change the sampling rates or other recording attributes go to the DAT panel and press the New button Enter recording options from the dialog box that appears 4 Go to the control panel for the device from which you plan to record For example go to the CD panel to record from CD Press the Play button If you are recording from an external device press its Play button to start the sound 5 G...

Page 104: ...als from external devices such as a tape deck a stereo CD player a docking station or a stereo tuner The Line In port has a mini type connector You may need an adapter to connect your input de vice to the NEC Versa 6060 through Line In CD ROM Input You can record music and sound effects from a CD compact disc and store them on your hard disk The audio signal from the CD ROM reader con nects direct...

Page 105: ...ess the Play button to check the portion you ve selected 3 From the Edit menu select Copy 4 Open the file where you want to add the sound clip and position your cursor where you want the clip to go 5 From the Edit menu select Paste Mix See the online help that is available with AudioRack or AudioRack 32 for more information Playing Back You can play back your recorded soundtrack through stereo hea...

Page 106: ...ing Headphones The NEC Versa 6060 headphone port delivers sound at half a watt The ste reo headphones plug in through the headphone line out jack located on the right side of the NEC Versa 6060 Adjust the volume using the audio soft ware contained on the NEC Versa 6060 If the software sets the volume to medium the knob controls volume from low to medium If software sets the volume to high the knob...

Page 107: ...layer Windows for Workgroups Your system has hardware assisted MPEG which supports full motion full screen MPEG video In Windows for Workgroups and Windows NT the Xing player gives you MPEG capabili ties in Windows 95 the Mediamatics Arcade player gives you MPEG ca pabilities Access either the Microsoft or the MPEG video player as follows 1 Open the Media Player in Accessories 2 Under Device selec...

Page 108: ...are packages include graphics packages animation software and presentation authoring systems as follows Animation software allows you to create 3 D effects and 3 D titles and add interest to an otherwise static presentation Authoring packages let you pull all the elements of your design into an exciting interactive multimedia presentation ...

Page 109: ...ou have an electrical outlet handy This saves battery power for when you really need it Take along any application or data files on diskette that you might need POWER CONNECTIONS With the right accessories you can run your NEC Versa system almost anywhere Your system self adjusts to various power sources The United States Canada and most of Central and South America use 120 volt alter nating curre...

Page 110: ...numbers for your software NEC Versa 6060 Quick Reference card AC extension cord NOTE When using a modem outside the U S and Canada you might need an international telephone adapter You can buy this at an electronics supply store Preparing Your NEC Versa for Travel Here is what you should do before you leave home NOTE Speed the trip through airport security by carrying a charged system Inspectors w...

Page 111: ...Back up your NEC Versa s hard disk Put your system into Suspend or Standby mode so you can quickly boot up at the airport security check Fully charge all your batteries Tape your business card to your NEC Versa AC adapter and batteries ...

Page 112: ...be able to solve the problem yourself PROBLEM CHECKLIST First check the items in the following list If these items don t help see the table that follows the list the computer is powered on The electrical outlet to which your AC adapter is connected is working Test the outlet by plugging in a lamp or other electrical device All cables are tightly connected The display setting is configured correctl...

Page 113: ...e due to low battery power Check the Status bar for a half moon icon Plug in the AC adapter or replace the battery pack then press the Suspend button to resume operation Battery power does not last long Change to a power saving mode Fn F7 Information on the LCD screen is difficult to see Adjust the brightness control An optional component does not work Make sure the component is securely installed...

Page 114: ...f either condition is true the system displays an invalid configuration in formation message To continue start up procedures press F2 and run the Setup utility to set current system parameters If an error message appears before the operating system starts look up the error message in the following table Follow the instructions If you see other error messages the hardware might need repair NOTE Whe...

Page 115: ...ight need repair Invalid system disk Diskette boot failure Replace the disk and then press any key Insert a bootable disk in drive A and press any other key Non system disk or disk error Replace and press any key when ready Remove the diskette from drive A and press any key to start the system from the hard disk Or insert a bootable disk in drive A and press any key Operating System Not Found or C...

Page 116: ...if the hard disk connector is seated properly If there is still a problem the hard disk might need repair Hard Disk controller failure Press F2 to start Setup Exit and save to update the parameters Check to see if the hard disk connector is seated properly The hard disk controller does not work and might need repair Keyboard controller failure Unplug external keyboard if attached and reboot the sy...

Page 117: ...lows 1 Check the Restore CD title and make sure that it is the correct CD for your operating system and NEC Versa computer 2 Put the Restore CD into the CD ROM reader tray and close the reader door 3 Reboot your computer 4 Press the cursor arrows to select the restore procedure that you need to use CAUTION Choose your restore option carefully to prevent losing data and applications installed on yo...

Page 118: ...rmatting the following must be reinstalled First the Windows NT operating system from Microsoft using the sup plied Windows NT documentation and software Second NEC supplied software any utilities drivers and applications supplied by NEC using the NEC Supplemental CD that came with your notebook The supplemental CD includes directories that contain the installation software for drivers and utiliti...

Page 119: ...days a week NOTE If you purchased and are using this product outside the U S please contact the local NEC office or their dealers for the support and service available in your country GETTING HELP NEC is ready and willing to help you with our products Here s how to reach us NOTE If you purchased and are using this product outside the U S please contact the local NEC office or their dealers for the...

Page 120: ...ing the functions of NEC products It also gives general public access to drivers for NEC products to be used with various software applications Internet Address tech support neccsd com Worldwide Web Address www neccsd com CompuServe Keyword GO NECTECH America Online Keyword NEC NEC is a member of TSANet Technical Support Alliance Network NEC WARRANTY NON WARRANTY REPAIR SERVICE Before you call for...

Page 121: ...m hardware support for a fee Before calling please have ready your system name model number serial number and purchase date Also have ready as much information as possi ble about the problem you are having including any message errors that oc curred NOTE Free technical specifications troubleshooting tips and other helpful information for out of warranty products are available through NEC FaxFlash ...

Page 122: ...hysical needs This information is based on ergonomics the science of making the workplace fit the needs of the worker Some nerve tendon and muscle disorders musculoskeletal disorders may be associated with repetitive activities improper work environments and in correct work habits Examples of musculoskeletal disorders that may be as sociated with certain forms of repetitive activities include carp...

Page 123: ...ook computer as your primary computer system at your home or office note the following recommendations use a separate external keyboard attached to your notebook computer use a separate external monitor attached to your notebook com puter ARRANGE YOUR EQUIPMENT Arrange your equipment so that you can work in a natural and relaxed posi tion Place items that you use frequently within easy reach Adjus...

Page 124: ... other adjustments discussed in this appendix are made Once all these adjustments are completed raise the armrests or adjust the forearm supports until they touch the forearms and allow the shoulder muscles to relax ADJUST YOUR INPUT DEVICES Note the following points when positioning your notebook computer or any external input devices Position your keyboard directly in front of you Avoid reaching...

Page 125: ...hould look slightly downward when viewing the middle of the screen or external monitor Position your screen or external monitor no closer than 12 inches and no further away than 28 inches from your eyes The optimal distance is be tween 14 and 18 inches Rest your eyes periodically by focusing on an object at least 20 feet away Blink often Position the screen or external monitor at a 90 angle to win...

Page 126: ...g posture periodically and keep your hands and wrists warm NOTE For more information on workstation setup see the American National Standard for Human Factors Engineering of Visual DisplayTerminal Workstations ANSI HFS Standard No 100 1988 The Human Factors Society Inc P O Box 1369 Santa Monica California 90406 PRE EXISTING CONDITIONS AND PSYCHOSOCIAL FACTORS Pre existing conditions that may cause...

Page 127: ...ver one s work Contact a doctor if you experience pain tenderness swelling burning cramping stiffness throbbing weakness soreness tingling and or numbness in the hands wrists arms shoulders neck back and or legs This appendix was prepared in consultation with Dr David Rempel of the University of California San Francisco Ergonomics Program and Mr M F Schneider of HUMANTECH Inc Ann Arbor Michigan ...

Page 128: ...ot Expandable in 8 MB 16 MB 32 MB or 64 MB increments Maximum 80 MB total Video RAM 2MB included in video chip Cache RAM L1 same for all models 32KB L2 same for all models 256KB write back Read Only Memory ROM 256KB x 8 bit Flash ROM Calendar Clock Year month day hour minute second maintained by internal back up battery Input Output I O Facilities Integrated industry standard interfaces Parallel 1...

Page 129: ...nnel Stereo Line In 1 port 3 pin Mini Pin Jack DC In 1 port for AC adapter cable Main Battery Type Lithium Ion Li Ion eight cell Output Voltage 14 4 V Capacity 2 600 mAh Battery Life Approximately 1 3 hours depending on configuration with power management features enabled Recharging Time Approximately 2 hours Speakers 2 built in 1 5 watts W each with a maximum 3W output 16 bit stereo 44 1 Khz Soun...

Page 130: ...eys arranged in inverted T layout Numeric keypad embedded Fn key function key for ROM based key functions Stroke 3 mm Diskette Drive Standard 1 44 MB drive Size 3 5 inch Capacity 1 44 MB formatted 2 MB unformatted Access Time average 94 ms Transfer Rate 250 to 500 K bps Interleave 1 1 Controller NS PC87338VJG Internal 2 5 inch removable IDE Hard Disk Drives 2 1 GB Hard Disk Drive Specifications Si...

Page 131: ...16 6 MB sec Media data rates 38 6 69 8 Μbit sec Versa Bay II SuperDisk LS 120 Drive External 3 5 inch Pack Data Transfer Rate 4MB sec Track to Track Seek Time 6 ms Formatted Capacity Optical diskette 120 MB High Density floppy diskette 1 44 MB Double Density floppy diskette 720 KB 20X speed CD ROM Reader External 5 inch CD ROM Pack Data Transfer Rate 1200 kilobytes KB second TYP Burst Transfer Rat...

Page 132: ...e an AC power cable specific to each country s standards Dimensions System Width 11 69 in 297 mm Depth 9 51 in 241 mm Height 2 17 in 55 mm Battery Pack Width 3 5 in 89 5 mm Depth 5 2 in 134 5 mm Height 0 81 in 20 7 mm Weight 7 1 lb 3 22 kg Battery Pack 1 16 lb 527 6 kg Recommended Environment Operation Temperature 41 F to 95 F 5 C to 35 C Relative Humidity 20 to 80 Noncondensing Storage Temperatur...

Page 133: ... 3 IRQ08 Real Time Clock Slave 4 IRQ09 Infrared Port Slave 5 IRQ10 USB Port Slave 6 IRQ11 PC Card Bus Controller Slave 7 IRQ12 PS 2 Mouse Slave 8 IRQ13 Math Coprocessor in CPU Slave 9 IRQ14 Hard Disk Controller Slave 10 IRQ15 IDE DS MD6000 or PC Card in MD6000 Master 11 IRQ03 Not used Available Master 12 IRQ04 Serial Port Master 13 IRQ05 Sound Master 14 IRQ06 Floppy Disk Master 15 IRQ07 Parallel P...

Page 134: ...application programs Software designed to perform specific functions like solving business or mathematical problems audio The range of frequencies that humans hear B base RAM Area of system memory between 0 and 640 kilobytes available to the user for operating system and application programs BIOS Basic Input Output System A collection of primary computer routines stored in ROM that controls the re...

Page 135: ...rd Bus offers wider and faster 32 bit bus and bus mastering operation for im proved adapter performance and can operate at speeds up to 32 MHz CD audio Also called digital audio uses the same format as conventional music CDs CD audio sounds have been digitized at a high sampling rate CD ROM reader A computer controlled device that reads high capacity optical discs and sends the output to the compu...

Page 136: ...here the next entered data appears D default A value option or setting that the computer automatically selects unless you direct it otherwise diskette A thin flexible platter coated with a magnetic material for storing informa tion diskette drive A magnetic drive that writes on and retrieves data from a diskette digital audio Recorded sounds such as speech and sound effects These are played back b...

Page 137: ...r systems must be designed to take advantage of this per formance increase EDO offers enhanced VGA A video interface that offers more colors or higher resolution than VGA extended RAM The area of RAM above the first megabyte of memory in the system avail able for enhancing system performance enhanced parallel port EPP A parallel port standard that provides faster data processing It also supports b...

Page 138: ...eve greater storage capacity than normal floppy disks without sacrificing access speeds FM synthesis A technique for synthesizing sound that uses a combination of modulated sine waves to produce different waveforms function key The set of keys on the keyboard usually F1 through F12 that let you get help and error message information or quickly select frequently used com mands H hard disk A rigid m...

Page 139: ...chnology A method of transmitting data from one device to another without using ca bles The data is transmitted using infrared light waves interface A connection that enables two devices to communicate interrupt A special control signal from an I O device that diverts the attention of the microprocessor from the program to a special address K kilobyte KB 1024 bytes L LAN Local Area Network LCD Liq...

Page 140: ...rared mode sends data at 1 152 Mbit second 1 152 000 bits per second MIDI Musical Instrument Digital Interface A standard serial bus digital interface designed to connect electronic musical devices MIDI has no innate sound of its own MMX The latest design in multimedia processors for enhancing audio video and other multimedia applications Intel s MMX is a set of 57 instructions added to the Pentiu...

Page 141: ...in the Versa is a complementary metal oxide semiconductor CMOS chip which is backed up by an internal battery The backup battery preserves the clock calendar data and system configuration parameters stored in CMOS See volatile memory O operating system Set of programs that manage the overall operation of the computer Optical diskette A storage medium from which data is read and to which it is writ...

Page 142: ...rage cards and wireless communications devices Also called PCMCIA Card PCI local bus The 32 bit industry standard PCI bus is a highly integrated input output I O interface that offers the highest performance local bus available for the Pentium based processor PCMCIA A credit card sized peripheral interface standard for portable devices Types of PCMCIA cards currently offered by major vendors inclu...

Page 143: ...ce into which data is entered and from which data is retrieved in a nonsequential manner read To extract data from a storage device such as a diskette ROM Read Only Memory Memory in which stored data cannot be modified by the user except under special conditions reset The process of returning a device to zero or to an initial or arbitrarily se lected condition resolution The degree of screen image...

Page 144: ...ond 2 400 to 115 200 bits per second software Programs that run on a computer such as operating systems word processors and spreadsheets suspend mode This is a power savings mode that promotes longer battery and system life The system pauses and shuts down operation in a sleep like state after a specified amount of system inactivity Press the Resume button to return to the point where you left off...

Page 145: ...ely replace serial and parallel ports V VGA Video Graphics Array Graphics technology that supports up to 256 colors and a graphics resolution of 640 by 480 pixels volatile memory Storage media that loses its data when system power is turned off Standard memory and memory that you add to the Versa are volatile memory See nonvolatile memory W warm boot Process of resetting the computer without turni...

Page 146: ...Glossary 13 waveform A graphic representation of a sound wave as displayed on an oscilloscope which converts sound waves into electronic signals write To record or store information to a storage device ...

Page 147: ...EC Versa 1 28 CMOS battery 1 27 Customer Support Guide 2 6 Customize icon 2 3 2 7 D DC car adapter 1 25 Docking station 6000 4 34 E Entering setup 3 1 Expansion port 1 10 External audio options 4 33 External bar code scanner 4 32 F Fan 1 13 FDD connector option 4 35 Function key combinations 4 3 H Hard disk drive bay 1 12 1 14 Headphones 1 12 I Increasing system memory adding a memory module 4 22 ...

Page 148: ...5 NEC VersaBay II 1 7 NEC VersaBay II release latches 1 14 O Online documentation 1 1 Online help NEC Versa 6060 Help Center 2 5 Online information group questions and answers 7 1 Operating systems MS DOS 2 5 Windows 95 2 2 Windows for Workgroups 2 4 Optional battery charger 1 18 Options catalog 1 18 P Parallel port 1 10 PC card inserting a card 4 14 slots 4 14 Pentium microprocessor 1 2 Periphera...

Page 149: ... 4 Suspend mode 6 3 Switch settings 4 36 System care 1 26 System date 3 8 System features IR port 1 8 left side 1 11 microphone 1 8 System software 2 1 System time 3 8 T Technical support inside U S 7 8 outside U S 7 8 Technical support center TSC 7 8 Traveling checklist 6 2 Traveling with your system 6 1 U UltraCare Guide 2 6 Updating the BIOS 4 37 Using LCD panel controls 4 1 Using the battery p...

Page 150: ...s instructions ATTENTION Il y a danger d explosion s il y a replacement incorrect de la batterie Remplacer uniquement avec une batterie du même type ou d un type recommandé par le constructeur Mettre au rébut les batteries usagées conformément aux instructions du fabricant BATTERY DISPOSAL The main battery and CMOS clock battery are made of Lithium Ion Li Ion Your bridge battery not the main batte...

Page 151: ...ns However there is no guarantee that interference will not occur in a particular installa tion If this equipment does cause harmful interference to radio or television reception which can be determined by turning the equipment off and on the user is encouraged to try to correct the interference by one or more of the following measures Reorient or relocate the receiving antenna Increase the separa...

Reviews: