background image

29

Option3 Settings Menu

Using the timer

This function sets the monitor to turn ON/OFF
automatically at a set time.

Set “ADVANCED OSM” to “ON” in the main menu (1/
2), then perform the following operations.

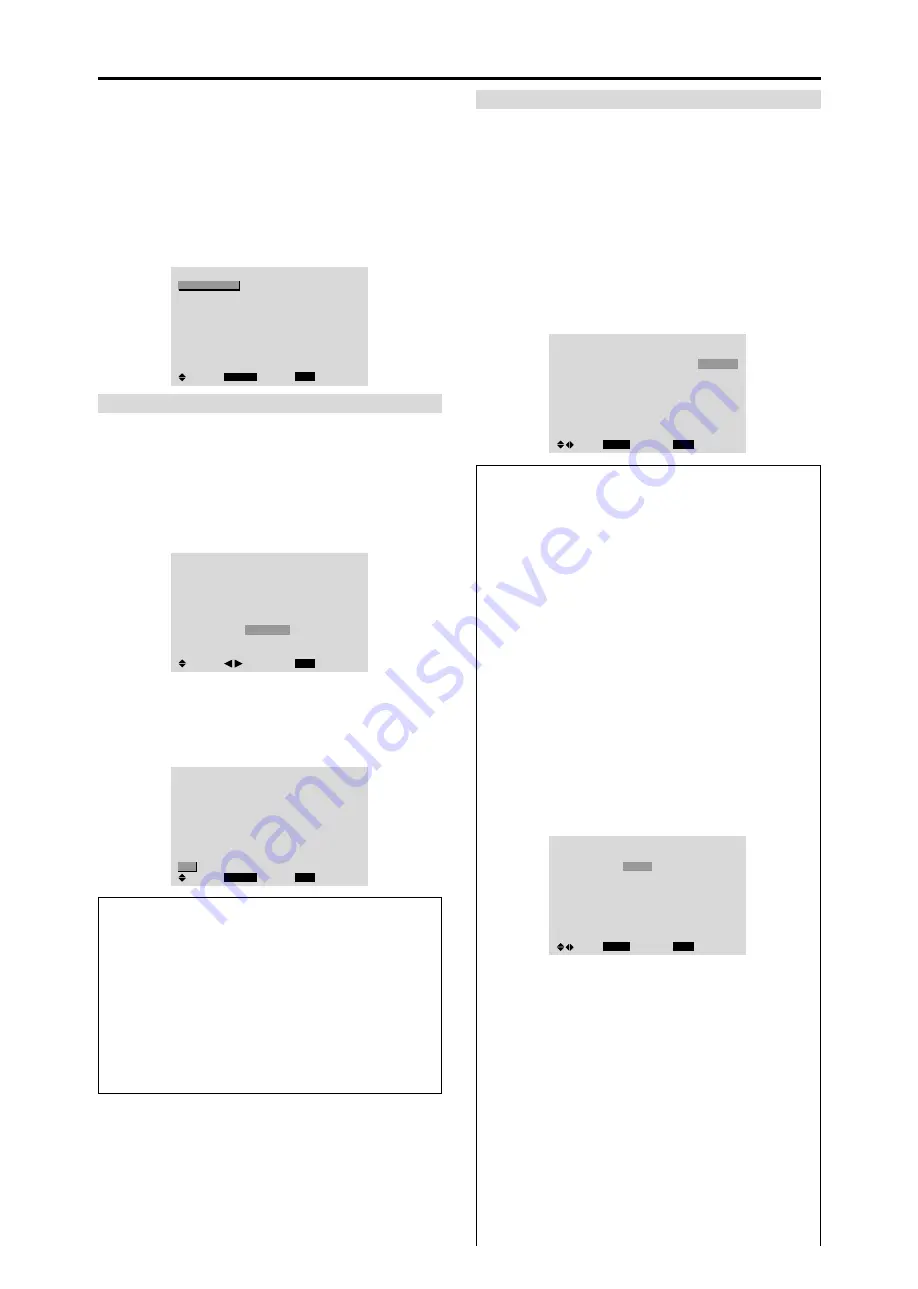
On “OPTION3” menu, select “TIMER”, then press the
MENU/ENTER button.
The “TIMER” screen appears.

TIMER

EXIT

PRESENT TIME

PROGRAM

MULTI REPEAT

:     OFF

:     OFF

SEL.

RETURN

MENU/ENTER

OK

PRESENT TIME

This sets the day of the week and present time.

Example: Setting “WEDNESDAY”, “22:05”

On “TIMER” menu, select “PRESENT TIME”, then press
the MENU/ENTER button.
The “PRESENT TIME” screen appears.
Adjust the items.

EXIT

SEL.

RETURN

PRESENT TIME

WEDNESDAY

22 : 05 : 00

RETURN

DAYLIGHT 

   SAVING TIME

:     OFF

ADJ.

Select “SET”, then press the MENU/ENTER button.
The adjustments are stored and return to the TIMER menu.
* If you press the EXIT button instead of the MENU/ENTER

button, the settings can not be made.

EXIT

SEL.

RETURN

PRESENT TIME

WEDNESDAY

22 : 05 : 00

:     OFF

MENU/ENTER

OK

RETURN

DAYLIGHT 

   SAVING TIME

SET

Information

 PRESENT TIME settings

DAYLIGHT SAVING TIME:

 Use to set DAYLIGHT

SAVING TIME.
ON:

The present time + 1 hour.

OFF: Cancelled

Day:

 Set the day of the week (e.g. Sunday).

Hour:

 Set the hour in the 24-hour format (range 00 to

23).

Minutes:

 Set the minutes (range 00 to 59).

PROGRAM TIMER

This sets the day and time at which the power will be
switched ON/OFF as well as the input mode.

Example: Setting so that the power will be switched
on at 8:30 A.M., Monday, displaying RGB2 source,
and switched off at 10:30 A.M.

On “PROGRAM” of “TIMER” menu, select “ON”, then
press the MENU/ENTER button.
The “PROGRAM TIMER” screen appears.
Adjust the items.
Each mode switches each time the ZOOM 

/

 button is

pressed.

PROGRAM TIMER

EXIT

DATE

MON

SEL.

RETURN

ADJ.

ZOOM

ON

08 : 30

- - : - -


- - : - -


- - : - -


- - : - -


- - : - -


- - : - -


OFF

10 : 30

- - : - -


- - : - -


- - : - -


- - : - -


- - : - -


- - : - -

INPUT

RGB2

FUNCTION

INVERSE

Information

 PROGRAM TIMER settings

DATE:

 Set the day of the week (e.g. Sunday).

ON (hour, minutes):

 Set the time at which the power

will be turned on in the 24-hour format.

OFF (hour, minutes):

 Set the time at which the power

will be turned off in the 24-hour format.

INPUT:

 Set the input mode that will be displayed when

the timer is on.

FUNCTION:

 Set the LONG LIFE function.

 To reset the program

Align the cursor with the DATE field that you wish to
reset, then press the CLEAR/SEAMLESS SW button.

 To reset the data

Align the cursor with the field (ON/OFF/INPUT/
FUNCTION) that you wish to reset, then press the
CLEAR/SEAMLESS SW button.

 Special characters in the PROGRAM TIMER

screen

PROGRAM TIMER

EXIT

DATE

MON

TUE

SAT

*

FRI

SAT

*

SEL.

RETURN

ADJ.

ZOOM

ON

08 : 30

- - : - -


08 : 30

08 : 30

- - : - -


08 : 30

15 : 30

OFF

10 : 30

18 : 15

12 : 15

10 : 00

- - : - -


12 : 15

16 : 00

INPUT

RGB2

VIDEO1

HD/DVD1

VIDEO1

RGB1

FUNCTION

INVERSE

WHITE

WHITE

• An asterisk “

*

” in the DATE field

An asterisk “*” means “every”. For example, “*FRI”
means every Friday and “*” means everyday.

• A hyphen “

-

” in the ON field or OFF field

If any hyphen remains in the ON field or OFF field, the
FUNCTION can not be set.

• A hyphen “

-

” in the FUNCTION field

A hyphen “-” means last mode (the mode that was last
selected at the time the power was switched off).

 To set MULTI INPUT

• Set the INPUT button to “MULTI”, then press the

MENU/ENTER button.
The “MULTI SCREEN SETTING” will appear on
the screen.

Summary of Contents for PlasmaSync PX-61XM3A

Page 1: ...PlasmaSync Plasma Monitor NEC Solutions America Inc Operation Manual Enhanced split screen Model For the specifications of your plasma monitor refer to Model Information...

Page 2: ...ord during electrical storms or if the unit will not be used over a long period 6 Do not open the cabinet which has potentially dangerous high voltage components inside If the unit is damaged in this...

Page 3: ...SI NE PAS UTILISER LA FICHE POLARISEE AVEC UN PROLONGATEUR OU UNE AUTRE PRISE DE COURANT SAUF SI CES LAMES PEUVENT ETRE INSEREES A FOND NE PAS OUVRIR LE COFFRET DES COMPOSANTS HAUTETENSION SETROUVENT...

Page 4: ...edecessurfaces 2 Nettoyer les prises d a ration du plasma en proc dant l aide d une brosse poils doux fix e un aspirateur 3 Pour garantir la bonne ventilation du moniteur nettoyer les prises d air tou...

Page 5: ...ng transmitted to RGB1 terminal 23 Setting a computer image to the correct RGB select screen 23 Setting high definition images to the suitable screen size 24 Setting the Input Skip 24 Resetting to the...

Page 6: ...the equipment or injury to the installer Product warranty does not cover damage caused by improper installation Use only the mounting kit or stand provided by manufacturer and listed under Options Dra...

Page 7: ...imaly 4 screen is rough standard with lower than 1024 768 60Hz signal A distribution amplifier is particularly recommended when using 9 screen and over video wall From the second monitor onward connec...

Page 8: ...trol within a distance of about 7 m 23ft from the front of the monitor s remote control sensor andathorizontalandverticalanglesofuptoapproximately 30 The remote control operation may not function if t...

Page 9: ...n the On Screen Menu OSM mode Front View MENU ENTER INPUTSELECT DOWN UP LEFT RIGHT EXIT VOLUME MENU ENTER INPUTSELECT DOWN UP LEFT RIGHT EXIT VOLUME 4 5 6 7 1 3 2 t LEFT and RIGHT Enlarges or reduces...

Page 10: ...Discs etc here This input can be set for use with an RGB or component source see page 23 G RGB1 mini D Sub 15pin Connect an analog RGB signal from a computer etc here This input can be used for Input...

Page 11: ...settings on the screen 4 OFF TIMER Activates the off timer for the unit 5 SIDE BY SIDE Press this button to show a couple of pictures in the side by side mode 6 PICTURE IN PICTURE Press this button t...

Page 12: ...agnifying glass A press of the ZOOM button will reduce the picture and return it to its original size To change the picture position Select the position with the buttons 2 Press the POINTER button to...

Page 13: ...rections at different ratios Use this for watching normal video programs 4 3 with a wide screen ZOOM size screen The picture is expanded in the horizontal and vertical direction maintaining the origin...

Page 14: ...are registered trademarks of IBM Inc of the United States Note Do not allow the displayed in 4 3 mode for an extended period This can cause a phosphor burn in Wide Screen Operation with Computer Sign...

Page 15: ...ending on the combination of input signals In the table below means Yes means No Split screen operations may not function depending on the type of the RGB signals VIDEO1 VIDEO2 VIDEO3 HD DVD1 HD DVD2...

Page 16: ...n also be used to change the selection Zooming up pictures 1 Press the SELECT FREEZE button to make the desired picture active 2 Use the POINTER button and the ZOOM button to enlage the picture For de...

Page 17: ...tton on the remote control to select a sub menu or item PICTURE 1 2 EXIT CONTRAST BRIGHTNESS SHARPNESS COLOR TINT PICTURE MODE NR NEXT PAGE NORMAL OFF SEL RETURN ADJ 4 Adjust the level or change the s...

Page 18: ...NPUT1 VIDEO 1 3 HD DVD 1 2 RGB 1 3 YES 22 AUDIO INPUT2 VIDEO 1 3 HD DVD 1 2 RGB 1 3 YES 22 AUDIO INPUT3 VIDEO 1 3 HD DVD 1 2 RGB 1 3 YES 22 Main menu Sub menu Sub menu 2 Sub menu 3 Sub menu 4 RESET RE...

Page 19: ...N YES 31 LOOP OUT OFF ON YES 31 ID NUMBER ALL 1 256 YES 31 VIDEO WALL DIVIDER OFF 1 4 9 YES 32 POSITION No 1 No 4 No 7 No 15 No 16 No 31 No 32 No 56 32 DISP MODE SPLIT BLANK YES 32 AUTO ID OFF ON YES...

Page 20: ...TURN ADJ PICTURE MODE THEAT 1 Information Types of picture modes THEAT 1 2 Set this mode when watching video in a dark room This mode provides darker finer pictures like the screen in movie theaters F...

Page 21: ...s darker as the number increases in the sequence of 1 2 3 4 Making the Low Tone adjustments This feature allows more detailed tone to be reproduced especially in the dark area Example Setting 2 Set AD...

Page 22: ...e switches as follows each time the or button is pressed NORMAL FULL The mode can also be switched by pressing the WIDE button on the remote control The settings on the IMAGEADJUST menu are not preset...

Page 23: ...mation BNC INPUT Settings RGB Use the 5BNC terminals for RGB input COMP Use the 3BNC terminals for component input OPTION1 1 4 EXIT OSM BNC INPUT D SUB INPUT RGB SELECT HD SELECT INPUT SKIP ALL RESET...

Page 24: ...of the signal scan and display all signals ON If no input signal is present skip that signal SETTING NOW will appear during the input search WIDE1 When an 852 dot 480 line signal with a horizontal fre...

Page 25: ...ment operating status Not activated Activated Description Horizontal and vertical synchronizing signals are present from the computer Horizontal and or vertical synchronizing signals are not sent from...

Page 26: ...erval of 1 5 minutes 1 horizontal dot or 1 vertical line per interval INVERSE Use this to set the inverse mode or to display a white screen Example Setting INVERSE to WHITE On INVERSE of LONG LIFE men...

Page 27: ...ot be set when the WORKING TIME is ON THE WORKINGTIME and WAITINGTIME can be set for up to 12 hours and 45 minutes in units of 3 minutes To select ON for the WORKING TIME Set the hours of the working...

Page 28: ...RETURN ADJ Setting CloseCaption Choose the closed caption mode that allows text to be superimposed on display Example Setting CLOSECAPTION to CC2 Set ADVANCED OSM to ON in the main menu 1 2 then perfo...

Page 29: ...0 A M On PROGRAM of TIMER menu select ON then press the MENU ENTER button The PROGRAM TIMER screen appears Adjust the items Each mode switches each time the ZOOM button is pressed PROGRAM TIMER EXIT D...

Page 30: ...or SUB for PICTURE IN PICTURE BTM LFT TOP LFT and LEFT or RIGHT for S BY S1 3 Only one signal is selected for SINGLE The two repeat timers run consecutively i e Timer1 Timer2 Timer1 Timer2 When both...

Page 31: ...the ID number for the remote control Example Setting 2 Press the ID SELECT button on the remote control The ID SELECT screen appears On ID NUMBER of ID SELECT menu select 2 ID SELECT POSITION 1 EXIT 2...

Page 32: ...lay 1 Display 2 Display 4 Display 3 OFF Disables Auto ID function DISP MODE Select the screen mode from between two options Splitting Blanking Example Setting BLANK On DISP MODE of VIDEO WALL menu sel...

Page 33: ...cted Example Adjusting the vertical position On VIDEOWALL menu select IMAGEADJUST then press the MENU ENTER button The IMAGE ADJUST screen appears On V POSITION of IMAGEADJUST menu adjust the position...

Page 34: ...ANCED OSM to ON in the main menu 1 2 then perform the following operations On ZOOM NAV of OPTION4 menu select S BY S OPTION4 4 4 EXIT PREVIOUS PAGE SUB P DETECT ZOOM NAV PIC FREEZE SEAMLESS SW SELECT1...

Page 35: ...ire image on the sub screen S BY S Will show the entire image on the sub screen of side by side mode BTM LFT TOP LFT Will show the entire image on the sub screen of picture in picture mode Displaying...

Page 36: ...etc On MAIN MENU select SOURCE INFORMATION then press the MENU ENTER button The SOURCE INFORMATION is displayed SOURCE INFORMATION EXIT H FREQ V FREQ H POLARITY V POLARITY MEMORY RESOLUTION 48 4KHZ 6...

Page 37: ...H 01H 01H 82H OFF DFH 80H 60H C1H 01H 02H 83H Note Contact your local dealer for a full list of the External Control Codes if needed 1 5 9 6 2 3 4 7 8 Communication Parameters 1 Communication system A...

Page 38: ...r or colors are weak Nothing appears on screen Part of picture is cut off or picture is not centered Image is too large or too small Picture is unstable POWER STANDBY indicator is lighted in red POWER...

Page 39: ...ial technical adjustments set up including adjustment of user controls These costs are the responsibility of the NEC Solutions dealer from whom the product was purchased 3 Shipping charges HOW YOU CAN...

Page 40: ...Printed on recycled paper Printed in Japan 7S801381 NEC Solutions America Inc 1250 N Arlington Heights Road Suite 400 Itasca Illinois 60143 1248...

Reviews: