background image

25

3. Projecting an Image (Basic Operation)

SOURCE

AUTO

ADJ.

ON/STAND BY

FOCUS

LAMP
STATUS

POWER

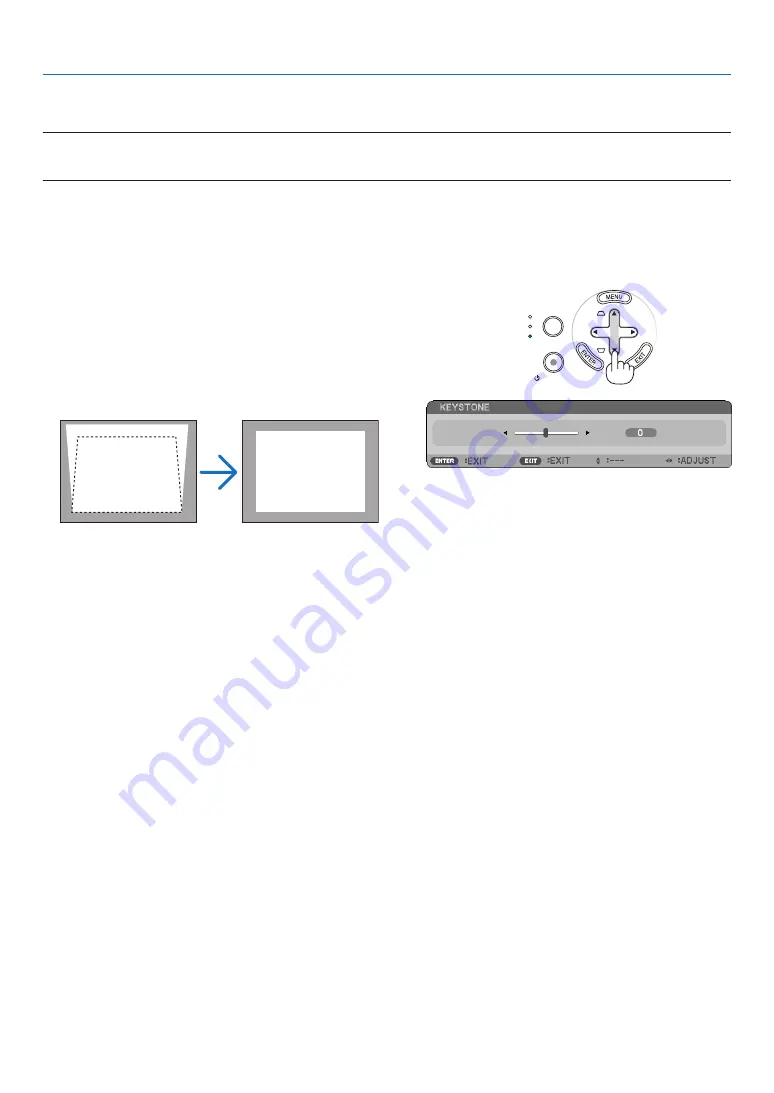
 Correcting Keystone Distortion Manually

You can also correct the vertical keystone distortion manually.

NOTE:

•  Keystone correction by using the 

/

 button is not possible when [VIEWER] is selected for the source.

•  The vertical keystone angle can be corrected between 40 degrees upward and 40 degrees downward from level.

Adjust the keystone distortion manually in the following cases:

•  To fine tune Keystone correction even after performing the [AUTO KEYSTONE] adjustment
•  When the menu setting for [AUTO KEYSTONE] is turned off

Adjusting with buttons on the cabinet

1.  Press the 

 or 

 button with no menus displayed.

  The slide bar will be displayed for your adjustment.

2. Use the 

 or 

 to correct the keystone distortion.

  Adjust so that the right and left sides are parallel.

3. Press the EXIT button.

  The slide bar will be closed.

Summary of Contents for NP43 Series

Page 1: ...ated on the projector s label is NP64 NP43 NP63G NP54G and NP43G respectively All the models are referred to as NP64 NP63 NP54 and NP43 throughout the user s manual except some of the specification pages The NP63 and NP54 are not distributed in North America The NP64G is not distributed ...

Page 2: ...ed in this user s manual may be the trademarks or registered trade marks of their respective holders The Bluetooth registered trademark is owned by Bluetooth SIG Inc Contains the software UBQ Blue Bluetooth protocol stack 2 0 EDR QD ID B010586 from Canon i tech Inc Canon Information Technologies Philippines Inc NOTES 1 The contents of this user s manual may not be reprinted in part or whole withou...

Page 3: ... Compliance Notice for Canada only This Class B digital apparatus meets all requirements of the Canadian Interference Causing Equipment Regula tions Machine Noise Information Regulation 3 GPSGV The highest sound pressure level is less than 70 dB A in accordance with EN ISO 7779 Disposing of your used product WARNING TO CALIFORNIA RESIDENTS Handling the cables supplied with this product will expose...

Page 4: ...erent from that to which the receiver is connected Consult the dealer or an experienced radio TV technician for help For UK only In UK a BS approved power cable with moulded plug has a Black five Amps fuse installed for use with this equipment If a power cable is not supplied with this equipment please contact your supplier Important Safeguards These safety instructions are to ensure the long life...

Page 5: ...r is on Serious damage to your eyes could result Keep any items such as magnifying glass out of the light path of the projector The light being projected from the lens is extensive therefore any kind of abnormal objects that can redirect light coming out of the lens can cause unpredictable outcome such as fire or injury to the eyes Do not place any objects which are easily affected by heat in fron...

Page 6: ...not send the projector in the soft case by parcel delivery service or cargo shipment The projector inside the soft case could be damaged Select HIGH in Fan mode if you continue to use the projector for consecutive days From the menu select SETUP OPTIONS 1 FAN MODE HIGH Do not turn off the AC power for 60 seconds after the lamp is turned on and while the POWER indicator is blink ing green Doing so ...

Page 7: ...ts could fall if the lamp has been burned out Note for US Residents The lamp in this product contains mercury Please dispose according to Local State or Fed eral Laws About High Altitude mode Set FAN MODE to HIGH ALTITUDE when using the projector at altitudes approximately 5000 feet 1500 meters or higher Using the projector at altitudes approximately 5000 feet 1500 meters or higher without setting...

Page 8: ... DVD Player with Component Output 13 Connecting Your VCR 14 Connecting the Supplied Power Cable 15 3 Projecting an Image Basic Operation 16 Turning on the Projector 16 Note on Startup screen Menu Language Select screen 17 Selecting a Source 18 Adjusting the Picture Size and Position 20 Adjusting Focus Manually 24 Correcting Keystone Distortion Manually 25 Optimizing RGB Picture Automatically 27 Ad...

Page 9: ... NP54 56 Menu Descriptions Functions ADJUST 57 BASIC 57 IMAGE OPTIONS 60 Menu Descriptions Functions SETUP 64 GENERAL 64 MENU 66 INSTALLATION 68 OPTIONS 1 71 OPTIONS 2 72 Menu Descriptions Functions INFO 75 USAGE TIME 75 SOURCE 76 VERSION 76 Menu Descriptions Functions RESET 77 7 Maintenance 78 Cleaning the Lens and Focus Sensor 78 Cleaning the Cabinet 78 Replacing the Lamp and the Cooling Pump 79...

Page 10: ...ignal cable 7N520073 NEC Projector CD ROM User s manual 7N951461 Quick Setup Guide 7N8N0711 Important Infomation For North America 7N8N0651 For Other countries than North America 7N8N0651 and 7N8N0661 1 Introduction Remote control 7N900881 Batteries AAA 2 Soft case 24BS7901 For North America only Registration card Limited warranty For customers in Europe You will find our current valid Guarantee P...

Page 11: ...will show energy saving effect in terms of CO2 emission reduction kg when the projector s ECO MODE is set to ON The amount of CO2 emission reduction will be displayed in the confirmation message at the time of power off and in the INFO page of the on screen menu AUTO FOCUS function When you turn on the power change the zoom or reposition the projector the AUTO FOCUS function will work instantly Th...

Page 12: ...essly from your computers or mobile phones with Bluetooth wireless technology to the projector See the list of countries and areas supported by the optional Bluetooth USB adaptor NP01BA on page 38 About this user s manual The fastest way to get started is to take your time and do everything right the first time Take a few minutes now to review the user s manual This may save you time later on At t...

Page 13: ...Tilt Foot page 21 Remote Sensor page 8 Front Top AC Input Connect the supplied power cable s three pin plug here and plug the other end into an active wall outlet page 15 Terminal Panel page 6 Rear This security slot supports the MicroSaver Security System Ventilation outlet Heated air is exhausted from here Focus Sensor page 22 Ventilation inlet Ventilation inlet Speaker ...

Page 14: ... function Closing the lens cover will turn off the image and sound dur ing normal projector operation opening it will restore the image and sound With the lens cover closed the image and sound is turned off however the lamp is still lit If the projector stays this way for about 2 hours it will turn off automatically Do not pull the lens cover with excessive force or apply strong pressure in either...

Page 15: ...ack Stereo Mini page 12 13 14 5 PC CONTROL Port Mini DIN 8 Pin page 91 Use this port to connect a PC or control system This enables you to control the projector using se rial communication protocol If you are writing your own program typical PC control codes are on page 91 6 USB Port Type A Inserting a commercially available USB memory al lows you to view images stored in the USB memory page 41 In...

Page 16: ...0 12 Numeric Keypad Button CLEAR Button page 70 13 FREEZE Button page 30 14 AV MUTE Button page 30 15 MENU Button page 52 16 EXIT Button page 52 17 Button page 52 18 ENTER Button page 52 19 MAGNIFY Button page 30 20 MOUSE L CLICK Button page 36 37 21 MOUSE R CLICK Button page 36 37 22 PAGE Button page 36 37 23 ECO MODE Button page 31 24 KEYSTONE Button page 26 25 PICTURE Button page 57 59 26 VOL B...

Page 17: ...trol Battery Installation Remote sensor on projector cabinet Remote control 22 feet 7 m The infrared signal operates by line of sight up to a distance of about 22 feet 7 m and within a 60 degree angle of the remote sensor on the projector cabinet The projector will not respond if there are objects between the remote control and the sensor or if strong light falls on the sensor Weak batteries will ...

Page 18: ... cables are disconnected before moving the projector When moving the projector or when it is not in use cover the lens with the sliding lens cover D i s t a n c e U n i t m i n c h Lens center Screen Size diagonal inch Screen Size Unit cm inch 609 6 W 457 2 H 240 W 180 H 487 7 W 365 8 H 192 W 144 H 406 4 W 304 8 H 160 W 120 H 365 8 W 274 3 H 144 W 108 H 304 8 W 228 6 H 120 W 90 H 243 8 W 182 9 H 9...

Page 19: ...2 3 Screen Size B C D α Diagonal Diagonal Width Height wide tele wide tele inch mm mm mm mm mm mm degree 33 838 671 503 321 1440 70 12 6 40 1016 813 610 390 1450 1760 85 15 0 12 5 60 1524 1219 914 584 2200 2660 127 14 9 12 4 67 1702 1361 1021 653 2460 2970 142 14 9 12 4 72 1829 1463 1097 701 2640 3200 153 14 9 12 4 80 2032 1626 1219 779 2940 3560 169 14 8 12 3 84 2134 1707 1280 818 3090 3740 178 1...

Page 20: ...o 104 F 35 C to 40 C Note that ECO mode will be selected automatically at 86 F to 104 F 30 C to 40 C when used in HIGH ALTITUDE Do not expose the projector to moisture dust or smoke This will harm the screen image Ensure that you have adequate ventilation around your projector so heat can dissipate Do not cover the vents on the side or the front of the projector Reflecting the Image Using a mirror...

Page 21: ...b 15 pin connector on the projector It is recommended that you use a commercially avail able distribution amplifier if con necting a signal cable longer than the cable supplied IBM VGA or Compatibles Notebook type or Macintosh Notebook type NOTE Before connecting an audio cable to the headphone jack of a computer adjust the computer s volume level to low After con necting the projector to the comp...

Page 22: ...about your DVD player s video output requirements Connecting Your DVD Player with Component Output Use audio equipment for stereo sound The projector s built in speaker is monaural DVD player Audio Equipment Optional 15 pin to RCA female 3 cable ADP CV1E Component video RCA 3 cable not supplied Audio cable not supplied Stereo mini plug to RCA audio cable not supplied ...

Page 23: ...ble not supplied VCR Audio equipment Audio cable not supplied NOTE Refer to your VCR owner s manual for more information about your equipment s video output requirements NOTE An image may not be displayed correctly when a Video or S Video source is played back in fast forward or fast rewind via a scan converter TIP The AUDIO IN Mini Jack Stereo Mini is shared between COMPUTER VIDEO and S VIDEO inp...

Page 24: ... outlet The projector will go into standby mode When in standby mode the POWER indicator will light orange and the STATUS indicator will light green when NORMAL is selected for STANDBY MODE CAUTION Parts of the projector may become temporarily heated if the AC power supply is disconnected either during normal projector operation or during cooling fan operation Use caution when picking up the proje...

Page 25: ...POWER indicator will turn to green and the projec tor will become ready to use TIP Turning on the projector will instantly cause the AUTO FOCUS function to operate page 22 When the message CONTROL PANEL LOCK IS TURNED ON is displayed it means that the CONTROL PANEL LOCK is turned on page 68 After you turn on your projector ensure that the com puter or video source is turned on and that the lens co...

Page 26: ...n the projector will not turn on to protect the internal system If this happens wait for the projector s internal components to cool down When the lamp reaches its end of usable life the projector will not turn on If this happens replace the lamp If the lamp fails to light and if the STATUS indicator flashes on and off in a cycle of six times wait a full minute and then turn on the power The proje...

Page 27: ... the operation 2 Press the button a few times quickly to select a signal you want to display Each time the button is pressed each source name will be highlight ed in sequence The selected signal will be displayed TIP Detecting the Signal Automatically Press and hold the button for a minimum of 2 seconds the projector will search for the next available input source Detecting the signal automaticall...

Page 28: ... will be dis played page 74 5 Select a source as the default source and press the ENTER button NOTE To specify VIEWER as the default source on the NP64 or NP54 select VIEWER from the DEFAULT SOURCE SELECT screen and press the ENTER button because detecting the signal automatically is not available for the Viewer source on the NP64 and NP54 6 Press the EXIT button a few times to close the menu 7 Re...

Page 29: ...e on the screen page 22 Adjusting the Picture Size and Position Automatic Operation AUTO FOCUS Just placing the projector on a flat level surface makes a fo cused image page 22 TIP If the projected image is distorted horizontally move the projec tor left or right to center the image horizontally on the screen AUTO KEYSTONE Correction Adjusting the height of a projected image or changing the projec...

Page 30: ...sult in the AUTO KEYSTONE function quickly correcting the vertical distortion page 23 The tilt foot can be extended up to 0 98 inch 25 mm There is approximately 10 degrees up of adjustment for the front of the projector Adjustable Tilt Foot Adjustable Tilt Foot Button Ventilation outlet CAUTION Do not use the tilt foot for purposes other than originally intended Misuses such as using the tilt foot...

Page 31: ...ze inch Tele Zoom at min Wide Zoom at max Minimum distance 57 1 1 5 m 33 40 Maximum distance 216 5 5 5 m 123 149 When the throw distance is beyond 5 5 m 216 5 it means that the focus sensor will not work correctly and that you need to use the FOCUS button to adjust the focus manually NOTE In some cases the AUTO FOCUS may not work correctly or the AUTO FOCUS range can be made narrower depending on ...

Page 32: ...projection angle during projection The left and right or horizontal keystone distortion is not available Place the projector so that the lens surface is parallel to the screen Also adjust the height to keep the projector level by rotating the rear feet TIP To turn off the AUTO KEYSTONE function from the menu select SETUP GENERAL AUTO KEYSTONE and select OFF page 64 Even when the menu setting for A...

Page 33: ...l 1 Press the FOCUS button quickly The focus adjustment screen will be displayed The focus adjustment screen will be closed if no button operation is made for 5 seconds TIP If the projector is placed within the effective focus range pressing and holding the FOCUS for a minimum of 2 seconds starts the AUTO FOCUS func tion 2 Press the or button to adjust the focus 3 Press the EXIT button The focus a...

Page 34: ...een 40 degrees upward and 40 degrees downward from level Adjust the keystone distortion manually in the following cases To fine tune Keystone correction even after performing the AUTO KEYSTONE adjustment When the menu setting for AUTO KEYSTONE is turned off Adjusting with buttons on the cabinet 1 Press the or button with no menus displayed The slide bar will be displayed for your adjustment 2 Use ...

Page 35: ...stone correction is 40 degrees This maximum range can be changed depending on the signal or aspect ratio setting The range of keystone correction is not the maximum tilt angle of projector The left and right horizontal keystone correction is not available TIP The changes can be saved with KEYSTONE SAVE page 64 ID SET CLEAR AV MUTE FREEZE ENTER EXIT ECOMODEKEYSTONEPICTURE VOL HELP FOCUS ASPECT 0 ME...

Page 36: ... The Auto Adjust function does not work for component video signals and the Viewer source If the Auto Adjust operation cannot optimize the RGB signal try to adjust HORIZONTAL VERTICAL CLOCK and PHASE manu ally page 60 61 If performing the Auto Adjust function does not correct image positioning vertical stripes banding or horizontal noise per form the HORIZONTAL VERTICAL CLOCK or PHASE function fro...

Page 37: ... again The power indicator will glow orange POWER STATUS LAMP POWER STATUS LAMP STATUS LAMP POWER Power On Fan running Standby Steady green light Blinking orange light Steady green orange light CAUTION Parts of the projector may become temporarily heated if the AC power supply is disconnected either during nor mal projector operation or during cooling fan operation Use caution when picking up the ...

Page 38: ...r the lens 5 Put the projector and its accessories in the supplied soft case Place the projector in the soft case as shown below This is to prevent the lens from damage CAUTION Use caution when putting the projector in the soft case immediately after the projector has been operating The projector cabinet is hot NOTE When placing the projector in the soft case retract the tilt foot and the rear fee...

Page 39: ...o is still playing back Enlarging a Picture You can enlarge the picture up to four times NOTE The maximum magnification may be less than four times depending on the signal or when WIDE ZOOM is selected for ASPECT RATIO To do so 1 Press the MAGNIFY button to magnify the picture To move the magnified image use the or button 2 Press the button The area of the magnified image will be moved 3 Press the...

Page 40: ... to OFF Go back to Step 2 and select OFF Repeat Step 3 NOTE The ECO MODE can be changed by using the menu Select SETUP GENERAL ECO MODE The lamp life remaining and lamp hours used can be checked in USAGE TIME Select INFO USAGE TIME The projector will always enter into the ECO MODE OFF condition for 60 seconds immediately after the projector is turned on The lamp condition will not be affected even...

Page 41: ...between the time of changing to ECO MODE immediately after the time of power on and the time of power off The CARBON SAVINGS SESSION message will be displayed in the POWER OFF ARE YOU SURE message at the time of power off TIP The formula as shown below is used to calculate the amount of CO2 emission reduction Amount of CO2 emission reduction Power consumption in OFF for ECO MODE Power consumption ...

Page 42: ...e menu To enable the Security function 1 Press the MENU button The menu will be displayed 2 Press the button twice to select SETUP and press the button or the ENTER button to select GEN ERAL 3 Press the button to select INSTALLATION 4 Press the button three times to select SECURITY and press the ENTER button The OFF ON menu will be displayed 5 Press the button to select ON and press the ENTER butt...

Page 43: ...n enabled To turn on the projector when SECURITY is enabled 1 Press and hold the POWER button for about 1 second The projector will be turned on and display a message to the effect that the projector is locked 2 Press the MENU button 3 Type in the correct keyword and press the ENTER button The projector will display an image NOTE The security disable mode is maintained until the power cable is unp...

Page 44: ...tton The KEYWORD CONFIRMATION screen will be displayed 4 Type in your keyword and press the ENTER button When the correct keyword is entered the SECURITY function will be disabled NOTE If you forget your keyword contact your dealer Your dealer will provide you with your keyword in exchange for your re quest code Your request code is displayed in the Keyword Confirmation screen In this example K992...

Page 45: ...mputer via the remote mouse receiver When connecting using the USB terminal For PC the mouse receiver can only be used with a Windows XP Windows 2000 Windows Vista Windows 7 or Mac OS X 10 0 0 or later operating system NOTE In SP1 or older version of Windows XP if the mouse cursor will not move correctly do the following Clear the Enhance pointer precision check box underneath the mouse speed slid...

Page 46: ...ton with the menu displayed both the menu and the mouse pointer will be affected Close the menu and perform the mouse operation The PAGE and buttons do not work with PowerPoint for Macintosh About Drag Mode By pressing the MOUSE L CLICK or R CLICK button for 2 or 3 seconds then releasing the drag mode is set and the drag operation can be performed simply by pressing the button To drop the item pre...

Page 47: ...ages can be set by name extension date or size Ascending or descending order can be selected Images can be rotated by 90 degrees during playback Connecting the optional Bluetooth USB adaptor NP01BA to the USB port Type A of the projector will allow you to transmit images wirelessly from your computers or mobile phones with Bluetooth wireless technology to the projector Operation of the optional Bl...

Page 48: ...mory is inserted before the projector is turned on If the projector fails to recognize the USB memory turn off the power and turn it back on Be sure to use a USB memory device formatted with the FAT32 FAT16 or FAT12 file system When formatting your USB memory set the allocation unit size to 32KB or less The projector does not support NTFS formatted USB memory If the projector does not recognize yo...

Page 49: ...e 2 Choose File F Save As A from the menu bar 3 Select a location to store the file Under Save as type choose one of the following formats GIF Graphics Interchange Format gif JPEG File Interchange Format jpg PNG Portable Network Graphics png Device Independent Bitmap bmp The BMP format is recommended for this case 4 Choose Save The message shown below will appear Do you want to export every slide ...

Page 50: ...ert the USB memory into the USB port of the pro jector To remove the USB memory from the projector select REMOVE USB DEVICE from the OPTIONS menu Step 5 on page 43 3 Press the SOURCE button The SOURCE list will be displayed Another way to display the SOURCE list is to press the VIEWER button on the remote control Go on to Step 5 4 Press the SOURCE three times to select the cur sor to VIEWER Each t...

Page 51: ...rees clockwise 9 Press the button to select and press the EN TER button The control bar will be closed 10 Press the EXIT button The thumbnail screen will be displayed Another way to display the thumbnail screen is to go back to Step 7 and select of the control bar and press the ENTER button To return the slide screen from the thumbnail screen select the image you wish to display in slide and press...

Page 52: ...he projector may not operate correctly If this happens turn off the projector and unplug the power cable Wait 3 minutes then connect the power cable and turn on the projector Exiting the Viewer 1 Press the MENU button with the slide screen or the thumbnail screen displayed The control bar or the pop up menu will be dis played 2 Press the MENU button again The on screen menu will be displayed 3 Sel...

Page 53: ...MENU button Displays the control bar Use the or button to move the yellow cursor to the item and press the ENTER button Each function is shown below Button Name Description Back Displays the previous image Play Pause Starts or stops auto playback of slideshow Or starts or stops slide show Forward Displays the next image 90 clockwise Rotates the image 90 degrees clockwise 90 counterclockwise Rotate...

Page 54: ... to the upper parent folder when the Up directory is highlighted EXIT button Returns to the upper parent folder MENU button Displays the following pop up menu Menu item Description PLAY Selects to start slideshow DELETE Note Deletes the images received with Bluetooth wireless technology The submenu of DELETE or DELETE ALL FILES is displayed REMOVE USB DEVICE Stops the USB memory inserted into the ...

Page 55: ...h Bluetooth wireless technology The BD address 12 digits not including colon of Bluetooth USB adaptor is used as the default name of the device PASSKEY Note 2 OFF ON 0000 CHANGE Selects whether to do authentication and en cryption when a device with Bluetooth wire less technology is connected The authen tication character string 1 to 8 characters can be changed if necessary BD ADDRESS Note 2 Displ...

Page 56: ...ss the button The cursor will move to the character type section 2 Press the or button The character type will be changed in the order of ABC abc and 123 3 Move the cursor to select the character type section and press the button The cursor will move to the character field 4 Move the cursor to select a character and press the EN TER button The character will be displayed in the entry field 5 After...

Page 57: ...ray 2 Press the or button The cursor I in the entry field will be moved from side to side 3 Move the cursor I to the right of the character to be deleted 4 Press the button and move the cursor to select DELETE and press the ENTER button The character in the entry field will be deleted To insert a space move the cursor to select SPACE and press the ENTER button ...

Page 58: ...dest image will be deleted and will receive a new image When the image is received a confirmation message will not be displayed Typical Specifications of Bluetooh USB Adaptor Model name NP01BA Standard Bluetooth Ver 2 0 EDR Transmission method FH SS Frequency Hopping Spread Spectrum Frequency range 2 4GHz band 2402 2480MHz Transmission output 2 5mW Class2 Supported profiles BIP Basic Imaging Profi...

Page 59: ...m your Bluetooth computers or mobile phones to the projector Select the device name of the projector and enter your passkey on your transmission device The default device name of the projector is BD address of inserted Bluetooth USB adaptor The default passkey is 0000 When the projector receives images those images will be shown on the thumbnail screen If the projector receives unsupported images ...

Page 60: ... such as a wireless LAN device or mi crowave oven These devices may cause interference to the radio communications Check if SEARCH RESPONSE is turned ON If SEARCH RESPONSE is turned OFF the search screen cannot be displayed Should this happen turn SEARCH RESPONSE to ON or specify the BD address in BD ADDRESS page 46 Check if the Bluetooth wireless technology function is turned off with your transm...

Page 61: ...ust or set You can use the buttons on the remote control or the projector cabinet to select the tab you want 5 Press the ENTER button on the remote control or the projector cabinet to display the submenu window 6 Adjust the level or turn the selected item on or off by using the buttons on the remote control or the projector cabinet Changes are stored until adjusted again 7 Repeat steps 2 6 to adju...

Page 62: ...ge to the front Radio button Use this round button to select an option in a dialog box Source Indicates the currently selected source Off Timer remaining time Indicates the remaining countdown time when the OFF TIMER is preset Slide bar Indicates settings or the direction of adjustment Key Lock symbol Indicates the CONTROL PANEL LOCK is enabled Thermometer symbol Indicates the ECO MODE is forcibly...

Page 63: ...NE ON OFF ON KEYSTONE KEYSTONE SAVE OFF OFF ON WALL COLOR OFF OFF WHITEBOARD BLACKBOARD BLACKBOARD GRAY LIGHT YELLOW LIGHT GREEN LIGHT BLUE SKY BLUE LIGHT ROSE PINK ECO MODE OFF OFF ON LANGUAGE ENGLISH DEUTSCH FRANÇAIS ITALIANO ESPAÑOL SVENSKA 日本語 DANSK PORTUGUÊS ČEŠTINA MAGYAR POLSKI NEDERLANDS SUOMI NORSK TÜRKÇE РУССКИЙ ΕΛΛΗΝΙΚΑ 中文 한국어 MENU COLOR SELECT COLOR COLOR MONOCHROME SOURCE DISPLAY ON O...

Page 64: ...AUTO POWER OFF OFF OFF 0 05 0 10 0 20 0 30 DEFAULT SOURCE SELECT LAST NP64 NP54 LAST AUTO COMPUTER VIDEO S VIDEO VIEWER NP63 NP43 LAST AUTO COMPUTER VIDEO S VIDEO INFO USAGE TIME LAMP LIFE REMAINING LAMP HOURS USED TOTAL CARBON SAVINGS SOURCE SOURCE NAME HORIZONTAL FREQUENCY VERTICAL FREQUENCY SIGNAL TYPE RGB COMPONENT VIDEO S VIDEO HDTV VIDEO TYPE NTSC NTSC3 58 NTSC4 43 PAL PAL M PAL N PAL60 SECA...

Page 65: ...r document camera S VIDEO Selects what is connected to your S VIDEO input VCR or DVD player NOTE A frame may freeze for a brief period of time when a video is played back in fast forward or fast rewind with a Video or S Video source VIEWER NP64 NP54 Projects images stored in a commercially available USB memory inserted into the USB port of the projector Inserting the optional Bluetooth USB adaptor...

Page 66: ...d for various types of images You can also use DETAIL SETTINGS to set user adjustable settings to customize each gamma or color Your settings can be stored in PRESET 1 to PRESET 6 HIGH BRIGHT Recommended for use in a brightly lit room PRESENTATION Recommended for making a presentation using a PowerPoint file VIDEO Recommended for typical TV program viewing MOVIE Recommended for movies GRAPHIC Reco...

Page 67: ...NATURAL Natural reproduction of the picture BLACK DETAIL Emphasizes detail in dark areas of the picture Adjusting Color Temperature COLOR TEMPERATURE This option allows you to select the color temperature of your choice NOTE When PRESENTATION or HIGH BRIGHT is selected in REFERENCE this function is not available Other options than OFF is selected in WALL COLOR the function is not available Adjusti...

Page 68: ...el is used as reference Input signal CONTRAST BRIGHTNESS SHARPNESS COLOR HUE Computer RGB Yes Yes No No No Component Yes Yes Yes Yes Yes Video S Video Yes Yes Yes Yes Yes Viewer NP64 NP54 Yes Yes No No No Yes Adjustable No Not adjustable VOLUME Adjusts the volume of the projector speaker NOTE The volume level is set to 16 at the factory Volume can be also adjusted by using the VOLUME button on the...

Page 69: ...nding that might appear This function adjusts the clock frequencies that eliminate the horizontal banding in the image This adjustment may be necessary when you connect your computer for the first time PHASE Use this item to adjust the clock phase or to reduce video noise dot interference or cross talk This is evident when part of your image appears to be shimmering Use PHASE only after the CLOCK ...

Page 70: ...SE This is not a malfunction The adjustments for CLOCK PHASE HORIZONTAL and VERTICAL will be stored in memory for the current signal The next time you project the signal with the same resolution horizontal and vertical frequen cy its adjustments will be called up and applied To delete adjustments stored in memory from the menu you select RESET CURRENT SIGNAL or ALL DATA and reset the adjustments p...

Page 71: ...llowing 4 3 The image is displayed in 4 3 aspect ratio 16 9 The image is displayed in 16 9 aspect ratio 15 9 The image is displayed in 15 9 aspect ratio 16 10 The image is displayed in 16 10 aspect ratio WIDE ZOOM The image is stretched left and right Parts of the displayed image are cropped at the left and right edges and therefore not visible NATIVE The projector displays the current image in it...

Page 72: ...orders on the top and bottom You can adjust the vertical position from the top to the bottom of the black area Turning on Noise Reduction NOISE REDUCTION This function allows you to select the level of noise reduction The projector is set to the optimized level for each signal at the factory Select your preference item for your signal when video noise is noticeable The options are OFF LOW MEDIUM a...

Page 73: ...ighlighted pressing the ENTER button will display its slide bar for adjustment Saving Vertical Keystone Correction KEYSTONE SAVE This option enables you to save your current keystone settings OFF Does not save current keystone correction settings It will return your keystone correction settings to zero ON Saves current keystone correction settings Saving your change once affects all sources The ch...

Page 74: ...The lamp condition will not be affected even when ECO MODE is changed within this time period After a lapse of 60 seconds from when the projector displays a blue black or logo screen ECO MODE will automatically switch to ON The projector will return to the OFF mode once a signal is accepted If the projector becomes overheated in OFF mode because of use in a high temperature room there may be a cas...

Page 75: ... control is pressed Turning On Off Eco Message ECO MESSAGE This option turns on or off the following messages when the projector is turned on The Eco Message prompts the user to save energy When OFF is selected for ECO MODE you will get a mes sage to prompt you to select ON for ECO MODE When ON is selected for ECO MODE To close the message press the ENTER or the EXIT button The message will disapp...

Page 76: ... 45 SEC is the factory preset Selecting a Color or Logo for Background BACKGROUND Use this feature to display a blue black screen or logo when no signal is available The default background is LOGO TIP The logo can be changed For more information about how to change the logo please consult your NEC or NEC designated service station If you cannot find one in your area ask your dealer NOTE Your setti...

Page 77: ...TROL PANEL LOCK function NOTE This CONTROL PANEL LOCK does not affect the remote control functions When the control panel is locked pressing and holding the EXIT button on the projector cabinet for about 10 seconds will change the setting to OFF TIP When the CONTROL PANEL LOCK is turned on a key lock icon will be displayed at the bottom right of the menu Enabling Security SECURITY This feature tur...

Page 78: ...ini DIN 8 Pin It supports data rates from 4800 to 38400 bps The default is 38400 bps Select the appropriate baud rate for your equipment to be connected depending on the equipment a lower baud rate may be recommended for long cable runs NOTE Your selected communication speed will not be affected even when RESET is done from the menu ...

Page 79: ... display the menu for canceling the Con trol ID Assigning or Changing the Control ID 1 Turn on the projector 2 Press the ID SET button on the remote control The CONTROL ID screen will be displayed If the projector can be operated with the current remote control ID the ACTIVE will be displayed If the pro jector cannot be operated with the current remote control ID the INACTIVE will be displayed To ...

Page 80: ...select High speed mode if you use the projector non stop for consecutive days Set FAN MODE to HIGH ALTITUDE when using the projector at altitudes approximately 5000 feet 1500 meters or higher Using the projector at altitudes approximately 5000 feet 1500 meters or higher without setting to HIGH ALTITUDE can cause the projector to overheat and the protector could shut down If this happens wait a cou...

Page 81: ...WER OFF button OPTIONS 2 Using Off Timer OFF TIMER The remaining countdown time will be displayed at the bottom of the menu when the OFF TIMER is preset 1 Select your desired time between 30 minutes and 16 hours OFF 0 30 1 00 2 00 4 00 8 00 12 00 16 00 2 Press the ENTER button on the remote control 3 The remaining time starts counting down 4 The projector will turn off after the countdown is compl...

Page 82: ...r cabinet Turning On the Projector By Applying RGB Signal AUTO POWER ON COMP When the projector is in Standby mode applying an RGB signal from a computer connected to the COMPUTER IN input will power on the projector and simultaneously project the computer s image This functionality eliminates the need to always use the POWER button on the remote control or the projector cabinet to power on the pr...

Page 83: ...and displays the first found source AUTO is not available for the Viewer source on the NP64 and NP54 COMPUTER Displays the RGB source from the COMPUTER IN connector every time the projector is turned on VIDEO Displays the Video source from the VIDEO IN connector every time the projector is turned on S VIDEO Displays the Video source from the S VIDEO IN connector every time the projector is turned ...

Page 84: ...lamp usage When the remaining lamp time reaches 0 the LAMP LIFE REMAINING bar indicator changes from 0 to 100 Hours and starts counting down If the remaining lamp time reaches 0 hours the projector will not turn on regardless of whether the ECO MODE is set to OFF or ON The message to the effect that the lamp should be replaced will be displayed for one minute when the projec tor is turned on and w...

Page 85: ...een Menu SOURCE SOURCE NAME HORIZONTAL FREQUENCY VERTICAL FREQUENCY SIGNAL TYPE VIDEO TYPE SYNC TYPE SYNC POLARITY SCAN TYPE VERSION PRODUCT SERIAL NUMBER FIRMWARE Version DATA Version CONTROL ID when CONTROL ID is set ...

Page 86: ...RITY COMMUNICATION SPEED CONTROL ID FAN MODE STANDBY MODE LAMP LIFE REMAINING LAMP HOURS USED and TOTAL CARBON SAVINGS To reset the lamp usage time see Clearing Lamp Hour Meter CLEAR LAMP HOURS below Clearing Lamp Hour Meter CLEAR LAMP HOURS Resets the lamp clock back to zero Selecting this option displays submenu for a confirmation NOTE Elapsed time of the lamp use will not be affected even when ...

Page 87: ... focus sensor Use a blower or lens paper to clean the focus sensor Keep finger prints off the focus sensor Leaving finger prints in the focus sensor might cause poor focus or short auto focus range Cleaning the Cabinet 1 Turn off the projector before cleaning 2 Vacuum the ventilation inlet of the cabinet CAUTION When cleaning the speaker us ing a vacuum cleaner do not force the brush of the vacuum...

Page 88: ...nts off the glass surface on the lamp housing Leaving finger prints in the glass surface might cause an unwanted shadow and poor picture quality The projector will turn off and go into standby mode when you continue to use the projector for another 100 hours after the lamp has reached the end of its life If this happens be sure to replace the lamp If you con tinue to use the lamp after the lamp re...

Page 89: ...g is stuck inside the projector Fig B remove it from inside the projector before install ing the new lamp housing To remove the packing ring simply pull it off of the stud In other cases where the lamp is removed other than lamp replacement pulling out the lamp housing may also cause the packing ring to stay stuck inside the projector If this happens make sure to insert the lamp housing back in it...

Page 90: ...ighten the lamp cover screw Be sure to tighten the screw 4 Push the part as shown on the drawing and insert a new lamp housing until it is plugged into the socket CAUTION Do not use a lamp other than the NEC replacement lamp NP09LP NP64 NP63 or NP08LP NP54 NP43 Order this from your NEC dealer Secure it in place with the two screws NOTE Tighten the two screws alternately until both screws are compl...

Page 91: ...10 seconds to reset the lamp clock back to zero When the lamp time clock is reset to zero the LAMP indicator goes out 2 Tighten the cooling pump cover screw Be sure to tighten the cooling pump cover screw This completes the cooling pump replacement Go on to the next step 7 Install a new cooling pump 1 Align the tabs on the cooling pump cover with the guide on the cabinet and slide the cooling pump...

Page 92: ...cle in red and 2 cycle in green 0 5 sec On 0 5 sec Off Cooling pump error The two screws on the lamp housing are not com pletely tightened Tighten the two screws alternately until both screws are completely tightened The cooling pump is not working properly Contact your dealer Green Re firing the lamp The projector is cooling down The projector is re firing Wait for a moment Steady light Green Sta...

Page 93: ...creen goes blank while using your remote control it may be the result of the computer s screen saver or power management software See also the next page Picture suddenly be comes dark When one of the following happens the ECO MODE automatically changes from OFF to ON When there are no signals blue or black screen To return to the OFF mode select another available source When the room where you re ...

Page 94: ...played correctly Should this happen deactivate the notebook PC s LCD screen when the projector display is in use Each notebook PC has a different way of deactivate reactivate the local LCD screens as described in the pre vious step Refer to your computer s documentation for detailed information Image displayed is incorrect when using a Macintosh When using a Macintosh with the projector set the DI...

Page 95: ...ESET mode is set to HIGH BRIGHT If any other mode is selected as the PRESET mode the light output value may drop 3 Compliance with ISO21118 2005 Electrical Inputs 1 Analog RGB shared with component video Mini D Sub 15 Pin 1 S Video Mini DIN 4 Pin 1 Video RCA 1 Stereo Mini Audio shared with analog RGB input PC Control 1 PC Control Mini DIN 8 Pin USB Port 1 A Type NP64 NP54 Built in Speaker 0 3 W mo...

Page 96: ...C 3 66W 200 240V AC 4 An image with higher resolution than the projector s native resolution 1024 x 768 will be displayed with scal ing technology Mechanical Installation Orientation Desktop Front Desktop Rear Ceiling Front Ceiling Rear Dimensions 9 7 W x 2 8 H x 7 2 D 246 mm W x 72 mm H x 182 mm D not including protrusions with lens cover open Net Weight 3 7 lbs 1 7 kg Environmental Consideration...

Page 97: ...88 8 Appendix Cabinet Dimensions Lens center Unit mm inch 246 9 7 182 7 2 with lens cover open 73 2 9 58 2 3 79 3 1 Lens center 72 2 8 VIDEO IN COMPUTER IN PC CONTROL AUDIO IN USB S VIDEO IN NP64 NP54 ...

Page 98: ...1 15 12 14 13 6 5 4 3 2 1 10 7 9 8 Pin No RGB Signal Analog YCbCr Signal 1 Red Cr 2 Green or Sync on Green Y 3 Blue Cb 4 Ground 5 Ground 6 Red Ground Cr Ground 7 Green Ground Y Ground 8 Blue Ground Cb Ground 9 No Connection 10 Sync Signal Ground 11 No Connection 12 Bi directional DATA SDA 13 Horizontal Sync or Composite Sync 14 Vertical Sync 15 Data Clock ...

Page 99: ... 59 81 1280 960 60 00 60 00 1280 1024 63 98 60 02 1400 1050 60 00 1600 1200 75 00 60 02 Apple Macintosh 640 480 35 00 66 67 832 624 49 72 74 55 1024 768 60 24 74 93 1280 x 1024 69 87 65 18 HDTV 720p 1280 720 37 50 50 00 720p 1280 720 45 00 60 00 1080i 1920 1080 28 13 50 00 1080i 1920 1080 33 75 60 00 SDTV 480p 31 47 59 94 576p 31 25 50 00 DVD YCbCr 15 73 59 94 15 63 50 00 NOTE An image with higher...

Page 100: ...H 00H 00H 12H PICTURE MUTE OFF 02H 11H 00H 00H 00H 13H SOUND MUTE ON 02H 12H 00H 00H 00H 14H SOUND MUTE OFF 02H 13H 00H 00H 00H 15H NOTE Contact your local dealer for a full list of the PC Contorol Codes if needed Cable Connection Communication Protocol Baud rate 38400 bps Data length 8 bits Parity No parity Stop bit One bit X on off None Communications procedure Full duplex NOTE Depending on the ...

Page 101: ...cleared after lamp replacement No power even though you press and hold the POWER but ton for a minimum of 1 second Shut down during operation Power cable s plug is fully inserted into the wall outlet Lamp cover is installed correctly AUTO POWER OFF is turned off only models with the AUTO POWER OFF function OFF TIMER is turned off only models with the OFF TIMER function Video and Audio Parts of the...

Page 102: ...e Model number Length inch m Distribution amplifier Model number Switcher Model number Adapter Model number Projector PC DVD player Installation environment Screen size inch Screen type White matte Beads Polarization Wide angle High contrast Throw distance feet inch m Orientation Ceiling mount Desktop Power outlet connection Connected directly to wall outlet Connected to power cord extender or oth...

Page 103: ...or movement by the customer or by improper han dling by the customers 3 Problems or damage caused by improper usage or unwarrant able alterations or repairs by the customer 4 Problems or damage caused by fire salt damage gas dam age earthquakes lightning damage storm or flood damage or other natural disasters or such external factors as dust ciga rette smoke abnormal voltage etc 5 Problems or dama...

Page 104: ...tries designated with an asterisk replacement product rental service are offered In Asia and Middle East NEC Display Solutions Ltd Address 686 1 Nishioi Oi Machi Ashigarakami Gun Kanagawa 258 0017 Japan Telephone 81 465 85 2369 Fax Line 81 465 85 2393 Email Address support_pjweb gw necds nec co jp WEB Address http www nec display com global index html Regions Covered Japan NEC Solutions China Co L...

Page 105: ...eriod I also confirm following information is correct Regards Application Sheet for TravelCare Service Program P 1 Country product purchased User s Company Name User s Company Address Phone No Fax No User s Name User s Address Phone No Fax No Local Contact office Local Contact office Address Phone No Fax No User s Model Name Date of Purchase Serial No on cabinet Problem of units per User Required ...

Page 106: ...n problem Enduser is required to fill in Application Sheet Enduser needs to confirm the availability of the Service to NEC Au thorized Service Stations 3 Loan Only For this service NEC Authorized Service Station supplies the cus tomer with a loan unit for US 200 up to 12 days Customer keeps the inoperable unit and when customer returns home customer arranges to have the projector serviced in the h...

Page 107: ... NEC Display Solutions Ltd 2009 7N951461 ...

Reviews: