background image

English-2

English

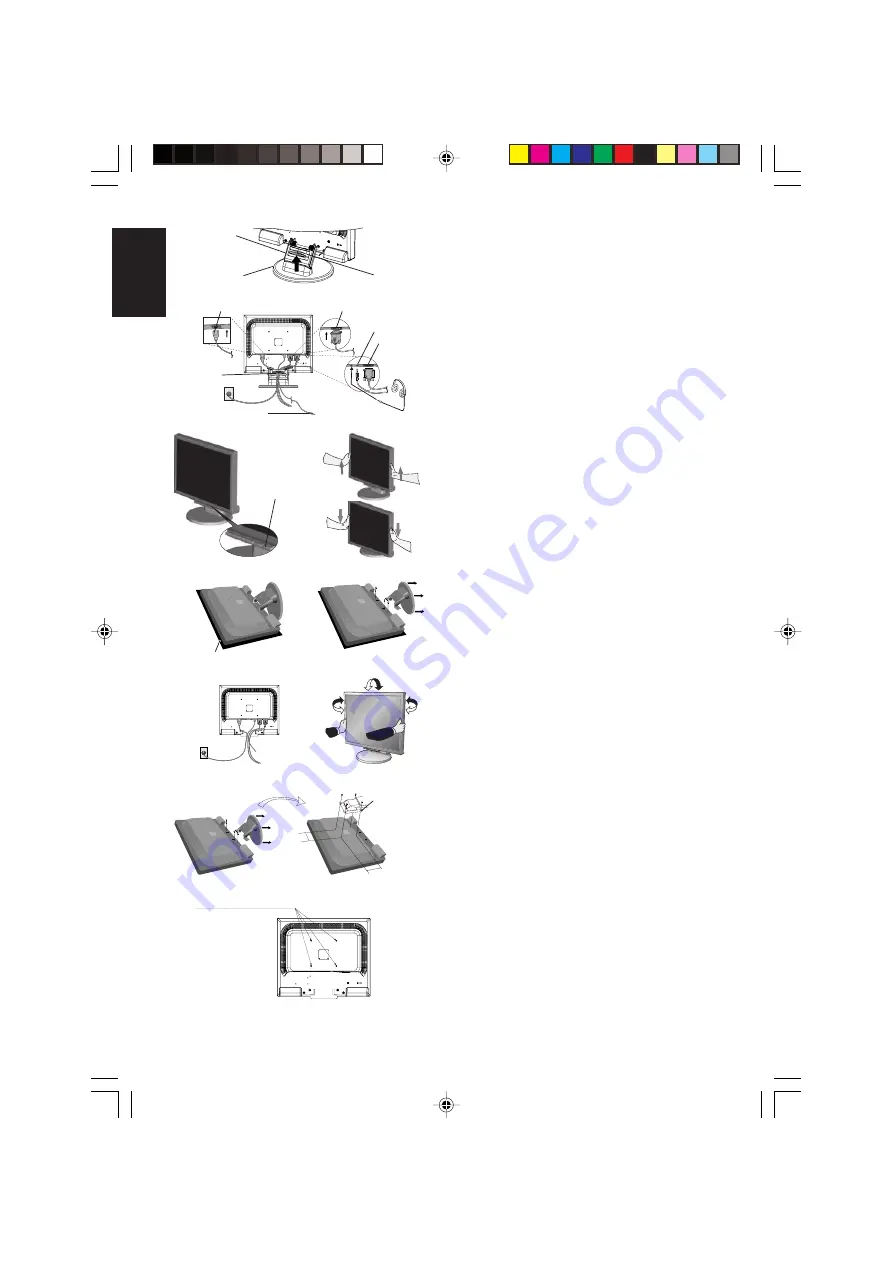
Figure C.1

Power Button

Figure TS.1

Figure R.1

Non-abrasive surface

Figure R.2

Figure R.3

4-SCREWS (M4)

MAX depth: 8.5mm
If use other screw,
check length of screw.

Weight of LCD assembly: 6.0 kg (MAX) (LCD205WXM)

6.3 kg (MAX) (LCD225WXM)

Specifications

Replace screws

Tighten all

screws

100 mm

Thickness

of Bracket (Arm)

2.0 ~ 3.2 mm

3. Remove the Cable management cover (

Figure A.4

).

4. Connect all cables to the appropriate connector on the back of the

monitor (

Figure B.1

). Connect Headphones

(not included) to the appropriate connector at the rear side of the
monitor, if desired (

Figure B.1

).

5. Connect one end of the power cord to the monitor and the other

end to the power outlet. Position the Video Signal Cable, Audio
cable and power cord between the holes on the Stand.

6. To attach the Cable management cover, insert the tabs of the

Cable management cover into the holes on the Stand and slide
the Cable management cover downward into place (

Figure B.1

)

making sure that the tabs are completely secure.

NOTE:

Adjust the position of the cables that are placed under the
Cable management cover to avoid damaging the cable or
monitor.

NOTE:

Please refer to the Caution section of this manual for proper
selection of power cord.

7. Turn on the monitor with the front power button and the computer

(

Figure C.1

).

8. No-touch Auto Adjust automatically adjusts the monitor to optimal

settings upon initial setup for most timings (Analog input only).
For further adjustments, use the following OSD controls:

Auto Contrast

Auto Adjust

Refer to the 

Controls 

section of this User’s Manual for a full

description of these OSD controls.

NOTE:

If you have any problem, please refer to the

Troubleshooting

 section (CD-ROM).

Raise and Lower Monitor Screen

The monitor may be raised or lowered. To raise or lower screen, place
hands on each side of the monitor and lift or lower to the desired
height (

Figure RL.1

).

NOTE:

Handle with care when raising or lowering the monitor
screen.

Tilt and Swivel

Grasp both sides of the monitor screen with your hands and adjust
the tilt and swivel as desired (

Figure TS.1

).

NOTE:

Handle with care when tilting and swivelling the monitor screen.

Remove Monitor Stand for Mounting

To prepare the monitor for alternative mounting purposes:

1. Disconnect all cables.

2. Place monitor face down on a non-abrasive surface (

Figure R.1

).

3. Remove the 4 screws connecting the monitor to the stand and

remove the stand as indicated (

Figure R.2

). The monitor is now

ready for mounting in an alternative manner.

4. Connect all cables to the back of the monitor (

Figure R.3

).

5. Reverse this process to re-attach stand.

NOTE:

Use only VESA-compatible alternative mounting method.

NOTE:

Handle with care when removing monitor stand.

Connecting a Flexible Arm

This LCD monitor is designed for use with a flexible arm.
Please use the attached screws (4pcs) as shown in the picture when
installing. To meet the safety requirements, the monitor must be
mounted to an arm which guaranties the necessary stability under
consideration of the weight of the monitor. The LCD monitor shall only
be used with an approved arm (e.g. GS mark).

100 mm

Figure RL.1

Base

Stand

Cable management cover

Figure A.4

Power Cable

Cable
management
cover

Connect to Computer
audio output

Figure B.1

Input (VGA)

Input (Audio)

Input (DVI)

Headphone

01_English

6/6/07, 8:36 AM

2

Summary of Contents for MultiSync LCD225WXM-BK

Page 1: ...MultiSync LCD205WXM MultiSync LCD225WXM User s Manual Bedienerhandbuch Manual del usuario Manuel Utilisateur Manuale utente 00_Cover 6 6 07 8 36 AM 1...

Page 2: ...after a certain time beneficial both for the user and the environment Electrical safety Emissions Electromagnetic fields Noise emissions Ecology The product must be prepared for recycling and the manu...

Page 3: ...ny in Europe http www nec display com in Japan or http www necdisplay com in USA Energy Saving This monitor features an advanced energy saving capability When a VESA Display Power Management Signallin...

Page 4: ...Chinese RoHS information relevant for Chinese market 00_Cover 6 6 07 8 36 AM 4...

Page 5: ...or User s Manual Audio Cable Power Cord 15 pin mini D SUB male to 15 pin mini D SUB male DVI D to DVI D for Europe MultiSync LCD monitor Quick Start To attach the MultiSync LCD monitor to your system...

Page 6: ...User s Manual for a full description of these OSD controls NOTE If you have any problem please refer to the Troubleshooting section CD ROM Raise and Lower Monitor Screen The monitor may be raised or...

Page 7: ...log Input only Controls Horizontal Image Position within the display area of the LCD DOWN UP Analog Input only Controls Vertical Image Position within the display area of the LCD H SIZE Analog Input o...

Page 8: ...or INPUT RESOLUTION Analog Input Only Sets of the resolution of input signal to one of the following When vertical active size is 768 you can select resolution from 1024 x 768 1280 x 768 1360 x 768 Wh...

Page 9: ...ckungsmaterial f r sp tere Transporte des Monitors auf Kurzanleitung Gehen Sie folgenderma en vor um den MultiSync LCD Monitor an Ihr System anzuschlie en 1 Schalten Sie Ihren Computer aus 2 PC oder M...

Page 10: ...lung Automatische Einstellung Im Abschnitt Bedienelemente dieser Bedienungsanleitung finden Sie eine ausf hrliche Beschreibung der OSD Steuerungen HINWEIS Sollten Probleme auftreten beachten Sie den A...

Page 11: ...Analogeingang Steuert die horizontale Bildposition im Anzeigebereich des LCD UNTEN OBEN Steuert die vertikale Bildposition im Anzeigebereich des LCD BILDBREITE nur Analogeingang Durch Erh hen oder Ve...

Page 12: ...NGSAUFL SUNG nur analoger Eingang Legt die Aufl sung des Eingangssignals auf eine der folgenden Einstellungen fest Wenn die aktive Bildh he 768 ist k nnen Sie zwischen folgenden Aufl sungen w hlen 102...

Page 13: ...erial de embalaje originales para poder transportar el monitor en el futuro Inicio r pido Para conectar el monitor LCD MultiSync a su sistema siga estas indicaciones 1 Apague el ordenador 2 Para PC o...

Page 14: ...ma inicial en la mayor a de cadencias s lo para entrada anal gica Para llevar a cabo otros ajustes utilice los siguientes controles de OSD Contraste autom tico Auto ajuste Consulte el apartado Control...

Page 15: ...ER EST NDAR se selecciona la configuraci n del color deseada Las configuraciones de color sRGB y EST NDAR son est ndar y no se pueden modificar COLOR ROJO Aumenta o disminuye el Rojo El cambio aparece...

Page 16: ...magen se ampl a sin modificar la relaci n entre la altura y la anchura DDC CI Activa o desactiva la comunicaci n y control bidireccional del monitor RESOLUCI N ENTRADA s lo para entradas anal gicas De...

Page 17: ...riel d emballage d origine pour le cas o vous seriez amen transporter ou exp dier le moniteur D marrage rapide Pour connecter le moniteur LCD MultiSync votre syst me suivez ces instructions 1 teignez...

Page 18: ...e l utilisateur pour une description compl te de ces commandes OSD REMARQUE Si vous rencontrez des probl mes veuillez vous reporter la section R solution des probl mes CD ROM l vation et abaissement d...

Page 19: ...es pr r glages des couleurs sRVB et NATIVE sont des pr r glages standard et ne peuvent pas tre modifi s COULEUR ROUGE Augmente ou diminue le Rouge La modification sera visible l cran COULEUR VERT Augm...

Page 20: ...ge est agrandie sans modification des proportions DDC CI ACTIVE ou D SACTIVE le contr le et la communication bidirectionnels du moniteur R SOLUTION D ENTR E Entr e analogique seulement D finit la r so...

Page 21: ...ed il materiale di imballaggio originali per trasportare o spedire il monitor Guida rapida Per collegare il monitor LCD MultiSync al sistema attenersi alle seguenti istruzioni 1 Spegnere il computer 2...

Page 22: ...lo ingresso analogico Per ulteriori regolazioni usare i seguenti controlli OSD Contrasto autom Auto Aggiust Fare riferimento alla sezione Controlli di questo Manuale Utente per una descrizione complet...

Page 23: ...o La modifica comparir sullo schermata COLORE VERDE Aumenta o diminuisce il verde La modifica comparir sullo schermata COLORE BLU Aumenta o diminuisce il blu La modifica comparir sullo schermata STRUM...

Page 24: ...solo ingresso analogico Imposta la risoluzione del segnale di ingresso su uno dei seguenti valori Quando la dimensione verticale attiva 768 possibile selezionare una risoluzione da 1024 x 768 1280 x 7...

Page 25: ...baura Minato Ku Tokyo 108 0023 Japan ME06 NEC MultiSync LCD MultiSync LCD 15 D SUB DVI D DVI D CD ROM T MultiSync LCD 1 2 PC Macintosh DVI DVI D A 1 15 D SUB A 2 Macintosh MultiSync Macintosh 15 D SUB...

Page 26: ...AX LCD205WXM 6 3 MAX LCD225WXM 100 2 0 3 2 100 RL 1 Macintosh Macintosh 3 A 4 4 1 1 5 6 1 7 1 8 No Touch Auto Adjust OSD Auto Contrast Auto Adjust OSD RL 1 TS 1 1 2 R 1 3 4 R 2 4 R 3 5 VESA 4 GS A 4 V...

Page 27: ...NESS CONTRAST AUTO CONTRAST AUTO ADJUST LEFT RIGHT DOWN UP H SIZE FINE COLOR CONTROL SYSTEMS 9300 7500 sRGB USER NATIVE sRGB NATIVE COLOR RED COLOR GREEN COLOR BLUE TOOL TOOL FACTORY PRESET OSD RESET...

Page 28: ...ET RESOLUTION NOTIFIER ON 45 MONITOR INFO EXPANSION FULL 1680 x 1050 ASPECT DDC CI INPUT RESOLUTION 768 1024 x 768 1280 x 768 1360 x 768 1050 1400 x 1050 1680 x 1050 OSD OSD SELECT NO SIGNAL No Signal...

Page 29: ...xx_Back 6 6 07 8 38 AM 1...

Page 30: ...Printed in China Part Number 1E505392 Printed on recycled paper xx_Back 6 6 07 8 38 AM 2...

Reviews: