


5-156 Installing and Using Utilities
Aborting the Upgrade
If necessary, you can abort the Active Upgrade process and restore the system to its original state at
any point of the upgrade process
prior to committing the upgrade
.
CAUTION:
You cannot abort the upgrade process after you commit an upgrade because the original state of
the system is lost (overwritten) as a result of completing the upgrade process.
When you abort an upgrade, the Active Upgrade Console:
•
Cancels the current Active Upgrade operation.
•
If applicable (and if your system is in the merge state), initiates a system restart. It shuts
down the Upgrade Side and restarts the system from the Production Side, which automatically
restarts your applications from your original Production side system disks.
•
If applicable, reestablishes the mirror of any internal RDR system disk by overwriting the
upgraded partner disk with the original partner disk.
•
If applicable, reestablishes the mirror of any internal RDR data disk by overwriting the stale
partner disk with its newer, live partner disk (the disk to which your applications have been
writing data throughout the upgrade process).
•
If applicable, bring the Upgrade Side online to enable fault-tolerant, duplex mode.
To abort an upgrade, click the
Abort
button on the
Active Upgrade
page, the
Split System
page, or
the
Merge System
page.
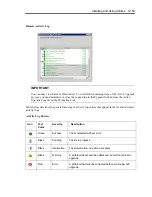
IMPORTANT:
Your screen might flicker and you might briefly lose control of your keyboard and mouse as the
system recovers its original state.
The abort process should take only a few minutes. When the process completes, the upgrade state is
Fault Tolerant\Abort\Ready
. You can click
Finish
to clean up ftServer resources, as described in
“Finishing the Upgrade” on page 5-157.
If the abort process fails the first time, you can click
Retry
to try again. If the problem persists, see
“Troubleshooting” for information about resolving the problem.
TIPS:
Finishing the Upgrade, page 5-157
Viewing Active Upgrade Process Status, page 5-158
Verifying If RDR Disks Are Resynchronizing, page 5-168
Troubleshooting, page 5-164
Summary of Contents for EXP320J
Page 12: ... THIS PAGE IS INTENTIONALLY LEFT BLANK ...
Page 25: ...xiii APPENDIX A SPECIFICATIONS A 1 APPENDIX B I O PORT ADDRESSES B 1 ...
Page 26: ...xiv THIS PAGE IS INTENTIONALLY LEFT BLANK ...
Page 28: ...1 2 Precautions for Use 使用上的注意 本章包含著對服務器恰當安全的操作必要的信息 ...
Page 54: ...1 28 Precautions for Use This page is intentionally left blank ...
Page 64: ...2 10 General Description Rear View ...
Page 68: ...2 14 General Description CPU IO Module CPU IO module ...
Page 88: ...2 34 General Description This page is intentionally left blank ...
Page 100: ...3 12 Windows Setup and Operation 3 Confirm that RDR of the disk is cancelled ...
Page 218: ...4 92 System Configuration This page is intentionally left blank ...
Page 390: ...5 172 Installing and Using Utilities This page is intentionally left blank ...
Page 408: ...6 18 Maintenance 3 Stop of PCI module 1 4 Start of PCI module 1 ...
Page 410: ...6 20 Maintenance This page is intentionally left blank ...
Page 454: ...7 44 Troubleshooting This page is intentionally left blank ...
Page 485: ...System Upgrade 8 31 board must not be mixed with N8804 005 or N8803 035 ...
Page 500: ......
Page 503: ......