background image

8

  Positioning the MDT 860  
  in a Vehicle

There are three options provided for mounting the MDT 860:

Use the suction mounted, flexible, snap-lock bracket provided.
Panel mount the MDT 860 with the hardware mounting kit provided.
Attach to a Panavise bracket (Navman part number BK000025-G) or an 
alternative bracket using the M mounting holes in the backcase.

.1  MDT 860 Suction-Mount

Follow these steps:

Attach the MDT 860 to the vehicle mount by matching the two slides on the stand to the corresponding 
slots on the back of the MDT 860 unit and slide to gether until they firmly latch into place.
Choose a position on the windshield that is clearly visible to the driver without obstructing 
the view of the road or any safety equipment ie airbags. Clean the surface thoroughly.
Press the suction cup firmly to the surface. Pull the lever down to seal the 
suction cup. The suction cup firmly anchors the vehicle mount.
Hold the vehicle mount base firmly and bend the stalk to adjust to a safe and easy viewing position.

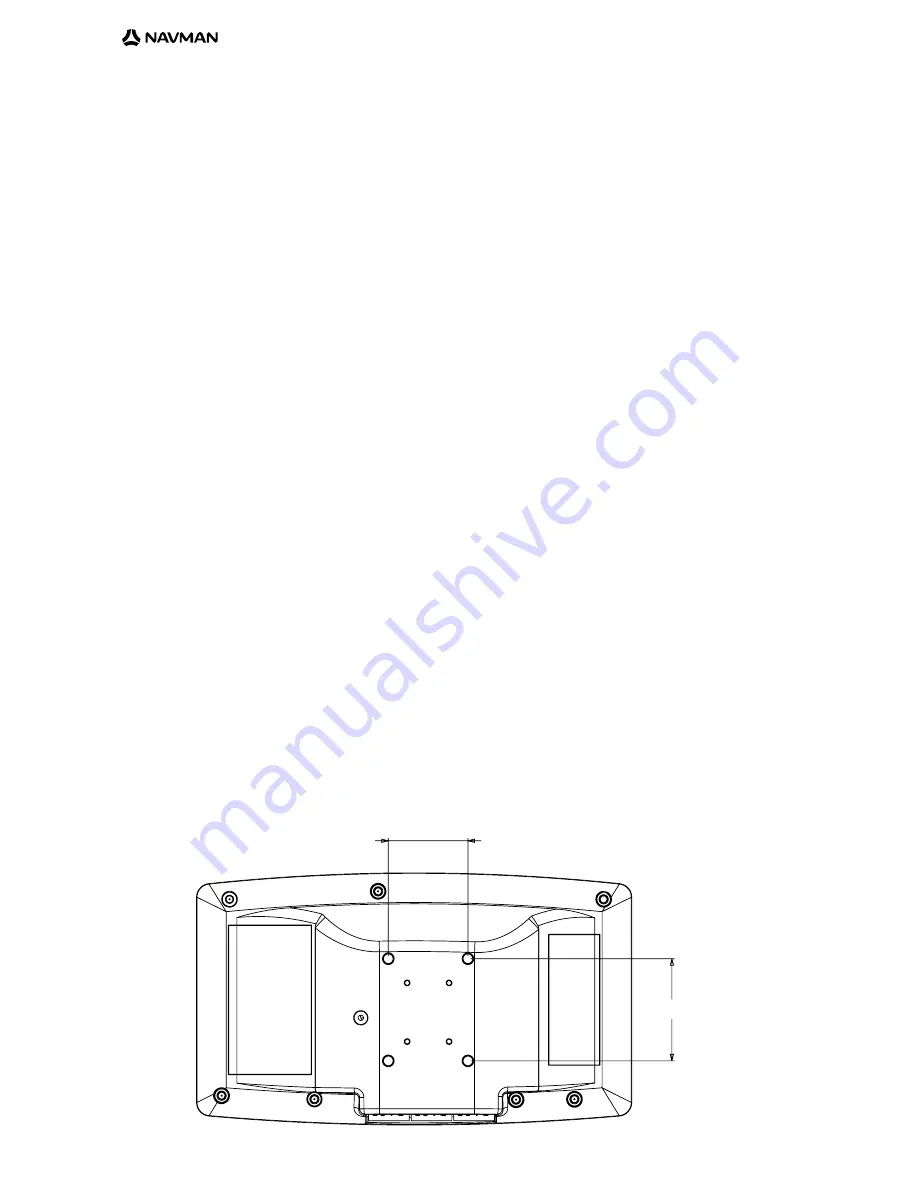
.2  MDT 860 M Mounting Holes 

The holes (illustrated in the diagram below) can be used to attach the MDT 860 to a Panavise bracket or an 
alternative bracket.  

Use the diagram below as a guide to insert M x 6 mm machine screws.  Do not over tighten, as driving the 
M machine screws in too far may cause damage.

38.5mm  (1.52")

30.0mm  (1.18")

1.
2.
.

1.

2.

.

4.

Summary of Contents for MDT 860

Page 1: ...User Manual MDT 860 GPS Tracking and Fleet Management Solutions...

Page 2: ......

Page 3: ...Sending a Message 17 5 4 Deleting a Message 18 5 5 Reading and Managing Sent Messages 18 6 Driver Options 19 6 1 Introduction 19 6 2 Driver Options 19 7 Miscellaneous 23 8 Configuration 24 8 1 General...

Page 4: ......

Page 5: ...device It is your responsibility to read and follow the vehicle mount installation instructions and to use the product in consistent with your government s laws and regulations Consult the vehicle ma...

Page 6: ...t Components Hardware mounting kit a Baseplate d x Screws b Retainer ring e x Screw caps c Screw plate MDT 860 Flexible mount RJ45 cable a b c d e Keyboard adaptor cable RJ25 PS2 Mounting Clip User ma...

Page 7: ...ccept Enter Key Use to select the highlighted item Confirms a selection 6 Cancel Escape Key Steps back 1 screen Go to Main Menu when held down Rejects a selection 7 4 way Cursor Key Use to navigate th...

Page 8: ...latch into place Choose a position on the windshield that is clearly visible to the driver without obstructing the view of the road or any safety equipment ie airbags Clean the surface thoroughly Pre...

Page 9: ...used a normal screen and a pop up screen Normal screen Normal screens are used to display and to process the MDT 860 OnlineAVL application A normal screen makes use of the entire display and consists...

Page 10: ...urable Refer to section 8 5 Font Size Status bar The Status bar displays continuously updated information related to the operation of the in vehicle system The status bar can be customised to display...

Page 11: ...mediate attention and or action In most cases a beep will sound when a pop up is displayed Most pop ups are blocking i e pop ups must be actioned in order to be able to return to the previously opened...

Page 12: ...re left Alternatively to return directly to the Main Menu screen where all opened screens will be automatically closed press and hold the O key At all times one item from the menu will be highlighted...

Page 13: ...Menu F2 Inbox F3 Send a Message F4 Outbox F5 Driver Options F6 Miscellaneous Note Regardless of the screen excluding pop up screens the MDT 860 is displaying at the time selecting a function key will...

Page 14: ...application and stored in the MDT 860 Messages are shown in the order of their receipt with the most recent message at the top The following information in the Inbox is shown for each message on a si...

Page 15: ...e following information in the Outbox is shown for each message on a single line First words of the message Time or date of sending time only is given if message has been sent on the current day other...

Page 16: ...eceived while there are unsaved changes on the screen e g while editing a reply a warning will be issued Selecting Cancel will close the new message pop up screen and the message can be viewed later f...

Page 17: ...ing on driver by driver basis Sending an original message Select Send A Message from the Main Menu or press F3 The Send A Message screen will be displayed Select either a canned message or the free fo...

Page 18: ...eleting a message a pop up screen confirming this action will be displayed to ensure messages are not deleted in error 5 5 Reading and Managing Sent Messages To read replies that have been sent in res...

Page 19: ...order to access all services of the system is configurable from the OnlineAVL application When a vehicle with no one logged on is detected to be in use ignition has been turned on the MDT 860 will be...

Page 20: ...t of coverage If the vehicle is out of cellular coverage when inserting the Driver PIN the Halo Qube tracking device will store the information and will send it when the vehicle is back in cellular co...

Page 21: ...log off OR press the O key to cancel the action If Driver Status is activated the driver must select a status before log off can occur The Driver Status feature is only visible on the MDT 860 if it h...

Page 22: ...e MDT 860 will beep to remind that a log on with a Driver PIN is required The beeping can be stopped by entering a correct Driver PIN If a Driver PIN has not been assigned and the MDT 860 is beeping c...

Page 23: ...iscellaneous Select Miscellaneous from the Main Menu screen or press F6 to access the Miscellaneous screen The Miscellaneous menu provides access to three sub menus Configuration Diagnostics Communica...

Page 24: ...y using the and on the 4 way cursor key As a general rule a short press on the or key will make the value increase or decrease by a unit A continuous press on the or key will make the value increase o...

Page 25: ...e 0 100 8 4 Buzzer Three settings are available for the keypad key press tone beep Pitch Range 100 8000 Hz Note A continuous press on the or key will result in a large increase or decrease of the pitc...

Page 26: ...ming Outgoing messages memory usage Use the and cursor key to select or deselect Yes or No the required information respectively Note The Status bar configuration screen settings are applied in real t...

Page 27: ...rming this action will be displayed to ensure the messages are not deleted in error 8 11 Outbox The following settings are available Automatic saving of originated messages Use the and cursor keys to...

Page 28: ...28 9 Diagnostics The following items are displayed Voltage of power supply Temperature GPS fix status Modem status AVL ID MDT 860 firmware version Halo Qube firmware version Ignition Status...

Page 29: ...Communication Test 10 Communication Test Select Communication Test to perform an end to end communication test between the MDT 860 and the OnlineAVL server A message will be received on the MDT 860 if...

Page 30: ...message s Press ACCEPT P to open the Inbox or CANCEL O to exit Note The xxx represents drivers name vehicle s ID or number of messages The external notifications cannot be disabled The following inter...

Page 31: ...2 banks 256KB battery backed SRAM as 2 banks Keypad 21 keys with backlighting 4 way cursor key with backlighting External Interface Two RJ45 connectors Power and RS232 International PC AT keyboard int...

Page 32: ...very time a new message arrives Using Multi Tap Text Entry Multi tap is only available for the alpha numeric keys 0 9 Two subsets of special characters have been implemented for keys 0 and 1 These inc...

Page 33: ...ill return the screen to the Main Menu The Editor screen The Editor screen is used for editing free form text messages Use the 4 way cursor key to move the cursor around the screen Press P to send the...

Page 34: ...ct of which notice in writing is received by Navman or its approved distributor within the Warranty Period Conditions Repairs may only be carried out by a Service Centre approved by Navman Repairs as...

Page 35: ...ed All rights reserved All other trademarks and registrations are the property of their respective owners Published in New Zealand Navman Australia Suite 2 408 Victoria Rd PO Box 479 Gladesville NSW 2...

Page 36: ...MN000498A Lat 36 48 422 S Lon 174 44 480 E...

Reviews: