background image

User's manual NAVIGON 72XX 

- 12 - 

Before you begin 

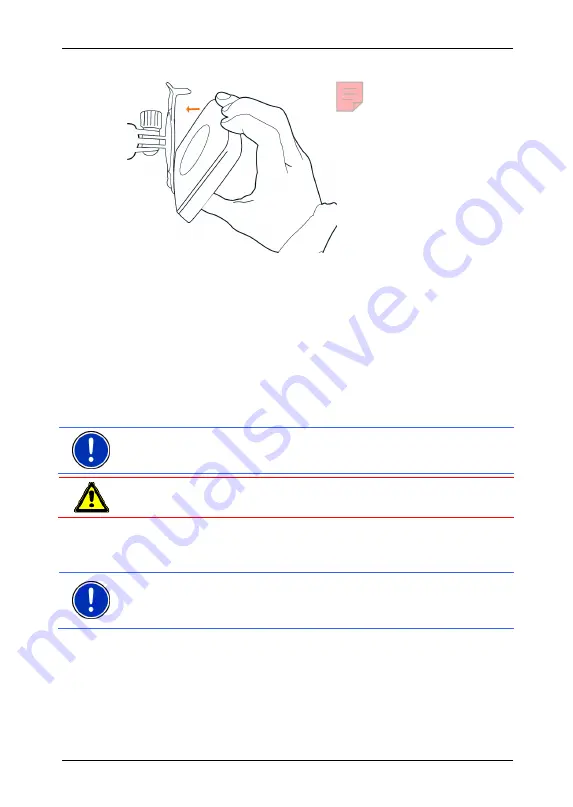
Inserting the navigation device into the cradle 


On the back of the 

NAVIGON 72XX

 there is a circle with two openings. 

1.  Hang the navigation device with the upper opening on the upper 

nose of the holder. (See illustration) 

2.  Then press it towards the holder until it locks in place. 

Supplying power to the navigation device 

Included in delivery of the 

NAVIGON 72XX

 is a car charger cable with 

which power can be supplied to the navigation device via the vehicle's 
cigarette lighter. 


Connect the car charger cable to the vehicle's cigarette lighter and 
to the mini-USB socket on the navigation device. 


Note:

 Without delay, plug the USB connector into the navigation device 

as far it will go! (Refer to "Troubleshooting" on pag64) 


Caution!

 Connect the car charger cable only to 10-24V cigarette 

lighters. 


During charging, the LED on the bottom of the navigation device shines 
with an orange light. 
The diode lights up green when the battery is fully charged. 


Note:

 It takes approx. 4-5 hours to charge the device when the battery 

is flat. 
A fully charged battery enables 3 hours of use. 


Removing the navigation device from the cradle 

There is a crank at the bottom ot the holder where you have hung the 
navigation device. 
1.  Pull the crank towards you so that the device unlocks. 
2.  Remove the device upwards from the cradle. 

Summary of Contents for 72 Series

Page 1: ...User s manual NAVIGON 72XX English United Kingdom August 2008 ...

Page 2: ...AVIGON AG Schottmüllerstraße 20A D 20251 Hamburg The information contained herein may be changed at any time without prior notification Neither this manual nor any parts thereof may be reproduced for any purpose whatsoever without the express written consent of NAVIGON AG nor may they be transmitted in any form either electronically or mechanically including photocopying and recording All technica...

Page 3: ...evice 9 2 3 3 Safety guidelines when installing the device in your car 10 2 4 Preparing the NAVIGON 72XX for use 10 2 4 1 Mounting the navigation system in the vehicle 10 2 4 2 TMC antenna 13 2 4 3 Memory card 13 2 5 Navigating with GPS 13 3 Switching on the NAVIGON 72XX 14 3 1 Options 14 4 Password Lock 15 4 1 Activating password protection 15 4 2 Changing a password 15 4 3 Cancelling password pr...

Page 4: ...3 6 4 1 Entering the starting point 33 6 4 2 Entering route points 34 6 4 3 Editing route points 34 6 4 4 Managing routes 35 6 4 5 Calculating and Displaying Routes 35 6 4 6 Simulating routes 36 6 4 7 Starting navigation 36 6 5 Options 37 6 6 Working with the map 39 6 6 1 Selecting the navigation map 39 6 6 2 Map in Preview mode 39 6 6 3 Map in Navigation mode 40 6 6 4 Reality View PRO 43 6 6 5 Ma...

Page 5: ...t 55 7 5 2 Handsfree Settings 56 7 5 3 Bluetooth Function 56 7 6 Connection with Mobile Phone 57 7 6 1 Establishing a connection from the navigation device 57 7 6 2 Establishing a connection from the mobile phone 58 7 6 3 Terminating the connection and deleting the connection data 58 8 Configuring the NAVIGON 72XX 59 9 Appendix 61 9 1 Technical data 61 9 2 Identification and serial number 62 9 3 L...

Page 6: ...ollowing symbols refer to specific passages of text Instructions and tips for operating the software More detailed information and explanations Warnings 1 2 Legal notice 1 2 1 Liability The software and manual are subject to change without notice NAVIGON AG is not liable for the accuracy of the information contained in this manual or for damages resulting from the use of this manual Suggestions fo...

Page 7: ... www navigon com and click on Support There you will find an area with frequently asked questions FAQ Center along with details of how to contact us by phone or e mail 2 Before you begin 2 1 Scope of Delivery Please check that the contents are complete If anything is missing get in touch immediately with the dealer who sold you the product The purchased product includes the following NAVIGON 72XX ...

Page 8: ...ot for MicroSD memory card 8 On Off 9 Connection for external GPS antenna 2 3 Important safety information In your own interest please read the following safety information and warnings carefully before starting up your navigation system 2 3 1 Navigation safety information Use the navigation system at your own risk Caution To prevent accidents do not operate the navigation system while driving ...

Page 9: ...of your navigation system 2 3 2 Safety information for the navigation device Caution Protect the device from moisture The device is neither waterproof nor protected against splash water Caution Do not open the case of the navigation device under any circumstances Caution Do not expose the navigation device to extreme heat or cold This may damage the device or impair its function Refer to Technical...

Page 10: ...vent of an accident Caution Do not run cables directly next to safety relevant devices and power supplies Caution Check that the cradle is secured and adjusted properly before each journey The suction cup may become loose after a while Caution After installation check all safety relevant equipment in the car Caution Connect the car charger cable only to 10 24V cigarette lighters Caution Disconnect...

Page 11: ...d for this Securing the cradle 1 Clean that part of the windscreen to which you want to secure the cradle The windscreen must be dry and free of dirt and grease 2 Open the lever of the cradle s suction cup as far as possible 3 Set the holder with its suction cup to the windscreen 4 Press the lever on the suction cup towards the windscreen ...

Page 12: ...igarette lighter and to the mini USB socket on the navigation device Note Without delay plug the USB connector into the navigation device as far it will go Refer to Troubleshooting on page 64 Caution Connect the car charger cable only to 10 24V cigarette lighters During charging the LED on the bottom of the navigation device shines with an orange light The diode lights up green when the battery is...

Page 13: ...e NAVIGON 72XX may use maps from both of the memories The following memory media can be used in the NAVIGON 72XX MicroSD cards with 2 GB max 2 5 Navigating with GPS GPS is based on a total of at least 24 satellites which are circling the earth and constantly transmitting their position and time The GPS receiver receives this data and calculates its own geographical position on the basis of the inf...

Page 14: ... long time then the battery is possibly fully flat In this case you will have to charge the device for about 3 minutes before you can switch it on Forgotten your password If you forget your password follow the procedure described in Forgotten your password on page 16 Switching the navigation device off Press the On Off key until the device switches off about 2 seconds Note If you press the On Off ...

Page 15: ... digits 4 2 Changing a password 1 In the NAVIGATION window tap on Options Settings Options Password Lock The ENTER PASSWORD window opens 2 Enter the currently valid password in the Enter password box 3 Tap Change password The NEW PASSWORD window opens 4 Enter a password into the New password field and tap on Next 5 Enter this password again in the Confirm new password box 6 Tap Activate Note The n...

Page 16: ...sition cannot be calculated GPS Ready Data is being received from at least three satellites Position can be calculated For details of the GPS status refer to chapter GPS Status saving the current location on page 47 Compass The Compass symbol shows you in which direction you are currently heading It can indicate the following points of the compass N NE E SE S SW W NW TMC Traffic Information The NA...

Page 17: ... TMC function refer to chapter TMC Traffic Information on page 49 Energy The Energy icon can indicate the following states of the integrated battery The device is being supplied by an external power source The battery is fully charged The device is being supplied by an external power source The battery is being charged The device is being supplied by its internal battery The battery charge is suff...

Page 18: ...board A software keyboard appears on the screen when text entries are necessary All entries can be made on the software keyboard using your fingertips Only capital letters can be entered When entering town or street names you must not enter any special characters or umlauts The navigation system fills in these characters for you automatically When you are looking for e g a French town called Bärna...

Page 19: ...English Note Street names and place names can be entered only in the language of the user interface if that is how they exist in the map s database Note The maximum number of keyboards is always 2 Umlauts accents and other letters Another keyboard with special characters is available for each alphabet opens the keyboard with Latin special characters opens the keyboard with Cyrillic special charact...

Page 20: ...ins 5 or less entries 5 3 Options Some windows offer options that lead to more functions A description of all available options can be found in chapter Options on page 37 5 4 Menus Some buttons have menus which open when activated Tap on a menu point to execute its function If you would like to quit the options list without selecting a function tap on the button you used to open the menu 6 Navigat...

Page 21: ...l in order to switch off the navigation device The NAVIGATION window is opened From here you can access all the functions of the navigation application Tap on Phone in order to move the hands free module into the foreground Tap on Navigation in order to move the NAVIGATION window back into the foreground Initialising the GPS receiver As soon as the navigation device has been switched on initialisa...

Page 22: ...not saved You can enter an address here select a special destination or select a destination from the quick search function Note The first time that you want to enter a new destination you will be asked to select the country in which your destination is situated Under My Destinations the NAVIGON 72XX provides the following lists of destinations and addresses for you to select from LAST DESTINATION...

Page 23: ... number but know the name of a nearby side street then tap on the Cross Street box and enter the name of this street The navigation system will calculate a route to the intersection of the streets you have entered Note It is not necessary to enter all the address details If you specify the town only the navigation system will calculate a route to the town centre If you specify only the town and st...

Page 24: ...ns given by the navigation system When you have finished entering the address the map will open in Preview mode The destination is indicated on the map For detailed information on how to start navigation please refer to chapter Starting navigation on page 31 Please read on there Note The Voice Command function is not available for every language In the languages for which this function is not avai...

Page 25: ...ect categories from which no POI is to be found nearby If sub categories exist for the category you have selected the Sub Category list opens 3 Select the sub category from which you would like to select a POI The Name of the Destination list opens It contains the nearest POI in the specified category sorted by distance 4 Tap on the name of the destination Information from the navigation system s ...

Page 26: ...pens in Preview mode The destination is indicated on the map For detailed information on how to start navigation please refer to chapter Starting navigation on page 31 Please read on there POI in a particular location POI in a particular location can be useful when navigating in an unfamiliar town 1 In the NAVIGATION window tap on New Destination Search for POI in a City The POI IN A CITY window o...

Page 27: ...gate The map opens in Preview mode The destination is indicated on the map For detailed information on how to start navigation please refer to chapter Starting navigation on page 31 Please read on there Direct access to POI The quick access system contains 3 categories of special destinations Destinations in your vicinity that correspond to these categories can be listed quickly without the need f...

Page 28: ...tabase There is for example a telephone number available for many restaurants You can then call the restaurant to reserve a table for example One of the destination entry windows described above is open Tap on Options Info The DESTINATION INFO window opens It contains all the information about the specified destination that is stored in the navigation system s database Tap on Cancel in order to cl...

Page 29: ...ens in Preview mode The destination is indicated on the map For detailed information on how to start navigation please refer to chapter Starting navigation on page 31 Please read on there Note Favourites are displayed on the map by means of a little flag and with their names You may switch these displays on or off under Options Settings Map Display Categories Shown 6 2 8 Imported addresses Using t...

Page 30: ...If you have not yet entered your home address a dialog box will notify you of this Navigation starts The route profile used for the previous navigation will be applied 6 2 10 Selecting destinations on the map You may select a destination directly on the map This is a quick way to select towns streets and POI 1 In the NAVIGATION window tap on Show Map Tap on Options Show Map if the Voice Command bu...

Page 31: ...n of travel to be displayed instead Route Profile The route is calculated on the basis of a route profile If you want to view or change the route profile tap Route Profile Note If you change the route profile the changes will also apply to future navigations Information about individual route profile settings can be obtained by tapping the related Help button Turn by Turn List If you want to see d...

Page 32: ...and IMPORTED ADDRESSES lists can be saved in the FAVOURITES list This makes sense if you frequently navigate to a particular destination Note Favourites are displayed on the map by means of a little flag and with their names You may switch these displays on or off under Options Settings Map Display Categories Shown 6 3 1 Saving destinations 1 Enter a destination Refer to Entering an address on pag...

Page 33: ...ting point The starting point of a route is the point at which you want to begin your trip This is not necessarily the current location If you are planning a route for your holidays at home you could for example enter your hotel as the starting point The starting point is only important if you want to see a planned route on the map but currently have no GPS reception or if you are not currently at...

Page 34: ... destination 3 Enter the route point See the corresponding section of chapter Specifying a destination on page 22 ff 4 Tap Add The selected route point is now shown next to its flow number Repeat these steps for each destination that you want to add to your route 6 4 3 Editing route points Route points can be deleted from a route The order of the route points can be changed as you wish Note The st...

Page 35: ...ndow closes Loading routes 1 Tap on Options Saved Routes 2 Tap on the route that you want to load 3 Tap Load Route The ROUTE PLANNING window opens The starting point and the route points of the loaded route have been entered 6 4 5 Calculating and Displaying Routes It is possible to calculate and display a planned route on the map even without GPS reception in order to get an impression of the jour...

Page 36: ...lated and displayed a route Route Profile The route is calculated on the basis of a route profile If you want to view or change the route profile tap on Route Profile Note If you change the route profile the changes will also apply to future navigations Information about individual route profile settings can be obtained by tapping the related Help button Note If you load routes that come from a co...

Page 37: ...list or FAVOURITES list depending on where you opened the options The list is then empty A dialog window prompts you to confirm deletion Delete Deletes the selected destination from the LAST DESTINATIONS or FAVOURITES list or the selected route from the SAVED ROUTES list A dialog window prompts you to confirm deletion Direct Help Opens a window where you can quickly and easily find addresses and p...

Page 38: ...Refer to Saving destinations on page 32 Save Destination Saves the selected address in the FAVOURITES list Refer to Saving destinations on page 32 Save Route Opens a window in which you can save the planned route under a specific name Refer to Saving routes on page 35 Saved Routes Opens a dialog window into which you can load a saved route Settings Opens the SETTINGS window Here you can configure ...

Page 39: ...e contains any maps of countries on other continents 6 6 2 Map in Preview mode You have entered a destination and tapped on Start Navigation OR You have planned or loaded a route and tapped on Show Route The map opens in Preview mode The entire route is visible 1 The route is marked in orange 2 Your current position is indicated orange arrow If you display a planned or loaded route and the specifi...

Page 40: ... the route may be recalculated The starting point for the calculation will now be your current location You will first be guided to the first route point entered Tap on Options Turn by Turn List to view detailed directions for the route Refer to Turn by Turn List page 48 Tap on Destination search in order to view the map in Destination search mode Refer to Map in Destination search mode page 44 6 ...

Page 41: ...to detour the obstruction Detour or not Ignore If no distance is shown the system detours all reported obstructions concerning your route and implying time loss Tap on Traffic Information to display a list with all obstructions reported for your route Refer to TMC Traffic Information on page 49 Note Calculating detours around reported obstructions can be done automatically Refer to TMC Settings on...

Page 42: ...igured in Options Settings Navigation Some displays will only function if the required information is available on the map Note If you tap on the large arrow box the current route instruction will be repeated Tap on Options Turn by Turn List to view detailed directions for the route Refer to Turn by Turn List on page 48 Tap on Destination search in order to view the map in Destination search mode ...

Page 43: ...ock a section of the route that lies in front of you i e to recalculate the route in order to avoid this section e g if you have heard on the radio of a traffic jam affecting this section Refer to Block on page 47 Tap on this button again to remove the block POI on Your Route Tap on this button to display POI on your route This way you can quickly find out for example how far it is to the nearest ...

Page 44: ... Reality View mode is not available for all motorway junctions and three leg motorway junctions Availability is dependent on the map data in use 6 6 5 Map in Destination search mode The map is always in the Destination search mode when the cross hairs appear on it Indicated in the address box are the coordinates and where applicable the name of the street under the cross hairs When you are driving...

Page 45: ... search mode 1 Tap on the point to which you want to navigate The destination that you have selected appears under the cross hairs The geographical coordinates of the destination and the corresponding address are shown in the bottom third of the screen 2 Tap on OK Buttons with various functions will be displayed Take Me There Starts navigation to the selected point If you are currently navigating ...

Page 46: ...ions Direct Help The DIRECT HELP window opens If GPS reception is good enough the address and the geographic coordinates of your current location will be indicated Tap on Show on Map If you want your current location to be displayed on the map In the bottom part of the window there are 4 category buttons Petrol Station Police Station Hospital Pharmacy Tap the corresponding button The nearest locat...

Page 47: ...Options GPS Status The current location can be saved in the FAVOURITES list 1 Tap Save Position The SAVE DESTINATION AS dialog box opens 2 Enter a name for the destination 3 Tap Save 6 7 3 Block Tap this button to block off a section of the route For example you have heard about a traffic jam in this route section on the radio and now would like to calculate a route around this area Note The block...

Page 48: ...map is open in Preview mode Navigation mode or Reality View mode Tap on Options Turn by Turn List The TURN BY TURN LIST window opens 1 Schematic depiction of the next junction where you must make a turn 2 Distance to this junction 3 Route instruction and if available the name of the street into which you must turn 4 Indicates whether you want to drive on the route section in question or not Allow ...

Page 49: ... messaging If necessary it can change your route dynamically for example in order to avoid a traffic jam Note In many European countries TMC is for free In some countries PremiumTMC is offered additionally or exclusively which is with costs and which is supposed to be much more up to date and faster You can subscribe PremiumTMC services on our homepage www navigon com Displaying traffic informatio...

Page 50: ...is information is not shown in the Americas Note Most radio stations do only broadcast traffic obstructions in their own country Tune always stations of the country you are currently in Refer to Tuning Mode on page 50 6 Displays the reported obstruction as traffic sign 7 Displays the concerned road 8 Displays the obstructed road section 9 The navigation system can Detour or Ignore congestion on th...

Page 51: ...o the reported obstruction Tap on the Traffic Information box You can then decide whether an alternative route is to be calculated or not 6 7 6 Logbook You can use the NAVIGON 72XX to record a logbook The logbook is recorded in the Logbook xls file You can open the file with Microsoft Excel Each recorded trip is added at the bottom of the table as a new entry The first time a trip is recorded the ...

Page 52: ...phone Opening the hands free module Tap in the navigation application on Phone The HANDSFREE MODULE window opens Operating the hands free module All functions can be performed in the HANDSFREE MODULE window Tap on Navigation in order to move the navigation application into the foreground Tap on Back in order to close the hands free module and return again to the previously opened window 7 1 Connec...

Page 53: ...stablish a Bluetooth connection to your mobile phone contact your mobile phone manufacturer s customer support 7 2 Taking a call When you receive a call the INCOMING CALL window will open You will be asked whether you want to take the call The name and the number of the caller will be displayed if this information is available Tap on Yes if you want to take the call The CALL IN PROGRESS window ope...

Page 54: ...ntly to the navigation device It is available to the hands free module only for as long as it is connected to the mobile phone 7 3 4 Calling most recently dialled received or missed numbers Note The RECENT CALLS list contains outgoing incoming and unanswered calls Incoming and unanswered calls can be dialled only if the caller s number was transmitted 1 Tap in the HANDSFREE MODULE window on the Re...

Page 55: ...le if a further connection via a telephone system is necessary 1 Tap Keyboard 2 Enter the desired numbers 3 Tap on Back in order to open the CALL IN PROGRESS window 7 4 3 Transferring a call to the mobile phone In the CALL IN PROGRESS window tap on Options Use Mobile Phone Pick up the mobile telephone and continue the call 7 4 4 Ending the call Tap in the CALL IN PROGRESS window on the Hang up but...

Page 56: ... Call number 3 Touch the button Delete 4 Confirm the deletion of the speed call number The MODIFY PRESET window opens again No phone number and no name exist any longer for the selected Speed Call button 7 5 2 Handsfree Settings In the HANDSFREE SETTINGS window you can configure the settings for the phone functions of the hands free module of your NAVIGON 72XX In the HANDSFREE MODULE window tap on...

Page 57: ...Phone Note The Bluetooth functions of both the NAVIGON 72XX and the mobile phone must be configured accordingly in order for a Bluetooth connection to be established between the two devices For details of how to configure the NAVIGON 72XX refer to chapter Bluetooth Function on page 56 For details of how to configure the mobile phone refer to the related manual The NAVIGON 72XX can establish a conn...

Page 58: ...tooth devices The navigation device is detected as NAVIGON 3 Initiate a connection to the detected NAVIGON device The mobile phone prompts you to enter a password 4 Enter a four digit password user defined The NAVIGON 72XX prompts you to enter a password 5 Enter the same password in the Key box as on the mobile phone and tap on OK The HANDSFREE MODULE window opens A connection is established betwe...

Page 59: ...s in the START window and via the options in many windows of the navigation application Tap on Options Settings The SETTINGS window of the navigation application has several buttons Navigation Route Profile Map Display and General Tap on a button to open the corresponding settings window The settings of the individual windows are distributed over several screen pages You can switch between the set...

Page 60: ...The list closes The new value is indicated For each setting there is a Help button When you tap on it you will see an exact definition of the setting in question You can close the settings windows in two ways Tap OK Any changes you have made will be adopted Tap Cancel Any changes you have made will not be adopted ...

Page 61: ...missive Flash 2 GB Memory RAM 64 MB GPS yes SiRF GRF3i Built in antenna MMCX socket for external antenna TMC Yes Device keys 1 On Off Keyboard Software keyboard Loudspeaker Yes Microphone Yes Headset 3 5 mm phone jack Memory card MicroSD USB USB 2 0 I O Bluetooth Built in CSR BlueCore 4 With echo cancellation Power supply Via USB socket Type Li Ion 1600 mAh Rechargeable battery Running time Up to ...

Page 62: ...NAVIGON 72XX device described in this manual bears the following labels It is authorised for operation in the countries of the European Union Switzerland Norway and the countries of North America NAVIGON AG declares herewith that the NAVIGON 72XX device conforms with the Radio Telecommunication Terminal Equipment Directive R TTE 1999 5 EEC The direction of conformity can be found at the following ...

Page 63: ...ced radio TV technician for help This device complies with Part 15 of the FCC Rules Operation is subject to the following two conditions 1 This device may not cause harmful interference and 2 this device must accept any interference received including interference that may cause undesired operation This device and its antenna s must not be co located or operating in conjunction with any other ante...

Page 64: ...nada 10 Troubleshooting In this chapter you will find solutions to problems which may arise during use of the NAVIGON 72XX This list does not claim to be complete Answers to many other questions can be found on the NAVIGON AG website Refer to Questions about the product on page 7 I have connected a charger to the NAVIGON 72XX A connection to a computer is shown on the display or I have connected t...

Page 65: ...or at least 6 seconds The device is now switched off 2 Press the On Off key until the device switches on about 2 seconds The software will restart Your settings and your saved destinations and routes will not be deleted Note Use only accessories that are allowed by NAVIGON for the NAVIGON 72XX NAVIGON AG assumes no liability for errors or damages that might result from using different accessories ...

Page 66: ...t Access 27 Favourites 29 From Map 30 Home Address 30 32 Imported addresses 29 Input Sequence 23 Last Destinations 28 My Destinations 22 New Destination 22 POI 24 in a City 26 Nationwide 25 Nearby 25 Save 32 Start Navigation 31 Take Me Home 30 32 Turn by Turn List 31 Voice Command 24 Direct Help 46 E Energy 12 17 Entering data 19 F Favourites 29 32 G GPS Faulty reception 20 Initialise 21 Signals 1...

Page 67: ...inations 22 N Navigation Block 43 47 48 Interim Destination 43 No GPS 31 37 POI 43 POI on Your Route 43 Route Profile 31 36 Skip Route Point 43 Start 31 36 Turn by Turn List 31 36 Unblock 48 Navigation Application Exit 21 Start 21 NAVIGON 72XX Description 8 Energy 12 Installation 10 Memory card 13 Scope of Delivery 7 Start 14 TMC 13 New Destination 22 O Options 14 20 37 P Password Lock 15 Phone se...

Page 68: ...ear Connection Data 58 Connection with Mobile Phone 57 Handsfree Settings 56 Preset 55 Volume 52 Simulation Exit 36 Start 36 Skip Route Point 43 Software keyboard 18 Support 7 Symbols used in this manual 6 T Take Me Home 30 32 TMC Recalculate Route 51 Show 49 Symbols 16 Tuning Mode 50 TMC Settings Recalculate Route 51 TMC 50 Traffic Information 50 Tuning Mode 50 Trade marks 6 Traffic Information R...

Reviews: