background image

www.navig8r.com.au/m35 


34 

MAIN MENU 

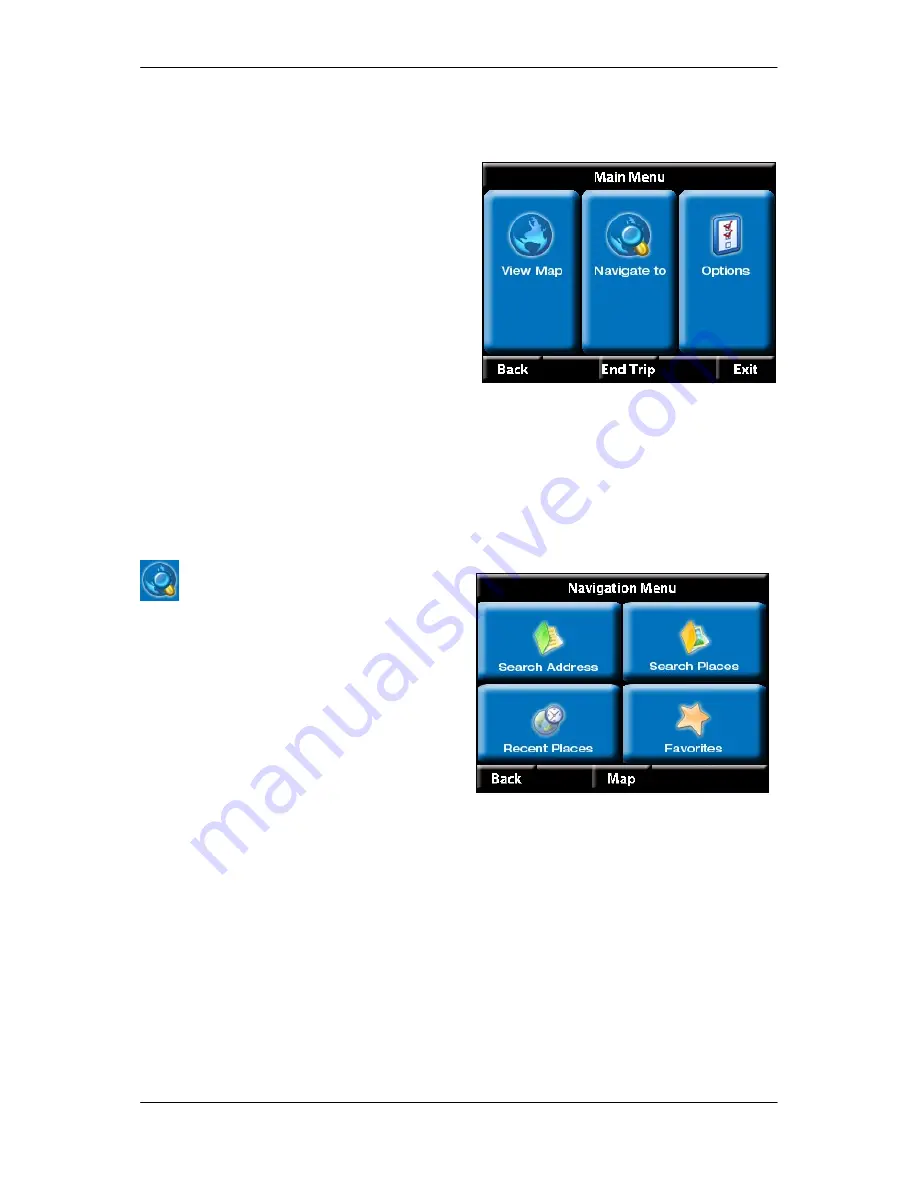
The Main Menu 

The Main Menu allows you to access the Main Map, the Navigation function and the 
options menu. 

Select from the following. 

View Map: Described previously. 

Navigate To:  For selecting the destination 
for your trip. 

Options: For setting the options for the Map, 
Sound and Trip options 

Back: Returns you to the Map screen. 

End Trip: Cancels your current Navigation. 

(In Navigation Mode only). 

Exit: Exits the Navig8r Navigation program and returns to the Main System Menu. 


The “Navigate To” Menu 

From the Navigation Menu, you can 
search for an address, Points of Interest, 
Recent Places navigated too and 
Favourites that you have added from 
previous trips. 

Select the required option for selecting 
your destination or tap the Back button to 
return to the Main Menu or the Map 
button to go to the Map screen.  


Summary of Contents for m35

Page 1: ...8 2 Battery Status 9 8 3 Navigation Icon 9 8 4 Multimedia 9 8 5 Photo 10 8 6 E Book Viewer 12 9 System Menu 13 9 1 Volume Setting 14 9 2 Date and Time Settings 14 9 3 Language 15 9 4 Power 16 9 5 Back...

Page 2: ...cation 32 18 16 Scrolling Maps 32 18 17 Immanent Direction Icon 33 19 The Main Menu 34 19 1 The Navigate To Menu 34 19 1 1 Entering Your Destination by an Address 35 19 1 1 1 Entering Your Destination...

Page 3: ...www navig8r com au m35 3 HARDWARE Hardware...

Page 4: ...n the dashboard of the car It should be removed and placed in a secure place along with the windscreen mount and power supply cable Do not leave the M35 Navig8r in direct sunlight when not driving the...

Page 5: ...Car Charger 5 USB Data Cable 6 4GB SD Card pre fitted to GPS 7 User Manual This Document Getting to Know Your M35 Navig8r Item Description Item Description 1 Touch Screen Panel 2 Charge Indicator Lig...

Page 6: ...hours in the first instance to charge and condition the battery It may take several charge discharge cycles for the device to reach peak endurance Subsequent charging should take less time to complet...

Page 7: ...possibility of damage caused by power surges when the vehicle is started the charger should not be connected to the GPS device when the vehicle is started The car charger supplies power to the device...

Page 8: ...oto Icon Launches the Photo display function F System Icon Enters the Main System Setup menu G E Book Icon Launches the E book viewer function H Time Display Displays current system time Main Menu Exp...

Page 9: ...s too low and requires charging when not connected to an external power supply 3 Navigation Icon Tapping this icon launches the main Navigation software Please refer to part 2 of the manual for detail...

Page 10: ...layback simply touch the screen again To stop playback and return to the main menu press the return button I 5 Photo 1 Tap photo on the main Menu Screen and enter the folder view 2 Tap the folder that...

Page 11: ...D Current image name E Zoom in on image F Zoom out on image G Rotates image 90 clockwise H Displays image in full screen Note If the image is too big to be displayed or the format is not supported th...

Page 12: ...folder that contains the text file to be displayed 3 Tap on the file that you wish to read and the test veiwer wil start automatically A Current file name B Stop viewer and return to Main Menu C Disp...

Page 13: ...urrent location within the menu structure B Date and Time Sets the systems time date and time zone C Language Sets the language displayed in the main system D Power Displays current battery charge sta...

Page 14: ...en Uncheck to disable Tap to return the previous menu Date and Time Settings Tap to the DateTime icon to set the system date time and time zone This screen displays the current date time and time zone...

Page 15: ...he button until the correct Time Zone is displayed for you current location Check or uncheck if you wish to have the system automatically adjust the clock for daylight saving Tap to return the previou...

Page 16: ...decrease Battery Allows the user to set the time backlight remains on after the last touch of the screen when the GPS unit is running off the internal battery AC Power Allows the user to set the time...

Page 17: ...t may vary from information in this image To calibrate the touch screen of the M35 Navig8r please tap the Calibration button Calibration of the Touch Screen should be completed using the supplied styl...

Page 18: ...stem should automatically detect the card Open the My Computer Window you should now be able to access the SD card in the card reader in the same way you can access other drives fitted to your compute...

Page 19: ...puter Connect the GPS unit to the computer using the supplied USB cable and turn the GPS unit on When the GPS unit is detected the Windows Mobile Device Centre window will be displayed Select Connect...

Page 20: ...creen Pictures JPG take a long time to load IF pictures are from a Digital camera try resizing the image Images only need to be 320 X 240 pixels This will save space on the card as well AVI files are...

Page 21: ...www navig8r com au m35 21 NAVIGATION NAVIGATION...

Page 22: ...place in a position that provides a clear view of the road ahead but should also be placed so that the driver does not have to look away form the road to check the screen The first time the GPS unit...

Page 23: ...t up tap the Tick icon to uncheck the box and then make your selection If the Start Demo option has been selected please tap a Demonstration Route to be viewed The Demonstration routes are recorded ac...

Page 24: ...www navig8r com au m35 24 MAIN MAP SCREEN Main Map Screen Getting to Know the Main Map Screen...

Page 25: ...nstruction on route 7 15 Zoom in Out on map Zooms in or out on maps Speed dependant 8 Speed Red Light Camera Alert Displayed when within 250 meter of known camera location camera 9 Exit to Main Menu B...

Page 26: ...4 GPS Signal Indicator for more details 3 Quick Options Menu Only displayed when in route this menu gives several quick options for changing the criteria for the current route A Toll Road When select...

Page 27: ...ng message will be displayed on the main map screen if the trip has been paused Tap on the icon in the Quick Trip options to resume the trip or on the warning message 4 GPS Signal Indicator The GPS si...

Page 28: ...e more accurate the data from the GPS satellites is Tap on the Back or Map buttons to return to the main map screen 5 Battery Level Indicator This icon shows the current level of charge remaining in t...

Page 29: ...ing normal driving and Navigation the M35 will auto zoom to a level that is determined to offer the best level of detail for the road ahead at the current speed Zooms in on the map Zooms out on the ma...

Page 30: ...ain Menu Button This buttons opens the Main GPS menu for Settings Route and General options and Destination options Please see The Main Menu Section in this manual 10 Current Speed Indicator Speedo Tr...

Page 31: ...tics page displays the same information it is calculated in a different manner This information is calculated from when the system was turned on or when it was it was last reset Tap the Reset button t...

Page 32: ...isplayed In Navigation Mode tap on the road name to toggle between the current road name and the Estimated Time of Arrival to you destination The ETA show distance to destination in Kilometres and the...

Page 33: ...you have finished tap on the back button to return view to the normal position This feature can only be made when maps are shown in 2D mode 17 Immanent Direction Icon This is displayed on the screen w...

Page 34: ...options Back Returns you to the Map screen End Trip Cancels your current Navigation In Navigation Mode only Exit Exits the Navig8r Navigation program and returns to the Main System Menu The Navigate T...

Page 35: ...ard Tap on the 3 Step Wizard icon to begin entering you destinations address Step 1 The Town City or Suburb Using the stylus spell out the name of the city town or suburb of your destination After the...

Page 36: ...f you do not know the exact number of your destination you can choose to enter in the name of the nearest cross street to your destination This feature is only available via the 3 Step Wizard option O...

Page 37: ...giana Terace in Gosford you would enter 120 GEO TCE GOS If more than one address is possible from the combination entered they will be displayed in list form To veiw the list tap the List button Use t...

Page 38: ...Step Wizard or the Quick Step method you can fine tune or alter the destination on the screen using the stylus zoom in or out Scroll the map and then pin point the a destination on he map to be used a...

Page 39: ...r instance it is not possible to travel by road from Sydney to Hobart by road The M35 can only calculate routes that are connected by a valid road The software does not include tracks or trials that a...

Page 40: ...e Quickest route option Walking The Walking option will calculate a route to your destination and may direct you along one way streets the wrong way over footbridges and along paths Some routes may be...

Page 41: ...f POI that you are looking for Use the button or the button to scroll through the options and when you have found the right catergory tap it to hightlight it and then press the OK button Enter the nam...

Page 42: ...n the trip to the location Searching By Name Tap the Nearest button and then select the type of POI that you are looking for Use the button or the button to scroll through the options and when you hav...

Page 43: ...highlighted address in the Recent Places list To continue tap the Confirm button to begin the trip Show On Map Displays the location of the highlighted address on the map When shown tap the Back butto...

Page 44: ...art Trip This option will start the Navigation process to the highlighted address in the Recent Places list To continue tap the Confirm button to begin the trip Show On Map Displays the location of th...

Page 45: ...y the on the button UBD Style Daylight Maps The look of these maps should be familiar to users of UBD map books The maps are easy to read and the colours and layout are designed for easy visibility in...

Page 46: ...he driver a sense of perspective on the route ahead The last 2 settings change the layout of the Keypad for address entry The current options will be flagged by the on the button Qwerty Sets the Keybo...

Page 47: ...oads used on this trip it may take longer that the Quickest Route option Walking The Walking option will calculate a route to your destination and may direct you along one way streets the wrong way ov...

Page 48: ...low you to get use to the M35 in Navigation mode It can also be used to check out settings made in the Look Feel before using it on the road Demonstration routes will run at 5 times the normal speed S...

Page 49: ...the computer in the first part of the manual for instruction for connecting the M35 to your computer Before attempting the update you should exit the Navigation program and return to the Main System M...

Page 50: ...your computer as described in the section Connecting the GPS to the computer in the first part of the manual This can be completed by connecting the computer directly or by placing the SD card in the...

Page 51: ...n receive signals from at least 6 of these satellites GPS satellites transmit signals constantly These signals are aimed at earth based receivers such as GPS navigation systems Each satellite transmit...

Page 52: ...pheric conditions signal reflection or multipath and clock errors Most of these errors are small and are usually only apparent when stationary Typically a personal GPS unit is accurate to within 15 me...

Page 53: ...reception as well as introduce Phantom Signals or Multi Path These are signals that are reflected of buildings and other surfaces These signals can make it hard for the GPS receiver to function correc...

Page 54: ...OA period please contact technical support on 1300 655 044 for the warranty process Please remember a proof of purchase will be required for any warranty claim Q I have finger prints over the screen o...

Page 55: ...charger is not included Q Why do I sometimes find map errors A While all care is taken there are a lot of roads out there and traffic signals detours etc are constantly being made to roads Sometimes...

Page 56: ...hat is the returns warranty procedure for these units A Contact technical support on 1300 655 004 Within Australia Q Fatal Application Error A During the operation of the GPS unit you may receive the...

Reviews: