background image

51                                                                                                                                               52 

8.3 

SETTING UP YOUR MICROPHONE 


8.3.1 

INSTALLING THE BATTERY PACK


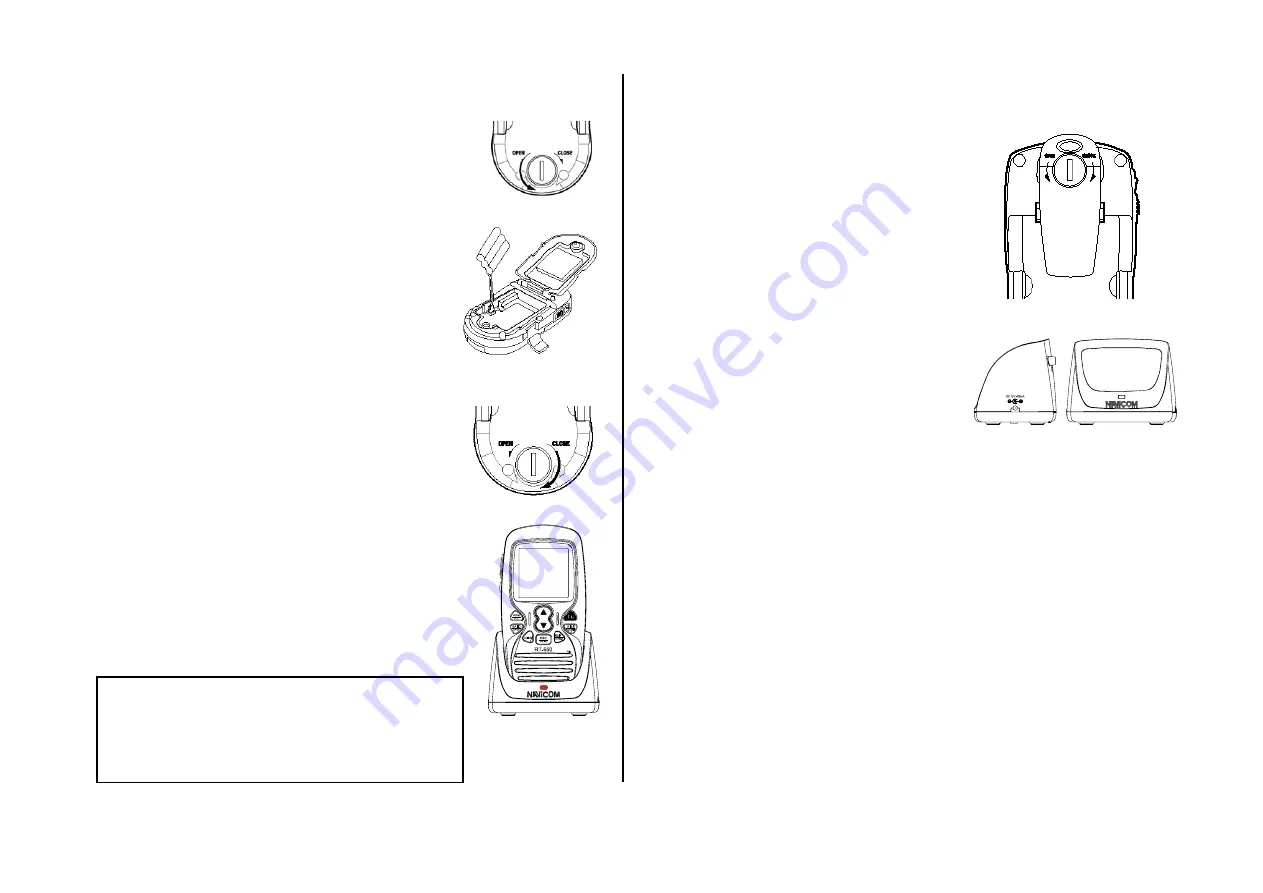
1. Use a coin or screw driver to loosen the screw 
on the cover, open the cover of battery 
compartment. 
 
2.  Connect the battery pack connector observing 
the correct polarity (black and red wires) to the jack 
inside the battery compartment. Do not exert any 
force on this connection. It could cause damage to 
the battery or handset. 
 
The plastic connector will fit together only one way. 
Once you are certain that you have made a good 
connection, then insert the battery pack into the 
battery compartment. Do not pinch the wires. 
 
 
3. Tighten the screw on the cover. 


8.3.2 

CHARGING THE BATTERIES 

Before you use rechargeable batteries, you must 
charge tem 
 
The microphone has a built-in circuit that lets you 
recharge batteries inside of the microphone. To 
charge the batteries, install the batteries in the 
microphone then slide it into the suplied cradle. 


Caution: To ensure proper charging and avoid accidental release, always 
FIRMLY lock the handset into the charger 


8.3.3 

INSTALLING THE BELT-CLIP 

1. Place the belt-clip on the mounting area on the 
back of the Handset, making sure the hole in the 
clip lines up with the notch on the back of the 
Handset 
 
2. Insert the screw into the corresponding hole and 
tighten. 


8.3.4 

MOUNTING THE CRADLE CHARGER 

1. Mount the drop-in charger to either a bulk head 
or dash. 
 
2. Plug one end of the AC adapter into a wall 
outlet, or the DC adapter into a cigarette lighter 
socket, and the other end into the drop-in charger. 
* Please turn the power Off on the handset before 
charging. 
 

8.4     BASIC OPERATION 

 
8.4.1 LINK THE WIRELESS MICROPHONE TO THE MAIN RADIO 

 
The optional RT-650-M Remote-control wireless Handset Microphone can be 
connected to the transceiver directly, without limits of wires, you can use it to 
control and communicate the radio from almost anywhere aboard your vessel. 


Before your first use the remote-control wireless microphone, the microphone 
must be subscribed as optional accessory to the NAVICOM marine radio. 
 
The following details the subscription between the radio and microphone 


1) Remote-control microphone: 

Turn on the unit by hold down the PWR button more than 2 seconds, until the 
LCD appears “Power On”, then immediately press “HILO/SCAN” button, LCD 

WARNING! 

Before you use rechargeable batteries for the first 
time, charge them for 14 hours to bring them to a 
full charge. Discharged batteries take about 14 
hours to fully recharge


Summary of Contents for RT-650

Page 1: ...ency energy and if not installed and used in accordance with the instructions may cause harmful interference to radio communications and human body Never transmit before you make sure the antenna is properly installed This device is only an aid to navigation Its performance can be affected by many factors including equipment failure or defects environmental condition and improper handling or use I...

Page 2: ...L USING THE CALL LOG 26 5 2 7 SEND AN IND CALL USING THE DISTRESS LOG 27 5 2 8 POS REQUEST AND POP REPLY 27 5 2 8 1 POS REQUEST 27 5 2 8 2 POS REPLY 28 5 3 RECEIVING DSC CALL 28 5 3 1 DISTRSS CALL 28 5 3 2 DISTRSS ACK FROM A COAST STATION 29 5 3 3 DISTRESS RELAY CALL 29 5 3 4 ALL SHIPS CALL 29 5 3 5 GROUP CALL 30 5 3 6 INDIVIDUALCALL 30 5 3 7 POSITION RELAY CALL 30 5 3 8 GEOGRAPHIC AREA CALL 30 6 ...

Page 3: ...OOK AT THE DISPLAY OF HANDSET 50 8 3 SETTING UP MICROPHONE 51 8 3 1 INSTALLING THE BATTERY PACK 51 8 3 2 CHARGING THE BATTERY 51 8 3 3 INSTALLING THE BELT CLIP 52 8 3 4 MOUNTING THE CRADLE CHARGER 52 8 4 BASIC OPERATION 52 8 4 1 LINK THE WIRELESS MICROPHONE TO THE RADIO 52 8 4 2 TRANSMISSION AND RECEPTION 53 8 4 3 BAND SWITCH 54 8 4 3 1 USA AND INT MODE 54 8 4 3 2 SAVE MEMORY FAV CHANNELS 54 8 4 4...

Page 4: ...of waterproof complying with Japanese Industry Standard level 7 25 watts high output power allows you make contact with others in a long distance of marine communication and 1 watt low power for short distance Separate 16 button for quick selection of the emergency call on CH16 Adjustable brightness of backlit for good visibility of the large LCD in various circumstance External interface easy to ...

Page 5: ... a signal of distress in case of emergency See DSC Operation for details of sending the call This button is cover by a spring cover NOTE The Distress Function or any other transmitted DSC function does not work unless a user s MMSI has been entered 12 LCD Large LCD 39mmx39mm with viewable area of graph dot matrix makes it easy to be read 13 Built in Speaker Guarantee a clear ring and voice communi...

Page 6: ...wer set to 25W Lo appears while power set to LO BUSY TRANSMIT INDICATOR Appears when receiving a signal or when the squelch opens Appears while transmitting SCAN INDICATOR SCAN appears during normal scan P SCAN appears during priority scan MESSAGE UNREAD INDICATOR The Envelop icon appears if there is received DSC call you had not read yet DUPLEX INDICATOR Appears when a duplex channel is selected ...

Page 7: ... at least 3 feet from radio 3 3 CONNECTIONS POWER SUPPLY You radio should be powered by a 13 8VDC power supply Red cable is for positive pole and the thicker black one is for negative pole EXTERNAL SPEAKER If needed you can connect your radio to an external speaker with the supplied connection cable White cable is for positive pole and the thinner black one is for negative pole GPS EQUIPMENT and P...

Page 8: ... you can not reach behind the mounting surface to attach the nut on the bolts use the supplied self tapping screws to fasten the bracket 7 Insert the four fixing screws and fasten them with a Philip screw driver with attention not to screw too tightly 8 Mount the base station onto the bracket with notice of the matching of the protuberances on the both inner side of the bracket and the pits on the...

Page 9: ... between the base station and the wall hanger should be less than the length of the handset cable 4 BASIC OPERATION 4 1 TRANSMISSION AND RECEPTION CAUTION Transmitting without an antenna may damage the radio 1 After the radio has been installed make sure of the power supply and antenna being properly connected 2 To rotate the VOLUME POWER knob clockwise turn on the radio and select a comfortable v...

Page 10: ... SCAN Scanning is an efficient way to locate signals quickly over a wide frequency range The transceiver has 4 Scan modes available All scan FAV CH scan Priority scan and Priority FAV CH scan 1 Briefly press the SCAN button to default all scan 1 2 3 4 2 Press and hold SCAN Button over 3sec the Priority scan icon 1 16 2 16 3 16 will be selected Pscan will be appeared on LCD Press SCAN again to turn...

Page 11: ...cue To be effective as a safety device this equipment must be used only within communication range of a shore based VHF marine channel 70 distress and safety watch system The range of signal may vary but under normal conditions should be approximately 20 nautical miles 5 2 DSC CALL TYPES Press the DSC MENU button to pop up the menu for user to select the DSC call type to send Note that only three ...

Page 12: ...n Rotate the CH knob to select ALL SHIPS Press the CH knob to enter ALL SHIPS The All Ships menu displays LCD the categories from which you can select 2 Rotate the CH knob to select SAFETY presses the CH knob to enter All Ships Safety send 3 Rotate the CH knob to select the working channel or press 16 button to quit 4 Press again and release the CH knob to advance the screen if send the call 5 Pre...

Page 13: ...rocedures are as same as manual send an individual call 5 2 4 3 ACKNOWLEDGEMENT OF AN INDIVIDUAL INCOMING CALL The EUR requires the operator to manually send an acknowledgement to the requesting radio Press CH knob to send an acknowledgement or CANCEL button to cancel The USA will automatically send an acknowledgement to the requesting radio within 10 seconds of receiving the call 5 2 5 LAST CALL ...

Page 14: ...d time information 3 Press CANCEL to record the received information then the screen goes back to default 5 3 RECEIVING A DSC CALL When a DSC call is received the radio automatically responds based on the type of call The information displayed on the LCD varies depending upon the call type See chart below 5 3 1 RECEIVING DISTRESS CALL 1 When a distress call is received the radio automatically tune...

Page 15: ...rm Tone Sounds The radio manually tunes to the channel designated in the DSC signal 2 The MMSI contained within the signal are displayed on the Text Area of the display If the MMSI correlates to an MMSI stored in the Buddy List the corresponding name is displayed in place of the MMSI 3 The DSC signal data is stored in the Call Log 5 3 7 RECEIVING AN POSITION Reply CALL 1 When Position Reply receiv...

Page 16: ...rm a selected item for adjustment push the CH knob When the desired setting is done press the CH knob to enter the setting and move back to the Main Menu list 4 Set Up operation is exited by turning the unit off All changes are saved in EEPROM 6 3 BUDDY LIST The Buddy List can store up to 20 entries with Name and MMSI User can add edit or delete the record from the list under this submenu 6 3 1 AD...

Page 17: ...n or is not functional a manual latitude longitude position and UTC should be entered and used in the DSC distress transmitted message When valid Lat Lon information is detected the data is display on the LCD when there is no valid position information NO GPS INFORMATION appears 6 7 1 MANUAL ENTER GPS DATE If no GPS data is available the NO GPS INFORMATION appears and after 2 minutes PLEASE INPUT ...

Page 18: ... Setup submenu there are 5 items that user can alter settings including Language CH name Ring Volume Button beep INT Speaker 6 8 1 LANGUAGE SELECTION Select the Menu language in English or French as desired 6 8 2 CHANNEL NAME DISPLAY AND EDITING To set the channel name for ON or blank on the first line Maximum of 12 characters could be set for channel name Channel name also allows editing the ways...

Page 19: ...ust enter your user MMSI first then you can access the DSC functions 1 Select DSC SETUP then USER MMSI and press the CH knob If an existing MMSI is stored the values appear 2 If the MMSI is blank a dashes line appears Enter user MMSI along the dashed line Press the CH knob to confirm each correct entry to move to the next digit If your make an error press until appears then press the CH knob to ba...

Page 20: ...r make an error press until appears then press the CH knob to backup and correct the entry 3 Hold the CH knob to store your ATIS MMSI 4 Enter your ATIS MMSI again as a password check hold the CH knob to permanently store the your ATIS MMSI and return to the menu 5 You can view your stored ATIS MMSI at anytime by selecting ATIS MMSI in the DSC SETUP menu 6 9 4 ATIS ENABLE When ATIS is enabled the f...

Page 21: ...s via dedicated VHF frequencies in the maritime band AIS will not replace radar because it is unable to detect landmasses and navigational beacons but it can be used as a significant enhancement to currently available technology 7 2 CLASSES OF AIS Your Navicom radio RT 650 is a receive only unit that will receive messages from vessels carrying Class A or Class B transceivers Class A A Class A tran...

Page 22: ...rse alteration based on the following tables Ships Dynamic Conditions Normal reporting interval At anchor or moored 3 Minutes 0 14 knots 10 Seconds 0 14 Knots and changing course 3 1 3 Seconds 14 23 knots 6 Seconds 14 23 Knots and changing course 2 Seconds Ship faster than 23 knots 2 Seconds Ship faster than 23 Knots and changing course 2 Seconds Platforms condition Normal reporting interval Class...

Page 23: ...lay in the format of Ship MMSI or Ship Name 7 4 2 2 AIS DATA DISPLAY MODE There are 3 mode concerning the AIS information Plotter mode List mode Information mode Notes Press 16 PTT Distress will return to normal mode in all 3 modes List mode In non menu mode long pressing the CH button to enter the List mode Rotate the channel knob will select the two closed ship The ships list will be sorted acco...

Page 24: ...d backlit control buttons make it easy to use even in extreme lighting and weather conditions You should read the rest of this Owners Manual thoroughly to acquaint yourself with all of your microphone s features and functions 8 1 LOOK AT THE MICOPHONE VOL PWR Hold down for 2 seconds to turn on or off Briefly press to select the volume setting mode BAND SAVE Press to select band USA Or INT Hold dow...

Page 25: ...he menu PTT Press to Transmit SQL LOCK Press to turn on the squelch setting mode Hold down to Lock Unlock the button board 11 INTERCOM Select to Internal communication mode 12 LCD Display screen 13 MIC Receive your voice 14 SPEAKER 8 2 A LOOK AT THE DISPLAY OF WIRELESS HANDSET The screen is similar to the LCD of fixed radio except the following SQL and VOL indicator Volume INDICATOR Appears while ...

Page 26: ...Handset making sure the hole in the clip lines up with the notch on the back of the Handset 2 Insert the screw into the corresponding hole and tighten 8 3 4 MOUNTING THE CRADLE CHARGER 1 Mount the drop in charger to either a bulk head or dash 2 Plug one end of the AC adapter into a wall outlet or the DC adapter into a cigarette lighter socket and the other end into the drop in charger Please turn ...

Page 27: ... displayed Speak clearly in a normal voice into the microphone on the wireless handset Once the transmission is finished release the PTT button The radio will return into receive mode Icon appear on screen 8 4 3 BAND SWITCH 8 4 3 1 USA AND INT MODE 1 Press the BAND SAVE button to switch the operational channel band USA INT 2 The icon will be displayed on the LCD for USA mode the icon will be displ...

Page 28: ...GPS input is made for 23 5 hours No GPS Information will disappear from the screen The position data transmitted goes to 9 s and all the time data goes to 8 s 8 4 7 INTERCOM Internal Communication The intercom feature lets you call and communicate with wireless handset connected to the radio Please reference to previous description on section 4 8 8 5 SETTING MENU SET UP MENU NAVIGATION 1 To access...

Page 29: ...no DISTRESS button with red cover on wireless handset You CAN T send DISTRESS call via wireless handset 9 MAINTENANCE Your VHF Marine Radio RT 650 is a marine radio of water proof who can meet the requirement of JIS level 7 gives you a good reliability when using in marine circumstance The equipment is designed to be maintenance free To keep your radio in good working condition Never unscrew the e...

Page 30: ...r 2W 8 Ohm Audio Distortion 10 RF Output Power High 25W Low 1W Harmonic Emissions High 80dB Low 60dB AIS Receiver Frequency Range 161 975 and 162 025 MHz Number of Channels 2 Local Oscillator mode PLL Sensitivity 20 BER 2 uV Spurious Resp Rej 70 dB Adjacent Channel selectivity 70 dB Intermodulation Response 68 dB 2 4GHz wireless RF link Frequency Range 2401 056 2482 272 MHz Number of Channels 95 S...

Page 31: ...61 62 ...

Page 32: ...CE certificate CE certificate ...

Reviews: