background image

4.3.5

Recording a Pattern with the Software


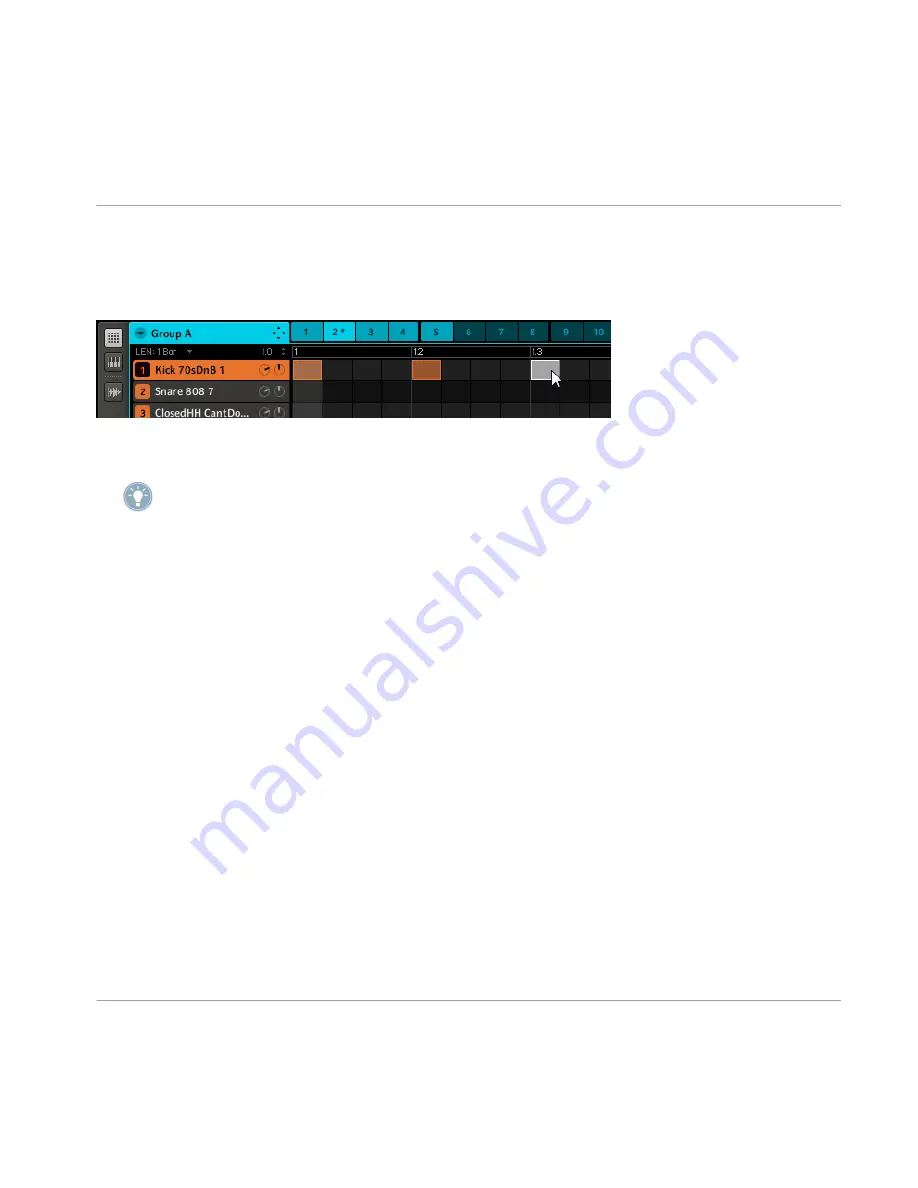
 In the MASCHINE Software, set a step by double-clicking into the Grid to the right of

the respective Sound.

 To clear the step, right-click (on Mac OS X: [Ctrl]+click) it. You may also drag it to the

right or left, or stretch it by dragging its right border.

There is an Undo function available that you can access from the MASCHINE Software's 

Edit

menu or by pressing [Ctrl]/[Cmd]+[Z] on your computer keyboard.

4.4

Creating Patterns in Keyboard Mode


Now lets add a melody and bass line to our drums. With MASCHINE you may choose an
internal tonal Sample in the way you chose a drum Sample as described in 

4.2, Selecting

Sounds and Creating a Group

 or, alternatively, you may use a VST/AU plug-in instrument

as your sound source as described in 

4.5, Creating Patterns with Plug-in Instruments

.

If you prefer to play your melodies with a MIDI keyboard, connect it to the MIDI In on the
MASCHINE Hardware. You can also use any USB MIDI keyboard selected in the Audio and
MIDI  Settings
  window.  The  connected  MIDI  input  device  will  always  play  the  selected
Sound.

Creating a Pattern

Creating Patterns


MASCHINE - Getting Started - 48

Summary of Contents for Maschine

Page 1: ...Getting Started...

Page 2: ...uments NI and associated logos are registered trademarks of Native In struments GmbH Mac Mac OS GarageBand Logic iTunes and iPod are registered trademarks of Apple Inc registered in the U S and other...

Page 3: ...e Str 29 30 D 10997 Berlin Germany www native instruments de USA Native Instruments North America Inc 6725 Sunset Boulevard 5th Floor Los Angeles CA 90028 USA www native instruments com Native Instrum...

Page 4: ...PORT Section 18 2 1 5 PADS Section 20 2 2 MASCHINE Software 22 2 2 1 The Header 23 2 2 2 The Browser 25 2 2 3 Arranger 26 2 2 4 Control Area 27 2 2 5 Pattern Editor 28 3 Overview of a MASCHINE Project...

Page 5: ...4 5 1 Module Slots 51 4 5 2 Defining Sources for Module Slots 51 4 5 3 Loading an Instrument Plug in 52 4 5 4 Opening and Closing Plug in Windows 55 4 6 Mute Solo 57 4 6 1 Hardware 57 4 6 2 Software...

Page 6: ...a Sample 86 8 3 Slicing a Sample 88 8 4 Mapping Samples 91 9 Managing Projects 94 9 1 Saving Sounds Groups Patterns 94 9 1 1 Saving a Sound 94 9 1 2 Saving a Group 95 9 1 3 Saving a Pattern 95 9 2 Sa...

Page 7: ...epeat 102 10 6 Set up your own Multi effect Groups 102 10 7 Use a Limiter on your Master 102 10 8 Hook up your other gear and sync it with MIDI clock 102 11 Glossary 103 Table of Contents MASCHINE Get...

Page 8: ...DAW that supports VST Audio Units or the RTAS format with multiple instances you can profit from its abilities in almost any software setup or use it as a stand alone application You can sample your o...

Page 9: ...hard drive or other storage devices is printed in italics Text appearing elsewhere labels of buttons controls text next to checkboxes etc is printed in blue Whenever you see this formatting applied yo...

Page 10: ...to the first sound coming through your speakers This should be your first stop in learning MASCHINE First read the Setup Guide Then proceed with this MASCHINE Getting Started Guide to get more famili...

Page 11: ...What you are reading now is the MASCHINE Getting Started Guide Manual This manual is structured as follows The first part is this introduction Chapter 2 quickly introduces you to the MASCHINE hardware...

Page 12: ...by saving different elements independently so you can easily use and find them in other Projects Chapter 10 provides some hands on tips for producing music with MASCHINE as well as for performing liv...

Page 13: ...should have read the printed Setup Guide included in the product box and will have setup MASCHINE by making the necessary connections and configuring the software Please take the time to read this ch...

Page 14: ...ccess to all Sound Group and Master parameters via the knobs and encoders The displays offer visual feedback on MASCHINE s current state which is mirrored in the software For more information on this...

Page 15: ...section Access the various modes of MASCHINE using the vertical row of buttons on the left hand side of this section By pressing any of the 16 pads you will hear the cor responding Sound assigned to...

Page 16: ...and fast er than anything you ve experienced before Anytime you press the BROWSE button the characteristics of the currently selected Sound are used to filter the Library e g Drums Snare Analog so th...

Page 17: ...ameter shown in the display above it When AUTO WRITE is pressed parameter changes are instantly recorded to an automa tion track 2 1 2 MASTER Section MASTER section overview 1 3 VOLUME TEMPO and SWING...

Page 18: ...2 1 4 TRANSPORT Section TRANSPORT section overview 1 RESTART button Press the RESTART button to restart the track at anytime Playback will begin at bar 1 of the project 2 Step Backwards button Skip b...

Page 19: ...ic erasing needs to be as quick and simple as re cording so there is a dedicated button for this Hold the ERASE button during playback and press any number of pads to erase the events of the currently...

Page 20: ...eate a new one during playback In this mode Dimmed pads show which Patterns contain Events fully lit pads show the currently selected Pattern 3 PAD MODE MASCHINE is designed to record drum sounds but...

Page 21: ...elected events 7 SOLO Instantly solo any Sound or Group equals muting all other Sounds Groups useful to tweak the sound or for performing live Sounds and Groups that are muted are represented by their...

Page 22: ...nect to MASCHINE controller and monitor your com puters CPU usage 2 Browser The Browser is your tool for managing finding tagging and categorizing Projects Groups Patterns Sounds Samples FX and Plug i...

Page 23: ...n MASCHINE is used as a DAW plug in 2 Browser button Use the Browser button to toggle the Browser The Browser is your tool for managing finding tagging and categorizing Projects Groups Patterns Sounds...

Page 24: ...cessary using export Please refer to the Reference Manual for more information on exporting audio from MA SCHINE 8 Volume control Shows the amplitude of the MASCHINE audio output and features an integ...

Page 25: ...ins 7 icons each representing the different files types of MASCHINE From the left to right the file types are Project Group Sound Pattern Instru ment FX and Sample By clicking one of them it causes on...

Page 26: ...st displays all files that match your query 6 Tag Editor The Tag Editor allows you to edit Tags applied to files and add Tags to new files from the three available categories 7 Audition controls This...

Page 27: ...erty Pages Controls on the Sound Page affect the sound of the currently selected Sound Slot 1 16 4 Module tabs 1 4 There are four modules on each project level Sound Group and Mas ter They can contain...

Page 28: ...blocks known as Events from the selected Pattern Slot In Pattern Editor view these represent each part of your drum pattern In Pia no Roll Keyboard view they represent musical notes The Events can be...

Page 29: ...tern Slots Each Group has 4 Pattern Banks which can contain up to 64 Patterns known as Pattern Slots Each slot can contain many Events to make up a single Pattern This can be a drum pattern or musical...

Page 30: ...and it has the file extension mprj A MASCHINE Project contains all the information stored with a MASCHINE produced piece of music In the following diagram we can see the different aspects of a MASCHIN...

Page 31: ...will explain these aspects in detail 3 1 1 Sound Content The sound content aspect of a MASCHINE Project The sound content aspect of a MASCHINE Project includes all the audio material the instruments...

Page 32: ...on the MASTER page affect the sound at the main outputs of MA SCHINE The controls on the GROUP page affect the sound of the selected Group A H The controls on the SOUND page affect the sound of the s...

Page 33: ...building a MASCHINE Song is as follows You load or sample audio into a Sound Slot 1 You record instances of your Sounds by playing the pads A recorded instance of a Sound is called an Event 2 Several...

Page 34: ...tever you want to call it An awful lot of terminology here but it sounds more complicated than it is you ll see For Completeness Now that you know about the core concepts let s have a quick look at th...

Page 35: ...Swing and viewing modes are also set here 2 The Browser Here you manage your audio content and effect presets For more de tailed information on the MASCHINE Browser please refer to the MASCHINE Refer...

Page 36: ...troller do The unlabeled buttons and knobs on the MASCHINE controller For better reference we applied a special formatting here throughout the document these elements are capitalized and numbered so t...

Page 37: ...specific control options When re leased the controller switches back to standard controller mode You can also lock controller modes so the controller doesn t switch back when releasing a mode button 1...

Page 38: ...in in Pad mode until you press Button 1 again For more detailed information on controller modes please refer to the Reference Manual Overview of a MASCHINE Project Controller Modes and Mode Locking MA...

Page 39: ...ad the Browser chap ter in the Reference Manual Hardware 1 On the MASCHINE controller press the BROWSE button In the left display you will now be presented with a selection of choices 2 Press the Butt...

Page 40: ...tern In the top row of the Browser click the Sample icon on the far right to get a list of all the available samples in the library Now activate Pre listen by clicking the Audition button with the lou...

Page 41: ...their names in the list and choose one you like Searching Samples by their names is not the only way to access the MASCHINE Library you can also use the Browser s Tag Filter to narrow down your search...

Page 42: ...d Slot 1 you will recognize that pad 1 on your hard ware is brightly lit This indicates that there is a sample assigned to pad 1 so if you hit the pad the bass drum sample will play 3 In the same way...

Page 43: ...If you want to adjust the Pattern Grid see section 4 3 2 Adjusting Pattern Length press Button 3 then select a Pattern Grid resolution by pressing the corresponding pad Software The area to the right...

Page 44: ...Software Adjusting the Pattern length The Pattern length is represented by the highlighted area of the Pattern To change the Pattern length click in the Pattern Length bar at the position you want yo...

Page 45: ...tap the pads you want to record and listen to what happens The Metronome will help you to keep the time when recording in real time To activate the Metronome hold down SHIFT and press PLAY To deactiva...

Page 46: ...starting from pad 1 going up all four rows from left to right and ending at pad 16 You may continue to activate or deactivate pads to build your sequence during play back 4 To switch to another Sound...

Page 47: ...A typical 4 4 kick in Step mode Creating a Pattern Creating Patterns MASCHINE Getting Started 47...

Page 48: ...d Mode Now lets add a melody and bass line to our drums With MASCHINE you may choose an internal tonal Sample in the way you chose a drum Sample as described in 4 2 Selecting Sounds and Creating a Gro...

Page 49: ...d mode then release the PAD MODE Keyboard button you will no tice that the button stays slightly lit 3 If you hit the pads now you will hear that they all play the same Sound but with a different pitc...

Page 50: ...s you can choose their pitch in halftones depending on where you put them the lowest note being the lowest row in the Piano Roll Keyboard Editor 4 5 Creating Patterns with Plug in Instruments In addit...

Page 51: ...options available from a Module Slot 1 s drop down menu Sampler Input MIDI Out and Plug ins Sampler allows the selected Slot to play back Samples This is the most common Source type as adding a Sampl...

Page 52: ...rument to 3 Press Button 3 to put the focus on the Sound tab 4 Make sure MODULES is activated to show Module Slots 1 to 4 Button 4 5 Press Button 5 to select Slot 1 6 Press SHIFT BROWSE to select the...

Page 53: ...MASCHINE hardware hold SHIFT then press the PAD MODE button to quickly toggle to Keyboard mode For information on changing and assigning plug in parameters please read the MASCHINE Reference Manual S...

Page 54: ...an host instrument plug ins and click the drop down arrow at the right end of it 4 Select Plug ins from the menu to get a list of all available instrument plug ins Creating a Pattern Creating Patterns...

Page 55: ...described in section 9 2 Sav ing and Recalling Module Presets To play the instrument plug in chromatically using the pads on the MASCHINE hardware press and hold SHIFT then press the PAD MODE button...

Page 56: ...ss the selected Module Slot button to open the plug in window on your computer screen Press the button a second time to close the plug in window Press Button 5 on the MASCHINE controller to open or cl...

Page 57: ...a useful means to play live and to test different sequences together 4 6 1 Hardware Solo Press the SOLO button and hold it now you can solo Sounds by pressing their pads and Groups by pressing the co...

Page 58: ...click on the pad icon again To solo a Group right click on Mac Ctrl click on the Group icon in the Arranger To unsolo it right click on Mac Ctrl click on the Group icon again Mute To mute a Sound cli...

Page 59: ...con in the Arranger To unmute the Sound click on the Group icon again In the next chapter you will learn how to add effects and get to know the powerful routing system of MASCHINE Creating a Pattern M...

Page 60: ...eally designed to be modulated That s when the sounds really come to life when you start recording the knob movements This is described in section 5 6 Automating Effects and Sampler Parameters 5 1 1 D...

Page 61: ...cularly suited to melodic content Reflex At moderate settings the Reflex can be useful to emulate small tight rooms At more extreme settings it can produce interesting artificial metallic textures Rev...

Page 62: ...ffects directly to each Sound Slot Module 1 is often used to contain a Sampler or live Input so choose one of the free Modules 2 4 to insert an effect If you plug one of the internal MASCHINE effects...

Page 63: ...found an effect you want to apply press Button 8 to load it into Module 2 You can also use buttons 5 and 6 to step through the list and load the effect directly 8 Switch back to Control mode by press...

Page 64: ...Now you can try out some of the parameters turn the Size knob for a bigger Reverb or adjust the Stereo Width by using the Stereo knob If you have VST AU effect plug ins installed you may also load th...

Page 65: ...y now shows the list of the available effects 5 On the left display use Knob 1 to set the TYPE to INTERNAL for MASCHINE FX or PLUG IN for VST AU plug ins The right display now shows the list of the av...

Page 66: ...to the Sound in focus they get applied to the Group in focus so make sure to have your Group in focus in the Arranger 3 Since our Group is mainly for drums let s apply some compression by adding the...

Page 67: ...BROWSE The right display now shows the list of the available effects 4 On the left display use Knob 1 to set the TYPE to INTERNAL for MASCHINE FX or PLUG IN for VST AU plug ins The right display now...

Page 68: ...fects Bypassing effects might come in handy whenever you want to return to a dry unaltered signal such as after applying so much Reverb that you can t hear the dry signal anymore or to get rid of the...

Page 69: ...u want to bypass the effect either SOUND GROUP or MASTER by clicking on it 2 Make sure you have the right Sound click on it on the left of the Grid or Group click on it on the left of the Arranger in...

Page 70: ...rn the knob again to delete the Automation of this parameter It is also possible to record Automation in the Step Sequencer 1 Enter the Step Sequencer by pressing the STEP button 2 Hold the pad repres...

Page 71: ...To edit the Automation drag the automation points in the Automation Lane Using Effects Routing Automating Effects and Sampler Parameters MASCHINE Getting Started 71...

Page 72: ...the Reference Manual 6 1 Applying an Effect to an external audio source Please make sure that you have connected an external audio signal source to your sound card and that the inputs of the soundcar...

Page 73: ...PUT and MIDI OUT Select INPUT and press Button 8 to confirm your selection 5 Switch back to Control mode by pressing the BROWSE button again or pressing the CONTROL button 6 Now you can select your ex...

Page 74: ...dule and select an effect using the effect menu from the upper right corner of the Module 2 tab Now the external audio will be processed by the effect 6 2 Setting up a Send Effect Sometimes you may wa...

Page 75: ...E now you see the list of the available effects 7 Select the Reverb and load it using Button 8 Switch back to Control mode by press ing the BROWSE button again or pressing the CONTROL button 8 Now go...

Page 76: ...Slot of an empty Group Load the Reverb into the Sound Slot s effects tab 2 On the Source tab SRC select Input and leave the Source at Internal The Input Module and Advanced Routing Setting up a Send E...

Page 77: ...are is already being sent to the effect by turning the Aux 1 Level you can adjust the amount of signal that gets sent into the Reverb 6 3 Routing Tips For a better overview rename the Sound you use as...

Page 78: ...ilter sweeps or complex effects clusters with multi ple effects that you can use on your material The Routing in MASCHINE is a really powerful tool with a vast amount of possibilities You can set up y...

Page 79: ...ent or length of a Pattern is edited all referencing clips in the Arranger will automatically get updated Hardware 1 Switch to Scene mode by holding the SCENE button The right display gives you an ove...

Page 80: ...t to use in the Scene by clicking on it in the Pattern Editor 3 A Clip representing the selected Pattern will be automatically inserted into the fo cused Scene Column in the Arranger To delete a Clip...

Page 81: ...ll get shifted upwards one Scene number respectively if you delete a Scene the following Scene will be shifted back ward accordingly Software 1 Select the Scene you want to edit by clicking on it 2 No...

Page 82: ...e first pad press the pad corresponding to the end Scene Software In Scene 1 click in the Arranger Timeline and drag to the right The active Loop will be high lighted Release the Mouse button in Scene...

Page 83: ...to enter the Sampling mode 3 You can select the Source by using Knob 1 it is either set to External EXTERN for audio signals connected to your audio interface or Internal INTERN for audio signals from...

Page 84: ...ord into by clicking on its name 2 Now click the SAMPLING button right underneath the PIANO ROLL KEYBOARD but ton 3 In the RECORD tab select your Source You can record Samples internally check the Int...

Page 85: ...your Sample Under the bigger Waveform representing the recorded Sample you can see a small icon for each Sample that got recorded into this Sound Slot this is called the Recording Histo ry You can dra...

Page 86: ...second page using knobs 2 and 3 4 Since we recorded a drum loop in sync there is no need to adjust Start and End of the Sample or the Loop here but we have to enable Loop as described above 5 To focus...

Page 87: ...End using the mouse or by entering the Start and End points in their respective fields 4 Enable Loop by clicking on the LOOP button 5 The Loop Area is now highlighted you can change the Loop Area by m...

Page 88: ...he mouse button then drag your mouse vertically to zoom in out and horizontally to scroll through the waveform 8 3 Slicing a Sample Slicing a Sample is useful if you want to rearrange Loops or make th...

Page 89: ...If you press APPLY TO Button 8 you can choose a different Sound or Group Slot to put the Slices on After that the display will automatically change to Keyboard Piano Roll mode Now you can play the Sli...

Page 90: ...t select Detect in the Mode menu at the far left This means that the Loop will be sliced according to the transients detected in the Sample in contrast to slicing it into a specified number of Slices...

Page 91: ...ne In the Mapping Editor you can set a root note a note range on the keyboard velocity ranges and Tune Gain and Pan for each Sample Hardware 1 In Sampling mode hit Button 4 to enter the Mapping tab MA...

Page 92: ...tab MAP by clicking on it 2 To add a new Sample select one from the Browser and drag it into the mapping area A Zone will be created you can drag the left and the right border of the Zone with your mo...

Page 93: ...e selected Zone s parameters Select a root note in the Root field Set the note range s limits using the Low Note and High Note fields Set the velocity range using the Low Vel and High Vel fields Set t...

Page 94: ...are only available in the MASCHINE Software You will also learn how to export audio files from Groups Sounds and the Master Output 9 1 Saving Sounds Groups Patterns 9 1 1 Saving a Sound To save a Sou...

Page 95: ...in the Ar ranger and select Save As from the dropdown menu 9 1 3 Saving a Pattern To save a Pattern right click on Mac OS X Ctrl click on the Pattern Label in the Arranger and select Save As from the...

Page 96: ...d recalling Module presets Select Save As from the Module menu to save your Module preset It will automati cally be tagged with the Module Type In case of a VST AU plug in the type attribute will be t...

Page 97: ...pe selector of the MASCHINE Browser 1 Click the DISK button if the file type selector is not visible 2 Module presets can be found in either the Instruments or the FX section In order to find e g a VS...

Page 98: ...Instrument presets in the MASCHINE Browser 9 3 Exporting Audio There are several ways to export audio files in MASCHINE Managing Projects Exporting Audio MASCHINE Getting Started 98...

Page 99: ...export all Scenes or the current Loop Range 4 From the Output menu select what you want to export the Master Groups or Sounds If you select Groups or Sounds a list of available Groups or Sounds will b...

Page 100: ...additionally select a Bit Depth enable Normalization Normalize and choose whether you wish to optimize the loop for looped playback Loop Optimize 7 When you are done click on the Export button at the...

Page 101: ...e your live set a thorough performance check by first playing it at home If necessary keep an eye on the CPU meter in the Head er of the MASCHINE software to see if there any peaks in during playback...

Page 102: ...ervative but if you want to avoid digital distortion caused by an overload of your soundcard this is a useful safety measure 10 8 Hook up your other gear and sync it with MIDI clock If you have other...

Page 103: ...hold up to 4 modules which can be a Sampler VST AU Plug in Instruments or FX internal MASCHINE FX as well as an external Input or a MIDI Out module Each Sound of the selected Group is mapped to one of...

Page 104: ...y linked to a Group since it is a part of the Group however you can also save it inde pendently from the Group This is useful if you want to try out different drum kits with the same Pattern or differ...

Reviews: