can push this switch to the ON position to unlock a chassis that was previously locked in
MAX.
NO APP Switch
Push the NO APP switch to the ON position to prevent a LabVIEW Real-Time startup
application from running at startup. If you want to permanently disable a LabVIEW Real-Time
application from running at startup, you must disable it in LabVIEW. To run an application at
startup, push the NO APP switch to the OFF position, create an application using the
LabVIEW Application Builder, and configure the application in LabVIEW to launch at
startup. If you already have an application configured to launch at startup and you push the
NO APP switch from ON to OFF, the startup application is automatically enabled. For more
information about automatically launching VIs at startup and disabling VIs from launching at
startup, refer to the
LabVIEW Help
.
USER1 Switch
You can define the USER1 switch for your application. To define the purpose of this switch in
your embedded application, use the RT Read Switch VI in your LabVIEW Real-Time
embedded VI. For more information about the RT Read Switch VI, refer to the
LabVIEW
Help
.
Understanding LED Indications
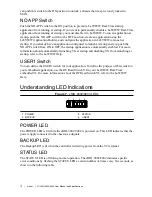
Figure 7.
cRIO-9002/9004 LEDs
1
2
3
4
1. POWER
2. BACKUP
3. STATUS
4. USER1
POWER LED
The POWER LED is lit while the cRIO-9002/9004 is powered on. This LED indicates that the
power supply connected to the chassis is adequate.
BACKUP LED
The Backup LED is lit when the controller is drawing power from the V2 terminal.
STATUS LED
The STATUS LED is off during normal operation. The cRIO-9002/9004 indicates specific
error conditions by flashing the STATUS LED a certain number of times every few seconds, as
shown in the following table
10
|
ni.com
|
NI cRIO-9002/9004 User Manual and Specifications

