background image

14 

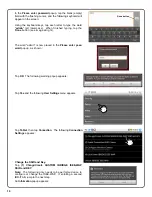
vice plans and add them to your cart.  If any optional services are available for your device, these will also be of-
fered. 


You will be asked to enter basic subscriber information, review your order and then check out by clicking 

Process 

Order

.  The product will be ready for use within 15 minutes of checkout.   


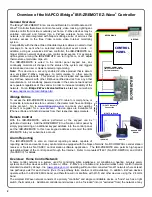
To access the IBR-ZREMOTE remotely via PC, tablet or smart phone, go to 

www.ibridgeonline.com

 to access your 

existing iBridge online account or register for a new account.  Device apps are available for iPhones, iPads and An-
droid devices from their respective apps markets.   


For iSeeVideo, iBridge and iRemote products, a new subscriber account will automatically be created.  A User ID 
and temporary password will be emailed to you (the dealer) upon activation.  This temporary password 

must

 be 

changed by the customer once the installation is complete*. 
*For existing subscribers, the system will NOT generate an email with a User ID/password.   


For detailed step-by-step instructions, go to 

http://tech.napcosecurity.com/

 and select 

ComNet Activation Guide


(

WI2113

).    


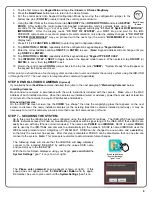
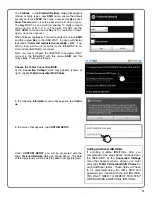
DEALER ADMINSTRATION & BRANDING 

To log into the dealer administration and branding site go to www.ibridgeonline.com and log in with your NapcoCom-
Net User ID and password.   
 
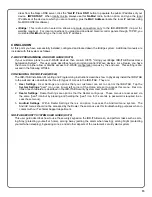
As shown in the screen image at right, at 

www.ibridgeonline.com

 you can manage your subscriber accounts, view a 

list of User IDs, as well as manage both 
your cameras and keypads registered to 
your dealer account.  

Note:

  For forgotten 

passwords, your customer must click the 
"Forgot your password?" link at 

www.ibridgeonline.com

.   


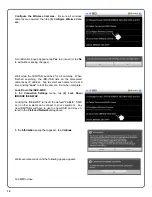
Branding:  Upload a New Logo 

The 

Upload a new Logo

 link, located un-

der "

User Management

", allows you to 

brand your site with a logo or unique com-
pany name that your customer will see when they log into their keypad.  Be sure to follow the logo size and dimen-
sion guidelines before uploading. 


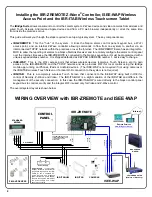
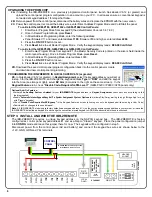
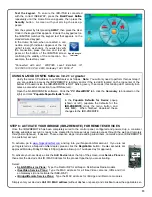
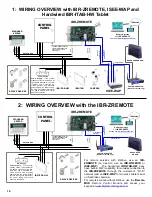
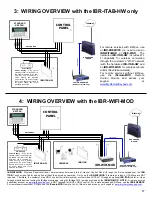
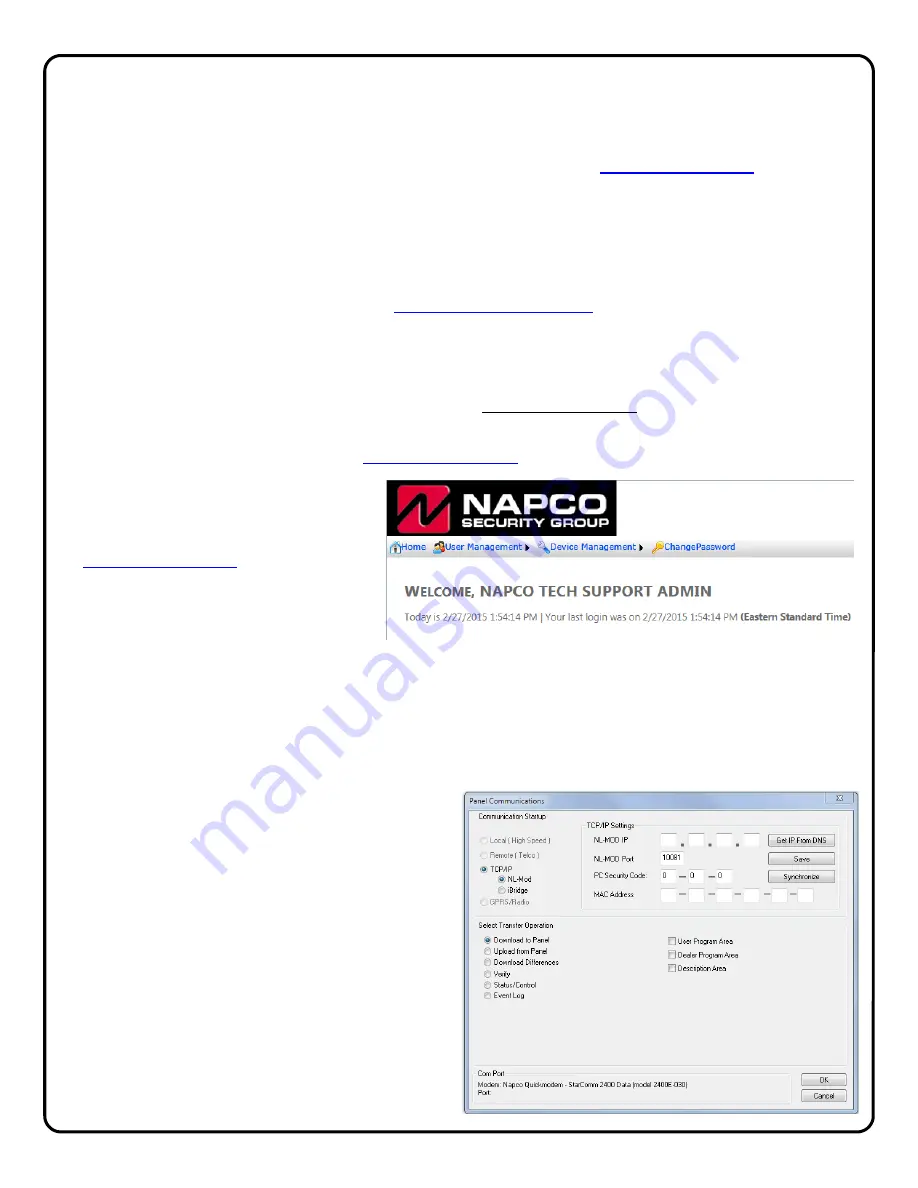
TCP/IP REMOTE AND LOCAL COMMUNICATIONS 

Before performing an upload or download, open the PCD-Windows Quickloader 

Digital Communications 

screen, 

Dig-

ital / Dialing Options 

tab and place a check to enable the 

TCP/IP Communications 

option.  In addition, be 

sure to connect a serial cable between the "

LOCAL 

DNLD

"  socket on the iREMOTE-MOD and the control 

panel motherboard local download jack. 
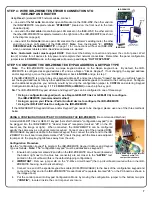
The following describes when to use the two options 
available for TCP/IP communications in the PCD-
Windows Quickloader 

Panel Communications 

screen 

(under 

TCP/IP

, shown at right).  When connecting to 

your Gemini control panels for local and remote up-
loading and downloading through the iBridge IBR-
ZREMOTE, iREMOTE-MOD or NL-MOD-UL, the fol-
lowing considerations should be noted: 
 



NL-Mod:

  This radio button selection allows 

local and remote connections to the NL-MOD, iRE-
MOTE-MOD and IBR-ZREMOTE through a local 
and a public IP address (port forwarding 10081 is 
required for remote access for NL-MODs and iRE-
MOTE-MODs only).  To retrieve the public IP ad-

Summary of Contents for iBridge Suite

Page 1: ...00 645 9445 For Technical Service 800 645 9440 or visit us at http tech napcosecurity com Note Technical Service is for security professionals only Publicly traded on NASDAQ Symbol NSSC NAPCO 2015 Z R...

Page 2: ...o to www ibridgeonline com to access your existing account or register for a new account Device apps are available for iPhones iPads and Android devices from their respective apps markets Remote Contr...

Page 3: ...the iBridge mobile app using the iBridge Wi Fi service provided by the IBR WIFI MOD NOTE A remote service subscriber account on www ibridgeonline com is NOT required for LOCAL ONLY control For remote...

Page 4: ...ess to the IBR ZREMOTE and the TCP IP network and also provides Wi Fi for local control using the iBridge mobile app running on iPhones iPads or Android devices The ISEE WAP is not required if not usi...

Page 5: ...nd mount the charging plate as described in WI1944 or just connect the power adapter to the charger plate observing polarity and power the IBR ITAB to continue STEP 2 CONFIGURE THE CONTROL PANEL The a...

Page 6: ...eypad Assignment select the keypad address you will set up in step 5 for the IBR ZREMOTE and change the keypad address Type to RCM and add the keypad into the Area see image at right select EZ Arm 6 c...

Page 7: ...g a configuration keypad such as a Napco GEM RP1CAe2 or GEM K1CA to configure the IBR ZREMOTE recommended method Using an app on your iPhone iPad or Android device to configure the IBR ZREMOTE Using t...

Page 8: ...d select KEYPAD MODE After putting the control panel into Keypad Configuration Mode it normally takes up to 40 seconds for the keypad on the iBridge APP to go out of system The keypad will display 01...

Page 9: ...et to go out of system The keypad will display 01 Out of System RCM MODULE IMPORTANT After the display reads XX OUT OF SYSTEM you MUST stop and wait for the IBR ZREMOTE components to reset and prepare...

Page 10: ...n is now placed in the Please enter pass word popup as shown Tap OK The following warning popup appears Tap Yes and the following User Settings menu appears Tap Tablet then tap Connection The followin...

Page 11: ...onnect to the ISEE WAP with this unique SSID and this unique Key Proceed as follows Choose the Tablet Connection SSID At the Connection Settings menu that appears shown at right tap 2 Tablet Connectio...

Page 12: ...y IP address Tap to select each camera one at a time and tap Lock to lock the camera Exit when complete Lock Down the ISEE WAP In the Connection Settings menu tap 4 Lock Down IBRIDGE ISEE WAP Locking...

Page 13: ...connected with the correct ISEE WAP press the Back Power Button repeatedly until the Home Screen appears then press the Security button A screen with your arming choices ap pears Arm the system by fir...

Page 14: ...ew a list of User IDs as well as manage both your cameras and keypads registered to your dealer account Note For forgotten passwords your customer must click the Forgot your password link at www ibrid...

Page 15: ...1944 CONFIGURING THE IBR ITAB WI1944 The IBR ITAB Installation Mounting and Programming instructions describes how to physically install the IBR ITAB to the wall and also describes the three 3 types o...

Page 16: ...cient for the 380mA required for the IBR ITAB HW use a separate UL Listed Security and Signaling power limited 12V power supply Be sure the negative terminals of the power supply and control panel are...

Page 17: ...STANDARD KEYPAD Internet RED BLACK GREEN YELLOW IBR WIFI MOD CONTROL PANEL CAMERAS IBR ITAB IBR WIFI MOD Wireless Panel Interface communicates between Internet Gemini Control Panel through the 4 wire...

Page 18: ...18 NOTES...

Page 19: ...to a different outlet so that computer and receiver are on different branch circuits If necessary the user should consult the dealer or an experienced radio television technician for additional sugges...

Page 20: ...on purporting to act on its behalf to modify to change or to assume for it any other warranty or liability concerning its products In no event shall NAPCO be liable for an amount in excess of NAPCO s...

Reviews: