


X
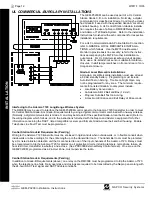
GEM-P3200 Installation Instructions
L
NAPCO Security Systems
WI817F 10/05
Page 26
ALARM INDICATION
If programmed to silence an alarm,
enter a valid User Code and press the
U
button
.
The keypad must have permission to disarm the alarm (Alarm, Pulse Alarm, Fire Output, Reset Output or Auxiliary Out-
puts) from the specific area. This can be done through the PC Quickloader software, Area Features Screen or Area Bell Con-
trol.
Should a burglary alarm occur, the red ARMED LED will flash, and the display will alternately read "
ALARM
", then the zones
violated. Disarm the panel; the display will read "
ALARM
" and will continue to indicate the violated zones until the
C
button
is pressed or the panel is armed once again.
FUNCTION MODE/DEALER PROGRAM MODE
The keypad can provide a wide assortment of utility functions as summarized in the Keypad Function Mode. The functions
are displayed in a prompting "
YES/NO
" format. To skip a function, answer NO (press the PRIOR/NO button); to select and exe-
cute a function, answer YES (press the
P
button or the
U
button). The complete function list is provided here in its normal
displayed sequence. However, since not all functions are designed for all systems (or intended for all users), only functions
that are applicable and active are displayed. (For example, if no zones are bypassed, "
DISPLAY ZN BYPASSED
" will not appear).
Furthermore, functions that are intended for use by the installer or servicer will not be displayed.
Note:
Functions may be
manually scrolled forward or backward using the
R
and the
B
buttons, respectively.
To return to normal keypad operation, press the
C
button. (The keypad will automatically return to its normal operat-
ing mode if no activity is detected for longer than one minute).
Note:
Due to space constraints, GEM-RP2ASe2/GEM-K2AS
message displays are abbreviated.
Remember:
(1) Functions that are not active, not programmed and/or not applicable to the user's authority level will be
suppressed and will not display. (2) Press the PRIOR/NO button to skip a function; press the NEXT/YES button to execute it.
(3) The GEM-RP2ASe2/GEM-K2AS displays abbreviated messages that autoscroll.
DISPLAY ZN FAULTS
Press the YES button to identify all unsecured zones (within the keypad's area) while disarmed. Press NEXT button to
scroll through the zones. (Zones may be bypassed in this mode by pressing the
B
button). Manually bypassed zones will
be indicated when displaying status.
DISPLAY ZN BYPASSED
Press YES button to display zones that have been deactivated. Press NEXT button to scroll through the zones.
DISPLAY ZN DIRECTORY
Press YES button to display a list of all programmed zone descriptions in the keypad area. Press NEXT button to scroll
through the zones. To return to the system, press the
C
button at any time.
ACTIVATE BELL TEST
Press YES button to activate the burg relay output (while disarmed) for about 2 seconds. If the device does not sound, it
may be defective.
DISPLAY PHONE #'S
The panel can function as an auto dialer to any of four programmed telephone numbers. (Telephone numbers must be
programmed through Napco PCD-Windows Quickloader software). Select Telephone #1-4 using NEXT and PRIOR buttons,
then press the
U
button. Pick up the phone to initiate dialing of the displayed number. (The phone will appear to be discon-
nected while dialing but will return to normal after a few seconds).
DISPLAY SYS TRBL
Press YES button to check trouble (LOW BATTERY, AC POWER LOSS, etc.). Wait for the display to scroll through multi-
ple system troubles, or use the NEXT and PRIOR buttons to manually scroll.
DISPLAY FIRE ALARM
To display Fire Zone(s) in alarm, access DISPLAY FIRE ALARM and scroll through the zones using the NEXT button.
Correct the problem, then press the
C
button to restore the "
SYSTEM READY
" condition.
DISPLAY FIRE TRBL
To display Fire Zone(s) in trouble, access DISPLAY FIRE TRBL and scroll through the zones using the NEXT button. Cor-
rect the problem, then press the
C
button to restore the "
SYSTEM READY
" condition.
B
A
SIC OPER
A
T
IO
N
Summary of Contents for Gemini GEM-P3200
Page 58: ...X GEM P3200 Installation Instructions L NAPCO Security Systems WI817F 10 05 Page 58 NOTES...
Page 66: ...X GEM P3200 Installation Instructions L NAPCO Security Systems WI817F 10 05 Page 66 Notes...
Page 67: ...L NAPCO Security Systems X GEM P3200 Installation Instructions WI817F 10 05 Page 67 Notes...


