background image

21


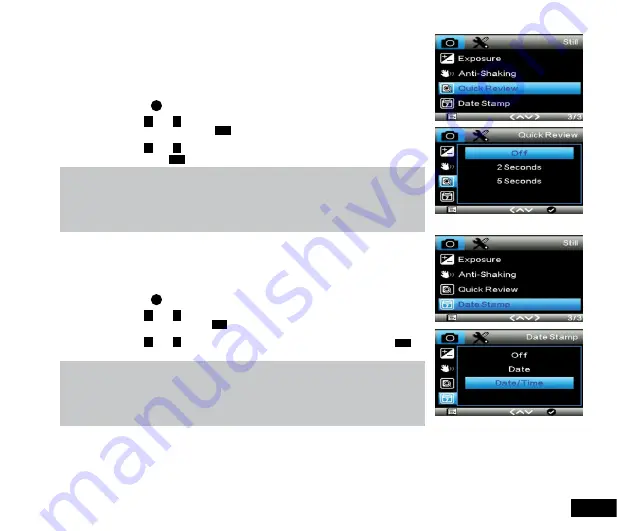
3.1.2.1 Quick Review


Quick review

 displays the photo on screen for the set amount of time after the 

photo has been taken. To change the Quick Review setting follow the instructions 
below.


1.

 Enter the Photo screen.


2.

 Press the 

M

 Button to enter the 

Photo Menu

.


  3.

   Use  the 

<

 and 

>

 Buttons to navigate the 

Photo Menu

 and highlight the 

Quick 

Review 

setting and press 

OK

 to select.


  4. 


 Use  the 

<

 and 

>

 Buttons to highlight your required image display time setting, 

then press the 

OK

 button to confirm your selection.

Note:


 1.

  Menus cannot be accessed while the camera is recording. Please stop the recording 

before attempting to access the menu.


 2.

   This setting can only be accessed through the 

Photo Menu

, please make sure that you 

are in the 

Photo screen

 when you access the menu.


3.1.2.2 Date Stamp


 Date  stamp

 is used to stamp your photos with the time and date that they are 

taken. To select your preferred time and date format follow the instructions below.


1.

 Enter the Photo screen.


2.

 Press the 

M

 Button to enter the 

Photo Menu

.


  3.

   Use  the 

<

 and 

>

 Buttons to navigate the 

Photo Menu

 and highlight the 

Date 

Stamp 

setting and press 

OK

 to select.


  4. 


 Use  the 

<

 and 

>

 Buttons either Date, Date/Time, or ON, then press the 

OK


button to confirm your selection.

Note:


 1.

  Menus cannot be accessed while the camera is recording. Please stop the recording 

before attempting to access the menu.


 2.

   This setting can only be accessed through the 

Photo Menu

, please make sure that you 

are in the 

Photo screen

 when you access the menu.

Summary of Contents for NCP-DVRGPS

Page 1: ...USER MANUAL FULL HD DASH CAM DVR WITH GPS LOGGER NCP DVRGPS...

Page 2: ...2 4 Powering the Car DVR On Off 8 2 4 1 Auto Power On Off 8 2 4 2 Manual Power On Off and Reset 8 2 4 2 1 Manual Power On 8 2 4 2 2 Power Off 8 2 4 2 3 Reset the device 8 2 5 Playing back Video on PC...

Page 3: ...ality 17 3 1 5 Sharpness 18 3 1 6 White Balance 18 3 1 7 Colour 19 3 1 8 ISO 19 3 1 9 Exposure 19 3 1 2 0 Anti Shaking 19 3 1 2 1 Quick Review 21 3 1 2 2 Date Stamp 21 3 2 Setting Menu 22 3 2 1 Date T...

Page 4: ...u 27 3 4 1 Deleting Photos Videos 27 3 4 2 Locking and Unlocking Photos and Videos 28 3 4 3 Slide Show 28 3 3 4 Deleting Files 28 3 5 Playing Video Viewing Pictures 29 3 5 1 Playback 29 4 Menu Tables...

Page 5: ...icinity of any devices that emit radio interference eg Microwave Ovens It is considered normal operation for the Car DVR to get warm during use Battery Warning Always charge the Car DVR using the prov...

Page 6: ...165 wide angle lens GPS recording saves your speed and path Emergency recording saves your footage when an impact is detected Supports Micro SD cards class 6 and above up to 32GB 1 2 Package Contents...

Page 7: ...cing you slide the bracket from left to right until the bracket locks in place 3 Connect the GPS plug to the Car DVR 4 With the GPS module in the down position attach the suction cup to the windscreen...

Page 8: ...y try restarting the car DVR To restart the car DVR with a flattened paper clip press the small button in the middle of the underside of the Car DVR 2 5 Playing back video on a PC To playback video fi...

Page 9: ...ou will not be able to recover them 2 6 2 Set Date Time Setting the Time and Date allows you to stamp your footage with the time as a reference 1 Press the OK Button to stop the Car DVR from recording...

Page 10: ...ording Locked Recording saves the current video file and protects it from being overwritten To manually start a Locked Recording follow the instructions below 1 During recording push the M button 2 To...

Page 11: ...2 7 4 Video Mode When the Car DVR is powered up the video screen will start by default In this screen recording will automatically start and can be stopped by pressing the OK Button To access the Vide...

Page 12: ...ss the menu 2 Selecting the OFF option will create the longest possible clip in most cases depending on the set resolution and other factors this will be limited to 10MB 3 To avoid filling the card qu...

Page 13: ...e stop the recording before attempting to access the menu 2 8 5 Motion Detection Motion Detection is used to pause recording when no motion is detected in front of the camera and to start recording wh...

Page 14: ...Please stop the recording before attempting to access the menu 2 8 7 Date Stamp Date stamp will stamp the current date onto the footage for future reference To set the date stamp please follow the ins...

Page 15: ...y card is filling up quickly you may need to lower the sensitivity of the G Sensor Gravity Sensor to decrease the number of triggers caused by normal driving 2 8 9 GPS The Car DVR s built in GPS senso...

Page 16: ...while the camera is recording Please stop the recording before attempting to access the menu 2 This setting can only be accessed through the Photo Menu please make sure that you are in the Photo scre...

Page 17: ...Photo Menu please make sure that you are in the Photo screen when you access the menu 3 1 4 Quality Quality sets the image detail Higher quality images will capture more detail and will also produce l...

Page 18: ...hoto Menu please make sure that you are in the Photo screen when you access the menu 3 1 6 White Balance The White Balance setting is used to manually adjust the settings used to counteract different...

Page 19: ...he Photo screen when you access the menu 3 1 8 ISO ISO is used to manage how much light is let into the image sensor Setting a higher ISO will let in more light and blurred movement and lower ISO will...

Page 20: ...nu please make sure that you are in the Photo screen when you access the menu 3 1 2 0 Anti Shaking The Anti Shaking setting uses the on board chipset to correct some of the blur caused but handheld ph...

Page 21: ...can only be accessed through the Photo Menu please make sure that you are in the Photo screen when you access the menu 3 1 2 2 Date Stamp Date stamp is used to stamp your photos with the time and dat...

Page 22: ...ate and time and return you to the Settings Menu Note 1 Menus cannot be accessed while the camera is recording Please stop the recording before attempting to access the menu 2 Once the time and date i...

Page 23: ...etting can only be accessed through the Settings Menu which can be accessed via the Video and Photo Menus 3 2 4 Language The Language setting is used to select your preferred Language in the menus To...

Page 24: ...through the Settings Menu which can be accessed via the Video and Photo Menus 3 2 6 Lamp Setting The Lamp Setting is used to activate or deactivate the LED on the front face of the DVR To adjust the...

Page 25: ...e menu 2 This setting can only be accessed through the Settings Menu which can be accessed via the Video and Photo Menus 3 2 8 Screen Saver The Screen Saver setting is used to set the duration of inac...

Page 26: ...enu 2 This setting can only be accessed through the Settings Menu which can be accessed via the Video and Photo Menus 3 3 0 Default Settings Default Settings is used to revert the NCP DVRGPS s setting...

Page 27: ...n using the instructions in the section labelled Playback Screen 2 In the Playback Screen use the and buttons to select the photo or video that you want to delete if you want to delete all unlocked ph...

Page 28: ...nnot be accessed while the camera is recording Please stop the recording before attempting to access the menu 2 To easily delete all file on the inserted Micro SD Card please follow the instructions g...

Page 29: ...rive 4 Open the Driving Recorder Player Software 5 In the Driving Recorder Player software click File in the top left corner and then click Open from the drop down menu 6 In the window that appears lo...

Page 30: ...ensitivity GPS Off On 4 0 Menu Tables Photo Capture Mode Single 55 Timer 2S Timer 10S Timer Resolution 12M 4032x3024 3M 2048x1536 10M 3648x2736 2MHD 1920x1080 8M 3264x2448 VGA 640x480 5M 2592x1944 1 3...

Page 31: ...nd Off On Language Language Select TV Mode NTSC PAL Frequency 50Hz 60Hz Lamp Setting Off On Format Internal Memory SD Card Screen Saver Off 30 Seconds 1 Minute 2 Minutes 5 Minutes Delayed Shut down Of...

Page 32: ...32...

Page 33: ...y is only valid where you have used the product in accordance with any recommendations or instructions provided by NanoCam Plus This warranty excludes defects resulting from alterations of the product...

Page 34: ...www nanocamplus com au www nanocamplus co nz NanoCam Plus 2016...

Reviews: