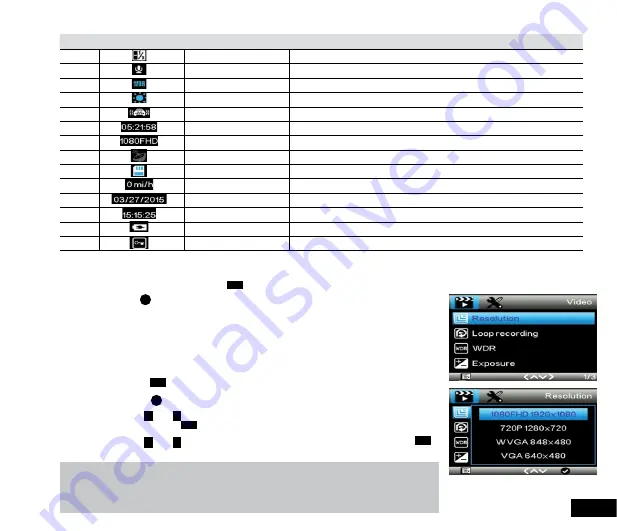
11
Number
Icon
Item
Description
5
Exposure
Shows the current exposure setting
6
Microphone
Shows if the microphone is muted or recording
7
Wide Dynamic Range
The WDR icon will appear when the Wide Dynamic Range setting is active
8
Day/Night Mode
Will show a sun or moon icon indicating if the LCD light is activated or not
9
Gravity Sensing
Icon shows the current Gravity Sensitivity
10
Recording duration
Shows the current recording duration
11
Resolution
Shows the current set resolution
12
GPS Signal
The GPS icon appears when GPS is active
13
Memory card
The Memory Card icon shows when a Micro SD Card is installed
14
Speed
Shows your current speed
15
Date
Shows the current date
16
Time
Shows the current time
17
Battery
Shows the battery level
18
Emergency Recording
Shows when the Gravity Sensing function has been triggered
2.7.4 Video Mode
When the Car DVR is powered up the video screen will start by default. In this screen recording will automatically start and
can be stopped by pressing the
OK
Button. To access the
Video Menu
, ensure that the Car DVR is not recording then
press the
M
button.
2.8 Video Menu
2.8.1 Resolution
Resolution
sets the video quality. Higher resolution video will capture more detail and
will also produce larger files. To change the recording resolution, please follow the
instructions below.
1.
Press the
OK
Button to stop the Car DVR from recording.
2.
Press the
M
Button to enter the
Video Menu.
3.
Use the
<
and
>
Buttons to navigate the
Video Menu
and highlight the
Resolution
setting and press
OK
to select.
4.
Use the
<
and
>
Buttons to highlight your required resolution, then press the
OK
button to confirm your selection.
Note:
1.
Menus cannot be accessed while the camera is recording. Please stop the recording before
attempting to access the menu.
2.
Higher resolution clips will create larger files which will fill the Micro SD Card faster.


