background image

6

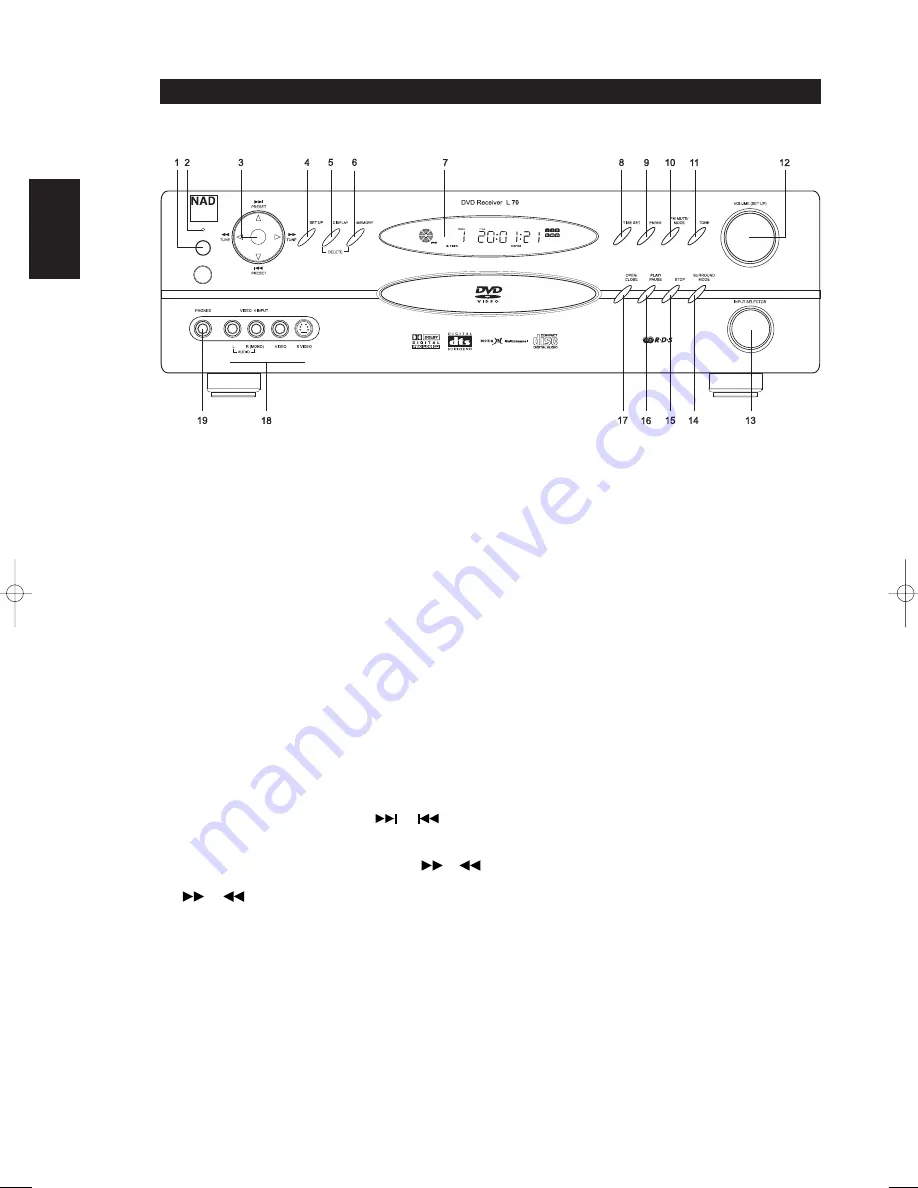
FRONT PANEL

Identification of controls

ENGLISH

FRANÇAIS

DEUTSCH

NEDERLANDS

ESP

AÑOL

IT
ALIANO

POR

TUGUÊS

SVENSKA

1 “Power”

: When the L70 is first plugged into the AC power, the L70’s

clock will light in the main VFL display showing the time of day, and
very little power is consumed. Press in to switch the receiver from
standby, changing the standby indicator to bright blue and
illuminating the VFL display. Pressing the power switch again turns
the unit back to standby. It is usual (and perfectly acceptable) to leave
the L70 in standby mode in between normal viewing and listening
sessions. Pressing the “OPEN CLOSE” button on the front-panel, or
the HTR L70 remote’s “ON” button, will switch the receiver on,
making it operational. Press the remote’s “OFF” button to return to
standby. Note that when you do choose to switch off from standby
using the front panel Power button, the L70’s memory back-up
system will store channel level, tuner preset, and other settings for
several weeks while the unit is switched off, or even unplugged from
AC power altogether.

2 INDICATOR

: When the L70 is in standby the LED will light bright

blue, the VFL in the L70 will display the L70’s internal clock. This
indicator will extinguish itself when the power cable is unplugged
from the AC supply.

3 PRESET TUNE

: Press to step up or down between radio presets or

searching channels; 30 FM and 30 AM station presets are available.
Note that this function “wraps”: Pressing 

or 

will step

from Preset 30 to Preset 1, or vice versa. “Unused” presets are
skipped over. (Note that Presets must previously have been stored; see
“Listening to Radio,” below.) Pressing momentarily the 

or 

button will manually scan the AM or FM band. Press and hold the

or 

for more than 2 seconds to search up or down; the

L70’s tuner will stop at the next sufficiently strong signal it encounters.
Note that this function, too, “wraps,” and will continue searching up
or down from one end of the AM or FM band to the other.

4 SET UP

: Press momentarily for setup of the L70 via the OSD. Use this

function in conjunction with your video monitor. This “SET UP”
button is mode dependent, the DVD and receiver’s OSD are mutually
exclusive. Press and hold “SET UP” to bring up the receiver OSD even
when in DVD mode.

5 DISPLAY

: Use this multifunction button to toggle between RDS PS,

RDS RT and station frequency in FM Tuner mode(see Listening to
Radio). This “DISPLAY” button will also toggle between optical,
coaxial and analog inputs.

6 MEMORY

: Use to store tuned stations to the L70’s 60 preset-

memory locations. (See “Listening to Radio”.)

7 VFL DISPLAY

: The Vacuum Fluorescent Display (VFL Display)

provides visual information on all of the L70’s important modes,
settings, and functions.

8 TIME SET

: Press and hold to set the internal clock, ON/OFF timer,

and display of the clock’s time. A red “clock face” will appear in the
florescent display when the timer is activated. Use the “MEMORY”
keys to toggle between the hours and minutes. There are two timers,
one for when the L70 powers on, the other for when the unit
powers off; these too are programmed in the same way as above.

9 FM/AM

: Press to toggle between the tuner’s FM and AM bands.

10 FM MUTE/MODE

: In the normal Mute position, only the stations

with a strong signal can be listened to, and the noise between
stations is muted. Pressing the “FM Mute/Mode” button allows
distant (and potentially noisy) stations to be received. (See “Listening
to Radio”.)

11 TONE

: Press to toggle between Bass, Treble, TONE OFF and TONE

ON. The VOLUME knob is used to adjust the Bass and Treble levels.

12 VOLUME

: Turn clockwise to increase the master-volume setting;

counter clockwise to lower it. The VFL and on-screen displays show
the setting, displayed as increments between MIN, 1 to 77. The
VOLUME knob is also used to increment/decrement the Bass and
Treble levels.

13 INPUT SELECTOR

: Use to select an audio/video input along with its

assigned analog or digital inputs (see “Input Setup”). Rotate
clockwise or counter clockwise to select between:
Internal DVD 

External 5.1 

Internal AM/FM tuner 

CABLE/SAT

VCR 

VIDEO 4 

then back to Internal DVD

L70 IM english  13/3/05  4:33 pm  Page 6

Summary of Contents for L 70

Page 1: ...FRAN AIS DEUTSCH NEDERLANDS ESPA OL ITALIANO PORTUGU S SVENSKA Owner s Manual Manuel d Installation Bedienungsanleitung Gebruikershandleiding Manual del Usuario Manuale delle Istruzioni Manual do Pro...

Page 2: ...ITH LIQUIDS SUCH AS VASES SHOULD NOT BE PLACED ON THE APPARATUS WARNING CHANGES OR MODIFICATIONS NOT EXPRESSLY APPROVED BY THE PARTY RESPONSIBLE FOR COMPLIANCE COULD VOID THE USER S AUTHORITY TO OPERA...

Page 3: ...ording Macros 27 Executing Macros 28 Key Illumination Timeout 28 Factory Reset 28 Delete Mode 28 Loading Code Libraries 29 Summary of HTR L70 Modes 30 REFERENCE Troubleshooting 31 Specifications 32 TA...

Page 4: ...dio circuits maximize quality from all sources including multichannel analog sources such as DVD Audio and SACD The L70 incorporates a high quality DVD player with exceptional playability The player h...

Page 5: ...be sure to read Input Setup PLAY A DVD MOVIE Connect the L70 s composite video or S Video MONITOR OUT jack to your TV monitor s corresponding input Depending on the selection above switch the OSD SELE...

Page 6: ...band to the other 4 SET UP Press momentarily for setup of the L70 via the OSD Use this function in conjunction with your video monitor This SET UP button is mode dependent the DVD and receiver s OSD...

Page 7: ...Play and Pause of a DVD CD 17 OPEN CLOSE Press this button to open and close the DVD CD drawer and simultaneously select the internal DVD CD player When in standby this button will also power On the...

Page 8: ...ignals NOTE The L70 s component video output is a fully wide band output compatible with all HDTV formats The L70 does not display its on screen menus on its component video output To use on screen me...

Page 9: ...gital analog converters via a digital connection can usually produce superior results 14 CABLE SAT VCR These comprise the L70 s principal inputs Connect S Video composite video and analog stereo audio...

Page 10: ...an be used to burnish copper and gold plated contacts to ensure good low resistance contact specialized contact cleaners can also be useful Avoid unnecessary unplugging and re plugging since the gold...

Page 11: ...e setting of any item Selecting MAIN MENU OFF from the main setup menu exits the OSD altogether retaining parameter value changes if any made previously When in the DVD OSD pressing the SETUP button o...

Page 12: ...is avoids possible confusion and ensures that the L70 s high performance surround and digital audio circuitry will always be employed Now use the keys to move to the DIGITAL INPUT line and select the...

Page 13: ...udspeakers require Set SUB to ON or OFF NOTE The SPEAKER CONFIGURATION is global that is it remains in force with all inputs and in all SURROUND MODEs You can set Subwoofer to ON even with LARGE front...

Page 14: ...tions before level setting Your subwoofer if any should be set with its integral crossover defeated or if undefeatable set to its highest possible frequency if you are using the L70 s SUBWOOFER output...

Page 15: ...sed The L70 s OSD will show the volume setting as a line graphic with a numeric display above relative to the reference level Since recordings vary considerably in overall average level there is no im...

Page 16: ...ress ENTER or press the numeric button s to select the desired item Play of the selected item now begins For further information also refer to the jacket or case of the disc you are playing NOTES Do n...

Page 17: ...not be present unless the AUDIO OUT is set to either PCM or BITSTREAM Please refer to your DVD CD media documentation for the correct settings AUDIO OUT Select between PCM and BITSTREAM at the L70 s...

Page 18: ...splay via OSD the title headings and menus of the DVD and MP3 CD media when available Some movie discs may contain two or more titles If the disc has a title menu recorded on it the TITLE button can b...

Page 19: ...s to select the receiver s radio mode Each subsequent press of either key will toggle the unit between its FM and AM bands TUNING STATIONS Press TUNE on the front panel momentarily to step up or down...

Page 20: ...s by no means impossible that your favourite stations will not be broadcasting RDS data VIEWING RDS TEXT When an RDS enabled FM broadcast is tuned after a brief delay the RDS symbol will light in the...

Page 21: ...bience or other sonic elements and thus remains truer to the sound of the original musical performance than most other music surround options Select EARS for listening to stereo music recordings and b...

Page 22: ...the maximum number of channels available The table below indicates which SURROUND MODEs are available with the two types of audio signal sources digital or analog input 2 channel whether the actual s...

Page 23: ...Adjusts front rear emphasis of the surround effect independently from the relative channel levels DTS DELAY TIME CENTER 0 to 5 mS Adjusts centre front emphasis of the centre channel such as vocals in...

Page 24: ...key ADJUSTING THE TONE CONTROLS The L70 bass and treble controls are adjusted using the front panel s TONE button in conjunction with the VOLUME knob see Front Panel above NOTE Bass treble settings a...

Page 25: ...ld not be necessary to re program any keys on the HTR L70 AMP and DVD page However in order for the HTR L70 to control your specific NAD brand components you may need to load one or more different cod...

Page 26: ...s steady green Press the HTR L70 s pause key the Learn LED turns amber Press and hold the VCR player s remote s pause key the HTR L70 s Learn LED flickers amber and then turns solid green The command...

Page 27: ...ayback again all from a single keypress The HTR L70 can store one macro on each of its function keys these exclude the Device Selector keys NOTE Macros are independent of the currently selected device...

Page 28: ...ed and punched through keys macros and other setup information reverting all keys to their pre programmed library commands To perform a factory reset simultaneously press and hold for 10 seconds the H...

Page 29: ...er old 201 DVD T562 600 DVD T550 L55 601 DVD T531 T571 602 DVD T512 T532 T572 602 SEARCH MODE If none of the codes from the table turn off the component and if you are quite sure you have followed the...

Page 30: ...For example to indicate code library 501 the HTR L70 will flash TAPE 5 times pause and then flash MACRO once You might wish to make a note of your components code library numbers SUMMARY OF HTR L70 M...

Page 31: ...Check connections check source component setup L70 DOES NOT RESPOND TO HTR L70 REMOTE Batteries are flat or incorrectly inserted IR transmitter window on remote or IR receiver window on L70 is obstru...

Page 32: ...io 3 85 dB Remote control HTR L70 TUNER SECTION Input sensitivity Mono 16 1 dBf 50dB Stereo 36 1 dBf Harmonic Distortion FM Mono 0 2 FM Stereo 0 5 Signal noise Mono 69 dB Stereo 64 dB Stereo separatio...

Page 33: ...33 NOTES Reference ENGLISH FRAN AIS DEUTSCH NEDERLANDS ESPA OL ITALIANO PORTUGU S SVENSKA...

Page 34: ...INTERNATIONAL A DIVISION OF LENBROOK INDUSTRIES LIMITED All rights reserved No part of this publication may be reproduced stored or transmitted in any form without the written permission of NAD Elect...

Reviews: