my!
WIND
Ltd.
Soola 1a
51013 Tartu, Estonia
Email: [email protected]
Website: www.mywind.ee
20 |
P a g e 2 6 / 0 7 / 2 0 1 9
Step 4: Placing the blades
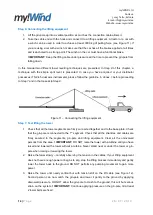
1. Take a my!Wind blade and place it against the root tube flange. Align the 8 mm fitting holes in
the blade flange and the root tube flange to achieve the right position for the blade (see
Figure 19). NO BOLTS shall go through these holes.
2. Take 24 M10 x 35 bolts and fit them with A 10,5 washers and place the bolts to join the blade
flange to the root tube flange. Place A 10,5 washers to the end of the bolts and fix the bolts
with M10 nylock nuts. Use WD-40 oil to lubricate the bolts before placing nuts onto them. Fix
the bolts cross wise with a torque of 53 Nm, going first 50% and then 100%.
TIP:
Fix at first
two bolts with a small torque and then place to others. This will make the bolt placement
easier.
3. Once the blade is fixed, place a support under the blade tip or have another person hold it to
prevent the generator turning on the yaw axis. DO NOT allow the blade tip to be turned
against the ground.
4. Repeat the process for the other two blades.
Figure 19- Placing the blades
Step 5: Placing the blade cover
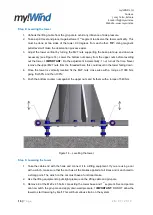
1. Take the my!Wind blade cover and place it from underneath onto the cover holders in a way
that the blades pass through the hole for blade (see Figure 20). Align the six fixing holes in
the cover and in the blade holders. Use two person to perform this job.
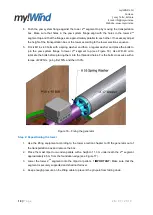
2. Take six M8 x 20 bolts and fit them with A 8,4 A2 washers and place the bolts to join the
blade cover to the cover holder flanges. Use WD-40 oil to lubricate the bolts before placing

