


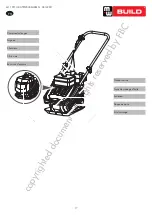


M1.1.TPT1300-TPT2000.NLFREN 08122017
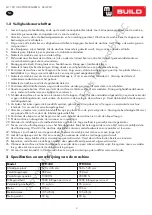
12
NL
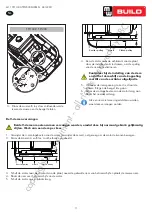
2. Verwijder het riemdeksel en de V-riem.
3. Verwijder de bevestigingsbouten van de motor bovenplaat op het frame.
4. Til de bovenplaat met de motor op.
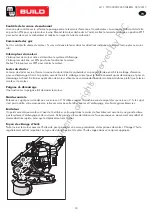
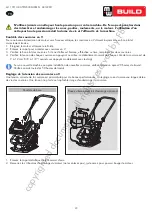
Controleer bij de instelling van de riem dat het riemschijf van de koppeling met dit van de
excitator uitgelijnd is.
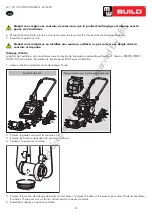
1. Wanneer de riemspanning correct is, draai de moeren B en de montage bouten van de motor aan.
2. Plaats het riemdeksel terug.
Bij de vervanging of de installatie van een riem, zorg ervoor, uw vingers niet tussen de riem en
het riemschijf te knijpen.
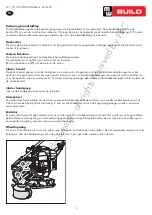
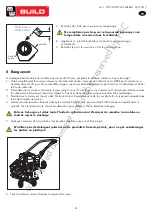
Olieverversing
De excitator behuizing wordt vooraf onderhouden met automatische transmissievloeistof Dextron III, Mercon, EXXON (ESSO)
NUTO H-32 of gelijkaardig. Ververs de vloeistof na 200 uren gebruik.
1. Laat de excitator afkoelen voor de olieverversing.
5. Verwijder de afvoerdop van de excitator frame. Til het frame en kantel dit, om de olie af te tappen. Controleer of de olie
metalen deeltjes bevat.
6. Zet het frame in verticale positie terug.
PLATE COMPACTOR
14
GB
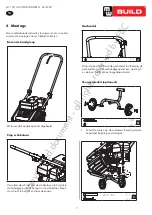
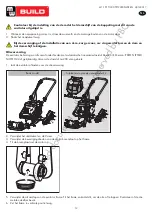
When adjusting the belt(s), make
sure that the clutch pulley is in
alignment with exciter pulley.
When removing or installing the
drive belt(s), be careful not to get
your fingers caught between the
belt and pulley.
Exciter Lubrication
The exciter housing is pre-serviced using
Automatic Transmission Fluid Dextron III,
Mercon, EXXON (ESSO) NUTO H-32 or its
equivalent. Change fluid after 200 hours of
operation.
Let exciter cool before changing exciter oil.
When the V-belt tension is correct, tighten
the jam nuts B and the engine mount bolts.
Replace the belt guard.
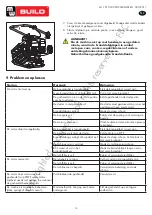
Slide the engine toward the front of plate
and slip the old V-belt(s) off of the wheel
pulley and install the new V-belt(s) in their
place.
Position the V-belt(s) over the engine pulley.
Move the engine back.
1.
6.
3.
7.
4.
5.
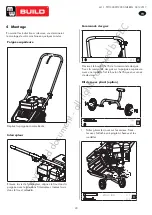
Compactor with optional water sprinkler kit
Remove the belt guard and V-belt(s).
2.
Basic Models
Replacing V-Belt(s)
Loose 4 engine mount bolts (do not
remove) only enough to move the engine
forward.
Loosen the jam nuts B and bolts A shown
in above figure.
1.
2.
V-belt
Clutch pulley
Exciter pulley
Both V-belts should be replaced
at the same time because they will
wear evenly through normal use.
Work on one belt at a time. (For
#29240, there is only one belt.)
29242UK00M101-改.indd 14
2016/6/23 17:58:39
PLATE COMPACTOR
14
GB
When adjusting the belt(s), make
sure that the clutch pulley is in
alignment with exciter pulley.
When removing or installing the
drive belt(s), be careful not to get
your fingers caught between the
belt and pulley.
Exciter Lubrication
The exciter housing is pre-serviced using
Automatic Transmission Fluid Dextron III,
Mercon, EXXON (ESSO) NUTO H-32 or its
equivalent. Change fluid after 200 hours of
operation.
Let exciter cool before changing exciter oil.
When the V-belt tension is correct, tighten
the jam nuts B and the engine mount bolts.
Replace the belt guard.
Slide the engine toward the front of plate
and slip the old V-belt(s) off of the wheel
pulley and install the new V-belt(s) in their
place.
Position the V-belt(s) over the engine pulley.
Move the engine back.
1.
6.
3.
7.
4.
5.
Compactor with optional water sprinkler kit
Remove the belt guard and V-belt(s).
2.
Basic Models
Replacing V-Belt(s)
Loose 4 engine mount bolts (do not
remove) only enough to move the engine
forward.
Loosen the jam nuts B and bolts A shown
in above figure.
1.
2.
V-belt
Clutch pulley
Exciter pulley
Both V-belts should be replaced
at the same time because they will
wear evenly through normal use.
Work on one belt at a time. (For
#29240, there is only one belt.)
29242UK00M101-改.indd 14
2016/6/23 17:58:39
Basis model
Trilplaat met optionele watersproeier kit
PLATE COMPACTOR
15
GB
3.
4.
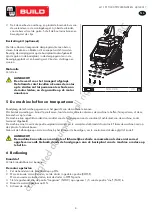
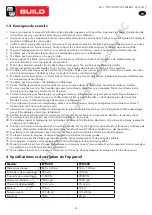
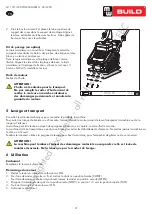
Do not overfill - overfilling can
result in excessive temperatures in
the exciter.
Remove pipe plug from top of exciter
housing. Tilt housing upside down so oil
drains from exciter. Examine oil for metal
chips as a precaution to future problems.
Return plate housing to the upright
position.
Fill the exciter housing with exciter oil.
Apply pipe sealant to pipe plug and
reinstall into top of exciter housing.
Reinstall deck, V-belt(s) and belt guard.
Engine maintenance
Refer to the
Engine Manual
included in your
plate compactor for the information on engine
maintenance. Your engine manual provides
detailed information for performing the tasks.
5.
7.
8.
9.
6.
EXCITER
EXCITER
SHAFT
29240 29242 29255 29260 29265
60 ml
80 ml 100 ml 130 ml 130 ml
STORAGE
If the plate compactor will not be used for
a period longer than 30 days, following the
steps below to prepare your unit for storage.
Drain the fuel tank completely. Stored fuel
containing ethanol or MTBE can start to go
stale in 30 days. Stale fuel has high gum
content and can clog the carburetor and
restrict fuel flow.
Start the engine and allow it to run until
it stops. This ensures no fuel is left in the
carburetor. Run the engine until it stops.
This helps prevent deposits from forming
inside the carburetor and possible engine
damage.
While the engine is still warm, drain the oil
from the engine. Refill with fresh oil of the
grade recommended in the
Engine Manual
.
Allow the engine to cool. Remove the
spark plug and put 60 ml of SAE-30 of
high quality motor oil into the cylinder. Pull
the starter rope slowly to distribute the oil.
Replace the spark plug.
1.
2.
3.
4.
Remove the bolts that hold the deck to the
housing.
Lift entire deck with engine from housing.
Use clean cloths to clean off the outside of
the compactor and to keep the air vents
free of obstructions.
5.
Remove the spark plug and drain all
of the oil from the cylinder before
attempting to start the unit after
storage.
29242UK00M101-改.indd 15
2016/6/23 17:58:40
copyrighted
document
- all
rights
reserved
by
FBC