


Chapter 6 – RouteFinder Software
Multi-Tech Systems, Inc. RouteFinder RF850/860 User Guide (PN S000400E)
82
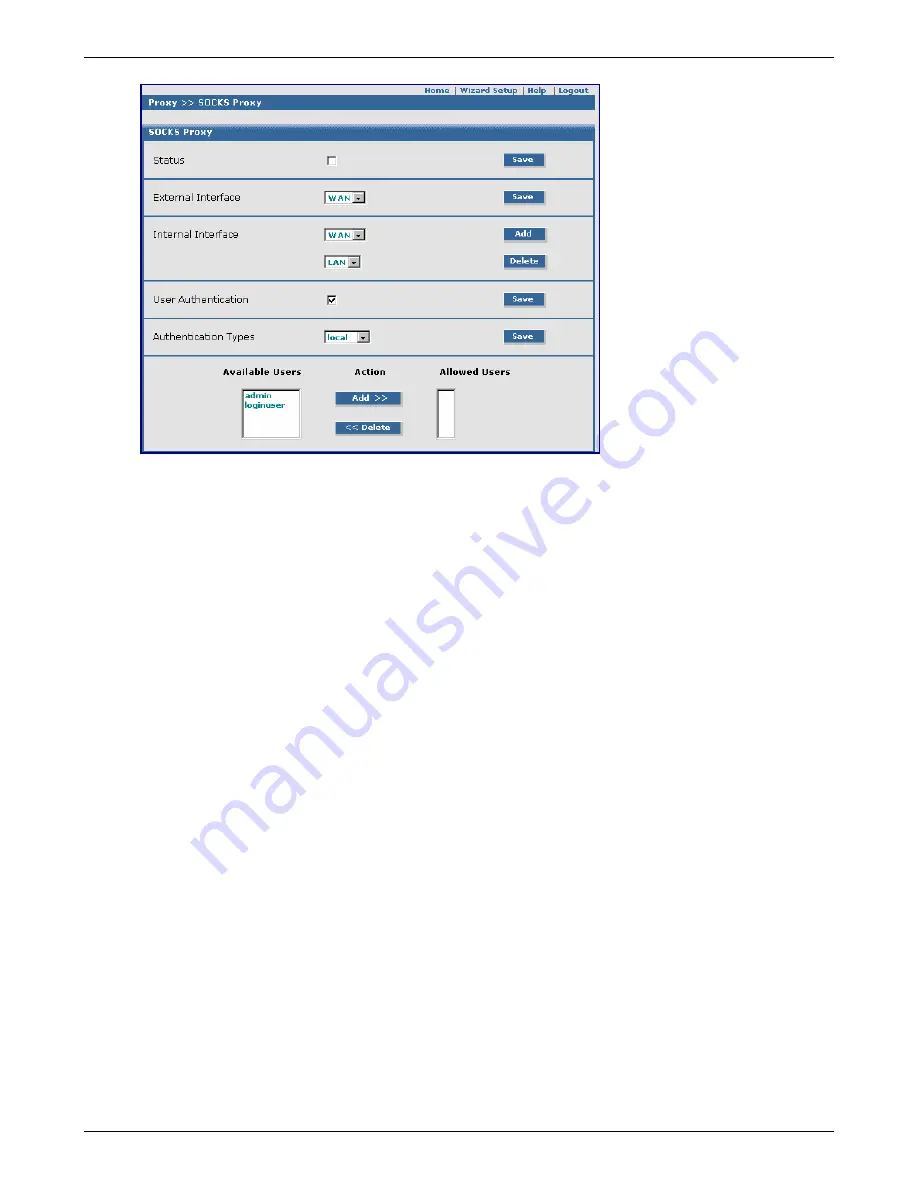
Proxy > SOCKS Proxy
SOCKS Proxy
Status
To enable SOCKS, check the
Status
box. Click the
Save
button.
External Interface
The SOCKS Proxy uses an external interface to send outgoing requests. This is the external
interface to the Internet. Select the interface that you want to use.
The options are LAN, WAN, and DMZ when Load Balancing is disabled.
The options are LAN, WANLINK1, and WANLINK2 when Load Balancing is enabled.
Internal Interface
Select one or two interfaces on which SOCKS is to accept connections from clients. These
interfaces can be used by clients with port 1080 to access the SOCKS proxy.
The options are LAN, WAN and DMZ when Load Balancing is disabled.
The options are LAN, WANLINK1 and WANLINK2 when Load Balancing is enabled.
User Authentication
To enable User Authentication, check the User Authentication box. When enabled, SOCKS
proxy users must log in with their user names and passwords.
Authentication Types
Select the method of user authentication. Options are Local, RADIUS, and Sam. If you choose
the Local method, you can choose whether or not local users may use the SOCKS proxy.
If you disable User Authentication, then client applications must be configured with empty user
name and password fields!
Allowed Users and Available Users
Enter a straightforward name that will identify a user group in the Allowed Users text box. Click
the Add button. The name will display in the Available Users box. Once the name has been
accepted, you can delete it at any time.
Add Users
A list of all users who are allowed to access the SOCKS Proxy can also be configured by
selecting the users from the right selection box and clicking the Add button. These users can
also be added by checking the checkbox against SOCKS users in the User Authentication >
Users section. The left box contains SOCKS users and the right box consists of all the local
users who are not allowed to access SOCKS.
Delete Users
The users who are now allowed to access the SOCKS Proxy can be changed by selecting the
users from the left box and clicking the
Delete
button. These users can also be deleted by
unchecking the checkbox against SOCKS users in the
User Authentication > Users
section.
The left box contains SOCKS users and the right box consists of all the local users who are not
allowed to access SOCKS.


