background image

SARANEX HOOD/ADVANTAGE 3000 (MODEL 3100)

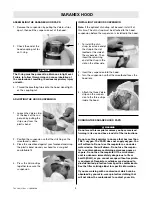
1. Don the support belt. Adjust the motor-blower and fil-

ter assembly to a comfortable position toward your
back.

Do not drop the PAPR. The case can be damaged by
impact. The blower can be loosened or the motor
shaft can be bent. If the unit is dropped, check the
case for cracks. Listen closely to the sound of the
motor. If the blower sticks or rattles, or if air output is
reduced, the entire motor-blower must be returned to
MSA or an authorized MSA Service Center for repair.

2. Check for an O-ring on the end of the breathing tube

coupling nut.

The O-ring must be present to ensure an air-tight seal.
Failure to follow this warning can cause inhalation of
the contaminant, resulting in serious respiratory injury
or death.

3. Thread the breathing tube onto the motor-blower and

hand-tighten the coupling nut.

4. Turn the power switch on. Let air flow through the unit

for a few seconds.

5. Grip the hood and knit collar between your fingers

with both hands. Stretch the collar and pull the hood
down over your head.

6. Put the suspension on your head.
7. Secure the chin strap under your chin.
8. Straighten the knit collar for a good fit around your

neck.

9. Check the hood inlet to make sure it is straight and

not twisted.

Do not wear the hood with the neck seal or bibs under
your clothing. Failure to follow this warning can cause
reduced air flow below the required minimums. This
can reduce or eliminate the protection of the unit,
resulting in serious personal injury or death. 

DONNING ADVANTAGE 3000 (MODEL 3100) 
RESPIRATOR

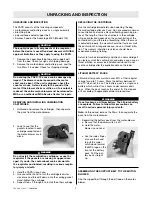
1.  Loosen the two bottom harness straps. Grip the 

straps by inserting thumbs through the straps. Insert
chin well into the lower part of the facepiece and pull
the harness back over the head.

2. Push the back of the harness downward toward the

neck until it is centered at the back of the head.

3. If necessary, hold the mask component housing with

one hand and position the harness with other hand,
until obtaining a firm and comfortable fit against the
face at all points.

4. Tighten the two bottom straps so that the mask is

snug against the face. The top two harness straps
should be flat against the top of the head. 

5. If the mask does not feel snug against the face,

remove the mask and adjust the length of the two
straps.

To Adjust the Top Straps:

1. Remove the strap from the fastener Button by pulling

the loose end of the strap away from the fastener
Button.

2. Move the slide away from the lens ring to allow the

strap to slide through the lens ring connection. Adjust
the length of the strap. Pull the straps to the next hole.
Secure the strap in position by pulling the strap onto
the button.

3. Smooth the straps so that they are flat. Move the slide

so that it is located at the lens ring connection.

DONNING THE RESPIRATOR WITH PLASTIC 
ADVANTAGE HARNESS

Instructions to Don the Mask

Note:

There are two recommended donning procedures.

Donnig Procedure A:

1. Completely loosen the two bottoms straps. Spread

the straps of the head harness with both hands and
place chin into the mask. Pull harness over head all
the way, until plastic cradle lies flat on the back of
head.

2. Tighten neck straps evenly so the mask is snug

against face.

3. If necessary, adjust the mask and tighten harness by

pulling loop on the back of harness.

Donning Procedure B:

1. Completely loosen the two bottom straps, insert finger

and hold the loop on the back of the harness.

2. Place chin into the mask.
3. Pull harness over the head with the loop; pull harness

down to the back of the head, until plastic cradle lies
flat on back of head.

4. Tighten neck straps evenly so that the mask is snug

against your face.

10

TAL 209 (L) Rev. 1 - 10040590

WARNING

WARNING

CAUTION

Summary of Contents for OptimAir 6HC

Page 1: ...emonstration of this equipment prior to use or for any additional information relative to use or repairs Call 1 800 MSA 2222 during regular working hours See separate insert for NIOSH approval information P N 10041484 This manual including the warnings and cautions inside must be read and followed carefully by all persons who have or will have the responsibility for using or servic ing the product...

Page 2: ...User s Instructions and or maintenance manuals for information on use and maintenance of these respirators P NIOSH does not evaluate respirators for use as surgical masks S Special or critical user s instructions and or specif ic use limitations apply Refer to User s Instructions before donning S SPECIAL OR CRITICAL USERS INSTRUCTIONS The respirator must not be worn in atmospheres which exceed any...

Page 3: ...First determine the total concentration of the chemical mixture CMixture from the individual contaminant con centrations C1 C2 C3 using the following formula CMixture C1 C2 C3 The TLV of the mixture is found by using the following for mula where T1 T2 T3 are the individual contaminant TLVs and C1 C2 C3 are the individual contaminant concentrations Only use these equations if the contaminants prese...

Page 4: ...e by trained qualified per sonnel only Failure to follow the above warnings can result in seri ous personal injury or death Do not use for urethane paints or other paints contain ing diisocyanates unless an appropriate cartridge change out schedule is developed Due to their poor warning properties over exposure can occur without user awareness and result in severe permanent dam age to the respirat...

Page 5: ... sure limits and concentrations Selection then matches a specific media which traps known particulates and a spe cific sorbent which removes known gas or vapor contami nants resulting in purified air reaching the user The motor blower battery pack and filters are worn as an assembly on the support belt The breathing tube con nects the belt mounted assembly to the facepiece or hood The respirator m...

Page 6: ...NOTES 6 TAL 209 L Rev 1 10040590 ...

Page 7: ...tridge REPLACING THE CARTRIDGE Use the cartridge immediately upon opening the bag Discard cartridge after each use Do not exceed maximum concentration and service life specified by governing pro tocol The length of time the chemicals in the cartridge will give protection depends on the concentration of the contaminant s and the rate of breathing When the mask is adjusted properly the wearer should...

Page 8: ...NOTES 8 TAL 209 L Rev 1 10040590 ...

Page 9: ... strap insert one end of the strap in the slot located at the side of the suspension Then insert the remaining end of the strap in the slot on the other side 2 Insert the suspension into the hood 3 Turn the suspension so that the sweatband faces the hood lens 4 Attach the three Velcro strips on the suspen sion to the three strips inside the hood DONNING THE SARANEX HOOD PAPR Do not wear this respi...

Page 10: ...ad 2 Push the back of the harness downward toward the neck until it is centered at the back of the head 3 If necessary hold the mask component housing with one hand and position the harness with other hand until obtaining a firm and comfortable fit against the face at all points 4 Tighten the two bottom straps so that the mask is snug against the face The top two harness straps should be flat agai...

Page 11: ...TALLING COMBINATION CARTRIDGES 2 To install a fresh Lithium battery pack refer to Reattaching the Battery Pack OTHER GAS MASK USES NOT EVALUATED OR APPROVED BY NIOSH This PAPR when used with the combination cartridge is effective against the following chemical warfare CW agents GA GB Sarin GD VX Mustard and Lewisite and all biological agents Although not evaluated or approved by NIOSH for this app...

Page 12: ...r death 3 Once the user and the protective equipment have been decontaminated proper disposal of affected equipment is to be performed Disposal is to be performed as required by federal state and or local laws that apply to CBA contaminated materials Failure to follow accepted safety and protection pro cedures when exposed to hazardous atmospheres can result in serious personal injury or death DEC...

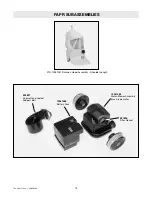
Page 13: ...BLIES 13 TAL 209 L Rev 1 10040590 P N 10041551 Saranex Hood Assembly Shoulder Length 492827 Polyurethane coated Support Belt 10041488 Battery Pack 487805 Filter Gasket 10041489 Motor Blower Assembly brush type motor ...

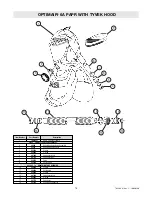
Page 14: ...E VALVE ASSEMBLEY 2 84660 Exhalation Valve Body Assembly 3 82382 Exhalation Valve Cover 4 626254 Clamp 5 628082 O Ring 6 801035 Connector Insert 7 467175 Connector Nut 8 486472 Tube 9 482614 Suspension 481980 19 BREATHING TUBE ASSEMBLY 10 626254 Clamp 11 490689 Corrugated 12 626254 Clamp 13 801035 Connector Insert 14 628082 O Ring 15 467175 Connector 16 801074 Exhalation Connector ...

Page 15: ...15 TAL 209 L Rev 1 10040590 20 ...

Page 16: ......

Reviews: