background image

UNI MP100 User’s Guide 


15 

9.


“Save” stores the current Docking Box configuration file to the PC. 

10.


“Load” calls up a stored Docking Box configuration file from the PC to mPower Suite. 

11.


To update the Docking Box firmware, select “Firmware Upgrade”.    The firmware must first 
be downloaded to the PC from the mPower website www.mPowerinc.com.   

6.2


Procedures for UNI Calibration on Docking Box 
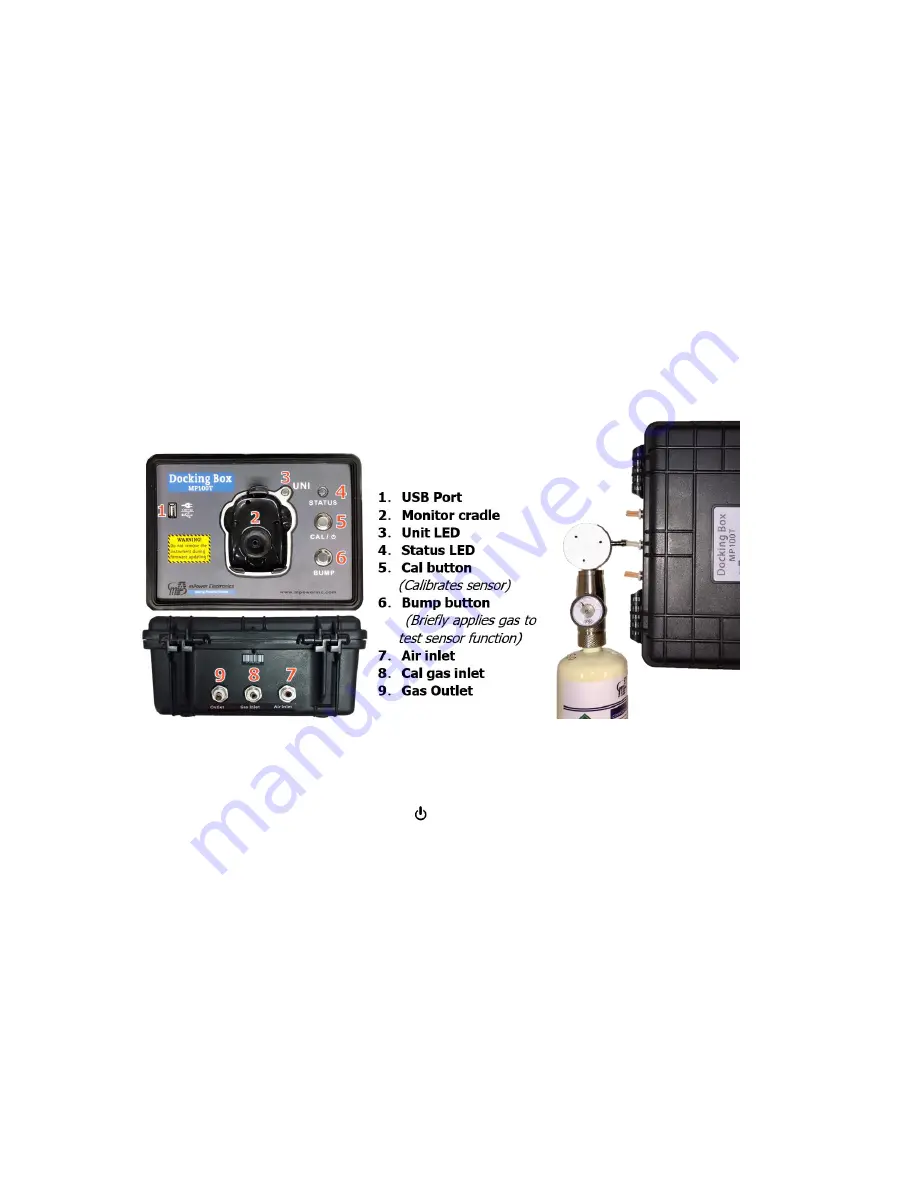
1.


Connect gas and regulator to the quick-connect in the Cal gas inlet port of the Docking Box 

using 6-mm or ¼-inch o.d. tubing 

2.


If the ambient air is not free of detectable compounds, connect the air inlet to a fresh air 

source. 

3.


If desired, connect tubing to the gas outlet to exhaust away from the operator breathing area. 


            Docking Box Components   


      Calibration Gas Connections


4.


Place the instrument face-down into the cradle. 

5.


If the Status LED

 [4]

 is off, press Cal/

  [5]

 until the LED turns green. 

6.


Push Cal

 [5]

 to initiate calibration or Bump

 [6]

 to run a bump test. The LED should blink 

green for about 100 s during calibration or 25 s during a bump test. 

7.


If the calibration or bump is successful, the Unit LED

 [3]

 will be green, otherwise red. 

8.


Up to 2000 Cal or Bump reports will be saved in the


internal storage of the Docking Box. 

9.


To power off, hold the Cal button until the status LED turns off. 


Summary of Visual and Audio Alarm Indications 

Summary of Contents for UNI MP100

Page 1: ...UNI Multi Gas Detectors MP100 User s Guide Rev 1 11 October 2019...

Page 2: ...nfigurations 9 4 6 1 Alarm Limits 9 4 6 2 Span Value 10 4 6 3 Bump Cal Intervals 10 4 6 4 Gas Concentration Unit 10 4 6 5 Vibrator Enable Disable 10 4 6 6 Power on Zero Enable Disable 10 4 6 7 Fast Po...

Page 3: ...omme non dangereuse Utilisez uniquement la batterie au lithium de mPower pi ce No M500 0001 000 1 17 02 0002 3 6V 2700mAH taille AA ou celle de EVE nergie Cie Lt pi ce No ER14505 Cet instrument n a pa...

Page 4: ...nd these can be displayed on demand High Low STEL and TWA alarm thresholds are configurable The shell is made of high strength durable material The two key operation is simple to use Sensor and batter...

Page 5: ...rm action 3 Unit status indicator OK and to confirm entry 4 Gas unit includes x10 6 ppm mg m3 mol mol 5 Battery charge status 6 HIGH LOW STEL TWA alarm indicator when flashing 7 Span calibration in pr...

Page 6: ...essed to acknowledge otherwise the instrument will turn itself off automatically after 15s Lastly the following values will be shown accordingly High alarm threshold Low alarm threshold STEL short ter...

Page 7: ...ar Peak screen and Press the Left Key again to acknowledge and clear the Peak value 4 3 5 Minimum Oxygen Sensor Only The Minimum screen is used for the oxygen sensor only and shows the lowest value si...

Page 8: ...o exit Config Mode press the Right Key until is displayed and acknowledge with the Left Key to return to Normal Mode 4 5 Sensor Calibration and Bump Test Before the unit can monitor gas correctly it n...

Page 9: ...t 0 3 LPM but no more than 0 6 LPM Use as short tubing connections as possible Span Calibration Procedure 1 Connect the Calibration Adapter to the span gas cylinder s regulator and snap it into place...

Page 10: ...s 4 6 1 Alarm Limits All the preset alarm limits HIGH LOW STEL TWA can be changed From these menus press the Left Key to change the corresponding alarm limit using the same process as for entering a p...

Page 11: ...ntly selected unit blinking Unit options include x10 6 ppm mg m3 and mol mol for toxic gas sensors and for oxygen Use the Right Key to scroll through the unit list and select and the Left Key to confi...

Page 12: ...e version number and then goes directly to concentration readings The fast power on menu alternates between and Press the Left Key to change the fast startup enable disable status Enable or disable Fa...

Page 13: ...ironments 2 Turn on the instrument and insert it face down into the Docking Box 3 Start mPower Suite on the PC and click the Search button on the bottom panel 4 Find the instrument in the left bar Dev...

Page 14: ...n be used for calibrations it must be set up for the desired gas type and span concentration 1 Connect the USB cable to both the Docking Box and the PC WARNING Connect only in non hazardous environmen...

Page 15: ...date entered 7 Hibernate Timeout is the number of seconds of inaction before the Docking Box turns itself off automatically Press the Cal button to turn back on 8 To download Cal Bump test reports cli...

Page 16: ...ounds connect the air inlet to a fresh air source 3 If desired connect tubing to the gas outlet to exhaust away from the operator breathing area Docking Box Components Calibration Gas Connections 4 Pl...

Page 17: ...ne Cal bump testing Green Beep Once Cal bump test pass Orange None Sensor type mismatch Red 3 beeps per sec Cal bump test fail Status LED 4 Green None Power On Green blinking None Low battery Orange N...

Page 18: ...gers every second The battery needs to be replaced as follows 1 Turn off the MP100 and place it face down on a soft surface 2 Use a T10 Torx screwdriver to loosen each of the four screws by turning th...

Page 19: ...onments for easier filter exchange 1 Turn off the MP100 and remove the top cover as described above for battery replacement 2 Peel a filter from its sheet center it over the sensor and gently press do...

Page 20: ...ilter Use external filter clip in dusty environments Weak sensor Have Service Technician check raw counts and replace sensor as needed Calibration Adapter is attached Remove Calibration Adapter Readin...

Page 21: ...1 Vibration per second HIGH 2 flashes per second Low alarm Buzzer 2 beeps per second LED 2 flashes per second 1 Vibration per second LOW 2 flashes per second STEL alarm Buzzer 1 beeps per second LED 1...

Page 22: ...minute LED 1 flash per minute 1 Vibration per minute Battery Low alarm Buzzer 1 beep per second LED 1 flash per second bAT LoW 1 flash per second Battery Empty alarm Buzzer 1 beep per minute LED 1 fl...

Page 23: ...0 250 1 25 25 50 25 25 Orange 30 NO2 0 20 0 1 5 1 10 1 1 Orange 30 PH3 0 20 0 01 5 1 2 1 0 3 Orange 60 SO2 0 20 0 1 5 2 10 5 2 Orange 15 ETO 0 100 0 1 10 2 5 2 1 Orange 120 0 200 0 1 10 2 5 2 1 Orange...

Page 24: ...TWA alarms adjustable Over range alarm Low battery alarm Alarm Signal 95 dB 30 cm Bright red LEDs Built in vibrator Calibration 2 point calibration zero and span power on zero user selectable Event Lo...

Page 25: ...UNI MP100 User s Guide 24 Technical Support and mPower Contacts mPower Electronics Inc 3046 Scott Blvd Santa Clara CA 95054 Phone 408 320 1266 Fax 669 342 7077 info mpowerinc com www mpowerinc com...

Reviews: