Motorola IDEN LM 3000E Getting Started Download Page 74

75

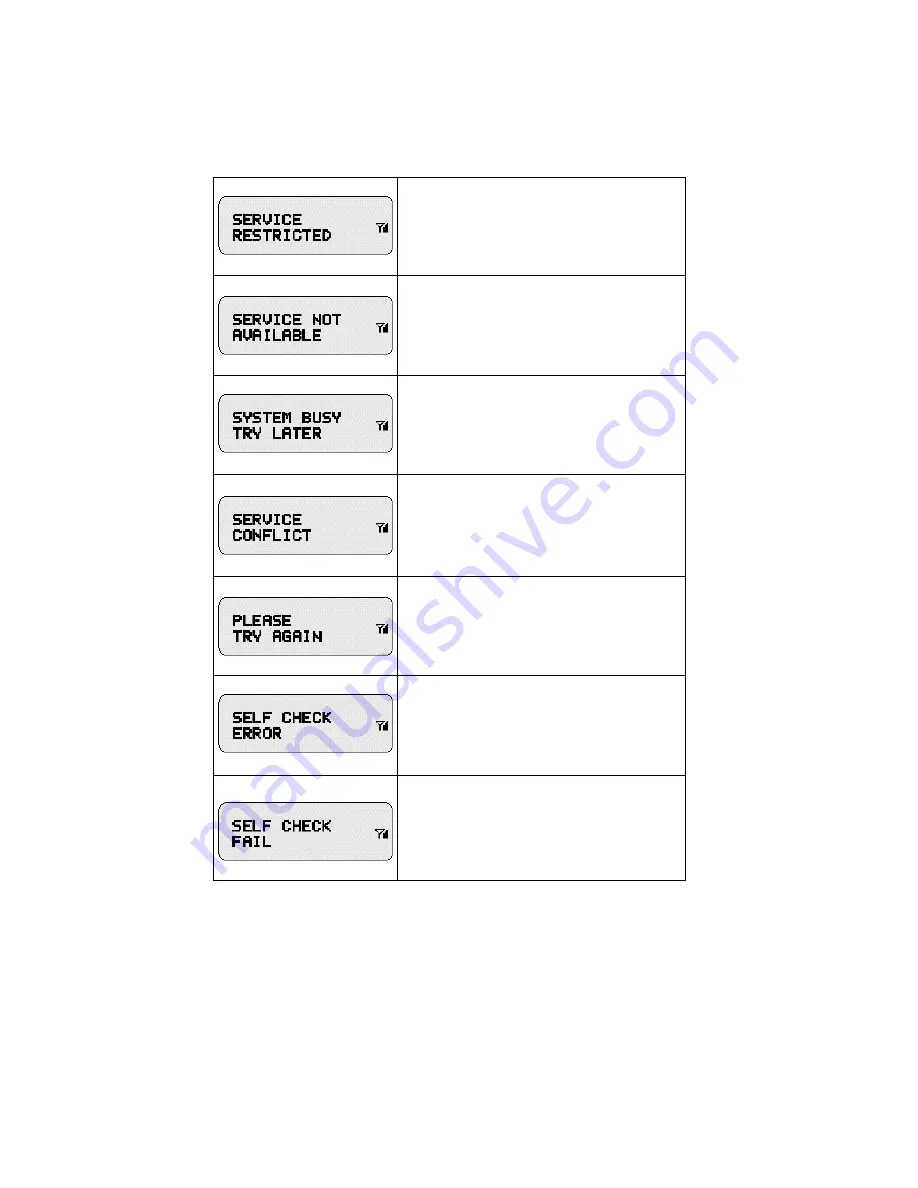
This service has been restricted by your service 
provider or it has not been purchased.

This feature is not available on the current network.

The system is experiencing heavy traffic. Please try 
again later.

This service cannot be enabled because an incom-
patible service has already been turned on.

A general error has occurred. 

A fault has been detected with your unit. Should 
this error recur, note the error code and contact 
your sales representative.

An operational fault has occurred. Turn your unit
off and contact your sales representative immedi-
ately.

Summary of Contents for IDEN LM 3000E

Page 1: ...iDEN LM 3000E Getting Started 68P81084C17 0 ...

Page 2: ...in different talkgroups so you can have one to many radio communication Talkgroups can be based on local targeted or wide area selections Private Conversation Private Conversation is used for one to one private radio communication Call Alert You can send Call Alerts to individuals indicating that you want to speak to them Horn and Lights Causes your vehicle s horn and lights to come on and flash e...

Page 3: ...2 iDEN Advanced Feature Mobile ...

Page 4: ...9 Alphanumeric Keypad Used for direct entry of radio IDs service area IDs talkgroup IDs or names 10 Microphone Jack Used to connect the microphone 11 Area Key Used to select service areas 12 Directional Keys Used to perform Memory Scrolling option scrolling and editing 13 Group Mode Key Used for one to many radio communication 14 Private Mode Key Used for one to one private radio communication 15 ...

Page 5: ...e are different modes your unit can be in Group Private Alert Status or Emergency These are your Radio Operation modes Each mode has a home or default screen To help you become familiar with the display oper ation shown below is the home screen for Group Call Radio Mode Area Talkgroup 4 ...

Page 6: ...ically turn off To prevent unauthorized use your unit will automatically lock when turned on using the power knob using the ignition switch will not automatically lock your unit To unlock your unit enter your passcode See the Feature Menu section for further information on locks Each time the mobile is turned on it performs a self check and system registration routine Once completed the unit will ...

Page 7: ...wer Volume knob clockwise to increase or counter clockwise to decrease the speaker volume You can also adjust the speaker and keypad volumes through the Feature Menu Refer to the Feature Menu section for instructions on adjusting these volumes ...

Page 8: ...ophone in front of your mouth and press the PTT to talk 2 Speak into the microphone 3 Release the PTT to listen As long as your unit is powered on and is idle you can receive radio calls Radio Operations This section explains Basic Operation Group Call Private Conversation Call Alert Emergency Call Status Message Horn and Lights When idle in radio Group or Private modes not talking or listening yo...

Page 9: ...back high chirp like tone then try again A time out timer limits the amount of time you can continuously talk When the allotted time expires you will hear a low pitched cut off tone Your unit may be pro grammed with a courtesy tone Upon releasing the PTT a courtesy tone alerts listeners that you have completed your transmission A Group Call consists of a service area and a talkgroup Service areas ...

Page 10: ...a Local Area call regardless of their loca tion Example Talk to Talkgroup 7 members in your Local Area Area 6 is your current Local Area Talkgroup 7 is your selected talkgroup 1 Press 2 Press PTT Service Area Selection When making outgoing Group Calls you may choose from three different service area selec tions Local Area Targeted Area Wide Area In each case you are speaking with members of the ta...

Page 11: ... to input service area IDs Example Select area ID 12 using the keypad Centreville is service area 1 Area 6 is your current Local Area Talkgroup 7 is your selected talkgroup 1 Press 2 Press 3 Press 4 Press 5 Press PTT 10 Service area ID 1 has been programmed with a name Centreville When in the Local Area the word LOCAL appears before the service area ID or name The word AREA appears before the serv...

Page 12: ... Local Area Talkgroup 7 is your selected talk group 1 Press GRP 2 Press ARE 3 Press twice 4 Press PTT Pressing PTT allows you to talk with the TALKGRP 7 members currently in the MID WAY service area plus your local cell Pressing SEL confirms your service area selection without initiating a Group Call Press and hold the or keys to activate the Auto Scroll feature Auto Scroll allows you to quickly s...

Page 13: ...talkgroup 1 Press 2 Press ARE 3 Press 4 Press PTT 12 WIDE AREA is at the end of your service area list With the on the top line use your to scroll to WIDE AREA When LOCAL appears on the display press once to locate Wide Area Pressing PTT allows you to talk with your dis patcher and the TALK GRP 7 members in all service areas Pressing SEL confirms your Wide Area selection without initiating a Group...

Page 14: ...emory Scroll Direct Entry Allows you to use the keypad to input talkgroup IDs Example Select talkgroup 18 SE PLANT is talkgroup 1 1 Press 2 Press 3 Press 4 Press PTT 13 Talkgroup Selection is independent of Service Area Selection To erase a digit press To clear all digits press and hold To return to your previously selected talkgroup press CLR To transmit press PTT To listen only press The word TA...

Page 15: ...th in the list Talkgroup 7 is your selected talkgroup and is seventh in the list 1 Press 2 Press 3 Press PTT PTT ID The PTT ID displays the ID or alias of the user currently transmitting in a group call 14 To transmit press PTT To listen only press SEL Press and hold the or keys to acti vate the Auto Scroll fea ture Auto Scroll allows you to quickly scroll through your lists ...

Page 16: ...eature Menu section for programming information A radio ID can be selected by Direct Entry or Memory Scroll Making a Private Conversation Call Direct Entry Allows you to use the keypad to input radio IDs Example Make a Pri vate Conversation call to Jane Her radio ID is 12 Jack s radio ID is 1 The last Private Conversation or Call Alert was with radio ID 5 1 Press 2 Press 3 Press 4 Press PTT When y...

Page 17: ...h memory for radio IDs When programmed names appear in place of radio IDs Example Call Mark who is the 13th entry in your radio ID list Jane is 12th 1 Press 2 Press 3 Press PTT 16 When you enter the Prvt mode the last sent or received radio ID or name appears ...

Page 18: ...g the person calling you Example Mark is Private calling you You will immediately begin hearing the voice of the person calling To respond to the call wait until the caller is finished speaking Then press and hold the PTT and talk Release to listen The person s ID appear ing on the display is stored as the last radio ID received When pro grammed names appear in place of radio IDs ...

Page 19: ...rget ed person that you want to get in touch with them A Call Alert is placed by selecting the radio ID for the person you want to alert A radio ID can be selected by Direct Entry or Memory Scroll Sending a Call Alert Direct Entry Allows you to use the keypad to input radio IDs Example Send a Call Alert to Jane Her radio ID is 12 Jack s radio ID is 1 The last Private Conversation or Call Alert was...

Page 20: ... any key except PTT Grp Prvt Alert Sts Emer or Men Note If not cleared all incoming calls will be blocked 19 You will be taken to Pri vate mode when responding to a Call Alert The list of radio IDs and names used to initiate a Call Alert is the same list that is used in Private Conversation Memory Scroll To send a Call Alert using Memory Scroll use the same procedure described in the Pri vate Conv...

Page 21: ...cy start tone to indicate that you have successful ly requested an emergency call The emergency call will be sent on either a pre programmed emergency talkgroup or the last selected talkgroup Emergency will flash until the system acknowledges the emergency condi tion A tone will be generated to provide indication that the channel is ready to begin the call Placing an emer gency call will exit any ...

Page 22: ...the PTT to talk The initiator cannot exit the emergency call without first cancelling the emer gency call The display will show the alias or ID of the talk group member who is transmitting If you place an emergency call to the currently selected talk group the second line will stay the same and not flash The second line will flash to indi cate the unit is affiliating with the pre pro grammed emer ...

Page 23: ...s tone indicates the cancellation has occurred The display will return to the non emergency Group Call state Other Methods for Cancelling an Emergency Group Call An emergency call will be cancelled if no talkgroup activity occurs for 30 seconds The dispatcher or any other person provisioned with this feature can also cancel the emergency call ...

Page 24: ...ng unit will hear an Emergency Receive tone and the receiver s display will change to indicate the condition The first line indicates the ID or alias of the person initiating the emergency call The second line will show you the talk group name or number with the ID or name of the person currently transmitting The display you ll see when you are transmitting ...

Page 25: ...Group Call talkgroup can leave the emer gency call and change modes while involved in the call While listening to the emergency call the receiving unit will not receive Call Alert Status Message Private Conversation or other group calls for the duration of the emergency call 24 ...

Page 26: ... selecting both the Status Message and target ID alias of the person who is to receive the Status Message You can cut talk time to a minimum by sending Status Messages You can also leave a Status Message for receivers while they are away from their radios Entering the Status Message Mode To enter the Status Message mode press the key This is the home screen you see when you enter the Status mode T...

Page 27: ...lect the message you want to send Enter any number from 1 255 to select a Status Message The number can correspond to one of 10 pre programmed alphanumeric status messages or any other numeric Status Message within the range of 1 255 1 Press Sel 2 Press Sel 3 Press PTT 26 Pressing the PTT at this time will send the message to the last radio ID to which you sent a successful Status Message ...

Page 28: ...rough the 10 named aliased Status Messages you have pro grammed by using the keys 1 Press until you find the message you want In this case we scrolled to the Status Message At Lunch 2 Press Se l 3 Press PTT Pressing the PTT at this time will send the message to the last radio ID to which you sent a successful Status Message ...

Page 29: ...ending the message 3 Press 4 Press PTT to send the message to the selected ID The ID list is the same as Call Alert and Private Con versation List The key acts as a backspace Clr returns to show you the last selected radio ID The second line reflects the ID or alias to whom you last sent a suc cessful Status Message Selecting a Target Once you have selected a Status Message you can select a target...

Page 30: ...n select a target by scrolling through radio IDs or aliases by using the keys 1 Press the key until you find the person to whom you want to send the message 2 Press 3 Press PTT The display shows the message that has been sent ...

Page 31: ...get ID press the PTT to send the message Four high pitched tones will be heard to indicate transmission The display will update to indicate the message was success fully delivered to the target radio The unit will return to the status screen after 3 seconds Two high pitched tones will be heard ...

Page 32: ...t Available is an example of an error message that you could receive Target Not Available indi cates that the unit you are sending the message to is either busy out of range or turned off Refer to the Safety and General Information section for a description of other error messages The unit will return to the status screen after 3 seconds ...

Page 33: ...urring alert tones only press any key except PTT Prv t Aler t S ts or Men Note If not cleared all incoming calls will be blocked Line 1 shows the ID Alias of the sending unit Line 2 shows the message Clr clears the Sta tus Message and returns you to the mode you were in prior to receiving the Status Mes sage Pressing the GRP PRV ALER STA TUS or MENU keys will also clear the Status Mes sage ...

Page 34: ...uses your vehicle s horn and lights to come on and flash each time you receive a Private Call Status Message or Call Alert Note This feature requires additional hardware Press H L to turn this feature on or off The bell icon indicates that Horn and Lights is on ...

Page 35: ...eature Menu The Feature Menu allows you to review select and program additional radio features The table below provides a description of the features available in the Feature Menu Key The Feature Menu can be accessed using the MENU key at any time without interrupting radio operation Own Radio ID Allows you to program edit and review your personal Radio ID Feature Name Example and Description Disp...

Page 36: ...he unit is turned on Theft Alarm When Theft Alarm is ON you have 30 seconds to enter your Passcode After that time the vehicle s horn and lights come on and start flashing This feature requires additional hardware Display Dimmer Allows you to set the brightness of the radio display bright for day dim for night There are four settings Press SEL to select Then press to change setting 36 Feature Name...

Page 37: ...Calls Each talkgroup ID can be up to three digits long and can be given an 11 character name alias Service Area List Programming Allows you to add edit and erase the pre programmed list of service areas for making Group Calls Each service area can be up to two digits long and can be given an 11 character name alias Status List Programming Allows you to add edit and erase the pre programmed list of...

Page 38: ...e is displayed as a bar graph Seven bars indicate maximum volume You can silence the keypad by decreasing the volume until SILENT appears on the display Keypad Volume is listed under the MENU key Press SEL when you get to the Keypad display to use the keys to adjust the volume Speaker Volume Set Tone Disabling this feature OFF will prevent speaker volume adjustment tones from being heard When this...

Page 39: ... Master Clear performs all functions of the Feature Reset It also returns the Radio ID list Talkgroup list Status list Service Area list and Passcode to their factory settings Master Reset Resets your radio s identification number and Service Key to their initial settings CAUTION Master Clear erases all entries stored in your Radio ID Talkgroup Status and Service Area lists Once con firmed this pr...

Page 40: ...Service Key disables ser vice of your unit until you notify the ser vice provider of the new Service Key Once confirmed this procedure cannot be cancelled or reversed Feature Name Example and Description Display NAM Selection Number Assignment Module NAM allows you to have local service in different cities NAM also allows you to register with different service providers in the same city ...

Page 41: ...he Radio ID List Program 3 Press SEL 4 Press SEL 5 Press to assign Radio ID 1 41 Feature Menu Examples List Programming Adding an Entry Example Add Al to your Radio ID list You can program your Area Group Radio ID and Status Mes sage List ...

Page 42: ...etter 3rd press 3rd letter 4th press number 6 Press 7 Press 8 Press 9 Press three times 10 Press SEL to add AL to your Private Radio List Wait three seconds 11 Press CLR to exit List Programming To erase a character press To clear all characters press and hold ...

Page 43: ...43 12 Press to exit Menu Mode or any mode key ...

Page 44: ...44 Editing an Entry Example Change the Radio ID 1 from Al to Joe 1 Press 2 Press until you get to the Radio ID List Program display 3 Press 4 Press to go to the Edit Screen 5 Press ...

Page 45: ...nter Joe and press aaaa Wait 3 seconds 9 Press when you have finished the editing A confirmation message is dis played for a moment At this point the name can be changed using the procedure described in Adding an Entry above ...

Page 46: ...g an Entry Example Erase Joe the first entry in your Radio ID List Press to cancel the operation 1 Press 2 Press until you get to the Radio ID List Program Dis play 3 Press 4 Press once or twice 5 Press 6 Press ...

Page 47: ...47 7 Press Joe is erased and the display returns to the Erase Entry display 8 Press when you have finished the erase function 9 Press to exit Fea ture Menu Mode ...

Page 48: ... Enter the old code 4 Enter the new code 5 Re enter the new code Wait 3 seconds Changing Passcode Your Passcode must be four digits long It will appear as on the display If you are set ting the pass code for the first time the old code is ØØØØ A confirma tion message is displayed ...

Page 49: ...xxxkey to get to the NAM display 2 Press 3 Press 4 Press NAM Selection Example Select your second NAM The current ly selected NAM is displayed At this point your unit begins a system registration routine onto the NAM 2 system ...

Page 50: ...up Call Emergency Group Call Provides priority access to talkgroup members and provides visible and audible indications of an emergency condition The emergency call will take place on a pre programmed emergency talkgroup or the last selected talkgroup depending on how the radio is programmed Note The Emergency Key is still operable from the mobile keypad The handset Emergency Key is the upper most...

Page 51: ...52 PTT ID The PTT ID displays the ID or alias of the user currently transmitting in a group call ...

Page 52: ...e to indicate that you have successful ly requested an emergency call A sample display is shown here The emergency call will be sent on either a pre programmed emergency talkgroup or the last selected talkgroup Emergency will flash until the system acknowledges the emergency condi tion A tone will be generated to provide indication that the channel is ready to begin the call Placing an emer gency ...

Page 53: ...ergency key 2 Press the PTT to talk The initiator can not exit the emer gency call without first cancelling the emergency call The third line will show the alias or ID of the talk group member who is transmit ting If you place an emergency call to the currently selected talk group the second line will stay the same and not flash The second line will flash to indi cate the unit is affiliating with ...

Page 54: ...is tone indicates the cancellation has occurred The display will return to the non emergency state Other Methods for Cancelling an Emergency Group Call An emergency call will be cancelled if no talkgroup activity occurs for 30 seconds The dispatcher or any other person provisioned with this feature can also cancel the emergency call ...

Page 55: ...ency Receive tone and the receiver s display will change to indicate the condition The first line indicates the ID or alias of the person initiating the emergency call The second line will show you the talkgroup name or number The third line shows the ID or alias of the person who is currently speaking NOTE When the receiving unit initiates a transmission the third line will be blank ...

Page 56: ...oup can leave the emer gency call and change modes phone group private while involved in the call While listening to the emergency call the receiving unit will not receive phone Call Alert Message Mail Status Message Private Conversation or other group calls for the duration of the emergency call ...

Page 57: ...atus Message You can cut talk time to a minimum by sending Status Messages You can also leave a Status Message for receivers while they are away from their radios Entering the Status Message Mode To enter the Status Message mode you must press the status option key This key is accessible from the Group and Private modes This is the default screen you see when you enter the Status mode The second l...

Page 58: ...ter any number from 1 255 to select a Status Message The number can correspond to one of 10 pre programmed alphanumeric status messages or any other numeric Status Message within the range of 1 255 1 Press 2 2 Press OK 3 Press TARGT Pressing the PTT at this time will send the message to the last radio ID to which you sent a successful Status Message EXIT will return you to the Status Message scree...

Page 59: ...tus Messages by scrolling through the 10 named aliased Status Messages you have programmed by using the keys 1 Press until you find the message you want In this case we scrolled to the Status Message At Lunch 2 Press OK 3 Press TARGT to select a target for this message ...

Page 60: ...rson to whom you are sending the message 2 Press OK 3 Press PTT to send the message to the selected ID The ID list is the same as Call Alert and Private Con versation List The second line reflects the ID or alias to whom you last sent a suc cessful Status Message The key acts as a backspace CANCL returns to show you the last selected radio ID ...

Page 61: ...select a target by scrolling through radio IDs or aliases by using the keys 1 Press the key until you find the person to whom you want to send the message 2 Press OK 3 Press PTT The display shows the message that has been sent ...

Page 62: ...t letter of the name alias If no name is stored under a letter the unit will automatically search for ward alphabetically until the next name is found 1 Press the ALPHA key 2 Press a numeric key ie Press twice to view the names aliases that begin with the letter R ...

Page 63: ...64 3 Use either the keys to scroll to the name alias who is to receive the Status Mes sage 4 Press PTT ...

Page 64: ...get ID press the PTT to send the message Four high pitched tones will be heard to indicate transmission The display will update to indicate the message was success fully delivered to the target radio The unit will return to the status screen after 3 seconds Two high pitched tones will be heard ...

Page 65: ...able is an example of an error message that you could receive Target Not Available indi cates that the unit you are sending the message to is either busy out of range or turned off Refer to the Safety and General Information section of this manual for a description of other error messages The unit will return to the status screen after 3 seconds ...

Page 66: ... a message along with alert tones Note All calls are blocked until the message is cleared To silence the recurring alert tones only press any key except PHONE GROUP PRVT or the CLEAR option key Line 1 shows the ID Alias of the sending unit Line 2 shows the message CLEAR clears the Status Mes sage and returns you to the mode you were in prior to receiving the Status Message Pressing the PHONE GROUP...

Page 67: ...you to program 10 status messages each up to 11 charac ters long For further information on ID List Programming and an example of Phone List Programming refer to the List Programming section of the Motorola Digital Communicator Handset User s Guide ...

Page 68: ...radio talktime or leave messages for others on the network when they are away from their radio Horn and Lights Ensures that you never miss important private radio calls or Call Alerts while you are away from your vehicle List Programming Allows you to personalize your phone and radio lists Lock Features Prevents unauthorized use of your mobile unit Memory Scroll A convenient way of searching throu...

Page 69: ...he car Otherwise you may impair call quality may cause your mobile to operate at at higher power level than is neces sary and may expose that person to RF energy in excess of the levels established by the updated ANSI Standard Exposure to Radio Frequency Energy In 1991 the Institute of Electrical and Electronics Engineers IEEE and in 1992 the American National Standards Institute ANSI updated the ...

Page 70: ...s so require Electronic Devices Most modern electronic equipment for example equipment in hospitals and cars is shielded from RF energy However RF energy from your mobile may affect some electronic equipment Consult your physician or the manufacturer of any personal medical devices such as pacemakers hearing aids etc to determine if they are adequately shielded from external RF energy The operatio...

Page 71: ...mmable gas liquid or explosives in the com partment of your vehicle which contains your mobile or accessories Vehicles powered by liquefied petroleum gas such as propane or butane must comply with the National Fire Protection Standard NFPA 58 For a copy of this standard contact the National Fire Protection Association One Batterymarch Park Quincy MA 02269 Attn Publications Sales Division For Vehic...

Page 72: ... map can be drawn The red status indicator No Ser vice lights solid if you are beyond range of a ser vice area There may be locations within your area such as tunnels and underground parking facilities where the unit may act as if it were beyond range Status Indicator Table There are two status indicators above the dis play which visually tell you the different states of your unit The left is yell...

Page 73: ...iencing difficulty Please try again later This service is temporarily not available Please try again later The targeted unit that you are trying to contact is busy in a private call Error Message Table Below is a list of the messages that may be displayed while operating your mobile unit Before contacting your service provider note the message and the state at which it appeared Error Message Messa...

Page 74: ...traffic Please try again later This service cannot be enabled because an incom patible service has already been turned on A general error has occurred A fault has been detected with your unit Should this error recur note the error code and contact your sales representative An operational fault has occurred Turn your unit off and contact your sales representative immedi ately ...

Page 75: ...76 ...

Page 76: ... Error Messages 74 75 Exit Status Mode 32 67 Feature Menu 1 3 35 Feature Reset 39 Features and Benefits 69 Group Call Grp 1 8 69 Group Mode Key 3 Handset 51 Handset Emergency Group Call 51 Handset Status Message 51 Horn and Lights H L 1 3 33 69 ID List Programming 68 Inactivity Timer 5 Invalid Entry 74 Keypad Alphanumeric 3 Keypad Volume 38 List Programming 41 68 69 Local Area 9 Lock Automatic 36 ...

Page 77: ...38 Status Indicators 2 3 31 32 73 Status List Programming 37 Status Message Sts 1 25 26 27 30 51 58 59 60 65 66 67 69 System Busy Try Later 75 Talkgroup Selection 13 28 29 69 Talkgroup List Programming 37 Target Busy in Dispatch 74 Target Not Authorized 74 Target Selecting 61 62 63 Target Not Available 31 66 74 Targeted Area 10 Theft Alarm 36 Time Out Timer 8 Tones 7 8 15 17 18 19 20 22 23 30 31 3...

Reviews: