24
CHANGING A VALUE
Select the value to be changed by pressing K2.
Press K3 to enter edit mode; the LED associated with the value will flash
while LEDs
L7, L8, L9
display the value.
Press K3 again to change the value.
The data is saved if no keys are pressed for 5 seconds or if you move
onto the next value by pressing K2.
LED Value L7,L8,L9
NOTE: The Minimum, Average and Maximum value of the local Room
Thermostat can be set by the user via a 2WAYS+ device.
Changing the Heating Power
Press
K2
with a simple click and select the heating power
L4
. By pres-
sing
K3
the LED
L4
flashes, by pressing
K3
again the LEDs
L7
,
L8
,
L9
start flashing simultaneously, to change the power level press
K3
again.
By clicking again, it is possible to change the power according to the
available values.
E.g.: 1
-
2
-
3
(Minimum, Average, Maximum).
After 3 seconds, the value is saved and the normal display reappears.
Changing the Room Thermostat Value
Press
K2
with a simple click and select the Local Room Thermostat
L5
.
By pressing
K3
the LED
L5
flashes, by pressing
K3
again the LEDs
L7
,
L8
,
L9
start flashing simultaneously, to change the power level press
K3
again.
By clicking again, it is possible to change the power according to the
available values.
E.g.: 1
-
2
-
3
(Minimum, Average, Maximum).
After 3 seconds, the value is saved and the normal display reappears.
Changing the Combustion Power
Press
K2
with a simple click and select the combustion power
L6
. By
pressing
K3
the LED
L6
flashes, by pressing
K3
again the LEDs
L7
,
L8
,
L9
start flashing simultaneously, to change the power level press
K3
again.
By clicking again, it is possible to change the power according to the
available values.
E.g.: 1
-
2
-
3
(Minimum, Average, Maximum).
After 3 seconds, the value is saved and the normal display reappears.
-
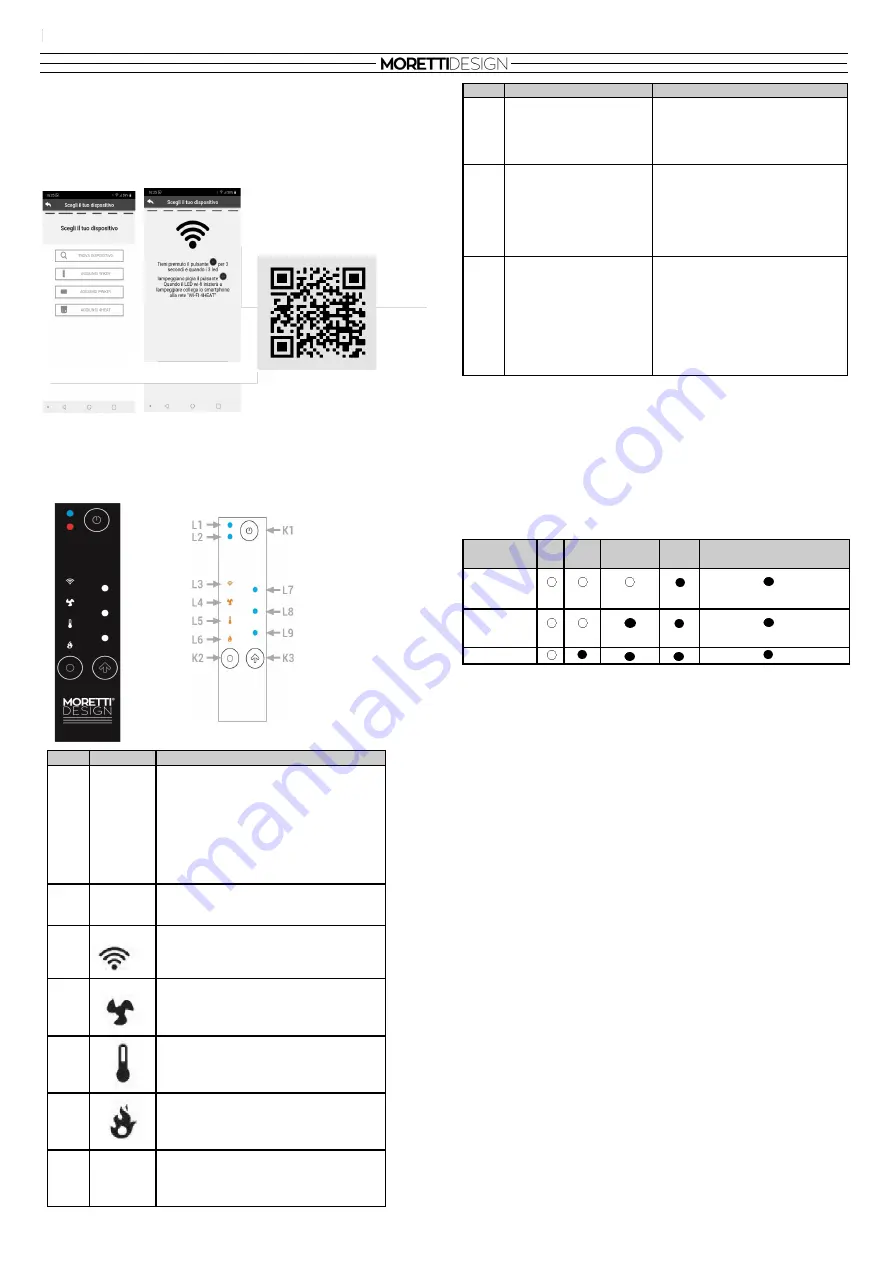
WIFI CONFIGURATION
To configure thermo
-
stoves equipped with a WiFi module, it is necessary
to:download the 4HEAT application, register your credentials and wait for
the confirmation emails. Then start the application and follow the set
-
up
procedure step by step using the 4HEAT application.
Once you have registered, you will see the following screen on your
Smartphone (fig.
A
), select
WiKEY
and then configure it as in
fig. B.
-
EMERGENCY CONTROL PANEL (AQUA)
WiKEY
Emergency control panel with basic heating system functions with
heating configured for Wi
-
Fi and Radio connections.
Click
Press and hold
K1
Press for 3 seconds:Power On /
Power Off / Reset Block
K2
Select the value to di-
splay (Combustion Po-
wer, Room Thermostat,
Heating Power)
Press for 3 secondsAllows you to
enter local WiFi network configu-
ration mode (LEDs
L7,L8,L9
flash).
K3
Modification of the selec-
ted value (LEDs
L7, L8,
L9
show the va-
lue).During the local Wifi
configuration, start the
configuration procedure
Press and holdReset the configu-
ration.
Led
Symbol
Description
L1
Multicolour LED:
Blue:
System off
Green:
System on
Flashing green:
System being turned
On/Off
Red alternating
with the other two co-
lours: System Error
L2
Service
L3
Fixed LED: Connected to the local Wifi
networkFlashing: Wifi configuration
L4
Displays Heating Power in the values of
LEDs
L7, L8, L9.
L5
Displays Local Room Thermostat in the
values of LEDs
L7
,
L8
,
L9.
L6
Displays Combustion Power in the va-
lues of LEDs
L7
,
L8
,
L9.
L7
L8
L9
They display the selected values
(Minimum, Average, Maximum)
LED value
0
Min
Average
Max
Auto
(only for power levels)
L7
L8
L9
FIG.A FIG:B
For more information on configu-
ring the
WiKEY
module,
see the dedicated manual using the
following
QR Code
:
:
EN


