background image

26

27

1

888

557

3848

Wards.com      

How to Use

 (cont’d)

Blind Hem Stitch

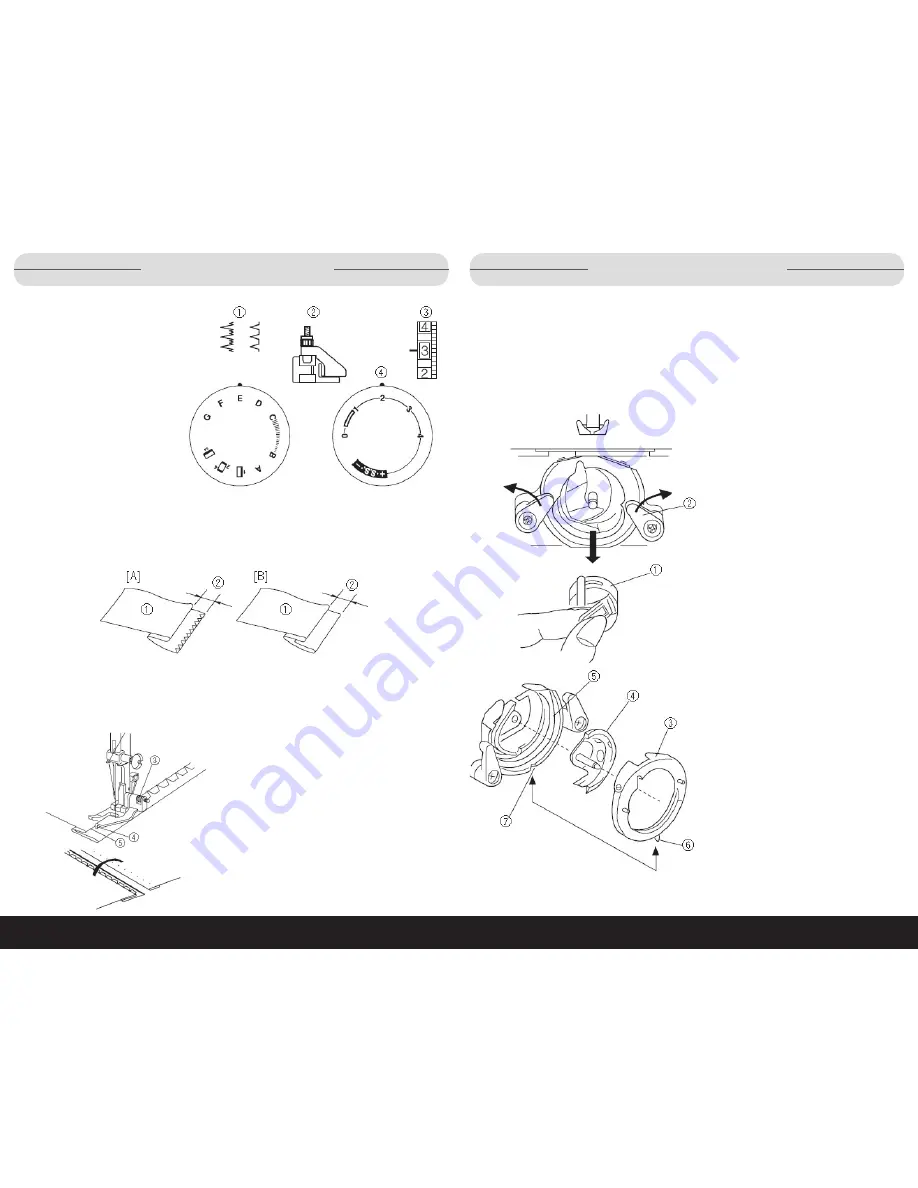
(1) Pattern selector: E or F

(2) Presser foot: Blind hem foot

(3) Thread tension: 1–3

(4) Stitch length: 1–3

[A] - Heavyweight fabrics; [B] - Fine or medium weight fabrics

(1) Wrong side of the fabric

1.  Fold the hem (2) leaving 1/4” (0.7 cm) of the hem edge showing.

2.  Position the fabric so that the needle at its leftmost position just pierces the edge 

of the fold.

3.  Turn the guide screw (3) to adjust the guide (4) aligning the folded edge (5).

4.  Sew along the folded edge guiding the fabric so the needle catches the folded 

edge.

5.  After hemming is complete, press together both sides of the finished hem. The 

top side of the fabric should show only the blind stitches.

Cleaning & Care

Cleaning the Bobbin Case and the Hook

WARNING: Turn the power switch to OFF and unplug the machine before  

dismantling or cleaning the machine.

WARNING: Do not dismantle the machine other than as explained in this section.

Dismantling Shuttle Race Unit

1.  Raise the needle to its highest  

position and open the hook cover.

2.  Open the hinged latch of bobbin 

case (1) and take it out of the 

machine.

3.  Push the shuttle race levers (2) 

aside and remove the shuttle race 

ring (3).

4.  Remove the shuttle (4).

5.  Clean the shuttle race (5) with a 

brush and a soft dry cloth.

Assembling Shuttle Race Unit

1.  Hold the shuttle (4) by the center 

pin and fit it carefully back into the 

shuttle race (5), forming a perfect 

circle with the shuttle driver.

2.  Attach the shuttle race ring (3) 

making sure the bottom pin (6) fits 

into the notch (7).

3.  Lock the shuttle race ring (3) by 

turning the holders back into  

position. 

4.  Insert the bobbin case (1).

Summary of Contents for JW12

Page 1: ...No 724723 120V 60Hz 15W Wards com 1 888 557 3848 Montgomery Ward Customer Service 1112 7Th Avenue Monroe WI 53566 8 00 am to Midnight Monday through Friday Wards com 1 888 557 3848 Sewing Machine Fre...

Page 2: ...ment or returning the product 5 The use of accessory attachments not recommended by the manufacturer may cause personal injury or damage to the appliance 6 Do not use outdoors 7 Never drop or insert a...

Page 3: ...be the same type 3 wire The longer cord should be arranged so that it will not drape over the countertop or tabletop where it can be pulled on by children or tripped over Important Safeguards cont d...

Page 4: ...a chine unattended attaching or removing parts Do not place anything on the foot control causing the machine to run inadvertently Operating Instructions cont d Presser Foot Lifter The presser foot lif...

Page 5: ...be consistent Never use a bent or blunt needle Changing 1 Raise the needle by turning the handwheel toward you 2 Lower the presser foot 3 Loosen the needle clamp screw by turning it counterclockwise 4...

Page 6: ...position Note Return the bobbin winder spindle when the machine stops Operating Instructions cont d Bobbin Case Threading Place the bobbin into the bobbin case Make sure the thread unwinds in the dir...

Page 7: ...g on the sewing materials layers of fabric and sewing method For an ideal zigzag stitch the bob bin thread does not show on the right side top side of the fabric and the needle thread shows slightly o...

Page 8: ...attern is uneven turn the stitch length dial in the direc tion of to compress it or to expand it Operating Instructions cont d Reverse Stitch Button To sew in reverse keep the reverse stitch button de...

Page 9: ...tches 6 Raise the presser foot and remove the fabric drawing the threads to the back 7 Cut the threads with the thread cutter 1 The threads are now the right length to begin sewing the next seam How t...

Page 10: ...ch length 0 5 4 Turn the pattern selector between the zigzag stitch C and straight stitch left position B to adjust the stitch width How to Use cont d Utility Stitching Tricot Stitch This stitch is us...

Page 11: ...ed as a decorative topstitch Decorative Stitching Shell Tuck 1 Pattern selector G 2 Presser foot Zigzag foot 3 Thread tension 6 8 4 Stitch length 2 3 1 Use a lightweight fabric tricot for example 2 Fo...

Page 12: ...wind it around the shank 3 Bring the needle thread to the wrong side bottom side and knot 4 After button sewing is completed remove the darning plate Appliqu 1 Pattern selector C 2 Presser foot Zigzag...

Page 13: ...r buttonhole Stop sewing at a left stitch 4 Set the pattern selector dial at Sew 5 stitches Stop sewing at a right stitch 5 Set the pattern selector dial at Sew until you reach the back marking of the...

Page 14: ...ing Care Cleaning the Bobbin Case and the Hook WARNING Turn the power switch to OFF and unplug the machine before dismantling or cleaning the machine WARNING Do not dismantle the machine other than as...

Page 15: ...ush and turn to the right Thread Needle Guide In general fine threads and needles are used for sewing thin fabrics and thicker threads and needles are used for sewing heavy fabrics Always test thread...

Page 16: ...wn to the rear when sewing has finished Needle is too fine for the fabric being sewn Page 8 Page 8 Page 8 Page 13 Page 16 17 Page 29 Skipped stitches Needle is incorrectly inserted Needle is bent or b...

Page 17: ...8 557 3848 Montgomery Ward Inc warrants this product to be free from defects in material and workmanship for one year from provable date of purchase Within this warranty period Montgomery Ward will re...

Reviews: