7
6
1
•
888
•
557
•
3848
Wards.com
Operating Instructions
Parts & Features
(cont’d)
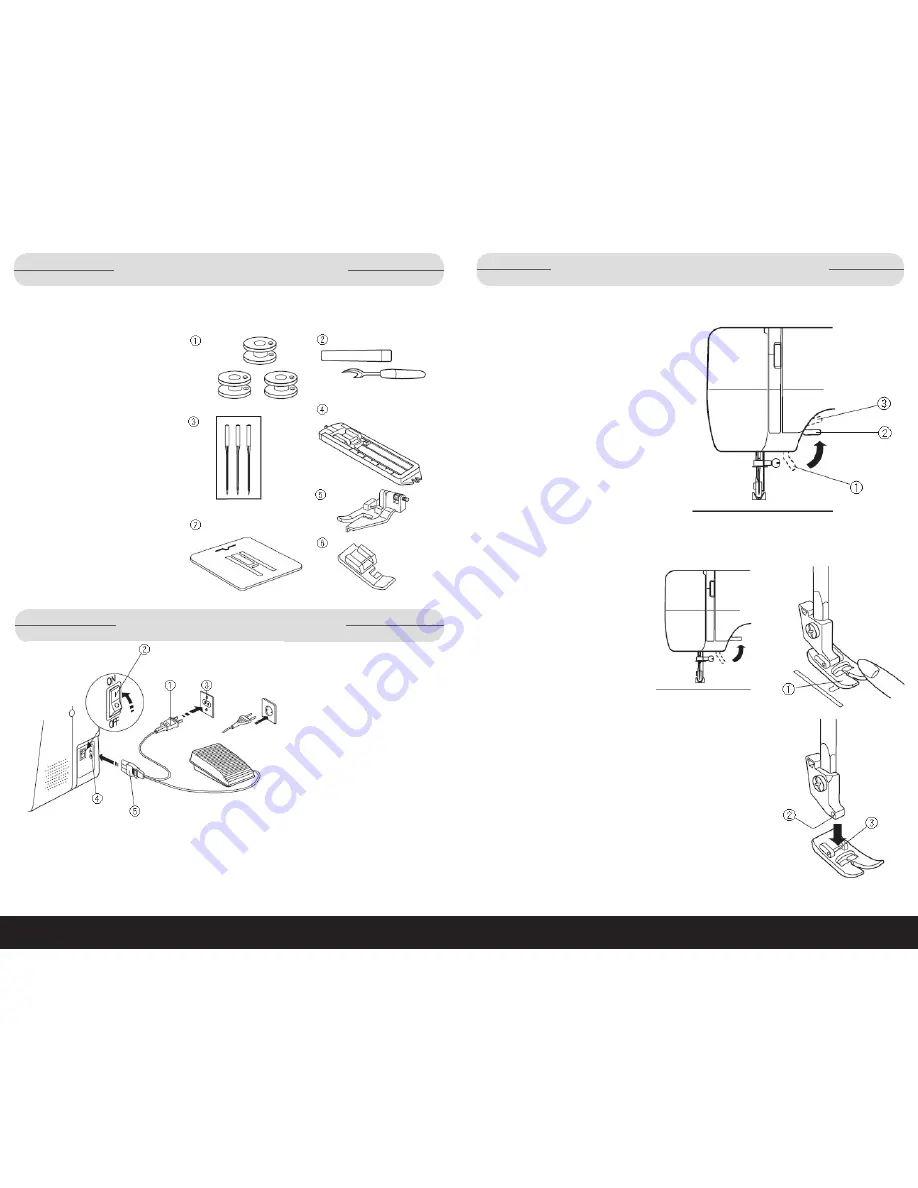
Accessories
Sewing accessories are conveniently located in the extension table.
1. Bobbins
2. Seam ripper/ Buttonhole
opener
3. Needle set
4. Sliding buttonhole foot
5. Blind hem foot
6. Zipper foot
7. Darning plate
1. Turn the power switch (2)
to OFF.
2. Insert the machine plug
(5) into the machine
socket (4).
3. Insert the power supply
plug (1) into the outlet (3).
4. Turn the power switch (2)
to ON.
While in operation, always keep your eyes on the sewing area, and do not touch
any moving parts such as the thread take-up lever, handwheel or needle. Always
turn off the power switch and unplug from the power supply when leaving the ma-
chine unattended, attaching or removing parts.
Do not place anything on the foot control causing the machine to run inadvertently.
Operating Instructions
(cont’d)
Presser Foot Lifter
The presser foot lifter raises and lowers
the presser foot. It can be raised 1/4
"
higher than the normal up position for
easy removal of the presser foot or for
ease of placement of heavier material.
Presser Foot Positions
1. Lowest
2. Normal
3. Highest
Changing Presser Foot
CAUTION:
When removing or
attaching presser foot, turn
the power switch to OFF.
Remove:
1. Turn the handwheel toward
you to raise the needle bar to
its highest position.
2. Raise the presser foot.
3. Push down on the toe of the
presser foot (1) to snap it off
the foot holder.
Attach:
1. Place the presser foot so that
the pin (3) on the foot lines up
directly below the groove (2) of
the foot holder.
2. Lower the foot holder to lock
the foot in place.


