background image

22 


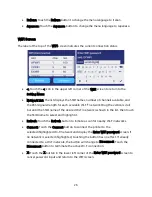
Stop: Stops movement of the X, Y, and Z axes. 


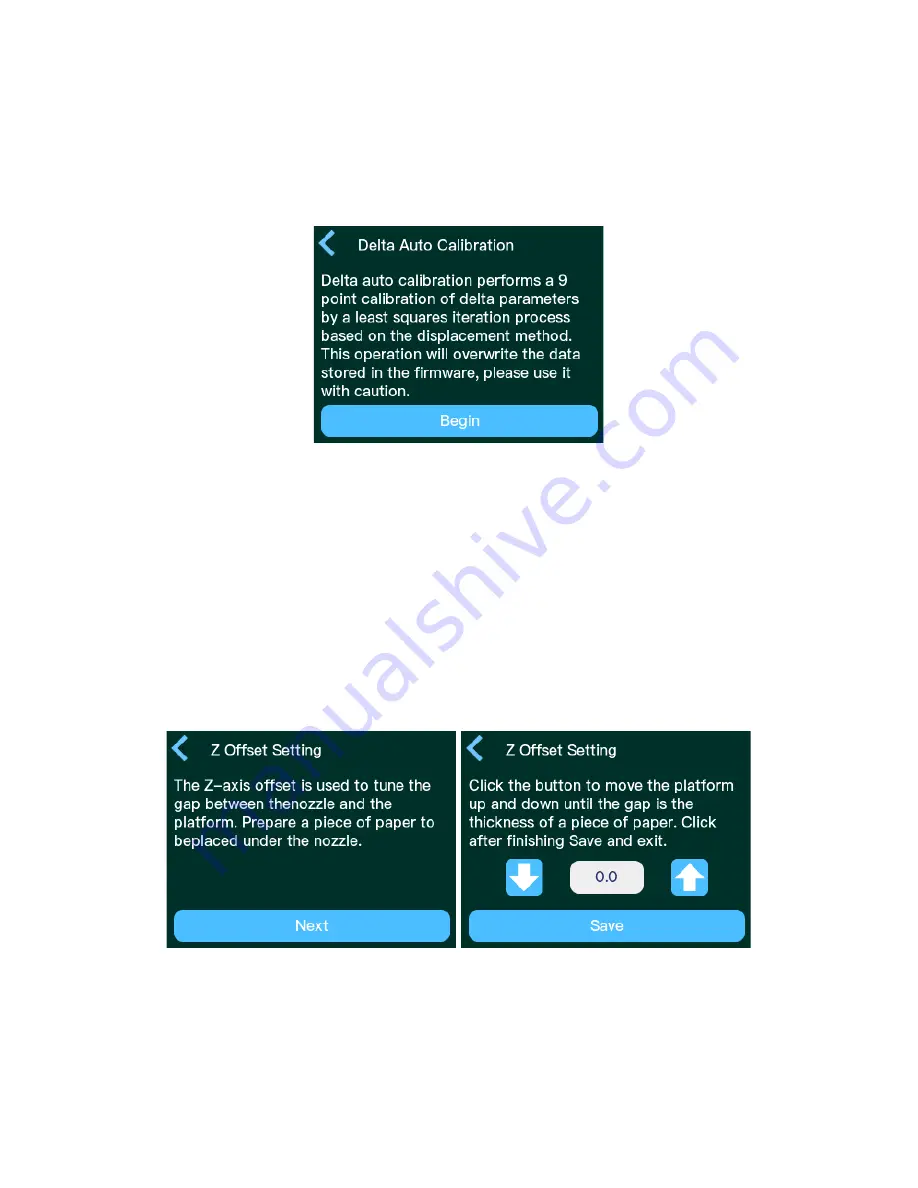
Delta Auto Calibration Screen 


<: Touch the < icon in the upper left corner to return to the Main Menu. 


Begin: Starts the automatic calibration process.


Z Offset Setting Screen 

When the Z Offset button is touched on the Printer Maintenance Menu, the printer will 
first display the Delta Auto Calibration screen. You must perform the Delta Auto 
Calibration process before adjusting the Z Offset. Once the calibration is complete, the Z 
Offset Setting screen is displayed. 


<: Touch the < icon in the upper left corner to return to the Main Menu. 


: Touch the 

 button to decrease the Z Offset value by 0.1mm. 


: Touch the 

 button to increase the Z Offset value by 0.1mm. 

Summary of Contents for 21666

Page 1: ...MP Mini Delta V2 3D Printer P N 21666 User s Manual ...

Page 2: ...MOVAL 11 POLOPRINT PRO WI FI SETUP 12 MENU MAP 16 MENU OPERATION 17 Main Menu 17 Print Menu 17 Printer Maintenance Menu 18 Filament Operation Screen 19 Set Target Temperature Screen 20 Jog Mode Screen 21 Delta Auto Calibration Screen 22 Z Offset Setting Screen 22 Motor Off Screen 23 Printer Setting Menu 24 Machine Information 25 Language Setting 25 WIFI Screen 26 ...

Page 3: ... SLICING SOFTWARE 30 Installation 30 Advanced Configuration 34 Speed Tab 35 Infill Tab 36 Support Tab 38 Build Plate Adhesion Tab 40 Retraction Tab 41 Material Tab 42 Travel Tab 42 Machine Tab 43 Line Width Tab 43 Warping Protection Tab 44 Seam Tab 44 Others Tab 46 CURA SLICING SOFTWARE 47 Installation 47 CARE AND MAINTENANCE 52 Cleaning the Nozzle 52 ...

Page 4: ...lacing the Nozzle 53 Cleaning the Feed Gear 54 TECHNICAL SUPPORT 54 SPECIFICATIONS 55 REGULATORY COMPLIANCE 56 Notice for FCC 56 RF Exposure Statement for FCC 57 Notice for Industry Canada 57 RF Exposure Statement for Industry Canada 57 ...

Page 5: ...xcessively high temperatures Do not place it in on or near a heat source such as a fireplace stove radiator etc Do not leave it in direct sunlight Do not place or install this device in an area where it can be exposed to excessive amounts of dust humidity oil smoke or combustible vapors Use only in a well ventilated area Do not use in close confined spaces Prior to operation check the unit and pow...

Page 6: ...e the 3D model properly adheres to the build platform during printing If this mat becomes damaged or wears out replace it with painter s tape Kapton tape or ordinary masking tape Do not reach inside the printer during operation Always allow the printer and extruded filament to cool before reaching inside Ensure that the printer is turned off and unplugged from its power source before making repair...

Page 7: ...d maintenance Includes an 8GB microSD card with custom Wiibuilder and Cura slicing software packages on the card CUSTOMER SERVICE The Monoprice Customer Service department is dedicated to ensuring that your ordering purchasing and delivery experience is second to none If you have any problem with your order please give us an opportunity to make it right You can contact a Monoprice Customer Service...

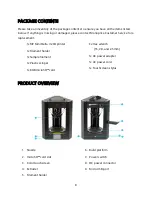
Page 8: ...vice for a replacement 1x MP Mini Delta V2 3D printer 1x Filament holder 1x Sample filament 1x Plastic scraper 1x 8GB microSD card 3x Hex wrench 1 5 2 0 and 2 5 mm 1x AC power adapter 1x AC power cord 1x Touchscreen stylus PRODUCT OVERVIEW 1 Nozzle 2 microSD card slot 3 Color touchscreen 4 Extruder 5 Filament holder 6 Build platform 7 Power switch 8 DC power connector 9 Micro USB port ...

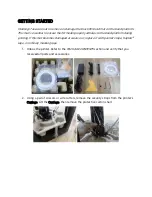
Page 9: ...ring printing If this mat becomes damaged or wears out replace it with painter s tape Kapton tape or ordinary masking tape 1 Unbox the printer Refer to the PACKAGE CONTENTS section and verify that you received all parts and accessories 2 Using a pair of scissors or wire cutters remove the security straps from the printer s Carriage Lift the Carriage then remove the protective carton shell ...

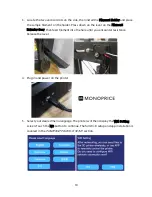
Page 10: ... Filament Extruder Gear then feed filament into the hole until you encounter resistance Release the lever 4 Plug in and power on the printer 5 Select your desired menu language The printer will then display the Wifi Setting screen Touch the NO button to continue The full Wi Fi setup and app installation is covered in the POLOPRINT PRO WI FI SETUP section ...

Page 11: ...s to remove a finished print 1 Wait until the printer and printed model cools down to room temperature 2 Insert the included Plastic Scraper under the edge of the model then continue pushing to separate the model from the Build Platform If you have difficulty sliding the Plastic Scraper under the model try approaching from a different angle or work it around the perimeter of the model Warning Alwa...

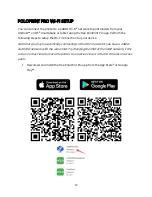
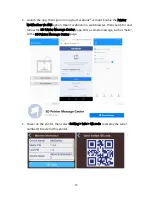
Page 12: ...eps to setup the Wi Fi connection for your device Note that you may have difficulty connecting to the Wi Fi network if you have a 2 4GHz and 5GHz network with the same SSID Try changing the SSID of the 5GHz network if this occurs For best results move the printer to a location closer to the Wi Fi router or access point 1 Download and install the free PoloPrint Pro app from the App Store or Google ...

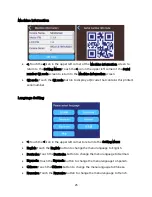
Page 13: ...n via SNS option Open Facebook in a web browser then search for and follow the 3D Printer Message Center page Post a sample message such as hello to the 3D Printer Message Center page 3 Power on the printer then select Setting Info QR code to display the serial number QR code for this printer ...

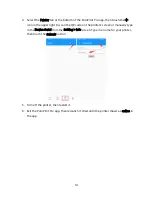
Page 14: ... to scan the QR code on the printer s screen or manually type in the Device Serial from the Setting Info screen Type in a name for your printer then touch the Submit button 5 Turn off the printer then restart it 6 Exit the PoloPrint Pro app then relaunch it Wait until the printer shows as online in the app ...

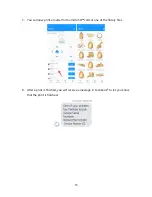
Page 15: ...15 7 You can now print a model from a microSD card or one of the library files 8 After a print is finished you will receive a message in Facebook to let you know that the print is finished ...

Page 16: ...16 MENU MAP ...

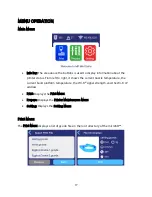
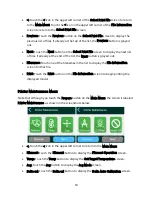
Page 17: ...ght it shows the current nozzle temperature the current build platform temperature the Wi Fi signal strength and the Wi Fi IP address Print Displays the Print Menu Prepare Displays the Printer Maintenance Menu Setting Displays the Setting Menu Print Menu The Print Menu displays a list of gcode files in the root directory of the microSD ...

Page 18: ...is grayed out Filenames Touch one of the filenames in the list to display the File Information screen for that file Print Touch the Print button on the File Information screen to begin printing the displayed model Printer Maintenance Menu Note that although you touch the Prepare button on the Main Menu the screen is labeled Printer Maintenance as shown in the screenshots below Touch the icon in th...

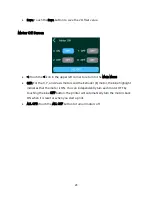
Page 19: ...followed by the Z Offset Setting screen The Delta Auto Calibration process must be performed before adjusting the Z Offset Motor Off Touch the Motor Off button to display the Motor Off screen Filament Operation Screen Touch the icon in the upper left corner to return to the Main Menu ...

Page 20: ... filament The printer will heat the nozzle then either load or unload the filament depending on whether Feedin or Retract was selected on the Filament Operation screen TPU Touch the TPU button on the Filament Type screen to set the target nozzle temperature to the temperature that is appropriate for TPU filament The printer will heat the nozzle then either load or unload the filament depending on ...

Page 21: ...ratures Jog Mode Screen Touch the icon in the upper left corner to return to the Main Menu Press the button to decrease the X Y or Z position by 10mm Press the button to decrease the X or Y position by 5mm or the Z position by 1mm Press the button to decrease the X or Y position by 1mm or the Z position by 0 1mm Press the button to increase the X or Y position by 1mm or the Z position by 0 1mm Pre...

Page 22: ... touched on the Printer Maintenance Menu the printer will first display the Delta Auto Calibration screen You must perform the Delta Auto Calibration process before adjusting the Z Offset Once the calibration is complete the Z Offset Setting screen is displayed Touch the icon in the upper left corner to return to the Main Menu Touch the button to decrease the Z Offset value by 0 1mm Touch the butt...

Page 23: ...nu OFF For the X Y and Z axis motors and the Extruder E motor the blue highlight indicates that the motor is ON You can independently turn each motor OFF by touching the blue OFF button The printer will automatically turn the motors back ON when it is reset or when you start a print ALL OFF Touch the ALL OFF button to turn all motors off ...

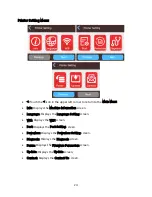
Page 24: ...n screen Language Displays the Language Setting screen Wifi Displays the WIFI screen Post Displays the Post Setting screen Powerloss Displays the Powerloss Setting screen Diagnosis Displays the Diagnosis screen Param Displays the Firmware Parameters screen Update Displays the Update screen Contact Displays the Contact Us screen ...

Page 25: ...ode that contains this printer s serial number Language Setting Touch the icon in the upper left corner to return to the Setting Menu English Touch the English button to change the menu language to English Deutsche Touch the Deutsche button to change the menu language to German Espanola Touch the Espanola button to change the menu language to Spanish Chinese Touch the Chinese button to change the ...

Page 26: ...bar until the SSID name of the desired Wi Fi network is shown in the list then touch the SSID name to select and highlight it Refresh Touch the Refresh button to initiate a scan for nearby Wi Fi networks Connect Touch the Connect button to connect the printer to the selected highlighted Wi Fi network and display the Enter WIFI password screen If no network is selected highlighted touching the butt...

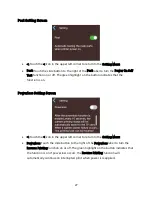
Page 27: ... indicates that the function is on Powerloss Setting Screen Touch the icon in the upper left corner to return to the Setting Menu Powerloss Touch the slide button to the right of the Powerloss label to turn the Resume Printing function on or off The green highlight on the button indicates that the function is on If power loss occurs the Resume Printing function will automatically continue an inter...

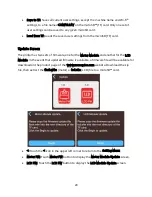
Page 28: ...gs except the machine name and Wi Fi settings Use the Update screen to update the actual printer firmware Touch the icon in the upper left corner of the first Firmware Parameters to return to the Setting Menu Touch the icon in the upper left corner of the second Firmware Parameters screen to return to the first Firmware Parameters screen Save Load Touch the Save Load button to display the second F...

Page 29: ...firmware one for the Motor Module and another for the LCD Module In the event that updated firmware is available a firmware file will be available for download on the product page of the www monoprice com website Download the zip file then extract the flash wfm motor or lcd efm LCD file to a microSD card Touch the icon in the upper left corner to return to the Setting Menu Motor FW Touch Motor FW ...

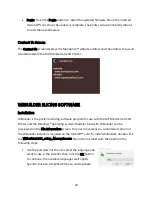
Page 30: ...ing software program for use with the MP Mini Delta V2 3D Printer and the Windows operating system Models sliced with Wiibuilder can be previewed on the File Information screen For your convenience a customized version of the Wiibuilder installer is included on the microSD card To install Wiibuilder double click the Wiibuilder2 1 2 1_setup_Monoprice exe file on the microSD card then perform the fo...

Page 31: ...directory Click the Next button to continue 3 The installer will now prompt you to select which components will be installed If you are unsure of which components to install select all components Click the Install button to continue 4 The install wizard will extract the files and install the program to the specified directory Once installation is complete you will be prompted to install the driver...

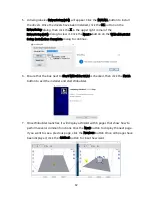
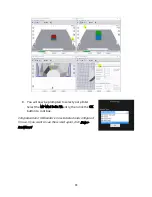
Page 32: ...lder2 1 2 1 Setup Installation Complete dialog to continue 6 Ensure that the box next to Start Wiibuilder 2 1 2 1 is checked then click the Finish button to exit the installer and start Wiibuilder 7 Once Wiibuilder launches it will display a Wizard with 6 pages that show how to perform several common functions Click the Next button to display the next page If you want to see a previous page click ...

Page 33: ...ompted to select your printer Select the MP Mini Delta V2 entry then click the OK button to continue Congratulations Wiibuilder is now installed and configured for use If you want to see the wizard again click Help RunWizard ...

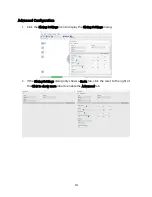
Page 34: ...ation 1 Click the Slicing Settings icon to display the Slicing Settings dialog 2 If the Slicing Settings dialog only shows a Basic tab click the caret to the right of the Click to show more label to enable the Advanced tab ...

Page 35: ...hell speed mm s Sets the printing speed of the external shell surfaces Inner shell speed mm s Sets the printing speed of the internal shell surfaces Infill Speed mm s Sets the printing speed of the infill inside the model Support Infill Speed mm s Sets the printing speed of infill inside the model supports Support Interface Speed mm s Sets the printing speed of the top and bottom surfaces of the m...

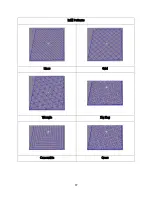
Page 36: ...fill Tab Infill Pattern Use the drop down list box to select one of seven different infill patterns The available patterns are Lines Grid Triangles Zig Zag Concentric Cross and Octet The patterns are illustrated in the table below Infill Before Wall Check this box to print the model after filling and printing the outline Outer Before Inner Walls Check this box to print the exterior walls before pr...

Page 37: ...37 Infill Patterns Lines Grid Triangle Zig Zag Concentric Cross ...

Page 38: ...sed on models that require more support Grid support is used on small models which need fewer supports Zig Zag support is used for models that are particularly difficult to remove It is stronger than Lines support and is better than Grid support Overhang angle for support The overhang angle is the angle between the support and the surface of the model Larger settings make the supports easier to re...

Page 39: ...The effects of this parameter are the same as the effects of the Support Top Gap mm parameter Distance X Y mm The distance between the support and the model surface in the horizontal plane The effects of this parameter are the same as the effects of the Support Top Gap mm parameter Enable Support Check this box to use supports Support Top Determines the thickness of the top layer of the supports S...

Page 40: ...a Margin mm The distance between the edge of the raft and the model surface Raft Base thickness mm Determines the thickness of the raft Initial Layer Z Overlap Determines the amount of overlap between the first and second layers of the model Brim line amount Sets the number of ring gaskets that are added to the edge of the model in contact with the build platform ...

Page 41: ...direction Retract at Layer Change Check this box to retract the filament when switching from layer to layer Retraction speed mm s Sets the speed at which filament is retracted Retraction distance mm The distance the filament is retracted within the nozzle Z Hop Height mm The distance the nozzle is lifted when filament is returned after retraction Retraction Minimum Travel mm Sets the minimum nozzl...

Page 42: ... move when not printing The Off option causes the nozzle to move the shortest distance between the previous extrusion location and the new start location The All option causes the nozzle to move along anything it has already extruded The No Skin option will avoid the outer layers to move the nozzle to the new start location which can greatly improve print quality Start Layers at Same Position This...

Page 43: ...Line Width Tab Outer Wall Line Width mm This is the width of the outermost wall line By lowering this value higher levels of detail can be printed Inner Wall s Line Width mm This is the width of a single wall line for all walls except the outermost wall Top Bottom Line Width mm This is the width of the top and bottom lines Infill Line Width mm This is the width of a single infill line Support Line...

Page 44: ...e prime tower Warping Protection Tab Z Offset mm When the Z axis bias is set to a negative value the nozzle will print closer to the build platform which helps reduce warping on large models Extra Skin Wall Count This value sets the number of contours on the outer surface of the model Initial layer Increment C This value is used to increase the printing temperature of the first layer which helps r...

Page 45: ...Seam will appear in the sharpest corner of the model Z Seam X mm This option is the X location of the Z Seam This option can only be set when the Z Seam Type is set to User Defined Z Seam Y mm This option is the Y location of the Z Seam This option can only be set when the Z Seam Type is set to User Defined Hiding Seam Preference This option is only available when the Z Seam Type is set to Sharpes...

Page 46: ...nts that require tighter tolerances Enable Print Cooling When enabled cooling air will be directed at the printed part Enable Draft Shield When enabled the printer will print a wall around the model to prevent environmental breezes or drafts from affecting the cooling This is typically used when Enable Print Cooling is disabled for filament that needs a longer cooling time such as ABS Wall Line Co...

Page 47: ...systems To install Cura double click the Cura 4 3 0 win64 Monoprice 20210115 exe file for Windows or the Cura 4 3 0 Monoprice MacOS 20210115 dmg file for Mac OS X on the microSD card then perform the following steps 1 The first screen is a Welcome dialog Click the Next button to display the License Agreement dialog Click the I Agree button to continue 2 The installer will prompt you to select the ...

Page 48: ...e Do not create shortcuts check box to skip shortcut creation Click the Next button to continue 4 By default the STL file extension will be associated with Cura Select the file types you want to associate with Cura then click the Install button to continue If you are prompted by Windows Security to approve a driver installation click the Install button to continue ...

Page 49: ... Once Cura launches you will see a Welcome dialog followed by a User Agreement dialog Click Get Started on the Welcome dialog then click Agree on the User Agreement dialog to continue If you have already installed Cura on this computer you will instead be left on the main screen If this is the case skip ahead to step 8 ...

Page 50: ...ext to the Monoprice label Click the radio button next to the MP Mini Delta v2 option then click the Next button to continue If you skipped to this step because the First time run wizard is bypassed click Settings Printer Add Printer to display the Add a printer dialog Click the radio button to the left of the MP Mini Delta v2 option then click the Add button Skip ahead to step 10 ...

Page 51: ...at the Infill density Support type and Platform adhesion type options should be set according to the needs of the model you are printing The Infill density will determine the overall strength of the finished object If printing a decorative object a low fill density is appropriate However if printing an object that will be used as a tool or part e g a gear a high fill density will impart maximum st...

Page 52: ...se Refer to the Cura documentation for operating details and information about the various options CARE AND MAINTENANCE All 3D printers require periodic maintenance including several maintenance tasks that should be performed on a daily basis Cleaning the Nozzle Extruded filament and filament particles can build up around the nozzle Use tweezers and a cleaning cloth to remove any extraneous materi...

Page 53: ...zzle connection plug 4 Loosen the buckles on each side of the nozzle fan then remove the fan cover Use the 1 5mm hex wrench to loosen the lower side nozzle fixing set screw then gently pull out the nozzle from the bottom 5 Install the new nozzle then tighten the set screw to secure it in place Plug in the connection cable and put on the wrapped cloth Use cable ties to fix the cable in place Finall...

Page 54: ...roubleshooting or product recommendations If you ever need assistance with your new product please come online to talk to one of our friendly and knowledgeable Tech Support Associates Technical support is available through the online chat button on our website www monoprice com or through email by sending a message to tech monoprice com Check the website for support times and links To download the...

Page 55: ...orm Temperature 50 C Supported Filament Types ABS PLA PLA Pro TPU Metal fill Wood fill etc Supported Slicing Software Wiibuilder Cura etc Supported File Formats STL OBJ gcode Print Interface Wi Fi microSD card Maximum microSD Card Capacity 8GB Supported Operating Systems Windows Mac OS X Input Power 12 VDC 5A AC Adapter Input Power 100 240 VAC 50 60 Hz Dimensions 9 1 x 8 5 x 14 6 230 x 215 x 370 m...

Page 56: ...pursuant to Part 15 of the FCC Rules These limits are designed to provide reasonable protection against harmful interference in a residential installation This equipment generates uses and can radiate radio frequency energy and if not installed and used in accordance with the instructions may cause harmful interference to radio communications However there is no guarantee that interference will no...

Page 57: ...transmitter Notice for Industry Canada This Class B digital apparatus complies with Canadian ICES 003 Cet appareil numérique de la classe B est conforme à la norme NMB 003 du Canada RF Exposure Statement for Industry Canada Caution This equipment complies with radiation exposure limits set forth for an uncontrolled environment End users must follow the specific operating instructions for satisfyin...

Page 58: ...ple Mac OS X App Store and the Download on the App Store logo are trademarks of Apple Inc registered in the U S and other countries Wi Fi and Wi Fi Alliance are registered trademarks of Wi Fi Alliance microSD is a trademark of SD 3C LLC Google Android Google Play and the Get It On Google Play logo are trademarks of Google LLC Cisco and IOS are registered trademarks or trademarks of Cisco Systems I...

Reviews: