background image

117

/140

Adjusting Lens Focus And Correcting Lens Distortion 

© MOBOTIX AG  •  Security-Vision-Systems  •  Made in Germany

www.mobotix.com  •  [email protected]

Since activated lens distortion correction requires additional processing power, you should 
consider disabling it in situations where it is not really necessary. You will only notice a 
minimal distortion of the image, especially if you use the zoom. However, the maximum 
frames rate for high resolution may be reduced, which means you have to choose between 
maximum distortion correction or maximum frame rate.

We recommend activating lens distortion correction, especially for applications with a low 
frame rate and non-zoomed images (e.g. when using the D25M as a webcam). However, 
images can usually be corrected at a later point in time when searching recorded images. 
This saves on processing power during recording and increases the frame rate. The more 
you zoom in on the image, the less distorted the image should appear.

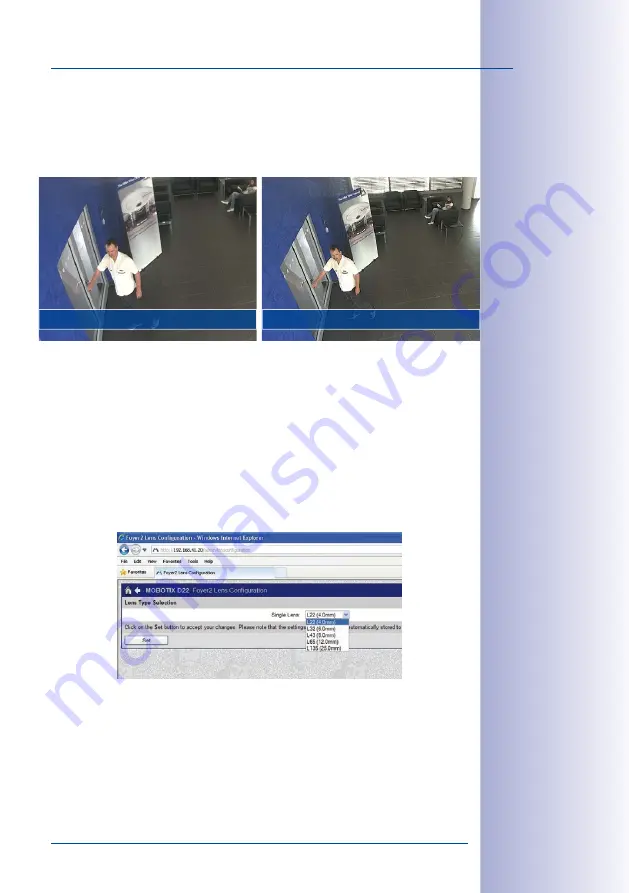
Activate/Deactivate Lens Distortion Correction In The Browser

To activate this option, first specify the lens you are using in the 

Admin Menu > Camera 

Administration > Lens Configuration

 dialog (this setting is saved until the camera is reset 

to its default configuration). Select the 

L25 (4.0 mm)

 option from the 

Lens Type Selection


field and then click 

Apply

 followed by 

Restart

Now select the 

Lens Distortion Correction

 option in the 

Display Mode

 Quick Control panel. 

An automatically corrected (live) image is displayed that can be panned, tilted or zoomed. 
Switching to the 

Full Image

 option will deactivate the automatic distortion correction function. 

Corrected image (zoom)

Zoom without distortion correction

Summary of Contents for D25M

Page 1: ...video systems cost efficient MOBOTIX AG D 67722 Langmeil Tel 49 6302 9816 103 Fax 49 6302 9816 190 info mobotix com O u t d o o r W a l l M o u n t O n W a l l S e t 0 O n W a l l S e t 1 0 I n C e i l i n g S e t V a n d a l i s m S e t Fits In Watches Out The D25M MonoDome camera adapts perfectly to any task Exchangeable lenses various mounting and configuration options including Vandalism Set s...

Page 2: ... logo the Bonjour icon iPod and iTunes are trademarks of Apple Inc registered in the U S A and other countries iPhone iPad iPad mini and iPod touch are Apple Inc trademarks Linux is a trademark of Linus Torvalds All other marks and names mentioned herein are trademarks or registered trademarks of the respective owners Copyright 1999 2014 MOBOTIX AG Langmeil Germany Information subject to change wi...

Page 3: ...1 3 2 D25M Basic 34 1 4 Available Accessories 38 1 4 1 On Wall Set 38 1 4 2 10 On Wall Set 38 1 4 3 Vandalism Set 38 1 4 4 In Ceiling Set 39 1 4 5 Outdoor Wall Mount 39 1 4 6 Corner And Pole Mount 39 1 4 7 Tinted Dome 39 1 4 8 MiniUSB Cable to MiniUSB Straight Angled 39 1 4 9 MiniUSB Cable to MiniUSB Angled Angled 40 1 4 10 MiniUSB Cable To USB A Socket 40 1 4 11 Ethernet Patch Cable For Bayonet C...

Page 4: ...h The In Ceiling Set 67 2 4 1 Mounting Instructions 67 2 4 2 Procedure 70 2 5 Installing The Vandalism Set 72 2 5 1 Mounting Instructions 72 2 5 2 Procedure 74 2 6 Installing The Wall Mount 76 2 6 1 Mounting Instructions 76 2 6 2 Procedure 79 2 7 Installing The Corner And Pole Mount 81 2 7 1 Mounting Instructions 81 2 7 2 Mounting To A Pole 83 2 7 3 Mounting To A Wall Or Building Corner 84 2 7 4 M...

Page 5: ...recting Lens Distortion 114 3 3 1 Aiming and Adjusting The Lens 114 3 3 2 Correcting Lens Distortion L25 Only 116 3 4 Virtual PTZ And Full Image Recording 118 3 4 1 Preparing The Virtual PTZ Function 118 3 4 2 Full Image Recording 120 3 5 MicroSD Card Recording 122 3 5 1 Introduction 122 3 5 2 Formatting The MicroSD Card 124 3 5 3 Activating MicroSD Card Recording 125 3 5 4 Accessing Data on the M...

Page 6: ...39 Legal Notes Legal aspects of video and sound recording You must comply with all data protec tion regulations for video and sound monitoring when using MOBOTIX products Depending on national laws and the installation location of the D25M the recording of video and sound data may be subject to special documentation or it may be prohibited All users of MOBOTIX products are therefore required to fa...

Page 7: ...rotection against lightning since this also protects the building and the whole network infrastructure Max power consumption of attached extension modules The power consump tion of all attached MxBus modules must not exceed 2 5 W When attaching mod ules to the MxBus connector and the USB connector the power consumption of all attached modules must not exceed 3 W if the camera is powered by PoE cla...

Page 8: ... under lowlight conditions Another improvement The D25M IT now generates HD images 1280 x 720 pixels instead of the VGA images of predecessor models 640 x 480 pixels Another plus the improved light sensitivity of the 5MP sensors which drastically reduces exposure times In conjunction with MxLEO the exposure and image optimization program working in the background the camera generates perceptibly b...

Page 9: ...9 140 MOBOTIX AG Security Vision Systems Made in Germany www mobotix com sales mobotix com ...

Page 10: ...to 1 536 scan lines an integrated video sensor and long term internal storage on a MicroSD card not available in the basic model The basic model the D25M Basic is designed for indoor use comes with a 82 Wide Angle lens and is powered over Ethernet PoE 90 Room monitoring 90 Raumüberwachung Overview of 3 elevators 3 Fahrstühle im Überblick Original MOBOTIX D25M image Size comparison standard resolut...

Page 11: ... D25M Wall Mount makes the camera ideally suited for outdoor use and for installation over surface mounted sockets so that the cabling remains thoroughly concealed Complete HiRes Video Solutions by MOBOTIX As opposed to conventional solutions MOBOTIX cameras with their decen tralized approach offer so much more state of the art network based video security technology that increases operating effic...

Page 12: ...timi zation program especially developed for these conditions on the other hand generates perceptibly better and more detailed images especially under low light conditions below 25 Lux Such conditions are typical at a parking lot at night that is illuminated by regular lights approx 10 to 25 Lux Or in a building after hours in which the emergency lights are burning approx 5 Lux This significantly ...

Page 13: ... Each lens is secured by a lock ring Each camera has a factory aligned and quality tested lens which makes on site camera focusing unnecessary in most cases The D25M cameras are available for delivery with a lens of your choosing or no lens at all The image area captured by the D25M varies depending on the selected lens With a Super Wide Angle lens L25 with 82 for example almost an entire room can...

Page 14: ...move the view to any section of the image This provides the features of a mechanical PTZ camera without the disadvantages of maintenance and wear This vPTZ functionality works differently depending on the camera operation platform web browser MxEasy MxControlCenter Virtual zoom pan and tilt using MxEasy and MxControlCenter is very simple thanks to special software tools and the use of an optional ...

Page 15: ...low the visible image to be zoomed and use the pan tilt features to examine every corner of the recorded full image Example The people marked by the red circle in the middle area of the image would not have been recorded by a regular PTZ camera the full image recording of the D25M allows you to determine for example the exact time at which these people entered the image area recorded by the camera...

Page 16: ...ter or MxEasy If you would like to archive sequences you can store all of the data or only certain parts to a computer or a USB hard disk MxActivitySensor Video Motion Analysis Secure Detection Avoiding False Alarms Regardless if there are large objects in the foreground or small objects in the background MxActivitySensor will only trigger video recording and alarm messaging if something important...

Page 17: ...me with the ExtIO module not available for Basic model Basic and IT Cameras Maximum Image Size Is now HD instead of VGA The D25M Basic and IT models now generate HD images 1280 x 720 pixels instead of the VGA images of predecessor models 640 x 480 pixels The special quality advantage of a MOBOTIX Basic IT camera with HD resolution 1280 x 720 The HD images of a MOBOTIX are generated by the high res...

Page 18: ...r security applications and allows individuals or license plates to be identified for example In contrast the H 264 standard which was developed for feature movies and is favored by some video security providers cannot achieve this with the required level of quality Good Color Images Even In Low Light The more light sensitive an image sensor is the better the image quality especially when the ambi...

Page 19: ...ilable and that registers all image changes in defined video motion windows In the monitored area the camera distinguishes between the continuous movements of vehicles persons or objects that trigger an alarm and movements that do not set off an alarm such as shadows changing light conditions and trees swaying in the wind Low Power Consumption In Accordance With The PoE Standard IEEE 802 3af An D2...

Page 20: ... MOBOTIX cameras such as the D25M to automatically detect when an event has occurred If necessary the cameras will respond immediately with an alarm sound and will establish a direct video and sound connection to a control room The D25M is equipped with a shock detector as standard for all IT and Secure models For example if the camera receives a blow to the housing it can simultaneously take a vi...

Page 21: ...il of panorama images with mega pixel technology Fewer recording devices because in the decentralized system ten times the standard number of cameras can be used to record high resolution HDTV video with sound on one computer server simultaneously Lower network bandwidth because everything is processed in the camera itself and the high resolution images therefore do not have to be constantly trans...

Page 22: ...IP65 cameras are highly robust and work without high power climate control and extra protective housing in a temperature range from 30 to 50 C 22 to 122 F Modern Integrated into the cameras are high power processors and flash storage thus making energy consuming servers and storage devices unnecessary And of course the disposal of waste later High Resolution A hemispheric MOBOTIX camera with two i...

Page 23: ...23 140 D25M Overview MOBOTIX AG Security Vision Systems Made in Germany www mobotix com sales mobotix com Notes ...

Page 24: ...light proof they do not require a mechanical auto iris making them extremely robust and maintenance free L25 Super Wide Angle with 82 image angle horizontal L38 Wide Angle with 55 image angle horizontal L51 Wide Angle with 40 image angle horizontal L76 Telephoto with 27 image angle horizontal L160 Telephoto with 13 image angle horizontal The L25 Super Wide Angle 82 lens has very little distortion ...

Page 25: ...dth 34 7 20 6 14 5 9 7 4 6 Image height 23 7 14 9 10 8 7 2 3 4 Distance 50 m 54 68 yd Image width 86 8 51 5 36 2 24 3 11 4 Image height 59 3 37 3 27 0 18 0 8 6 Notes The specified focal lengths of the MOBOTIX lenses do not reflect the actual focal length of the lenses but the focal length Lxx mm converted to 35 mm camera format For example the MOBOTIX L25 Super Wide Angle lens has an actual focal ...

Page 26: ... 0 013 Color 0 05 0 0025 BW 0 25 0 013 Color 0 05 0 0025 BW Hardware Features IP protection class IP54 IP65 IP65 Temp Internal DVR MB 2 32 64 Internal DVR MicroSD up to 64 GB 4 GB included 4 GB included Microphone speaker Passive infrared sensor PIR Integrated temperature sensor Shock detector Power consumption in Watts typical 4 5 4 5 4 5 Variable PoE class 2 3 2 3 2 3 Image Formats Frame Rates a...

Page 27: ...and event control Weekly schedules holidays Web functionality FTP email Playback Quad und MultiView Bidirectional sound in browser Logo generator animated Flexible event logic Master Slave arming Several scheduled privacy zones Customized voice messages VoIP telephony audio video alert Remote alarm notification network msg Signal inputs outputs RS232 Via MX 232 IO Box Via MX 232 IO Box Programming...

Page 28: ...4 Internal DVR MicroSD slot incl 4 GB max 64 GB External video ring buffer Directly on NAS and computer server without additional recording software Software included MxEasy video management software MxControlCenter control center software MOBOTIX App for iOS devices iOS 5 0 and higher Image processing Backlight compensation automatic white balance image distortion correction panorama correction V...

Page 29: ...rig Power over Ethernet IEEE 802 3af PoE Klasse variabel typ 4 5 W Operating conditions IP65 30 to 50 C 22 to 122 F Dimensions weight D25M without mounting options Diameter x H 160 x 86 mm on wall installation weight approx 350 g 0 77 lb including lens Delivered parts Housing high resistance composite PBT white shock proof polycarbonate dome transparent free choice of lenses mounting parts allen w...

Page 30: ...0 pre installed 1 6 1 Allen wrench 3 mm 1 7 1 Toothed wrench 1 8 1 Outer shell with rubber seal 1 9 1 Mounting ring 1 10 4 Dowels 8 mm 1 11 4 Stainless steel washers Ø 5 3 mm 1 12 4 Stainless steel wood screws with Torx head 4 5x60 mm 1 13 1 Torx wrench TX20 1 14 4 Stainless steel Allen screws M4x16 mm 1 15 4 Stainless steel washers Ø 4 3 mm 1 16 1 Single wire plug black MxBus 1 17 2 Single wire c...

Page 31: ...5M IT Secure consists of the camera housing mainboard lens dome the outer shell and the mounting ring Connections Network Ethernet network incl PoE power supply MxBus for MOBOTIX expansion modules e g MX GPS Box MX 232 IO Box USB e g for ExtIO MX 232 IO Box Slot for MicroSD card Outer shell MxBus LEDs Network connector USB Dome Lens R key L key Slot for MicroSD card ...

Page 32: ... AG Security Vision Systems Made in Germany www mobotix com sales mobotix com Dimensions By rotating the camera module on both axes you can aim the lens at the precise area you want to record Camera module can be freely rotated and tilted 85 mm 160 mm ...

Page 33: ...emplate at the end of the manual Make sure that the drilling template is not scaled or adjusted to the paper size when printing the PDF file enlarged or reduced When printing the PDF file you should print two pages onto one using 100 scaling to obtain an unscaled printout of the drilling template Find the drilling templates scale 1 1 at the end of the manual as a fold out ...

Page 34: ...ns 2 3 1 Lock ring 2 4 1 Dome transparent 2 5 1 CAT5 Ethernet cable 0 5 m pre installed 2 6 1 Allen wrench 3 mm 2 7 1 Hook wrench 2 10 4 Universal screw anchors 8 mm 2 11 4 Stainless steel washers Ø 5 3 mm 2 12 4 Stainless steel Torx screws 4 5x60 mm 2 13 1 Torx wrench TX20 2 14 4 Allen screws M4x16 mm 2 15 4 Stainless steel washers Ø 4 3 mm 2 4 2 5 2 4 2 11 2 10 2 12 2 2 2 3 2 5 2 6 2 13 2 7 2 1 ...

Page 35: ...many www mobotix com sales mobotix com Camera Housing And Connector The MOBOTIX D25M Basic consists of the camera housing with the motherboard the lens and the dome Connections Network Ethernet network incl PoE supply LEDs Network connection see Section 1 3 1 Dome Lens unit R key L key ...

Page 36: ... AG Security Vision Systems Made in Germany www mobotix com sales mobotix com Dimensions By rotating the camera module on both axes you can aim the lens at the precise area you want to record Camera module can be freely rotated and tilted 85 mm 129 mm ...

Page 37: ...emplate at the end of the manual Make sure that the drilling template is not scaled or adjusted to the paper size when printing the PDF file enlarged or reduced When printing the PDF file you should print two pages onto one using 100 scaling to obtain an unscaled printout of the drilling template Find the drilling templates scale 1 1 at the end of the manual as a fold out ...

Page 38: ...sts of On Wall Mount and mount ing supplies for inclined installation 10 of a camera Conforms to U S instal lation standards Reliably protects the cabling and allows additional modules to be integrated within the On Wall Mount patch installation cable connector IO extensions WiFi battery 1 4 3 Vandalism Set Order no MX D25M Vandal Consists of a stainless steel ring secu rity screws and reinforced ...

Page 39: ...eatherproof IP65 1 4 6 Corner And Pole Mount Order no MX OPT MH Flange for Outdoor Wall Mount Can be mounted to wall corners or poles 3 mm stainless steel white Wall Mount may be ordered separately or as a set 1 4 7 Tinted Dome Order no MX D25M OPT DCS Suitable for especially bright environments e g under direct sunlight A tinted dome reduces the glare from sunlight by 50 compared with the standar...

Page 40: ...ealing gasket Every D25M ships with a 0 5 m long cable as standard which can be exchanged for a patch cable up to 10 m in length 1 4 12 NPA PoE Set Order no MX NPA PoE EU and MX NPA PoE INT Version EU and Version INT Order no MX CBL NPA BAT 2 battery cable for mobile voltage sources This is a multifunctional PoE injector according to the IEEE 802 3af standard with three connectors for network came...

Page 41: ... Patch Box s weath erproof and extremely compact exterior housing protec tion class IP65 30 to 60 C 22 to 140 F which means it can also be installed in the space of the Outdoor Wall Mount Interfaces of the MX NPA Box Camera via patch cable Ethernet via LSA and external power supply via terminal connector 12 to 57 V DC possible 1 4 15 MX GPS Box Order no MX OPT GPS1 EXT The MX GPS Box primarily ser...

Page 42: ... Module Order No MX ExtIO The device which is suitable both for on wall and in wall installations contains a powerful speaker microphone infrared motion sensor ambient temperature sensor two input and two output contacts and two illuminated keys It is ideal for door communication elevators access control systems etc The ExtIO is suitable for use as direct con nection to the S15 via a MiniUSB cable...

Page 43: ...d visit the MOBOTIX website www mobotix com in the Products Accessories section to see the entire list of available accessories THE MOBOTIX INFORMATION CHANNELS MOBOTIX Support on the MOBOTIX Website www mobotix com other Support The MOBOTIX Video Tutorials www mobotix com other Support Tutorials Seminars on MOBOTIX Campus www mobotix com other Partners Seminars The MOBOTIX YouTube Channel www you...

Page 44: ...ve image that is visible or the full sensor image full image storage This also allows you to examine parts of an image or video that had not been visible in the live image section on display at the time of the recording Unlike in the camera systems from other manufacturers there is no need to buy an install additional software on your computer thanks to the MOBOTIX firmware that can be accessed di...

Page 45: ... video search functions effective alarm handling automatic camera integra tion video storage on file servers as well as useful configuration and update wizards MxControlCenter Professional Video Management Proven worldwide in the most demanding video applications thousands of times over Unlimited number of users and cameras No license fees Individual user interface adaptable to each individual use...

Page 46: ...antly in the configuration of the corresponding camera The calendar functions integrated in the Alarm Planner provide an innovative tool for the scheduled settings of one or more cameras This tool not only controls video and sound recording based on certain time and date information but also allows features like video motion detection image brightness and the microphone to be activated deactivated...

Page 47: ...rk with professional security equipment In addition using mobile devices to operate the various functions such as door opening activating the voice mailbox switching the door bell off at night and switching a light on off creates added value in the form of greater convenience and security in every day life MOBOTIX App Mobile Remote Station For MOBOTIX Cameras And Door Stations Bandwidth optimized ...

Page 48: ...ng or wall see Section 2 1 1 2 Which other mounting options are available On wall mounting in ceiling mounting vandalism protection wall mounting pole mounting see Section 2 1 2 3 How is the camera connected to the network and how is the power supplied MX NPA PoE or other PoE components IEEE 802 3af see Section 2 1 3 4 How are the connections furnished from the building Sockets see Section 2 1 4 5...

Page 49: ...he IP54 standard while the IT and Secure models are weatherproof in accordance with IP65 However installations on a wall or ceiling are the most common mounting positions In indoor spaces the D25M is usually mounted from the ceiling The Super Wide Angle lens 82 L25 allows a room to be monitored almost entirely by a camera mounted in the corner Using the PTZ software you can easily zoom in on image...

Page 50: ...he lens may be limited as a result We therefore recommend using the practical Wall Mount from the range of available accessories see Section 2 6 The cable exit of the D25M is located in the center of the housing s underside For more detailed information on the installation process see Section 2 2 and the following sections The appropriate drilling templates can be found at the end of the manual A ...

Page 51: ... protection for D25M cameras The set consists of a robust stainless steel cover matt or polished and an impact resistant polycarbonate dome A camera equipped with the Vandalism Set is perfectly suited for applications in demanding environments such as prisons trouble areas train stations etc Wall Mount MX OPT WH The Wall Mount is the ideal solution for mounting the D25M to walls for indoor and out...

Page 52: ... is 100 m The Mx2wire media converter set available as an accessory can be used to extend the range of an Ethernet connection up to 500 m in length maximum transmission speed for a 500 m cable 45 Mbps and 12 W for the PoE device Note The MOBOTIX D25M can be powered by switches or routers which support the PoE Power over Ethernet standard and conform to IEEE 802 3af Advantages of PoE power supply A...

Page 53: ...r Supply or with PoE compliant switches according to IEEE 802 3af 2 1 4 Preparing the Camera Connections MX Overvoltage Protection Box Once the camera position the position of the cable outlets and the method of power sup ply have been decided upon the cabling can be installed Before installing the MOBOTIX D25M you should make sure that the network connections have been properly tested so that the...

Page 54: ...d to installing network devices and having proper respect for the applicable regulations regarding lightning protection and fire prevention as well as the current tech nology for preventing damages from electrical surges Guidelines for Wiring Data cable Make sure you only use double shielded CAT5 or higher cable S STP for Ethernet connections Outdoors Installing the camera outdoors requires specia...

Page 55: ... Box This competitively priced and weatherproof network connector provides reliable protection against overvoltages of up to 4 kV the box is easily installed in the Outdoor Wall Mount for example seeSection 1 4 12 MX Overvoltage Protection Box More information is available at an institution such as the International Electrotechnical Commission IEC www iec ch or at a manufacturer of protection devi...

Page 56: ...ned for installation on walls or ceilings In general direct installation of the camera without any accessories is always possible However to ensure a flush finish with the surface you should first install a flush mounted wall outlet space for the connection cable If you choose to mount the camera directly to a wall without the MOBOTIX recommended wall mount you should position the camera in the ce...

Page 57: ...installing Any additional materials for fastening the camera to a ceiling wall if necessary 4 Torx screws incl screw anchors and washers are included in the original packaging Screwdriver Power drill for screw anchor holes needed for ceiling wall mounting MOBOTIX drilling templates at the end of this manual Scissors to cut out the template Pen to mark the drill holes Materials and any tools needed...

Page 58: ...tion 3 3 1 Caution For safety reasons only use the pre installed MOBOTIX network cable that was included in the delivery Always ensure that the rubber plug of the network cable reliably protects the outer shell from moisture entering the camera All openings of the camera housing need to be properly sealed This is the only way to guarantee that the camera remains weatherproof Notes Network Connecti...

Page 59: ...amera cannot be mounted directly on top of protruding surface mounted sockets Use the supplied camera drilling template fold out at the end of this manual to mark the position of the flush mounted socket for the desired camera position 3 Drill the holes Drill the holes for the supplied screw anchors see drilling template 4 Connect the cable Connect the on site network cable to the camera patch cab...

Page 60: ...he dome clean use the enclosed plastic foil or a lint free cotton cloth 2 Unplug the pre installed network cable from the network connector inside the camera Never touch electronic components as the static electricity may damage them 3 Loosen the internal part of the camera by releasing the two blue clamps with the thin side of the hook wrench Now turn the toothed ring in a counter clockwise direc...

Page 61: ...ing a 5 mm drill bit 6 Tighten the base of the camera using the supplied screws Depending on the installation site the screw openings should be sealed shut e g with silicon 7 Insert the internal part of the camera with the lens mount into the attached outer shell and secure it by turning the two blue clamps in a clockwise direction using the supplied hook wrench or a screwdriver This will pre vent...

Page 62: ... lens may not exceed 80 for design related reasons If the discreet appearance of the D25M is of particular importance the In Ceiling Set is ideal for mounting the camera on ceilings or drywalls The network connection and drill holes must be prepared correctly before installing the On Wall Set both indoors and outdoors Network connection You can use any one of the four openings in the On Wall Set t...

Page 63: ... Wall Set MOBOTIX AG Security Vision Systems Made in Germany www mobotix com sales mobotix com Drilling Template On Wall Set 85 mm 0 Set 160 mm 74 mm 10 Set 166 mm Find the drilling templates scale 1 1 at the end of the manual as a fold out ...

Page 64: ...d Parts Please first check that all components supplied with the On Wall Set are present in the original packaging The following additional items are required for installation Suitable materials for ceiling wall installation 4 screws incl screw anchors and washers e g from the original camera packaging Screwdriver Power drill for screw anchor holes needed for ceiling wall mounting MOBOTIX drilling...

Page 65: ...seal is on the outside Fix it in place from the inside using a small hexagonal nut 3 Mount the On Wall Set Mount the On Wall Set with out the camera at the intended position using the Torx screws included with D25M camera items 1 10 1 12 4 Cable feeding Attach the counter nut to the network cable pass it through the seal from the outside and tighten the nut The network cable is now screwed into th...

Page 66: ...Wall Set using a standard connector Make sure to leave enough unused cable inside the housing This will ensure that you can turn and tilt the lens mount freely later on Excess cable can be easily stored within the On Wall Mount 8 Attach the camera to the mount Press the D25M so that it is seated firmly within the On Wall Mount The tapered guides at the back of the D25M housing fit exactly into the...

Page 67: ...ic e g hotels restaurants banks retail stores public buildings etc The common use of suspended ceilings in commercial and public buildings is an additional reason to place a preference on in ceiling installation The installation process is also simplified as the network cable may be laid without difficulty and only a 15 cm diameter hole must be cut in the ceiling or ceiling component Before instal...

Page 68: ...ng template at the end of the manual Make sure that the drilling template is not scaled or adjusted to the paper size when printing the PDF file enlarged or reduced Find the drilling templates scale 1 1 at the end of the manual as a fold out Clamping range 6 to 22 mm ø 180 mm 65 mm The In Ceiling Set can be used in ceilings and walls that have a thickness of 6 to 22 mm 0 25 to 0 9 in ...

Page 69: ... the original packaging The following additional tools are required for installation Power drill with matching hole saw 150 mm diameter or jigsaw MOBOTIX drilling templates at the end of this manual Scissors to cut out the template Pen to mark the hole positions Two blue In Ceiling wrenches from the In Ceiling Set Materials and tools needed to connect the pre installed MOBOTIX network cable in the...

Page 70: ...ove all four Allen screws using the supplied Allen wrench and lift off the outer shell not mounted upon delivery 4 Remove the mounting ring Separate the mounting ring from the camera housing This ring is not required to mount the camera in the In Ceiling Set 5 Place the camera in the In Ceiling Set The dovetail guides at the back of the camera housing fit exactly into the openings of the In Ceilin...

Page 71: ...g on the set as shown in the figure and turn the ring clockwise until it stops The two wrenches from the In Ceiling Set are also used for dismounting Insert them as shown and turn the ring counter clockwise Loosen the screws of the In Ceiling Set this will automatically retract the winged cams You can now remove the In Ceiling Set with the camera still attached from the ceiling 9 Proceed to Sectio...

Page 72: ...er particularly demanding conditions such as prisons trouble areas train stations etc The set consists of a robust stainless steel outer shell that is available in five different colors and a reinforced plastic dome To install the Vandalism Set replace the standard plastic outer shell supplied with the D25M IT Secure with the stainless steel outer shell of the Vandalism Set including the safety sc...

Page 73: ...uter Shell The Following Additional Tools Are Required For Installation Allen wrench for removing the standard outer shell included in the D25M packaging Screwdriver with bit receptacle for the two hole driver bit Matt stainless steel Polished stainless steel Silver gray powder coated stainless steel Black powder coated stainless steel White powder coated stainless steel ...

Page 74: ...ell Remove the standard dome Unscrew the dome from the housing counter clockwise Package and store the standard dome for possible use at a later time Aim and adjust the lens When mounting the camera for the first time please proceed to Section 3 3 1 Aiming and Adjusting The Lens Mount the reinforced dome of the Vandalism Set Tighten it in a clockwise direction using a soft cotton cloth If necessar...

Page 75: ...stems Made in Germany www mobotix com sales mobotix com Insert the four spacers included in the Vandalism Set Now attach the stainless steel outer shell of the Vandalism Set using the safety screws Tighten the screws into place using the supplied two hole driver bit ...

Page 76: ... the required standard connector for the camera cable patch cable are ideally protected by a robust wall sealing made from foam rubber Nothing is visible or accessible from the outside The Wall Mount may be mounted directly on top of surface or flush mounted sockets Maximum width x height of the socket 88 mm x 80 mm Only use the factory installed patch cable of the D25M 50 cm cable length or a MOB...

Page 77: ... the folded drilling template at the end of the manual Make sure that the drilling template is not scaled or adjusted to the paper size when printing the PDF file enlarged or reduced Find the drilling templates scale 1 1 at the end of the manual as a fold out Direct installation over surface and flush mounted sockets Depth 201 mm Height 125 mm Width 216 mm ...

Page 78: ...Wall Mount Set are present in the original packaging The following additional items are required for installation Power drill for screw anchor holes Screwdriver MOBOTIX drilling templates at the end of this manual Scissors to cut out the template Pen to mark hole positions Materials and tools needed to connect the pre installed MOBOTIX network cable in the camera with the on site network cable Cle...

Page 79: ...en screws beforehand 2 Separate the bottom plate from the Wall Mount The bottom plate is used to hold the camera and is only attached and screwed into place during a later step 3 Pass the camera cable up through the bottom of the bottom plate Ensure the orientation is correct The spring clips should be on the underside of the bottom plate 4 Snap the camera into place on the bottom plate Firmly pus...

Page 80: ...thout the camera at the intended position Pass the network cable through the large square opening on back side of the Wall Mount 6 Connect the cable Prepare the on site network cable for connection with the camera patch cable using a standard connector Excess cable can be stored easily within the Wall Mount 7 Install the bottom plate with the camera in the Wall Mount Connect the camera patch cable...

Page 81: ...en 60 and 180 mm Attaching the camera to the corner of a wall not only makes sense from an aesthetic perspective but also allows you to monitor an area that is not specifically covered by the camera without incurring major building modification costs In such cases only the lens of the camera has to be repositioned By design the Corner and Pole Mount does not allow the use of a flush mounted socket...

Page 82: ...tix com The Following Additional Tools Are Required For Installation Of The Corner Mount Power drill for screw anchor holes Screwdriver Scissors to cut out the template Pen to mark hole positions Materials and tools needed to connect the pre installed MOBOTIX network cable in the camera with the on site network cable ...

Page 83: ...at best fit for the thickness of the pole The stainless steel straps allow attaching the mount to poles with diameters between 60 and 180 mm Guide the on site network cable from behind through one of the large round holes of the Corner and Pole Mount In order to properly protect the cabling it is best to pass the cabling from the inside of the pole through the Corner and Pole Mount directly into t...

Page 84: ... of the large round holes at the back of the Corner and Pole Mount then through one of the 16 mm diameter holes on the front of the mount In order to properly protect the cabling you should let the cabling run from the inside of the building through the Corner and Pole Mount directly into the camera concealed cabling Note The cable length from the building corner should be at least 80 cm Place the...

Page 85: ... the network cables through the appropriate hole at the back of the Outdoor Wall Mount The wall seal ing on the Wall Mount must be in place already Use the 6 x 20 mm Allen screws Ø 6 mm washers and M6 nuts included with the Corner and Pole Mount and attach the Wall Mount to the Corner and Pole Mount Continue with the remaining work steps as described in Section 2 6 Installing The Wall Mount ...

Page 86: ...protected 2 8 1 Removing a MicroSD Card Deactivate recording Recording to MicroSD card must be deactivated Admin Menu Storage on External File Server Flash Device If MicroSD card recording is still active deactivate recording and reboot the camera Section 3 5 MicroSD Card Recording contains more information on this topic Remove the outer shell Remove all four Allen screws using the supplied Allen ...

Page 87: ...ection Attach the outer shell Place the outer shell onto the camera and tighten all four Allen screws using the supplied Allen wrench Make sure that the rubber seal is seated properly Activate recording If you have inserted a MicroSD card that has already been MxFFS formatted you can activate recording under Admin Menu Storage on External File Server Flash Device Once the camera has been rebooted ...

Page 88: ... 802 3af Power over Ethernet network components to supply power to MOBOTIX cameras make sure if possible that these components do not have a fan Since the power consumption of MOBOTIX cameras is very low compared to other products the reliability of the entire system is increased thus extending the life of these components Caution Appliances with a maximum total power consumption of four watts may...

Page 89: ...ox or an MX NPA Box open the Products Accessories Interface Boxes section on www mobotix com When using a standard network outlet only for indoor installations insert the MOBOTIX patch cable of the D25M directly into the network outlet 2 9 3 Power Supply Using A Switch 1 Connect the factory pre installed cable of the camera to the camera connector of the PoE adapter 2 Connect the LAN Power connect...

Page 90: ... power supply unit into the LAN Power connector of the PoE adapter 2 9 5 Power Supply With Power Over Ethernet Products Connect the factory pre installed cable of the camera to the Ethernet connector of the PoE switch router The switch router must support the PoE standards IEEE 802 3af or IEEE 802 3at IP addresses in the diagram are shown only as an example PoE adapter MX NPA PoE Power supply PC 1...

Page 91: ...loth and remove the dome by turning it in counter clockwise direction Tilt the main board If required release the two stainless steel Allen screws and tilt the mainboard so you can access the USB connector Remove the sealing plug Push one of the three sealing plugs out of the housing by pushing it from the inside Guide USB cable through wire plug Gently push the angled connector of the MOBOTIX USB...

Page 92: ...he D25M Note that you can attach one MxBus cable with two wires to the MxBus connector red arrow in figure Take care not to switch the polarity of the wires It is recommended to use the same wire color for for the entire MxBus system e g red blue Procedure Uninstall camera Remove the camera so you can access the connectors on the back Remove the outer shell Remove all four Allen screws using the s...

Page 93: ...rear into the housing make sure that the plug is seated properly Insert MxBus connector Push the MxBus connector into the receptacle on the mainboard red arrow in figure Connect MxBus cable Use one single wire connector to join one wire color of the MxBus cable and repeat for the other color Store the connectors within the camera housing so that they do not obstruct the main board when adjusting t...

Page 94: ...ipheral devices to MxBus and USB interface Caution If the total power consumption of the camera and peripheral devices exceeds the power provided by the PoE switch for the specified class the switch can disconnect the camera from the power supply In this case the camera will only be accessible again once the peripheral devices have been disconnected from the camera and the camera has been restarte...

Page 95: ...error the camera will start using the backup system Waiting for key pressed Both LEDs light up for four seconds If you press the R or L key of the camera during this time the camera will execute the corresponding function see Section 3 2 6 Starting The Camera With An Automatic IP Address DHCP and Section 3 2 5 Starting The Camera With The Factory IP Address Use a suitable device to press a key a b...

Page 96: ...n 2 1 3 2 Set up the camera s network parameters Manually using a web browser see Section 3 2 1 then Section 3 2 2 Automatically using MxControlCenter MxEasy see Section 3 2 3 and 3 2 4 or via DHCP see Section 3 2 6 3 Configure the camera using the browser based user interface Every MOBOTIX camera comes preconfigured with a fixed IP address in the 10 x x x range e g 10 8 0 99 However local compute...

Page 97: ...ings In The Browser Next click the Admin Menu button to open the camera s Quick Installation in the browser s user interface This is where you can configure the desired network parameters of the cam era Once you have completed the Quick Installation you can connect the camera with its new network parameters to the desired network Advantages The camera does not need to be physically accessible i e ...

Page 98: ...MOBOTIX cameras that are not operating on the same IP address range as the computer Advantages You can connect the camera directly to the target network The camera does not need to be physically accessible i e it can remain mounted to a pole for example The camera can be configured to automatically receive an IP address optional The network parameters can be manually set optional You do not need t...

Page 99: ...omatically assigned by the DHCP server can be announced via the speaker of an activated ExtIO that is connected to the D25M as soon as the camera has booted successfully Advantages You can connect the camera directly to the target network Network parameters are automatically assigned No additional software is required You do not need to access the camera user interface Disadvantages The camera nee...

Page 100: ...camera with the factory address 10 8 0 99 Replace this IP address with the IP address of your camera You will find the IP address of your camera on a small sticker on the camera Make sure that the IP addresses used in the following examples are not already being used by other devices in the network Hint Pressing the R key on the camera prompts the camera to announce its current IP address over a s...

Page 101: ...isplays the user interface of the MOBOTIX camera see also Section 3 2 2 First Images And The Most Important Settings In The Browser 2 Click the Admin Menu softbutton in the user interface of the MOBOTIX camera The Quick Installation starts automatically once the admins user has logged on Note The Quick Installation can also be executed at a later stage by opening Admin Menu Network Setup Quick Ins...

Page 102: ...aphical browser with activated JavaScript is suitable It does not matter which operating system is used After entering the camera s IP address in the browser address bar you will see the live screen of the MOBOTIX camera with its user interface controls such as softbuttons buttons for the different camera screens pull down menus Quick Controls symbols for access ing the online help and the camera ...

Page 103: ...splays several cameras with live or recorded images MultiView allows you to view several cameras via a proxy camera especially useful if you want to access your cameras from outside of the network with reduced bandwidth and the PDA mode provides a special screen for mobile devices Note For more information on camera screens see Section 4 1 1 Camera Screens in the Browser the Camera Software Manual...

Page 104: ...r versions will be removed automati cally and the designated shortcuts are created during the installation process Desktop Start Menu etc Caution MxControlCenter will automatically attempt to find all MOBOTIX cameras in the physically connected network that is even a MOBOTIX camera with a factory IP address of 10 x x x Make sure that the firewall settings on your computer are low enough so that Mx...

Page 105: ...earches for MOBOTIX cameras in the local network when you launch the program for the first time Select Video Source Add from the menu to perform a camera search at a later time If your MOBOTIX camera is properly connected it should appear together with the exist ing video sources in the following list Note Video sources in this context not only refer to MOBOTIX cameras but also to third party IP c...

Page 106: ... image is automatically displayed in the preview window when a camera is selected to help you identify the cameras For cameras marked with Different subnet or if you want to add additional video sources follow the instructions in the following sections You can also display the selected cameras directly in a layout For more information see Creating A New Layout further down Reconfiguring Cameras In...

Page 107: ...rrect network settings even after they have been rebooted Click on OK to close the dialog box Wait until MxControlCenter has changed the network settings and rebooted the cameras The status of the reconfigured camera changes from Different subnet to OK Defining Additional Video Sources In addition to the MOBOTIX cameras that are found automatically you can also manually add video sources to the li...

Page 108: ...nfiguration at that time It is also possible to open the Configure selected cameras dialog box using the shortcut menu in order to change the camera network parameters Creating A New Layout Select the camera or other video sources that you would like to display in a layout a view with a group of selected cameras in the Add video sources dialog box and then click on Add selected video sources The C...

Page 109: ...s all cameras found in a list The camera list will be updated automatically as soon as new MOBOTIX cameras are con nected to or removed from the network MxEasy also automatically monitors and displays the operating status of all cameras Cameras that are not on the same subnet as the computer will get a differently colored symbol than the cameras that are on the same subnet Likewise the cameras tha...

Page 110: ...lick on Continue After a security prompt a new dialog box for configuring the selected camera is displayed If your computer automatically obtains its IP address from a DHCP server then this is certainly the best choice for that specific camera and most likely for all other cameras that have been found in a different subnet Get IP address automatically option If you have assigned a static IP addres...

Page 111: ... made at a later time for example password protection available bandwidth For this reason we recommend activating the option Complete integration and complete the remaining dialog boxes of the MxEasy Assistant until the main window appears After you are done with the MxEasy Assistant the application s main window appears and displays the first camera For more information see the MxEasy User Manual...

Page 112: ...eed to try again go back to Step 1 Use a suitable device to press a key a ball point pen for example 4 After about 30 to 45 seconds the camera emits a double sound boing boing The camera has finished booting and can now be used e g MxEasy MxControlCenter MOBOTIX App web browser Notes Starting the camera with an automatic IP address DHCP is only temporary The network configuration of the camera can...

Page 113: ...d it down if you need to try again go back to Step 1 Use a suitable device to press a key a ball point pen for example 4 After about 30 to 45 seconds the camera emits a single sound boing The camera has finished booting and can now be used e g MxEasy MxControlCenter MOBOTIX App web browser Notes If you use the camera s L key to load the factory network configuration this configu ration is not auto...

Page 114: ... have to remove the outer shell first Loosen the toothed ring slightly by turning it in a counter clockwise direction using the supplied hook wrench In addition loosen the two Allen screws on both sides of the lens mount slightly by turning them in a counter clockwise direction using the supplied Allen wrench Loosen the ring and screws until you are still able to pan and rotate the internal part o...

Page 115: ...slightly once the dome has been mounted Before mounting the dome the Telephoto lens should be rotated by 90 120 in a counter clockwise direction against the direction in which the lens is screwed Make sure that you check the focus of the live image with the dome installed and re adjust the lens if required Mount the dome Use the supplied foil or a lint free cot ton cloth to insert the dome into it...

Page 116: ...tly distorted due to the extreme angle of the lens You can suppress this effect using software e g in the browser so that a new and appro priately corrected image can be displayed live A side effect of this correction however is that a cushion shape appears around the edges of the image To hide this cushion effect you simply have to zoom in on the image slightly Although this reduces the size of t...

Page 117: ...usually be corrected at a later point in time when searching recorded images This saves on processing power during recording and increases the frame rate The more you zoom in on the image the less distorted the image should appear Activate Deactivate Lens Distortion Correction In The Browser To activate this option first specify the lens you are using in the Admin Menu Camera Administration Lens C...

Page 118: ...e image sensor area Operation Using The Mouse And Scroll Wheel The vPTZ function of the D25M can be controlled in the browser using the mouse By clicking any position on the image displayed on the monitor this position becomes the new image center The image moves and is corrected accordingly The scroll wheel can be used to control the zoom function This functionality is disabled in the default set...

Page 119: ...o the manufacturer s instructions In order to use a USB joystick in the browser make sure that you have a PC with a Windows operating system and the latest version of Internet Explorer and that the ActiveX mode in the camera software browser is activated Select Browser in the Quick Control In the dropdown to the right of to Browser select the ActiveX option The USB joystick can then be used until ...

Page 120: ...at you can use the vPTZ features in VGA resolution to pan tilt and zoom the live image while the camera is e g recording full images at 1 fps in MEGA or QXGA resolution When using MxEasy or MxControlCenter the recorded full images may be prepared for the user using vPTZ functions e g panning and zooming in on an image detail such as a doorway If full image storage is not activated only the last di...

Page 121: ...n storing This will facilitate later searches in MxControlCenter or MxEasy The advanced distortion correction features require this function to deliver satisfactory image quality Full Image Recording On Due to its increased computing power full image record ing reduces the data rate of the live image stream which may drop by about 10 to 30 percent It is therefore recommended to reduce the image ra...

Page 122: ...MOBOTIX cameras constantly monitor activated flash storage devices MOBOTIX has developed a technology to test the wear of the flash device by logging the number of write delete cycles patent pending The flash memory wear is automatically displayed in the status bar in the live camera image but it can also be viewed at any time in the Admin Menu Camera Status dialog box Conservative Memory Usage Th...

Page 123: ... cycle 12 hours 4 hours 14 4 hours 9 2 hours 4 4 hours Caution The MicroSD card s service life depends on production quality and frequency of use Set the type of recording event controlled or continuous recording frame rate resolution according to your specific requirements We recommend changing the pre installed high quality 4 GB MicroSD card once a year if you have it constantly set to continuou...

Page 124: ...r the user name and the password of a user of the admins group and click OK to confirm The MOBOTIX camera now starts for matting the card It takes 5 to 12 min utes to format an 8 GB MicroSD card if the Secure deletion Slow option is disabled If Secure deletion Slow is enabled this may take anywhere between 3 and 14 hours Once the formatting has been completed you can activate the MicroSD card for ...

Page 125: ...g target If not you must activate the recording see below Activating The Recording If the FR REC symbols are not visible in the live image after rebooting you need to activate the recording using one of the following methods In the web browser Automatic activation by clicking on the Arm Record softbutton Confirm this in the Easy Dialog by clicking on the Yes button In the web browser Manual activa...

Page 126: ...enter If the recordings stored on the MicroSD card were encrypted you need to enter the password used for the encryption before you can access the data If this is the case both MxControlCenter and MxEasy will provide a dialog box for this purpose Caution When using the MicroSD card from one MOBOTIX camera in another MOBOTIX camera you need to make sure that the time on the original camera is in sy...

Page 127: ... MOBOTIX camera Once a MicroSD card recording has been activated requires a reboot the new MOBOTIX camera automatically synchro nizes with the card and resumes recording No data is lost in this process Make sure that you deactivate MicroSD card recording before removing the card and then reboot the MOBOTIX camera If the MicroSD card s contents are encrypted you need to enter the same password in t...

Page 128: ...h as Windows Linux Apple etc The camera provides a HTML based user interface for this purpose The camera executes the changes you make to the camera configuration via HTTP commands using programs and scripts of the embedded software The settings are stored in the camera s flash memory This section contains an overview of the basic browser settings of the MOBOTIX camera as well as further configura...

Page 129: ...ly implement the change when you click Close you will be asked to store the complete configuration in the camera s permanent memory or in the Admin Menu Admin Menu Store current configuration into flash memory The Configuration section of the Admin Menu provides more functions for storing copying and managing camera settings For more information on this topic refer to the online help for the speci...

Page 130: ...tomatic reboot if this is not desired Admin Menu Time Tasks Optimize the image settings The factory image settings of MOBOTIX cameras deliver excellent images for most application scenarios and should therefore not be changed If you do wish to make changes your changes should be minor and gradual You should however set an image program according to the application scenario of the camera Image prog...

Page 131: ...orm of action profiles The different action profiles can also be defined in the following areas Admin Menu in the Hardware Configuration profiles for signal output Transfer Profiles FTP e mail network messages and Sound and VoIP Telephony sound profiles VoIP profiles For more information refer to the online help for the Action Group Overview dialog box Activate shock detector The D25M is also equi...

Page 132: ...rity reasons it is highly recommended to change the default administrator password after the camera has been properly configured Enter the user name and password exactly as shown above Note that all entries are case sensitive Caution Make sure that you store information on user names and passwords in a secure place If you lose the administrator password and cannot access the Administration menu th...

Page 133: ...on as the motion detection window detects movements 3 7 7 Deactivating Text And Logo Options As camera arming is deactivated in the camera s default configuration see preceding section the MOBOTIX camera only displays the text www mobotix com the time stamp and the MOBOTIX logo at the top of the image Once the camera arming has been acti vated the text at the bottom of the live image event action ...

Page 134: ... sound recording You must comply with all data protection regulations for video and sound monitoring when using MOBOTIX products Depending on national laws and the installation location of the D25M the recording of video and sound data may be subject to special documentation or it may be prohibited All users of MOBOTIX products are therefore required to familiarize themselves with all valid regula...

Page 135: ...ea of the image sensor can get quite hot especially when the ambient temperature is also high This does not affect the proper functioning of the camera in any way For this reason the product must not be installed within the reach of persons without the dome Only exchange sensor module when powered off Make sure the power supply to the camera is disconnected before installing or replacing sensor mo...

Page 136: ...ispose of MOBOTIX products at the end of their service life in accor dance with all legal requirements and regulations or deposit these products at a munic ipal collection center MOBOTIX products may not be disposed of with household waste If the product contains a battery please dispose of the battery separately the correspond ing product manuals contain specific directions if the product contain...

Page 137: ...137 140 Additional Notes MOBOTIX AG Security Vision Systems Made in Germany www mobotix com sales mobotix com Notes ...

Page 138: ...138 140 D25M Camera Manual MOBOTIX AG Security Vision Systems Made in Germany www mobotix com sales mobotix com Notes ...

Page 139: ... Board MOBOTIX AG Dr Magnus Ekerot Kaiserstrasse 67722 Langmeil Germany Registration Office Kaiserslautern Local Court Germany Registration Number HRB 3724 Tel 49 6302 9816 103 Tax Code 44 676 0700 4 Fax 49 6302 9816 190 TaxOffice Worms Kirchheimbolanden Germany http www mobotix com VAT ID sales mobotix com DE202203501 You can find the latest version of this and other documents e g declarations of...

Page 140: ...video systems cost efficient MOBOTIX AG D 67722 Langmeil Tel 49 6302 9816 103 Fax 49 6302 9816 190 info mobotix com O u t d o o r W a l l M o u n t O n W a l l S e t 0 O n W a l l S e t 1 0 I n C e i l i n g S e t V a n d a l i s m S e t Fits In Watches Out The D25M MonoDome camera adapts perfectly to any task Exchangeable lenses various mounting and configuration options including Vandalism Set s...

Reviews: