background image

Mobilex A/S

Grønlandsvej 5
DK-8660 Skanderborg

www.mobilex.dk

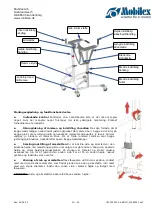
Adjusting the handles position

To adjust the angle

 of handle loosen the knob located at the pivoting point, 

set the desired angle and tie tie the knob. Repeat above steps for the second 
handle.

To adjust the length

  of the handle press the pin button located under the 

arm support and slide the handle to the desired position. Let the pin button to 
“catch” the hole located the nearest to desired position. That will lock handle 
in place.

NOTE


!


  We recommend that both handles should be adjusted to the same 

length   and   angle,   unless   there   are   important   therapeutic   reasons   to   do 
differently.

Using of the elevable safety back bars.

 Safety back bars are designed to 

protect user against tipping to the back and falling of the device. For the user 
to get in to the device, back bars should be lifted up by pressing the push 
buttons lock located under the arm supports and pulling them up. When user 
is placed in the device the back bars should be lowered to horizontal position 
and locked. 

WARNING


!


 It is essential for user safety, that safety back bars are always lowered and locked in flat 

position always when there is user in the device. The safety back bars should be unlocked and lifted 
only when user enters or leaves the device.
 

Using the of the supporting seat belt.

 Seat belt is adjustable in length and attached to the frame 

with four quick release buckles. When user suppose tu enter in to the device release 2 rear buckles of 
the belt, so the belt would hang on the 2 front buckles. Lead two loose rear ends of the belt between 
user's legs and lock the 2 released buckle when user is already in the device and safety back-bars are 
lowered and locked. If it is necessary adjust the length of the belt by shortening or extending 4 tails of  
the belt. 

NOTE


!


 All belt's tails should be adjusted to approximate same length. 

NOTE


!


  Correct   seating   belt   length   is   achieved   when   the   middle   (sitting)   part   of   the   belt   is   right 

between user's legs, about 3-4 cm below user's crotch. User should not seat on the belt at all times 
during walking. The belt is a safety feature to be used only in the situation of user's exhaustion. 

WARNING


!


  Do not remove the belt when user is in the device. The belt must always be in closed 

position when the device is in use!  Otherwise the user may fall down and get injured.

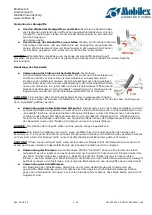
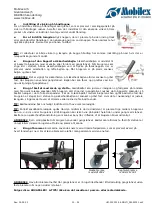
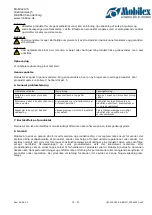
Using of the brakes.

 The brakes are easily engaged by depressing with a foot the pedal located on 

top of each castor wheel. To unlock the brake pedal should be lifted with your toes.

Brake lever on model 313002

Rear brake

on model 313002

Rear brake with pedal

and sliding brake

on model 312001

WARNING


!


 Always engage brakes when the device is used in stationary position! Never leave device without 

breaks engaged when there is someone sitting in it!

Rev. 29.09.21

 16 - 24

UM-313001-04-MULTI_29092021.odt

bremsen

feststellen

feststellen

lösen

Summary of Contents for DYNAWALK 313002

Page 1: ...nd Gebrauchsanleitung Montage og brugervejledning User Manual Manuale d uso e manutenzione Mobilex A S Gr nlandsvej 5 DK 8660 Skanderborg www mobilex dk Model 313002 Brake lever on handle Model Brake...

Page 2: ...Indholdsfortegnelse Table of content Indice Montage und Gebrauchsanleitung 3 8 DEUTSCH Montage og brugervejledning 9 13 DANSK User Manual 14 18 ENGLISH Manuale d uso e manutenzione 19 23 ITALIANO Dec...

Page 3: ...hinweise Benutzen Sie das Produkt nur im einwandfreien technischen Zustand Falls Sie irgendwelche Besch digungen oder Fehler am Produkt vorfinden kontaktieren Sie bitte unverz glich Ihren H ndler Beac...

Page 4: ...wieder und achten darauf dass die Noppen des linken und rechten Clips an der gew nschten H he in den Einstelll chern einrasten C Ziehen Sie die Handschraube der Verbindungsstrebe D wieder an Anschlie...

Page 5: ...tellbar und mit 4 Schnellverschl ssen ausgestattet so dass man sie einfach abnehmen kann Vor dem Einsteigen in den DynaWalk l sen Sie die beiden hinteren Schnellverschl sse so dass der Sitzgurt nur an...

Page 6: ...n Sie hnlich vor wie bei der Breiteneinstellung siehe Seite 3 ffnen Sie die Handschraube an der Verbindungsstrebe D und die Clips an der oberen Verbindung des Rahmenkreuzes A Nun k nnen Sie das Produk...

Page 7: ...d empfohlen die R der mit warmem Wasser und einem milden Reinigungsmittel zu reinigen Schmieren Sie auch die Lager indem Sie von Zeit zu Zeit oder wenn die R der zu quietschen beginnen ein Schmiermitt...

Page 8: ...ht mit dem Hausm ll entsorgt werden sondern muss zur lokalen M llentsorgungsstelle gebracht werden 8 Garantie Mobilex A S bietet 2 Jahre Garantie auf Sch den die durch Produktionsfehler oder Materialf...

Page 9: ...e l ngere anvendes F lg informationerne p produktlabel Benyt kun produktet til det oplyste form l Der m ikke laves konstruktive ndringer p produktet uden producentens skriftlige tilladelse Ved de fors...

Page 10: ...side og armst tten i den nskede h jde lad tv rstangen glide i det valgte hul p rammen V lg den nskede h jde og stram h jdejusteringsgrebet s stangen er fikseret og stabil Gentag ovenn vnte trin for at...

Page 11: ...k release sp nder N r brugeren skal stige ind i gangstativet l snes de to bagerste sp nder s b ltet h nger i de to forreste sp nder F r de to l se b lter mellem brugerens ben og l s b lterne fast n r...

Page 12: ...anbefaler vi at f lgende kontrolleres og udf res Reng ring og desinficering af produktet Ramme produkt tjekkes for sk vheder og tegn p brud Sliddele kontrolleres og skiftes hvis n dvendigt Generel eft...

Page 13: ...er er forkert indstillet Kontroller hvordan bremserne er indstillet udskift evt bremseklodser servicev rksted S det g r ikke rigtigt i hak ved udklapning L seanordningen er forkert indstillet eller de...

Page 14: ...described purpose Avoid making constructive changes on the device unless you have the manufacturer s written acceptance for such modifications During different adjustments which are possible on the de...

Page 15: ...Choose the desired height of the support and tie the height adjustment knob so the support is fixed and stable Repeat above steps to fix the support on the second side of the device If you want to cha...

Page 16: ...table in length and attached to the frame with four quick release buckles When user suppose tu enter in to the device release 2 rear buckles of the belt so the belt would hang on the 2 front buckles L...

Page 17: ...d the use of resistant materials the product is subject to wear It is therefore recommended to check the product at regular intervals by a professional service We recommend the following to be checked...

Page 18: ...ork or work only in one side The brake shoes are worn or the brakes are not adjusted correctly Adjust the brakes Replace the brake shoes if needed service centre The seat does not fit in when the roll...

Page 19: ...ditore di fiducia annotare le informazioni sull etichetta del prodotto utilizzare il prodotto solo per l uso consentito date le varie possibilit di regolazione offerte dall apparecchio l utente dovr p...

Page 20: ...due poggiagomiti devono essere sempre regolati alla stessa altezza NOTA Per regolare la larghezza del deambulatore o per chiuderlo deve essere sempre allentata la manopola sulla barra di congiunzione...

Page 21: ...e chiudetele congiungendo le serrature automatiche Regolate l altezza dell imbragatura NOTA Le 4 cinghie dell imbragatura devono essere regolati alla stessa altezza NOTA Una corretta lunghezza delle...

Page 22: ...tto Vita utile consigliata massimo 10 anni a seconda dell uso Pulizia delle ruote Si raccomanda di pulire le ruote in acqua calda con un detergente delicato Lubrificare i cuscinetti con olio periodica...

Page 23: ...i bloccaggio regolata male o difettosa Controllare o sostituire il sistema di bloccaggio seduta centro d assistenza 7 Smaltimento del prodotto Il prodotto non pu essere smaltito insieme ai rifiuti dom...

Page 24: ...alizer Walking Frame 313001 313002 Harmonized norms used during conformity estimation PN EN ISO 11199 2005 EN ISO 14971 2012 EN 1041 2009 EU2017 745 for Medical Equipment ber Medizinprodukte for medic...

Reviews: