


MKS MultiGas High-Speed Gas Sampling Cart
Preparation
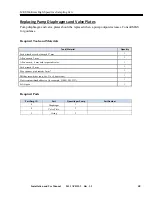
Always replace the valve plates and diaphragm together to maintain the pump performance
WARNING: CHEMICAL HAZARD!
The pump components may contain chemical residues. Always wear appropriate personal
protective clothing including gloves, clothing, and respiratory protection as designated by your
on-site safety manager.
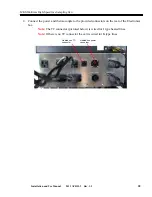
1.
Loosen the screws on the upper side of the pump-head insulation and lift off the cover plate.
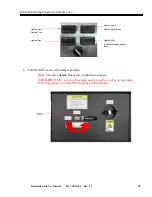
2.
Loosen screws on the lower side of the pump-head insulation
.
Removing the pump head
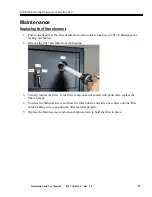
1.
Mark the installation position for the head plate (
3
) (felt pen line in direction of motor).
2.
Release the screws (
1
) and remove them together with the disk springs (
2
).
3.
Grasp head plate (
3
) by threaded adapters and lift off, together with pump-head insulation.
The pump head insulation must be removed carefully to prevent damage to any components
and electrical wires.
4.
Mark the installation position of the carrier (
12
) with respect to the intermediate plate (
6
) with
a continuous felt pen line.
5.
Remove intermediate plate (
6
).
CAUTION
: Set down the intermediate plate carefully to avoid damaging its sealing edge.
Changing diaphragms
1.
Use a face spanner to loosen the retainer plate (
7
) in a counterclockwise direction while
counter-holding the conrod extension (
11
) with 19-mm open-end wrench. Remove retainer
plate.
2.
Carefully remove diaphragm (
8
).
3.
Remove diaphragm support (
9
).
CAUTION!
Make sure diaphragm spacer(s) (
10
) under the diaphragm support do not fall into the
crankcase housing.
4.
Remove diaphragm spacer(s) (
10
) from conrod extension (
11
) and retain them.
5.
Slide new diaphragm (
8
) and diaphragm support (
9
) onto the retainer plate’s (
7
) threaded stud.
6.
Replace the previously removed diaphragm spacer(s)
(10)
on the threaded stud of the retainer
plate
(7)
.
7.
Apply a small amount of heat-resistant thread adhesive (such as DELO ML 5327) to the
threads of the retainer plate (
7
).
8.
Screw retainer plate (
7
) with diaphragm (
8
) into connecting-rod extension (
11
) and tighten
with face spanner while counterholding conrod extension (
11
).
Installation and Use Manual 2011 APRIL 2 Rev. 1.5
42


