background image

2-30   

Confirming the operation

2 Unpacking to Installation

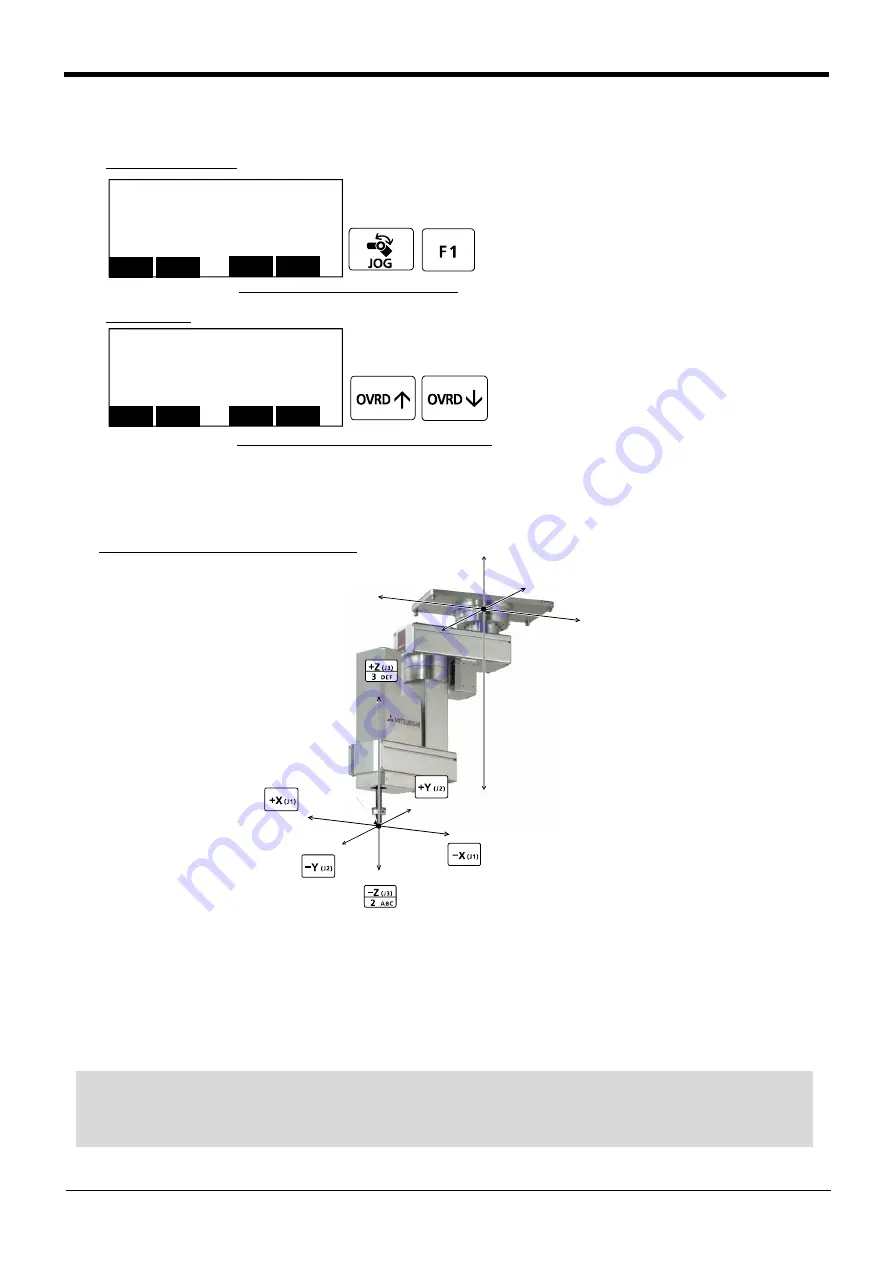
(2) XYZ jog operation

[JOG] Press the key and display the jog screen. 
("JOG" is displayed on the screen bottom)
Check that the "XYZ" in jog mode is displayed on 
the screen.  
If other jog modes are displayed, please press the 
function key corresponding to the "XYZ." (If the 
jog mode which he wishes under the screen is not 
displayed, it is displayed that the [FUNCTION] 
key is pressed) 
If it finishes jog operation, press the [JOG] key 
again, or function key which correspond to 
"close."
Whenever it presses the key of [OVRD ↑ ], the 
override goes up. Conversely, if the [OVRD ↓ ] 
key is pressed, it will go down.  
The current setting speed is displayed on screen 
upper right, and "STATUS NUMBER" of the 
controller.
Set the override to 10% here for confirmation 
work

・ When the [+X (J1)] keys are pressed, the robot will move along the X axis plus direction. 

When the [-X (J1)] keys are pressed, Move along the minus direction.

・ When the [+Y (J2)] keys are pressed, the robot will move along the Y axis plus direction. 

When the [-Y (J2)] keys are pressed, Move along the minus direction.

・ When the [+Z (J3)] keys are pressed, the robot will move along the Z axis plus direction. 

When the [-Z (J3)] keys are pressed, Move along the minus direction.

Select XYZ jog mode

Set jog speed

Setting the speed                                     

XYZ jog mode                                      

<CURRENT>    JOINT       100%  M1  T0  

 J1:   +0.00        J5:   +0.00
 J2:   +0.00        J6:   +0.00

 J3:  +90.00          :

 J4:   +0.00          :

CYLNDR

JOG

TOOL

XYZ

 3-XYZ

<CURRENT>    JOINT       100%  M1  T0  

 J1:   +0.00        J5:   +0.00
 J2:   +0.00        J6:   +0.00

 J3:  +90.00          :

 J4:   +0.00          :

CYLNDR

JOG

TOOL

XYZ

 3-XYZ

+X

-X

+Z

+Y

-Z

-Y

先端軸

-X

+Y

+X

+Z

-Z

-Y

Moving along the base coordinate system

◇◆◇ When the robot is in the transportation posture ◇◆◇

There are directions from which linear movement is not possible from the transportation posture. In this case, the 
robot will not move. Refer to section 

Page 28, "(1) JOINT jog operation"

", and move the robot to a position where 

linear movement is possible, and then carry out XYZ jog.

Summary of Contents for RH-3SQHR3515

Page 1: ...Mitsubishi Industrial Robot RH 3SQHR3515 INSTRUCTION MANUAL ROBOT ARM SETUP MAINTENANCE BFP A8840 C ...

Page 2: ......

Page 3: ...s on the start switch etc This also applies to maintenance work with the power source turned ON Indication of teaching work in progress Provide a fence or enclosure during operation to prevent contact of the operator and robot Installation of safety fence Establish a set signaling method to the related operators for starting work and follow this method Signaling of operation start As a principle t...

Page 4: ...e this could lead to malfunctioning by noise or to electric shock accidents Indicate the operation state during robot operation Failure to indicate the state could lead to operators approaching the robot or to incorrect operation When carrying out teaching work in the robot s movement range always secure the priority right for the robot control Failure to observe this could lead to personal injuri...

Page 5: ...r is turned off while in automatic operation or rewriting the program or parameters the internal information of the robot controller may be damaged Use the network equipments personal computer USB hub LAN hub etc confirmed by manufacturer The thing unsuitable for the FA environment related with conformity temperature or noise exists in the equipments connected to USB RS 232 or LAN When using netwo...

Page 6: ...with specified speed Especially as for the corner section short cut distance may change Therefore when beginning automatic operation moves at low speed at first and you should gather speed slowly with being careful of interference with peripheral equipment 2 It can be confirmed whether the specified position exist in the defined area by using the instruction command ZONE It can utilize as one of t...

Page 7: ...re number in 3 1 Installing the solenoid valve set 2011 02 02 BFP A8840 B The note of installing the hand input cable was added The precautions about interference of the ball screw shaft RH 3S HR and the movement locus were added 2011 05 09 BFP A8840 C The note of the cover installation screw was added The caution at installing and removing of the machine cable was added ...

Page 8: ...base section is necessary Please prepare the environment which can access the robot with the stepladder etc in RH 3SQHR The contents of this manual correspond to the following robot types Type RH 3SQHR3515 No part of this manual may be reproduced by any means or in any form without prior consent from Mitsubishi The details of this manual are subject to change without notice The information contain...

Page 9: ...ut method 2 19 1 Confirming the origin data 2 19 2 Turning ON the control power 2 19 3 Preparing the T B 2 20 4 Selecting the origin setting method 2 21 5 Inputting the origin data 2 22 6 Installing the base cover B L 2 23 2 5 Confirming the operation 2 24 1 JOINT jog operation 2 28 2 XYZ jog operation 2 30 3 TOOL jog operation 2 32 4 3 axis XYZ jog operation 2 34 5 CYLNDER jog operation 2 36 6 Wo...

Page 10: ...battery 5 76 1 Replacing the robot arm battery 5 77 5 4 About Overhaul 5 78 5 5 Maintenance parts 5 79 5 6 Resetting the origin 5 80 5 6 1 Mechanical stopper method 5 81 1 J1 axis origin setting mechanical stopper 5 81 2 J2 axis origin setting mechanical stopper 5 83 3 J3 and J4 axis origin setting mechanical stopper 5 85 4 All axis origin setting 5 88 5 6 2 Jig method 5 89 1 J1 axis origin settin...

Page 11: ...ned Explains the procedures required to operate the robot arm unpacking transportation installation confirmation of operation and the maintenance and inspection procedures Explains the procedures required to operate the controller unpacking transportation installation confirmation of operation basic operation from creating the program to auto matic operation and the maintenance and inspection proc...

Page 12: ...inology Item Symbol Meaning Item The Robot controller or the Controller Indicates the controller which controls the robot arm Indicates the box which arranged control parts such as robot CPU servo amplifier and the safety circuit Symbol Precaution indicating cases where there is a risk of operator fatality or serious injury if handling is mistaken Always observe these precautions to safely use the...

Page 13: ...ng work This also applies to maintenance work with the power source turned ON Setting of emergency stop switch During teaching work place a sign indicating that teaching work is in progress on the start switch etc This also applies to maintenance work with the power source turned ON Indication of teaching work in progress Provide a fence or enclosure during operation to prevent contact of the oper...

Page 14: ...njuries or damage if the object comes off or flies off during operation Securely ground the robot and controller Failure to observe this could lead to malfunctioning by noise or to electric shock accidents Indicate the operation state during robot operation Failure to indicate the state could lead to operators approaching the robot or to incorrect operation When carrying out teaching work in the r...

Page 15: ...tic operation or rewriting the program or parameters the internal information of the robot controller may be damaged When the SSCNETIII cable is removed install the cap in the connector If the cap is not installed there is a possibility of malfunctioning by adhesion of the dust etc Don t remove the SSCNETIII cable when the power supply of the robot controller is turned on Don t face squarely the l...

Page 16: ...astic bag of attachment in the robot arm Note2 The numbers 8 and 9 are installed in the robot arm No Part name Type Qty Remarks 1 Robot arm R 1 unit 2 Guarantee card 1 copy 3 Installation bolts M8 90 4 pcs For robot arm installation 4 Installation bolts Spare M8 40 4 pcs 5 Installation nut M8 4 pcs 6 Spring washer for installation bolts For M8 8 pcs 7 Plain washer for installation bolts For M8 8 p...

Page 17: ... material 5 and remove packing material 4 Unpacking is complete above Unpacking the robot with hoisting Utilize the hanging tools two places 4 of the robot arm Please unpack near the installation place 5 Packing material Cut the tape Hang the hook of the crane Completion Robot arm base section 2 Upper cover Remove the upper cover Remove the packing material Open the vinyl Hoist with crane and remo...

Page 18: ... bolts 9 attached certainly to installation stage 8 3 Remove hanging tools two places 4 after installation Loosen the screw M5 x 4 M4x1 fixing the fixing plate 7 and remove the fixing plate 7 Also remove the nut for T slots Fixing plate 7 and fixing screws and hanging tools 4 are needed at secondary transportation Please keep them with care Transportation is complete above The transportation postu...

Page 19: ...viation could occur when the robot moves 4 When installing use a common table to prevent the position of the devices and jigs subject to robot work from deviating 5 The installation surface must have sufficient strength to withstand the arm reaction during operation and resistance against deformation and vibration caused by the static dynamic load of the robot arm and peripheral devices etc 据付架台 例...

Page 20: ...ximum reaction force design values that may be applied to an installation stand Please use these values as reference when designing the installation stand Table 2 3 Magnitude of each reaction force Secure the maintenance space necessary at rear for connection of the machine cable and at side for replacement of the backup battery Unit Value Tilt moment ML N m 380 Torsional moment MT N m 410 Horizon...

Page 21: ...e grounding point should be as close to the robot arm and controller as possi ble and the length of the grounding wire should be short Fig 2 4 Grounding methods 2 Grounding procedures 1 Prepare the grounding cable AWG 11 3 5mm2 or more and robot side installation screw and washer 2 If there is rust or paint on the grounding screw section A remove it with a file etc 3 Connect the grounding cable to...

Page 22: ...tor on the machine cable side to the rear of the projection of the robot arm connector to fix securely in place 4 To remove the cable insert a minus screwdriver into the hook while padding with a cloth and remove the cable by lifting the hook ロボット本体ベース部 ロボットコントローラ CN2用 モータ信号ケーブル 7m モータ電源ケーブル 7m CN1用 CN1 CN2 CN2 CN1 Drive unit DU2A 700 Robot arm base section Motor signal cable 7m Motor power cable ...

Page 23: ...tion Take special care to the leading of the connection cable If the cable is pulled with force or bent excessively wires could break or the connector could be damaged Connect the machine cable at the place without the effect of the dust or oil mist Please keep the dust and oil mist from being applied to of the robot arm connector section in the condition that the machine cable is removed Since it...

Page 24: ...arm cover 3 Confirm spare wiring ADD 4 Remove either one grommet on the No 2 arm cover 5 Install the connector after letting the cable for spare wiring connection of customer preparation pass to the cable clamp 6 Fixing the cable clamp securely to the hole which removed the grommet 7 Connect the cable for spare wiring connection to the spare wiring 8 Install the No 2 arm cover as before Be careful...

Page 25: ... load is added the breaking of a wire and the air hose break and the robot cannot operate normally When No 2 arm cover is installed catch neither the cable nor the air hose If the bolt is tightened while it had been caught the breaking of a wire and the air hose break and the robot cannot operate normally CAUTION 正常な状態 折れた状態 エアホース Normal condition abnormal condition Air hose CAUTION ...

Page 26: ...ngth is necessary cut the cable tie 5 Remove the grommet on the base 6 Install the connector after letting the cable for spare wiring connection of customer preparation pass to the cable clamp 7 Fixing the cable clamp securely to the hole which removed the grommet 8 Connect the cable for spare wiring connection to the spare wiring 9 Install the base cover B L as before Be careful not to catch any ...

Page 27: ... load is added the breaking of a wire and the air hose break and the robot cannot operate normally When base cover B R is installed catch neither the cable nor the air hose If the bolt is tightened while it had been caught the breaking of a wire and the air hose break and the robot cannot operate normally CAUTION 正常な状態 折れた状態 エアホース Normal condition abnormal condition Air hose CAUTION ...

Page 28: ...the dummy connector or draw it out Please do not pull the cable of T B strongly or do not bend it too much It becomes the breaking of a wire of the cable and the cause of breakage of the connector Please installing and removing so that stress does not start the cable with the connector itself Explain the installation method of T B below 1 Check that the POWER power supply switch of the robot contr...

Page 29: ...ound on also the robot examination report sheet Always install remove the cover with the controller control power turned OFF Failure to do so could lead to physical damage or personal injury should the robot start moving due to incorrect operations 2 Turning ON the control power Confirm that there are no operators near the robot before turning the power ON 1 Turn the controller POWER switch ON The...

Page 30: ... The following operations are carried out with the T B MODE MANUAL AUTOMATIC 下 ENABLE ランプ点灯 上 DISABLE T B背面 Up Disable Down Enable Lighting Operating from the T B Always set the MODE switch mode selection key switch on the front of the controller to MAMNUAL and then set the T B ENABLE switch to ENABLE When the T B is valid only operations from the T B are possible Operations from the controller or...

Page 31: ... BRK 5 SET INIT 6 ENHANCED CLOSE 123 ORIGIN BRAKE 1 ORIGIN 2 BRAKE CLOSE 123 ORIGIN 1 DATA 2 MECH 3 TOOL 4 ABS 5 USER CLOSE 123 ORIGIN DATA D J1 J2 J3 J4 J5 J6 J7 J8 CLOSE 123 Selecting a menu The menu can be selected with one of the following methods A Press the numeral key for the No of the item to be selected B Using the and keys etc move the cursor to the item to be selected and then press the...

Page 32: ... the key five times will be set Press the key once and advance the cursor Press the key twice input and press the PQRS key four times input S Press the CHARACTER key and set to the numeral input mode Condition that 123 was displayed under the screen Press the 2 key input 2 and press the 9 key input 9 V S29 will appear at the D data on the teaching pendant screen 3 Press the key and move the cursor...

Page 33: ... operations or to physical damage or personal injury ORIGIN DATA D V S29 J1 06DTYY J2 2 HL9X J3 1CP55V J4 T6 MSY J5 Z21J Z J6 A12 Z0 J7 J8 CLOSE ABC ORIGIN DATA CHANGE TO ORIGIN OK No 123 Yes Moving the cursor Press the and keys Inputting characters Press the CHARACTER key and set to the character input mode Condition that ABC was displayed under the screen The displayed character is scrolled each...

Page 34: ...re no operators near the robot and that there are no obstacles such as tools in the robot operation range To immediately stop the robot release the deadman switch on the back of the T B The servo power will turn OFF and the robot will stop The robot will also stop if the EMG STOP switch emergency stop switch on the front of the T B or the EMG STOP switch emergency stop on the front of the controll...

Page 35: ...es straight along the base coordinate system Also while maintaining the end axis position the end axis posture changes Base coordinate system reference orgin End axis 先端軸 シール座標原点 Z Z X Y Y C X While maintaining the end axis posture the axis moves straight along the tool coordinate system Also while maintaining the end axis position the end axis posture changes End axis Tool coordinate reference or...

Page 36: ...xis posture is not maintained Also the end axis posture changes Base coordinate system reference orgin End axis X X Y Y Z Z 半径 円弧 C 上下 The current position is set as the arc centering on the Z axis and the axis moves along that arc expands and contracts in the radius direction and moves vertically At this time the end axis posture is maintained Also while maintaining the axis posture position the ...

Page 37: ... jog operation X X Y Y Z Z ツール長 Z Z Zw Zw Xw Xw Yw Yw WORK coordinate system Controll point Tool length While maintaining the end axis posture the axis moves straight along the work coordinate system Also while maintaining the end axis position the end axis posture changes ...

Page 38: ...ver it presses the key of OVRD the override goes up Conversely if the OVRD key is pressed it will go down The current setting speed is displayed on screen upper right and STATUS NUMBER of the controller Set the override to 10 here for confirmation work When the X J1 keys are pressed the J1 axis will rotate in the plus direction When the X J1 keys are pressed Rotate in the minus direction Select jo...

Page 39: ...eys are pressed the J4 axis will rotate in the plus direction When the A J4 keys are pressed Rotate in the minus direction When the robot is in the transportation posture The axes may be outside the movement area Move these axes toward the inner side of the movement area J3軸 J3 axis jog operation J3 axis J4軸回転 J4 axis jog J3 axis If the buzzer of T B sounds and the robot does not move If it is goi...

Page 40: ...g the X axis plus direction When the X J1 keys are pressed Move along the minus direction When the Y J2 keys are pressed the robot will move along the Y axis plus direction When the Y J2 keys are pressed Move along the minus direction When the Z J3 keys are pressed the robot will move along the Z axis plus direction When the Z J3 keys are pressed Move along the minus direction Select XYZ jog mode ...

Page 41: ... the robot does not move In this case please move to the counter direction X X Z Y Z Y 先端軸 X Y X Z Z Y C Changing the end axis posture When alarm No 5150 occurs If alarm No 5150 ORIGIN NOT SET occurs the origin has not been set correctly Reconfirm the value input for the origin data Tool length The default tool length is 0mm and the control point is the center of the end axis After installing the ...

Page 42: ...he controller Set the override to 10 here for confirmation work When the X J1 keys are pressed the robot will move along the X axis plus direction of the tool coordinate system When the X J1 keys are pressed Move along the minus direction When the Y J2 keys are pressed the robot will move along the Y axis plus direction of the tool coordinate system When the Y J2 keys are pressed Move along the mi...

Page 43: ...out XYZ jog If the buzzer of T B sounds and the robot does not move If it is going to move the robot across the operation range the buzzer of T B sounds and the robot does not move In this case please move to the counter direction 先端軸 シール座標原点 X Y X Z Z Y C Changing the end axis posture The Position of the end axis will not change When alarm No 5150 occurs If alarm No 5150 ORIGIN NOT SET occurs the...

Page 44: ...ght and STATUS NUMBER of the controller Set the override to 10 here for confirmation work When the X J1 keys are pressed the robot will move along the X axis plus direction When the X J1 keys are pressed Move along the minus direction When the Y J2 keys are pressed the robot will move along the Y axis plus direction When the Y J2 keys are pressed Move along the minus direction When the Z J3 keys a...

Page 45: ... the minus direction The flange surface end axis posture cannot be maintained with 3 axis XYZ jog With 3 axis XYZ jog the flange surface end axis posture orientation is not maintained when moving linearly in the X Y or Z axis direction Use XYZ jog to maintain the posture X X Z Y Z Y 先端軸 X Y X Z Z Y J4 The Position of the end axis will not change Changing the end axis posture ...

Page 46: ...re for confirmation work Assuming that the current position is on an arc centering on the Z axis the robot moves along that arc When the X J1 keys are pressed the robot will expand in the radial direction When the X J1 keys are pressed Contract in the radial direction When the Y J2 keys are pressed the robot will move along the arc in the plus direction When the Y J2 keys are pressed Move in the m...

Page 47: ...e operation 2 37 When the C J6 keys are pressed The Z axis will rotate in the plus direction When the C J6 keys are pressed Rotates in the minus direction X X Z Y Z Y 上下 半径 円弧 C The position of the end axis will not change Vertical Radius Arc ...

Page 48: ... versions T B Ver 1 3 or later SQ series N8 or later SD series P8 or later The work coordinates system teaches and sets up the three points WO WX WY Fig 2 18 Setting of the work coordinates system teaching point The setting definition method of the work coordinates system is shown in the following Zw Xw Yw Z Y X Teaching point WO Work coordinates system origin WX Position on the X axis of work coo...

Page 49: ...n screen is displayed MENU 1 FILE EDIT 2 RUN 3 PARAM 4 ORIGIN BRK 5 SET INIT 6 ENHANCED CLOSE 123 EMHANCED 1 SQ DIRECT 2 WORK COORD CLOSE 123 The screen shows the coordinate value of the origin WO of the work coordinates number 1 EMHANCED 1 SQ DIRECT 2 WORK COORD CLOSE 123 WORK COORD WORK NUMBER 1 TEACHING POINT WO X 0 00 Y 0 00 Z 0 00 123 TEACH WX WY DEFINE WORK COORD WORK NUMBER 1 TEACHING POINT...

Page 50: ...d re teach the three points This work coordinate data is registered into parameter WKnCORD n means the work coordinates numbers 1 8 If the function key corresponding to CLOSE is pressed it will return to the previous screen 6 Finishing of setting the work coordinates Press the FUNCTION keys and display CLOSE function Press the function key corresponding to CLOSE Returns to the MENU screen WORK COO...

Page 51: ...ays confirm that the number of the target work coordinates system is displayed correctly Display of W1 W8 at the upper right of the screen If mistaken the robot will move in the direction which is not meant and will cause the damage and the personal injuries Whenever it presses the key of OVRD Upper arrow the override goes up Conversely if the OVRD Lower arrow key is pressed it will go down The cu...

Page 52: ...oordinates system When the Y J2 keys are pressed Move along the minus direction When the Z J3 keys are pressed the robot will move along the Z axis plus direction on the work coordinates system When the Z J3 keys are pressed Move along the minus direction X X Z Y Z Y ツール長 Z Z Zw Zw Xw Xw Yw Yw Controll point Work coordinates system The direction of the end axis will not change Move the control poi...

Page 53: ...vement is not possible from the transportation posture In this case the robot will not move Refer to section Page 28 1 JOINT jog operation and move the robot to a position where linear movement is possible and then carry out XYZ jog If the buzzer of T B sounds and the robot does not move If it is going to move the robot across the operation range the buzzer of T B sounds and the robot does not mov...

Page 54: ...ut cable GR2 5 Hand output cable Robot arm side A port B port 4 Hand output cable GR1 Primary piping air hose φ6 x 2 Secondary piping air coupling φ4 x 4 Secondary piping air hose Customer preparation Customer preparation hose φ4 x 4 Hand output signal connector Secondary piping air coupling φ4 x 4 Connect the hand tube optional Secondary piping air hose Customer preparation hose φ4 x 4 Primary pi...

Page 55: ...g down Fig 3 2 Storing of the hand output cable 5 Install the No 2 arm cover 3 and the arm cover A 2 13 as before Be careful not to catch any the cables 6 Connect primary air piping with the two φ6 air hoses customer preparation Connect between the R port 6 of the solenoid valve set and the RETUEN 8 on No 2 arm cover and between P port 7 and AIROUT 9 7 Connect secondary air piping with the φ4 air ...

Page 56: ...connection correspondence after installation is as shown in Table 3 1 1 Nylon clamp Screw 2 M5 and nut for T slots Air hose for secondary piping customer preparation Air hose for secondary piping customer preparation Solenoid valve set option 1 Fixing the air hose customer preparation using the T slot by nylon clamp etc ...

Page 57: ...3 47 Table 3 1 Solenoid valve ports and hoses Correspondence of couplings and hand ports Hand Hand port Solenoid valve port Solenoid valve used Hand 1 OPEN 1 1 st row CLOSE 2 Hand 2 OPEN 3 2 nd row CLOSE 4 Hand 3 OPEN 5 3 rd row CLOSE 6 Hand 4 OPEN 7 4 th row CLOSE 8 ...

Page 58: ... Fig 3 4 Installation of the hand tube The procedure is shown below 1 Motor cover J3 Hand tube 3 Piping fixing bracket The grease is applied 2 Secondary piping air coupling φ4 x 4 places Insert the union installation side 4 Shaft The grease is applied 5 Fixing place two places Rubber sheet cable tie 1 The position of the J3 axis and the J4 axis J3 upper end J4 0 degree 1 Adjustment of the fixing p...

Page 59: ...gree This position is adjustment basis for fixing hand tube The hand tube and the hand input cable having the mark at the position which rolls the rubber sheet The hand tube is the four places a b c and d sequentially from the union side The hand input cable is the four places a b c and d sequentially from the connector side Put together each mark and roll the attached rubber sheet Roll at two pla...

Page 60: ...he rubber sheet attachments in the same way and fix it by cable tie etc attachments with maintaining this adjustment position The example of the fixing method is shown in Fig 3 7 9 Remove the tape and connect the tool side Please utilize the attached union φ 4 to φ3 for optional if needed Note The grease is applied to hand tube contact places such as the inside of the shaft Please wipe off the gre...

Page 61: ...Installing the option devices Installation of hand tube 3 51 Fig 3 7 Tool side fixing image of hand tube example Metal plate for tool side fixing Tool Hand flange Union φ 4 to φ3 Nylon clamp Rubber sheet ...

Page 62: ...J4 motor by cable tie attachments as before Note Fixing the connector at flat surface on the J4 motor to make the connector parallel to the motor cover J3 1 6 Pass through the hand input cable into the shaft 4 along the piping fixing bracket 3 7 Fixing the hand input cable to the piping fixing bracket 3 with cable tie two places 5 attachment Fixing the cable from top of the rubber sheet that rolle...

Page 63: ... etc attachments with maintaining this adjustment position Fixing like the fixing method shown in Fig 3 7 10 Install motor cover J3 1 securely as before The grease is applied to hand input cable contact places such as the inside of the shaft Please wipe off the grease adhering to the hand input cable The installation of the hand input cable is completion above Fixing the hand input cable securely ...

Page 64: ...e of the three grommets on No 2 arm cover Install the cable clamp here 3 Remove the lock nut of attachment on the hand output cable and let the connector side of hand output cable with the cable clamp pass through the hole of No 2 arm cover Fixing securely with the lock nut removed 4 Connect the connector of hand output cable optional to the hand output cable connector GR1 GR2 3 of robot arm side ...

Page 65: ...will become the cause of breaking down Fig 3 10 Storing of the hand output cable 5 Install the No 2 arm cover 3 and arm cover A 2 4 as before Be careful not to catch any the cables 6 Connect to the solenoid valve of customer preparation the hand output cable taken out from No 2 arm cover 2 The installation of the hand output cable is completion above Bracket Cable should be stored in outside of th...

Page 66: ... B L and R with referring to the Page 65 5 3 2 Installing removing the cover 3 There is the pin cover at back in the base A of Fig 3 11 Two places Loosen the fixing screw and remove the two pin covers both Although the removed pin cover is unnecessary use the screw for fixing this option later 4 Move the J1 axis by jog operation Once turn ON the power supply of the drive unit Move the J1 axis 3 ti...

Page 67: ...value Press the JOG key of T B and display the current coordinate value Choose joint jog mode If the coordinate value of the J1 axis is nearly 90 degrees the mechanism stopper is installed correctly 10 Confirm the minus side in the same way If not installed correctly please reinstall the pin 11 Install the base cover B L and R as before 12 Setting the operation range parameter Turn on the power su...

Page 68: ...oint jog operation confirming the coordinate value of T B as follows Note This operation is necessary for position adjustment of the mechanism stopper Although it is not alteration visible especially performs sure Because to move correctly move at 10 or less speed a First move to 140 degree or more Note Arm cover A 1 side The hole for operating range change optional insertion plus side The hole fo...

Page 69: ...dinate value Choose joint jog mode If the coordinate value of the J2 axis is nearly 60 degrees the mechanism stopper is installed correctly 10 Confirm the minus side in the same way If not installed correctly please reinstall the pin 11 Install the arm cover A 1 as before 12 Setting the operation range parameter Turn on the power supply of the drive unit Parameter MEJAR Set 60 and 60 as the 3rd el...

Page 70: ...ions 4 Basic operations The basic operations from creating the program to automatic operation are explained in section 4 Basic operations in the From Controller Setup to Maintenance manual Refer that manual as necessary ...

Page 71: ...00 Hr operation hours Fig 5 1 Inspection schedule 0 Hr Daily inspection Monthly inspection Monthly inspection 500 Hr Monthly inspection 3 month inspection Monthly inspection Monthly inspection 1 000 Hr Monthly inspection 3 month inspection 6 month inspection Monthly inspection Monthly inspection 1 500 Hr Monthly inspection 3 month inspection Monthly inspection Monthly inspection 2 000 Hr Monthly i...

Page 72: ... connect 6 Are there any cracks foreign contamination or obstacles on the robot and controller cover Replace with a new part or take remedial measures 7 Is any grease leaking from the robot arm Visual After cleaning replenish the grease 8 Is there any abnormality in the pneumatic system Are there any air leaks drain clogging or hose damage Is the air source normal Visual Drain the drainage and rem...

Page 73: ...tact the Mitsubishi Service Department 3 month inspection items 1 Is the timing belt tension abnormal If the timing belt is loose or too tense adjust it 2 Is there any grease of the shaft section still Wipe off the old grease and supply the new grease 6 month inspection items 1 Is the friction at the timing belt teeth severe If the teeth are missing or severe friction is found replace the timing b...

Page 74: ...on of the J1 axis motor 1 arranged in the base is conveyed to the reduction gears 3 via the timing belt 2 to rotate the J1 axis Brakes are not mounted in the J1 axis motor 2 The rotation of the J2 axis motor 4 arranged in the No 1 arm is conveyed to the reduction gears 6 via the timing belt 5 to rotate the J2 axis Brakes are not mounted in the J2 axis motor 3 The rotation of the J3 axis motor 7 ar...

Page 75: ...r A 1 Low head hexagon socket bolt M4 x 8 bolts four 5 No 1 Arm cover B Low head hexagon socket bolt M4 x 8 bolts four 6 Motor cover J2 Low head hexagon socket bolt M4 x 8 bolts four 7 Motor cover J3 Low head hexagon socket bolt M4 x 8 bolts four 8 Arm cover A 2 Low head hexagon socket bolt M4 x 8 bolts four 9 Arm cover A 3 Low head hexagon socket bolt M4 x 8 bolts four 10 No 2 Arm cover Low head ...

Page 76: ...the covers 2 The names of the covers are given in Table 5 3 and a list of the cover installation screws is given in Table 5 3 3 When installing the cover after maintenance and inspection use the procedure of removal in reverse Bolt the installation screw with the torque shown in Table 5 3 Note Please wipe off the grease which splashed from the ball screw spline at the time of maintenance inspec ti...

Page 77: ...n gauge in inspection and adjustment of the timing belt The recommendation gauge is shown below Please prepare by customer Refer to the Page 73 6 Timing belt tension for the tension adjustment value of the timing belt Maker Gates Unitta Asia Company Type U 505 1 Timing belt replacement period The timing belt life is greatly affected by the robot working conditions so a set time cannot be given How...

Page 78: ... nut which is fixing tension adjustment screw 3 is loosened turn tension adjustment screw 3 and adjust the tension of timing belt 2 When the screw is turned to the right the belt will be stretched and when turned to the left will loosen Lightly press the center of the belt A and confirm that the value of belt slack is in following RH 3SQHR3515 Force to press the belt apprpx 10N m Flexure approx 1 ...

Page 79: ... much 3 The nut which is fixing tension adjustment screw 3 is loosened turn tension adjustment screw 3 and adjust the tension of timing belt 2 When the screw is turned to the right the belt will be stretched and when turned to the left will loosen Lightly press the center of the belt A and confirm that the value of belt slack is in following RH 3SQHR3515 Force to press the belt apprpx 4N m Flexure...

Page 80: ...3 and adjust the tension of timing belt 2 When the screw is turned to the right the belt will be stretched and when turned to the left will loosen Lightly press the center of the belt A and confirm that the value of belt slack is in following RH 3SQHR3515 Force to press the belt apprpx 3N m Flexure approx 1 2mm If the belt is loosened too much when adjusting the tension causing it to come off the ...

Page 81: ... the No 2 arm cover and the belt pulley cover J4 The belt can be pushed and adjusted by removing the No 2 arm cover Idler 2 Timing belt 4 Timing pulley No 2 arm No 2 arm cover section Idler 2 Timing belt A 5 Timing pulley 4 Timing pulley No 2 arm No 2 arm cover section Note The figure shows the timing belt structure section shaft side inside the No 2 arm Remove and confirm the No 2 arm cover and t...

Page 82: ... 2 Lightly loosen the two idler installation bolts 1 Do not loosen too much 3 The nut which is fixing tension adjustment screw 3 is loosened turn tension adjustment screw 3 and adjust the tension of timing belt 2 When the screw is turned to the right the belt will be stretched and when turned to the left will loosen Lightly press the center of the belt A and confirm that the value of belt slack is...

Page 83: ... belt tension side will vibrate The detailed adjustment tension is shown in Fig 5 8 Check and adjust with the belt pressing force f and the slack amount d between span s F Pressing force The preset value and adjustment value in the sound wave type belt tension gauge Axis Belt type Sepang s mm Slack d mm Pressing force f N J1 340 5GT 20 84 1 3 10 J2 363 3GT 12 103 1 6 4 J3 297 3GT 9 77 1 2 3 J4 Mot...

Page 84: ...function of the personal computer support software option the guidance of lubrication time is calculated according to the operating environment of the customer The numbers in the Table 5 4 correspond to the supply positions in Fig 5 9 Avoid excessive lubrication since it may lead to grease leak Also the number of lubrications is limited to 3 times The maintenance exceeding 3 times needs the overha...

Page 85: ...in Table 5 4 using a grease gun from the lubrication grease nipple Add only the specified amount of grease Adding excess grease may cause grease to leak 3 The J1 axis has the grease nipple and the timing belt in the near position Although the timing belt is using the oil resistant belt if the grease adheres please wipe it off 4 Install the covers with the removal procedure in reverse 4 Lubrication...

Page 86: ... time is over Error No 133n Encoder battery voltage low n indicates the axis number The encoder battery voltage of the robot arm is low Error No 7510 Battery voltage low R C The battery voltage of the controller is low Error No 7500 No battery voltage The battery of the controller is depleted If error No 7500 occurs the program data and other data in the controller is lost and it becomes necessary...

Page 87: ...attery should be performed one by one Extract the old battery from holder and remove the lead connector 3 Insert the new battery into the holder and connect the lead connector Replace all batteries with new ones at the same time 4 Install the base cover B L as before Be careful not to catch any the cables 5 Initialize the battery consumption time Always carry out this step after replacing the batt...

Page 88: ...r operating conditions and thus with the degree of the equipment s wear and loss of performance As a rule of thumb however it is recommended that overhaul be carried out before the total amount of servo on time reaches the predetermined levels 24 000 hours for the robot body and 36 000 hours for the controller See Fig 5 11 For specific information about parts to be replaced and timing of overhaul ...

Page 89: ... Table 5 5 Consumable part list Table 5 6 Spare parts list No Part name Type Note1 Note1 Confirm the robot arm serial No and contact the dealer or service branch of Mitsubishi Electric Co for the type Usage place Q ty Supplier 1 Timing belt J1 axis 1 Mitsubishi Electric J2 axis 1 J3 axis 1 J4 axis motor side 1 J4 axis shaft side 1 2 Grease Reduction gears of each axis An needed 3 Lithium battery I...

Page 90: ...1 Origin data input method The origin data set as the default is input from the T B The setting method is explained in Page 18 2 4 Setting the origin 2 Mechanical stopper method This origin posture is set by contacting each axis against the mechanical stopper The setting method is explained in Page 81 5 6 1 Mechanical stopper method 3 Jig method The origin posture is set with the calibration jig i...

Page 91: ... safety purposes the brakes must be released by two workers 1 J1 axis origin setting mechanical stopper 1 Press the 4 key on the menu screen and dis play the Origin Break selection screen 2 With both hands slowly move the J1 axis in plus direction and contact the axis against the mechanical stopper 3 Press the 1 key and display the Origin setting selection screen 4 Press the 2 key and display the ...

Page 92: ...23 ORIGIN MECH CHANGE TO ORIGIN OK No 123 Yes Release the brake Do cursor movement into the parenthesis of each axis by the arrow key The brakes can be released only for the axis for which a 1 is displayed on the screen If the brakes are not to be released press the 0 key and display a 0 If the F1 key on the teaching pendant or the enabling switch is detached while the brakes are released the brak...

Page 93: ...echanical stopper J 3 Press the 1 key and display the Origin setting selection screen 4 Press the 2 key and display the Mechanical stopper selection screen 5 Input 1 into the J2 axis Set 0 to other axes 6 Press the EXE key and display Confirmation screen MENU 1 FILE EDIT 2 RUN 3 PARAM 4 ORIGIN BRK 5 SET INIT 6 ENHANCED CLOSE 123 ORIGIN BRAKE 1 ORIGIN 2 BRAKE CLOSE 123 ORIGIN 1 DATA 2 MECH 3 TOOL 4...

Page 94: ...vement into the parenthesis of each axis by the arrow key The brakes can be released only for the axis for which a 1 is displayed on the screen If the brakes are not to be released press the 0 key and display a 0 If the F1 key on the teaching pendant or the enabling switch is detached while the brakes are released the brakes will be work immediately Select the axis of origin setting Do cursor move...

Page 95: ...irection and contact the axis against the mechanical stopper Match the alignment mark of J4 axis in this con dition next Go to the following procedure continuously For safety purposes the step for releasing the brakes must be carried out by two workers One worker must operate the T B and the other must support the J3 axis shaft When the brake is released the J3 axis could drops with its own weight...

Page 96: ...creen 10 Press the 2 key and display the Mechanical stopper selection screen 11 Input 1 into the J3 and J4 axis Set 0 to other axes 12 Press the EXE key and display Confirmation screen 13 Press the F1 key and the origin position is set up 14 Setting of the origin is completed 15 Refer to Page 99 5 6 5 Recording the origin data in this manual and record the origin data on the origin data seal J4 合い...

Page 97: ...kes are not to be released press the 0 key and display a 0 If the F1 key on the teaching pendant or the enabling switch is detached while the brakes are released the brakes will be work immediately Select the axis of origin setting Do cursor movement into the parenthesis of each axis by the arrow key The origin is set only for the axis for which a 1 is displayed on the screen If the origin is not ...

Page 98: ...d display the Origin set ting selection screen 3 Press the 2 key and display the Mechanical stopper selection screen 4 Input 1 into the J1 to J4 axis Set 0 to other axes 5 Press the EXE key and display Confirmation screen 6 Press the F1 key and the origin position is set up 7 Setting of the origin is completed 8 Refer to Page 99 5 6 5 Recording the origin data in this manual and record the origin ...

Page 99: ... position There are the method of releasing the brake and adjusting with the origin position manually and the method of adjusting with the origin position by jog feed Here explain operation by brake release Then do origin setting operation and set up the origin To ensure safety the brake release procedure described below should always be done by two persons This operation is carried out with the t...

Page 100: ... 5 Input 1 into the J1 axis Set 0 to other axes 6 Press the EXE key and display Confirmation screen 7 Press the F1 key and the origin position is set up 8 Setting of the origin is completed 9 Refer to Page 99 5 6 5 Recording the origin data in this manual and record the origin data on the origin data seal MENU 1 FILE EDIT 2 RUN 3 PARAM 4 ORIGIN BRK 5 SET INIT 6 ENHANCED CLOSE 123 Select ORIGIN BRK...

Page 101: ...kes are not to be released press the 0 key and display a 0 If the F1 key on the teaching pendant or the enabling switch is detached while the brakes are released the brakes will be work immediately Select the axis of origin setting Do cursor movement into the parenthesis of each axis by the arrow key The origin is set only for the axis for which a 1 is displayed on the screen If the origin is not ...

Page 102: ... the Tool selection screen 5 Input 1 into the J2 axis Set 0 to other axes 6 Press the EXE key and display Confirmation screen 7 Press the F1 key and the origin position is set up 8 Setting of the origin is completed 9 Refer to Page 99 5 6 5 Recording the origin data in this manual and record the origin data on the origin data seal After origin setting should always install the plug in pin hole as ...

Page 103: ...into the parenthesis of each axis by the arrow key The brakes can be released only for the axis for which a 1 is displayed on the screen If the brakes are not to be released press the 0 key and display a 0 If the F1 key on the teaching pendant or the enabling switch is detached while the brakes are released the brakes will be work immediately Select the axis of origin setting Do cursor movement in...

Page 104: ...nd display the Mechanical stopper selection screen 4 Input 1 into the J1 to J4 axis Set 0 to other axes 5 Press the EXE key and display Confirmation screen 6 Press the F1 key and the origin position is set up 7 Setting of the origin is completed 8 Refer to Page 99 5 6 5 Recording the origin data in this manual and record the origin data on the origin data seal SPACE ORIGIN BRAKE 1 ORIGIN 2 BRAKE C...

Page 105: ...e axis for which the origin is to be set with jog operation This can be set for all axes simultaneously or each axis independently When setting the ABS mark always view the operations from the mark and set at the end of the triangular mark The positions where the ABS mark is attached are shown in below Refer to Page 24 2 5 Confirming the operation for details on the jog operation Note that if the ...

Page 106: ...c tion screen 4 Input 1 into the axis to origin setting Press the EXE key and display Confirmation screen 5 Press the F1 key and the origin position is set up This completes the setting of the origin with the ABS method ORIGIN 1 DATA 2 MECH 3 TOOL 4 ABS 5 USER CLOSE 123 MENU 1 FILE EDIT 2 RUN 3 PARAM 4 ORIGIN BRK 5 SET INIT 6 ENHANCED CLOSE 123 ORIGIN BRAKE 1 ORIGIN 2 BRAKE CLOSE 123 ABS J1 1 J2 0...

Page 107: ...o Page 24 2 5 Confirming the operation for details on the jog operation Choose the user origin position as the position where it doesn t move by the gravity This position is left as a guideline to position all axes with jog operation when setting the origin again with this method 2 Enter the JOINT jog mode and display the joint coordinates on the teaching pendant screen Record the value of the axi...

Page 108: ...igin setting Press the EXE key and display Confirmation screen 9 Press the F1 key and the origin position is set up This completes the setting of the origin with the user origin method USER J1 1 J2 0 J3 0 J4 0 J5 0 J6 0 J7 0 J8 0 CLOSE 123 REL ORIGIN USER CHANGE TO ORIGIN OK No 123 Yes ...

Page 109: ... onto the origin label 1 Confirming the origin data label Remove the Refer to Page 65 5 3 2 Installing removing the cover and remove the 2 Confirming the origin data Confirm the value displayed on the teaching pendant s Origin Data Input screen Refer to Page 19 2 4 2 Setting the origin with the origin data input method 5 Inputting the origin data and display the Origin Data Input screen on the tea...

Page 110: ... change to The posture is expressed by this configuration flag and the posture is saved with FL1 in the position constant X Y Z A B C FL1 FL2 The types of configuration flags are shown below 1 RIGHT LEFT Indicates the location of the end axis relative to the line that passes through both the rotational center of the J1 axis and the rotational center of the J2 axis Fig 6 1 Configuration flag RIGHT ...

Page 111: ......

Page 112: ... without notice HEAD OFFICE TOKYO BUILDING 2 7 3 MARUNOUCHI CHIYODA KU TOKYO 100 8310 JAPAN NAGOYA WORKS 5 1 14 YADA MINAMI HIGASHI KU NAGOYA 461 8670 JAPAN Authorised representative MITSUBISHI ELECTRIC EUROPE B V GERMANY Gothaer Str 8 40880 Ratingen P O Box 1548 40835 Ratingen Germany ...

Reviews: