Mitsubishi Lancer Evolution-VI Workshop Manual Download Page 43

ENGINE  – 

Timing Belt

11-19

"

D

A

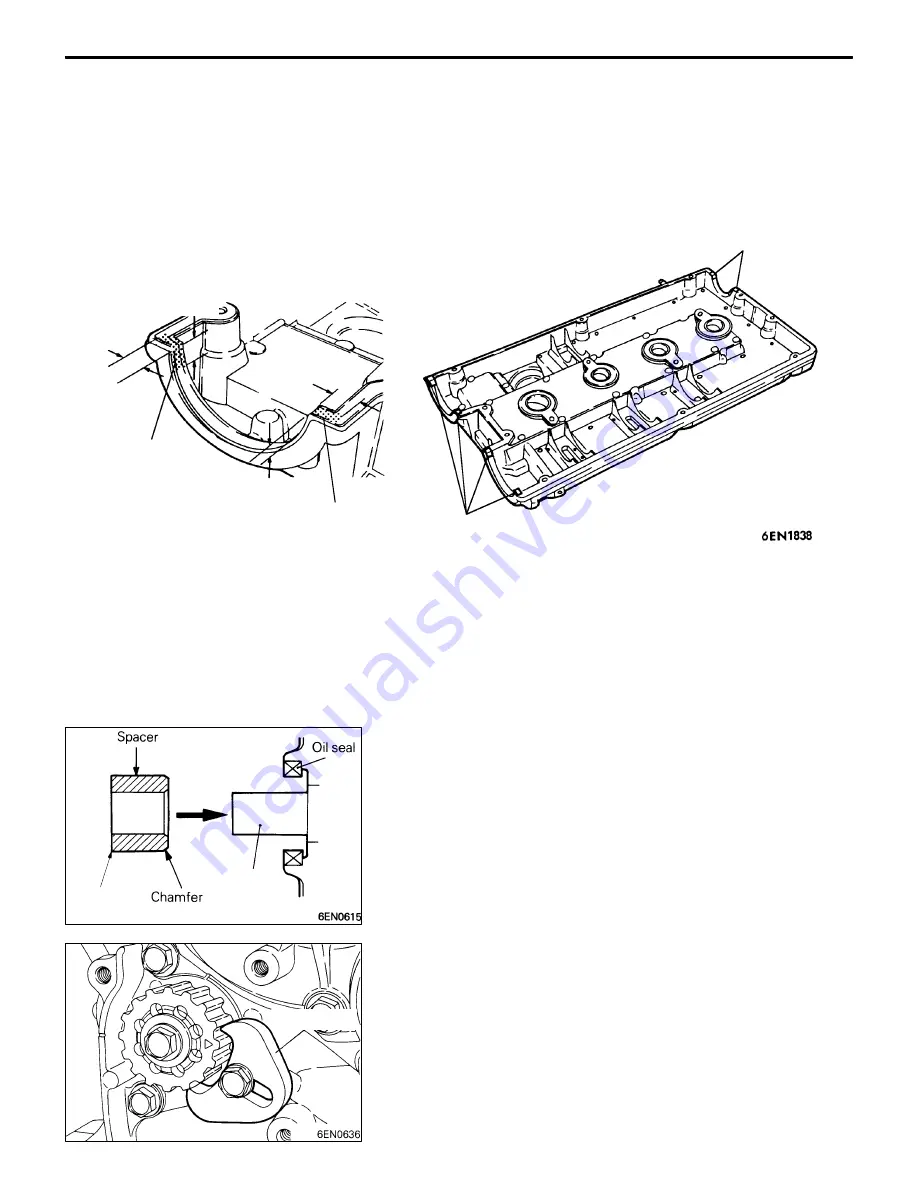
SEALANT APPLICATION TO ROCKER COVER

Apply sealant to the areas indicated in the illustration.

Specified sealant: 3M

TM

 AAD Part No. 8672 or equivalent

Apply sealant

Apply sealant

Apply sealant

10 mm

10 mm

10 mm

10 mm

Apply sealant

"

E

A

SPACER INSTALLATION

Install the spacer with the chamfered end toward the oil seal.

"

F

A

COUNTERBALANCE SHAFT SPROCKET
INSTALLATION

(1) Install the counterbalance shaft sprocket and screw the

bolt.

(2) Install special tool MD998785 as shown in the illustration

to lock the counterbalance shaft.

(3) Tighten the bolt, and then remove the special tool.

Counter-
balance
shaft

Sharp
edge

MD998785

Summary of Contents for Lancer Evolution-VI

Page 1: ...Pub No S9806CNCP9 A EVOLUTION VI WORKSHOP MANUAL...

Page 2: ...N9806CNCP9 N9806CNCP9 A WORKSHOP MANUAL S9806CNCP9 All information illustrations and product descriptions contained in this manual are current as at the time of publication We however reserve the rig...

Page 3: ...ag module and clock spring before drying or baking the vehicle after painting 3 Service or maintenance of any SRS component or SRS related component must be performed only at an authorized MITSUBISHI...

Page 4: ...ng Contents 6 Diagnosis Function 7 How to Use the Inspection Procedures 10 Connector Measurement Service Points 11 Connector Inspection 12 Inspection Service Points for a Blown Fuse 13 Points to Note...

Page 5: ...cing procedures visual inspections should always be performed as well DEFINITION OF TERMS STANDARD VALUE Indicates the value used as the standard for judging the quality of a part or assembly on inspe...

Page 6: ...assifications of Major Maintenance Service Points When there are major points relative to maintenance and servicing procedures such as essential maintenance and service points maintenance and service...

Page 7: ...Indicates the section title Indicates the group num ber Indicates the page number Indicates the group title Denotes non reus able part Repair kit or set parts are shown Only very frequently used part...

Page 8: ...n from the customer Check trouble symptom Reoccurs Does not reoccur Read the diagnosis code No diagnosis code or communication with MUT II not possible Refer to the INSPECTION CHART FOR TROUBLE SYMPTO...

Page 9: ...ing to each trouble symptoms classified in the Inspection Chart for Trouble Symptoms Refer to P 00 10 for how to read the inspection procedures 8 SERVICE DATA REFERENCE TABLE Inspection items and norm...

Page 10: ...ion of diagnosis code by warning lamp When the diagnosis code No 24 is output When no diagnosis code is output On Off 1 5 secs 0 5 sec 0 5 sec Pause time 3 secs Tens signal Place division 2 secs Units...

Page 11: ...tery terminal for 10 seconds or more reconnect the cable 3 After the engine has warmed up run it at idle for about 15 minutes INPUT SIGNAL INSPECTION POINTS VEHICLES WITH ETACS ECU WHEN USING THE MUT...

Page 12: ...hat there are trouble symptoms If trouble symptoms have disappeared the connector may have been inserted incorrectly and the trouble symptom may have disappeared during inspection If it seems that tro...

Page 13: ...e that if the connector control unit etc is too small to permit insertion of the test bar it should not be forced use a special tool the extra thin probe in the harness set for checking for this purpo...

Page 14: ...d the terminal connections male and female pins will not be perfect even if the connector body is connected and the pins may pull out of the reverse side of the connector Therefore gently pull the har...

Page 15: ...becomes simple In order to ascertain the conditions under which an intermittent malfunction occurs first ask the customer for details about the driving conditions weather conditions frequency of occur...

Page 16: ...TION V Model code Class code Model year Grade Engine model Transmission model Fuel supply system GF CP9A SNDF 98 EVOLUTION V RS 4G63 2 000 DOHC 16 valves intercooler W5M51 4WD 5M T MPI SNGF 98 EVOLUTI...

Page 17: ...ocated in the following locations D Sun visor D Glove box D SRS air bag control unit D Steering wheel D Steering gear and linkage D Air bag module D Clock spring 6 Store components removed from the SR...

Page 18: ...r Cover the oxygen sensor with a protective cover when applying anti corrosion agents and undercoats PRE INSPECTION CONDITION Pre inspection condition refers to the condition that the vehicle must be...

Page 19: ...CTION MANUAL for instructions on handling the MUT II Connect the MUT II to the diagnosis connector as shown in the illustration Caution Connection and disconnection of the MUT II should always be made...

Page 20: ...Jacking 00 18 SUPPORT LOCATIONS FOR LIFTING AND JACKING GARAGE JACK Caution Do not support the vehicles at locations other than specified supporting points Neglecting this will cause damage etc Cautio...

Page 21: ...GENERAL Support Locations for Lifting and Jacking 00 19 AXLE STANDS SINGLE POST AND DOUBLE POST LIFT Notch Rubber Rubber Notch Notch Notch...

Page 22: ...to do so will result in deterioration of the viscous coupling and result in the viscous coupling causing the vehicle to jump forward suddenly Front wheels lifted No good D If only the front wheels or...

Page 23: ...eeds the specified value jack up the vehicle and manually rotate each wheel to check the rotation condition of each wheel NOTE If the brake dragging force exceeds the specified value the cause may be...

Page 24: ...inserted nuts 4 If self tapping screws or self locking nuts are used Standard bolt and nut tightening torque Thread size Torque Nm Bolt nominal diameter mm Pitch mm Head mark 4 Head mark 7 Head mark...

Page 25: ...SPECIAL TOOLS 11 ALTERNATOR AND IGNITION SYSTEM 14 TIMING BELT 15 FUEL AND EMISSION CONTROL PARTS 27 SECONDARY AIR SYSTEM AND INTAKE MANIFOLD 29 EXHAUST MANIFOLD 31 WATER PUMP AND WATER HOSE 34 ROCKER...

Page 26: ...bustion chamber Pentroof curved top piston type Total displacement dm3 1 997 Cylinder bore mm 85 0 Piston stroke mm 88 0 Compression ratio 8 8 Valve timing Intake valve Opens BTDC 21 Closes ABDC 59 Ex...

Page 27: ...rall height mm 131 9 132 1 Cylinder head bolt shank length mm Maximum 99 4 Valve thickness of valve head margin mm Intake 1 0 0 5 Exhaust 1 5 1 0 Overall valve length mm Intake 109 5 109 0 Exhaust 109...

Page 28: ...0 35 0 8 No 2 ring 0 40 0 55 0 8 Oil ring 0 10 0 40 1 0 Piston pin outer diameter mm 21 0 Piston pin press in load N Room temperature 7 350 17 200 Crankshaft pin oil clearance mm 0 02 0 05 0 1 Connect...

Page 29: ...l level gauge guide 13 Water pump pulley 9 Alternator brace Alternator side 21 Alternator brace Tightened with water pump 23 Alternator pivot bolt 44 Crankshaft pulley 25 Center cover 3 Spark plug 25...

Page 30: ...oid valve 9 Vacuum hose and vacuum pipe 11 Secondary air intake manifold Heat protector 13 Vacuum hose and vacuum pipe 11 Air pipe Heat protector side 13 Air pipe Cam position sensor side 11 Air pipe...

Page 31: ...e sensor 29 Water temperature gauge unit 11 Water inlet fitting 24 Water outlet fitting M6 10 Water outlet fitting M8 13 Thermostat housing 24 Thermostat housing Clamp 11 Water inlet pipe Cylinder blo...

Page 32: ...Plug 24 Front case 24 Oil pump cover Screw 10 Oil pump cover Bolt 16 Piston and connecting rods Connecting rod nut 20 90 to 94 Crankshaft and flywheel Flywheel bolt 132 Rear plate 11 Bell housing cove...

Page 33: ...ed in the text SEALANTS Item Specified sealant Quantity Engine support bracket bolt 3MTM AAD Part No 8672 or equivalent As required Semi circular packing 3MTM AAD Part No 8672 or equivalent As require...

Page 34: ...y hammered in between the joined surfaces In this case however care must be taken to prevent damage to the joined surfaces For removal of the oil pan the special tool Oil Pan Remover MD998727 is avail...

Page 35: ...aft sprocket MD998719 Pulley holder pin Holding camshaft sprocket MB990767 Crankshaft pulley holder MD998785 Sprocket stopper Holding silent shaft sprocket MD998767 Tensioner puller socket wrench Adju...

Page 36: ...essor MD998737 Valve stem seal installer Installation of valve stem seal MD998727 Oil pan remover Removal of oil pan MD998162 Plug wrench Removal and installation of front case cap plug Use with MD998...

Page 37: ...er Installation of counterbalance shaft front and rear bearing MD998375 Crankshaft front seal installer Installation of crankshaft front oil seal MD998285 Crankshaft front oil seal guide Guide for ins...

Page 38: ...Nm 23 Nm 25 Nm 3 Nm 2 1 3 4 5 6 7 8 9 10 11 12 13 14 15 16 Removal steps 1 Oil level gauge 2 O ring 3 Oil level gauge guide 4 O ring 5 Water pump pulley 6 Alternator brace 7 Alternator 8 Crankshaft pu...

Page 39: ...pulley 8 Tensioner arm JA 9 Auto tensioner 10 Idler pulley 11 Crank angle sensor AB IA 12 Oil pump sprocket AC HA 13 Crankshaft sprocket bolt AD 14 Crankshaft sprocket 15 Crankshaft sensing blade 16...

Page 40: ...haust side can turn very easily because of the valve spring tension Use care not to allow your fingers to get caught by the sprocket 3 Loosen the lock nut of the tensioner pulley then remove the timin...

Page 41: ...part check front case oil seals camshaft oil seal and water pump for leaks AF COUNTERBALANCE SHAFT SPROCKET REMOVAL 1 Set the special tool as shown to prevent the counterbalance shaft sprocket from t...

Page 42: ...Coat the bolts illustrated with sealant before tightening Specified sealant 3MTM AAD Part No 8672 or equivalent CA SEALANT APPLICATION TO SEMI CIRCULAR PACKING Specified sealant 3MTM AAD Part No 8672...

Page 43: ...0 mm 10 mm 10 mm 10 mm Apply sealant EA SPACER INSTALLATION Install the spacer with the chamfered end toward the oil seal FA COUNTERBALANCE SHAFT SPROCKET INSTALLATION 1 Install the counterbalance sha...

Page 44: ...in the direction of arrow while lifting with a finger to give a sufficient tension to the tension side of timing belt In this condition tighten bolt to secure tensioner B When the bolt is tightened u...

Page 45: ...is in its fully extended position reset it as follows 2 Clamp the auto tensioner in the vise with soft jaws 3 Push in the rod little by little with the vise until the set hole A in the rod is aligned...

Page 46: ...o turn one tooth in the clockwise direction by the valve spring tension and stabilized there 3 Place the timing mark on the crankshaft sprocket one tooth this side from the mated timing mark as in the...

Page 47: ...ng belt over the sprocket and secure it with a paper clip NOTE The intake camshaft will be turned a little clockwise by the valve spring tension and stabilized in position even if the belt is clipped...

Page 48: ...offset one tooth from the corresponding timing marks in the counterclockwise direction 14 Using the special tool turn the tensioner pulley in the illustrated direction to strain the timing belt Then...

Page 49: ...2 turns Then leave it intact 15 minutes 22 Check to see that the wire inserted when installing the auto tensioner can be pulled out lightly If it can be pulled out lightly the timing belt is being ten...

Page 50: ...leaks and replace as necessary 2 Check the rod end for wear or damage and replace as necessary 3 Measure the rod protrusion If it is out of specification replace the auto tensioner Standard value 12...

Page 51: ...15 16 9 Nm 11 Nm 9 Nm 11 Nm 18 Nm Removal steps 1 Throttle body CA 2 Throttle body gasket 3 Fuel return pipe BA 4 Fuel pressure regulator 5 O ring 6 Insulator 7 Insulator AA 8 Injector 9 O ring 10 Gro...

Page 52: ...l amount of new engine oil to the O ring Insert the fuel pressure regulator into the delivery pipe being careful not to damage the O ring Caution Be sure not to let engine oil get into the delivery pi...

Page 53: ...Nm 11 Nm 19 Nm 30 Nm 35 Nm 24 Nm 49 Nm 21 Nm 13 Nm 21 Nm 35 Nm Removal steps 1 Exhaust manifold heat protector 2 Vacuum hose and vacuum pipe BA 3 Air pipe assembly 4 Air control valve gasket 5 Air con...

Page 54: ...h the intake manifold is also installed to the engine 2 Tighten the bolts and nuts to the specified torque in the sequence given in the illustration BA AIR PIPE ASSEMBLY INSTALLATION 1 Install the air...

Page 55: ...0 13 Nm Removal steps 1 Engine hanger 2 Turbocharger heat protector 3 Oxygen sensor 4 Exhaust fitting 5 Exhaust fitting gasket 6 Air outlet fitting CA 7 Air outlet fitting gasket 8 Oil return pipe BA...

Page 56: ...shown EVOLUTION VI 1 Install the gasket with the tabbed end directed as shown 2 Apply sealant to both sides of the oil return pipe gasket and leave it for 20 minutes to dry before installing Tighten t...

Page 57: ...ENGINE Exhaust Manifold 11 33 CA GASKET INSTALLATION Position the projection as shown in the illustration Projection...

Page 58: ...11 Nm 11 Nm 24 Nm 24 Nm 29 Nm 9 8 Nm 13 Nm Removal steps 1 Water hose 2 Water hose 3 Water hose 4 Water hose EA 5 Water temperature sensor DA 6 Water temperature gauge unit 7 Thermostat 8 Water outle...

Page 59: ...24 Nm 29 Nm 13 Nm 10 13 Nm Removal steps 1 Water hose 2 Water hose 3 Water hose 4 Water hose EA 5 Water temperature sensor DA 6 Water temperature gauge unit 7 Water inlet fitting 8 Thermostat CA 9 Wat...

Page 60: ...LLATION Apply 3 mm diameter of form in place gasket FIPG to the location shown in the illustration Specified sealant Mitsubishi Genuine Part No MD970389 or equivalent DA SEALANT APPLICATION TO ENGINE...

Page 61: ...3 Cam position sensor support cover 4 Cam position sensor support gasket FA 5 Cam position sensing cylinder EA 6 Cam position sensor support DA 7 Camshaft oil seal CA 8 Camshaft bearing cap rear righ...

Page 62: ...aft until the timing marks are lined up setting No 1 cylinder to the TDC 3 Set the camshafts so that their dowel pins are positioned at top CA BEARING CAP INSTALLATION 1 According to the identificatio...

Page 63: ...er to the compression top dead center position so that dowel pin of the exhaust camshaft is at the top 2 Install the camshaft position sensing cylinder so that the white paint mark is facing in the di...

Page 64: ...juster 2 Place the lash adjuster in container A and clean its outside surface NOTE Use a nylon brush if deposits are hard to remove 3 While gently pushing down the internal steel ball using wire 0 5 m...

Page 65: ...e lash adjuster from the container Then push down the steel ball gently and push the plunger to eliminate diesel fuel from the pressure chamber Caution Make sure the oil hole in the side of the body i...

Page 66: ...tches that of a new lash adjuster NOTE If lash adjuster contracts perform the operations 7 through 9 again to fill it with diesel fuel completely Replace the lash adjuster if it still contracts after...

Page 67: ...al steps AA DA 1 Cylinder head bolt 2 Cylinder head assembly 3 Cylinder head gasket AB CA 4 Retainer lock 5 Valve spring retainer BA 6 Valve spring 7 Intake valve AB CA 8 Retainer lock 9 Valve spring...

Page 68: ...st be handled with utmost care because otherwise the following dangerous conditions may result Loss of eyesight if sodium gets in eyes Burns if soduim contact skin Fire hazard 2 Handling of Soduim fil...

Page 69: ...or the like NOTE The reaction occurs when water enters the cavity in the valve Hydrogen gas may be trapped inside the valve temporarily blocking the water passage In such a case wait until hydrogen g...

Page 70: ...LATION 1 When installing the cylinder head bolts check that the shank length of each bolt meets the limit If the limit is exceeded replace the bolt Limit Max 99 4 mm 2 Apply engine oil to the bolt thr...

Page 71: ...ing performance may not be expected When tightening the bolt therefore be careful to give a sufficient turn to it 2 If the bolt is overtightened loosen the bolt completely and then retighten it by rep...

Page 72: ...cified replace the valve Item Standard value mm Limit mm Intake 109 5 109 0 Exhaust 109 7 109 2 VALVE SPRING 1 Measure the free height of spring and if it is smaller than the limit replace Standard va...

Page 73: ...ion refer to VALVE SEAT in INSPECTION VALVE SEAT REPLACEMENT PROCEDURE 1 Cut the valve seat to be replaced from the inside to thin the wall thickness Then remove the valve seat 2 Rebore the valve seat...

Page 74: ...ole diameters in cylinder head Item Standard value mm 0 05 O S 12 05 12 07 0 25 O S 12 25 12 27 0 50 O S 12 50 12 52 3 Press fit the valve guide until it protrude specified value 19 5 mm as shown in t...

Page 75: ...6 Oil screen gasket 7 Buffle plate IA 8 Oil pressure switch 9 Oil cooler by pass valve 10 Relief plug 11 Relief plug gasket 12 Relief spring 13 Relief plunger 14 Oil filter bracket 15 Oil filter brac...

Page 76: ...ol MD998783 2 Loosen the plug 3 Remove the special tools MD998783 and MD998162 and then the plug AC FLANGE BOLT REMOVAL 1 Remove the plug on the side of cylinder block 2 Insert a Phillips screwdriver...

Page 77: ...EAR BEARING INSTALLATION 1 Apply engine oil to the outer surface of bearing 2 Using special tools install right rear bearing Make sure that oil hole of bearing is aligned with oil hole of cylinder blo...

Page 78: ...LLATION Using a suitable socket wrench install the counterbalance shaft oil seal into the front case EA OIL PUMP OIL SEAL INSTALLATION Using a suitable socket wrench install the oil pump oil seal into...

Page 79: ...e 2 Install the front case assembly through a new front case gasket and temporarily tighten the flange bolts other than those for tightening the filter bracket IA SEALANT APPLICATION TO OIL PRESSURE S...

Page 80: ...o the specified torque 5 Remove the special tools MD998783 and MD998162 LA OIL PAN INSTALLATION 1 Clean both mating surfaces of oil pan and cylinder block 2 Apply a 4 mm wide bead of sealant to the en...

Page 81: ...eakage Install the drain plug gasket in the direction shown INSPECTION FRONT CASE 1 Check oil holes for clogging and clean if necessary 2 Check the left counterbalance shaft front bearing section for...

Page 82: ...nsure that the dimension L measures the standard valve under normal temperature and humidity Standard value L 34 5 mm 3 The dimension must be the standard value when measured after the valve has been...

Page 83: ...re installation 1 2 3 4 5 6 7 8 9 10 11 12 20 Nm 90_ to 94_ Removal steps GA 1 Connecting rod nut AA FA 2 Connecting rod cap EA 3 Connecting rod bearing DA 4 Piston and connecting rod assem bly 5 Conn...

Page 84: ...nder number AB PISTON PIN REMOVAL 1 Insert the special tool Push Rod into the piston from the side on which the front mark is stamped in the piston head and attach the guide C to the push rod end 2 Pl...

Page 85: ...rod in the piston with their front marks facing the same direction 5 Apply engine oil to the entire periphery of the piston pin 6 Insert the piston pin push rod and guide A assembly having assembled i...

Page 86: ...ersize Yellow 2 Install the upper side rail To install the side rail first fit one end of the rail into the piston groove then press the remaining portion into position by finger See illustration Use...

Page 87: ...nd spacer as shown in the figure 3 Rotate the crankshaft so that crank pin is on the center of cylinder bore 4 Use suitable thread protectors on the connecting rod bolts before inserting piston and co...

Page 88: ...Example If the measured value of a crankshaft pin outer diameter is 44 996 mm the pin is classified as 1 in the table In case the crankshaft is also replaced by a spare part check the identification...

Page 89: ...the head of each nut 6 Make a paint mark on the bolt end at the position 90 to 94 from the paint mark made on the nut in the direction of tightening the nut 7 Give a 90 to 94 turn to the nut and make...

Page 90: ...0 10 0 40 mm Limit No 1 No 2 ring 0 8 mm Oil ring 1 0 mm CRANKSHAFT PIN OIL CLEARANCE PLASTIC GAUGE METHOD 1 Remove oil from the crankshaft pin and connecting rod bearing 2 Cut the Plastigage to the...

Page 91: ...12 13 14 15 25 Nm 90_ 11 Nm 132 Nm 9 Nm 11 Nm 32 Nm 11 Nm Removal steps 1 Flywheel bolt 2 Flywheel 3 Rear plate 4 Bell housing cover EA 5 Oil seal case DA 6 Oil seal CA 7 Beam bearing cap bolt CA 8 B...

Page 92: ...sition 2 The thrust bearings must be installed with their groove side toward the crankshaft web BA CRANKSHAFT BEARING INSTALLATION 1 From the following table select a bearing whose size is appropriate...

Page 93: ...re is no ID color paint on the crankshaft measure the journal outside diameter and select a bearing appropriate for the measured value 2 Install the bearings having an oil groove to the cylinder block...

Page 94: ...paint mark on the bolt and that on the cap are in alignment Caution If the bolt is turned less than 90 proper fastening performance may not be expected When tightening the bolt therefore be careful t...

Page 95: ...cified torque 5 Carefully remove the crankshaft bearing cap 6 Measure the width of the Plastigage at its widest part by using a scale printed on the Plastigage package Standard value 0 02 0 04 mm Limi...

Page 96: ...utside diameter of piston to be used Measure it in thrust direction as shown 3 Based on the measured piston O D calculate boring finish dimension Boring finish dimension Piston O D clearance between p...

Page 97: ...control body assembly 3 O ring AB 4 Throttle body 5 Fixed SAS 6 Speed adjusting screw 8 O ring NOTE 1 The fixed SAS and the speed adjusting screw are correctly adjusted at the factory and should not...

Page 98: ...Y SERVICE POINT AA THROTTLE POSITION SENSOR INSTALLATION 1 Install the throttle position sensor to the throttle body as shown in the diagram 2 Turn throttle position sensor 90 clockwise to set it and...

Page 99: ...SSEMBLY 1 2 3 4 5 6 7 8 11 Nm Disassembly steps FA D Inspection of turbocharger waste gate actuator operation 1 Snap pin 2 Waste gate actuator EA 3 Coupling DA 4 Turbine housing AA CA 5 Snap ring AB B...

Page 100: ...NG 1 Use a clean cleaning oil commercially available Do not use corrosive cleaning oils as they could damage to some parts 2 Use a plastic scraper or hard brush to clean aluminum parts REASSEMBLY SERV...

Page 101: ...ester apply a pressure of approx 100 0 kPa to the actuator and make sure that the rod moves Caution Do not apply a pressure of more than 113 3 kPa to the actuator Otherwise diaphragm may be damaged Ne...

Page 102: ...ades for bend burr damage corrosion and traces of contact on the back side and replace if defective 2 Check the oil passage of the turbine wheel assembly for deposit and clogging 3 In the case of wate...

Page 103: ...5 6 7 8 9 10 11 12 13 14 Disassembly steps AA 1 Front bracket assembly AB 2 Alternator pulley BA 3 Rotor 4 Rear bearing 5 Bearing retainer 6 Front bearing 7 Front bracket AC 8 Stator 9 Plate AC AA 10...

Page 104: ...stator with a soldering iron 180 to 250 W Complete this work within four seconds not to transfer heat to the diode 2 When removing rectifier from the regulator assembly remove the soldered sections t...

Page 105: ...replace the rotor if the resistance value is not at the standard value Standard value 3 5 2 Check the continuity between the slip ring and core and if there is continuity replace the rotor STATOR CHE...

Page 106: ...cuited so replace the rectifier 3 Check the diode trio by connecting an ohmmeter to both ends of each diode and check the continuity of the three diodes If there is a continuity at both ends or if the...

Page 107: ...steps 1 Cover 2 Screw AA 3 Magnetic switch 4 Screw 5 Through 6 Rear bracket 7 Brush holder 8 Brush 9 Rear bearing AB 10 Armature 11 Yoke assembly AB 12 Ball 13 Packing A 14 Packing B 15 Plate 16 Plan...

Page 108: ...unning clutch STARTER MOTOR PARTS CLEANING 1 Do not immerse parts in cleaning solvent Immersing the yoke and field coil assembly and or armature will damage insulation Wipe motor assembly with a cloth...

Page 109: ...check the runout with a dial indicator Standard value 0 05 mm Limit 0 1 mm 2 Measure the commutator outer diameter Standard value 32 0 mm Limit 31 4 mm 3 Check the undercut depth between segments Sta...

Page 110: ...urred replace front bracket assembly or rear bracket assembly BRUSH AND SPRING REPLACEMENT 1 Brushes that are worn beyond wear limit line or oil soaked should be replaced 2 When replacing ground brush...

Page 111: ...ENGINE Starter Motor 11 87 ARMATURE COIL OPEN CIRCUIT INSPECTION Check the continuity between segments If there is continuity the coil is in order...

Page 112: ...RVICE SPECIFICATIONS 4 SEALANT 4 SPECIAL TOOLS 5 TROUBLESHOOTING 6 ON VEHICLE SERVICE 68 Fuel Pump Resistor Check 68 Fuel Pump Relay No 2 Continuity Check 68 Engine Control Relay and Fuel Pump Relay C...

Page 113: ...gly the service procedures for these items are described herein The service procedures for the remaining item are the same as those for EVOLUTION V D Fan motor control D Fuel pump drive control D Fuel...

Page 114: ...10 Engine coolant temperature sensor L11 Detonation sensor D Power supply voltage D Ignition switch IG D Ignition switch ST D Vehicle speed sensor D A C switch D Power steering fluid pressure switch D...

Page 115: ...e k At 20_C 2 3 3 0 At 80_C 0 30 0 42 Coolant temperature sensor resistance k At 20_C 2 1 2 7 At 80_C 0 26 0 36 Fuel pressure kPa When vacuum hose is connected 230 When vacuum hose is disconnected 289...

Page 116: ...oting MD998478 Test harness 3 pin triangle D Measurement of voltage during trouble shooting D Inspection using an oscilloscope Red harness White harness MB991223 Inspection test harness set D Pin cont...

Page 117: ...ottle position sensor Engine coolant temperature sensor Crank angle sensor Camshaft position sensor Barometric pressure sensor Detonation sensor Injector Ignition coil power transister unit METHOD OF...

Page 118: ...eration due to the throttle position sensor signal Engine coolant temperature sensor 1 Controls as if the engine coolant temperature is 80_C This condition is maintained until the ignition switch is t...

Page 119: ...r min or more Set conditions D Sensor output frequency is 3 Hz or less for 4 seconds D Malfunction of the air flow sensor D Improper connector contact open or short circuited harness wire of the air f...

Page 120: ...flow sensor NOTE Refer to Workshop Manual for LANCER EVOLUTION IV and EVOLUTION V Pub No S9806CNCP9 Code No 14 Throttle position sensor system Probable cause Range of Check D Ignition switch ON D Excl...

Page 121: ...ons D The sensor output voltage increases from 1 6 V or less corresponding to an engine coolant temperature of 40_C or more to 1 6 V or more corresponding to an engine coolant temperature of 40_C or l...

Page 122: ...ace the engine ECU Measure at the crank angle sensor connector A 51 D Disconnect the connector and measure at the harness side 1 Voltage between 3 and earth Ignition switch ON OK System voltage 2 Volt...

Page 123: ...engine ECU NG Measure at the camshaft position sensor connector A 97 D Disconnect the connector and measure at the harness side 1 Voltage between 3 and earth Ignition switch ON OK System voltage 2 Vo...

Page 124: ...he engine ECU and the vehicle speed sensor connector NG Repair OK Check trouble symptom OK Check the following connectors A 19 B 62 NG Repair NG Check the harness wire between the engine ECU and the v...

Page 125: ...3 8V Altitude 1 200 m NG Measureattheairflowsensorcon nector A 25 D Disconnect the connector and measure at the harness side D Voltage between 1 and earth Ignition switch ON OK 4 8 5 2 V D Continuityb...

Page 126: ...No 41 Injector system Probable cause Range of Check D Engine speed is approx 50 1 000 r min D The throttle position sensor output voltage is 1 15 V or less D Actuator test by MUT II is not carried out...

Page 127: ...ON OK System voltage 2 Voltage between 3 and earth Engine Cranking OK 0 5 4 0 V 3 Continuity between the 2 and earth OK Continuity 1 NG Check the following connectors B 65 B 76 OK Check trouble sympt...

Page 128: ...fan Stopped Headlamp OFF ON Brake lamp OFF ON Rear window defogger switch OFF ON OK Voltage drops 0 2 to 3 5 V OK Replacethe engine ECU NG Measure at the alternator connector A 05 D Disconnect the co...

Page 129: ...time to start improper starting 7 13 24 Idling stability Improper idling Unstable idling Rough idling hunting 8 13 25 Improper idling Idling speed is high Improper idling speed 9 13 26 Idling speed i...

Page 130: ...e stall Pass out The engine stalls when the accelerator pedal is depressed or while it is being used Driving Hesitation Sag Hesitation is the delay in response of the vehicle speed engine speed that o...

Page 131: ...asure at the diagnostic connector B 22 D Continuity between 4 and earth D Continuity between 5 and earth OK Continuity NG Check the earth wire and repair if nec essary OK Replace the MUT II INSPECTION...

Page 132: ...burnt out bulb NG Replace OK Measure at the combination meter connector B 08 D Disconnect the connector and measure at the harness side D Voltage between 42 and earth Ignition switch ON OK System volt...

Page 133: ...reign materials in fuel Check system voltage when cranking OK 8 V or higher NG Check the battery OK MUT II Inspection of no initial combustion Refer to P 13 47 INSPECTION PROCEDURE 37 OK Can any sound...

Page 134: ...using a soundscope NG Check the injector system Refer to P 13 15 INSPECTION PRO CEDURE FOR DIAGNOSIS CODE 41 OK Is starting good if the engine is cranked with the accelerator pedal slightly depressed...

Page 135: ...V or higher NG Check the battery OK MUT II Check if uncomplete combustion occurs Refer to P 13 48 INSPECTION PROCEDURE 39 OK Can any sound be heard from the injectors when cranking check using a soun...

Page 136: ...OSIS CODES No Does idling speed fluctuate excessively Yes Check if hunting occurs Refer to P 13 48 INSPECTION PROCEDURE 40 No Check the ISC servo for operation sound NG Check the ISC servo system Refe...

Page 137: ...fer to P 13 44 INSPECTION PROCEDURE 33 OK MUT II Data list 21 Engine coolant temperature sensor Refer to P 13 57 NG Check the engine coolant temperature sensor system Refer to P 13 10 INSPECTION PROCE...

Page 138: ...d NG Check the ISC servo system Refer to P 13 44 INSPECTION PROCEDURE 33 OK MUT II Data list 26 Idle position switch Refer to P 13 58 NG Check the idle position switch system Refer to P 13 38 INSPECTI...

Page 139: ...D Check the ignition coil spark plugs spark plug cables D Check the compression pressure D Check the engine oil viscosity OK MUT II Data list 26 Idle position switch Refer to P 13 58 NG Check the idle...

Page 140: ...RO CEDURE FOR DIAGNOSIS CODE 41 OK Does the engine stall right after the accelerator pedal is released Yes Clean the throttle valve area Adjust the fixed SAS Refer to P 13 30 No Does the engine stall...

Page 141: ...nction of the ISC servo system No MUT II Data list 26 Idle position switch Refer to P 13 XX NG Check the idle position switch system Refer to P 13 XX INSPECTION PROCEDURE 26 OK MUT II Data list 14 Thr...

Page 142: ...umble or poor acceleration occurs Refer to P 13 51 INSPECTION PROCEDURE 43 OK Check the fuel pressure Refer to P 13 30 OK Check the following items D Check the ignition coil spark plugs spark plug cab...

Page 143: ...f air fuel ratio control system D Malfunction of the fuel supply system D Poor compression pressure D Clogged exhaust system D Malfunction of the turbocharger system MUT II Self Diag code Are diagnosi...

Page 144: ...waste gate actuator NOTE Refer to Workshop Manual for LANCER EVOLUTION IV and EVOLUTION V Pub No S9806CNCP9 INSPECTION PROCEDURE 20 Knocking Probable cause In cases as the above the cause is probably...

Page 145: ...er to P 13 58 NG Check the barometric pressure sensor system Refer to P 13 14 INSPECTION PROCEDURE FOR DIAGNOSIS CODE 25 OK MUT II Data list 11 Oxygen sensor OK 600 1 000 mV when racing suddenly NG Ch...

Page 146: ...cessary OK Check the alternator OK Check the harness wire between the alternatorand the engine ECU connec tor NG Repair OK Replace the engine ECU INSPECTION PROCEDURE 24 Power supply system and igniti...

Page 147: ...e between 39 and earth D MUT II Actuator test Fuel pump drive OK System voltage NG Check the harness wire between fuel pump relay No 2 and engine ECU connector and repair if necessary NG Check the har...

Page 148: ...oltage between 39 and earth D MUT II Actuator test 07 Fuel pump OK System voltage NG Check the following connector A 123 NG Repair NG Check the harness wire between fuel pump resistor and fuel pump re...

Page 149: ...sensor connector OK Replacethe engine ECU NG Repair OK Check the following connector A 16 NG Repair OK Check trouble symptom NG Replace the engine ECU NOTE Refer to Workshop Manual for LANCER EVOLUTIO...

Page 150: ...e ECU OK Check the following connector A 101 NG Repair OK Check trouble symptom NG Replace the engine ECU INSPECTION PROCEDURE 29 A C switch and A C relay system Probable cause When an A C ON signal i...

Page 151: ...ction of engine ECU NG D Check the radiator fan circuit D Check the A C condenser fan circuit Refer to Electrical Wirings NG Replace the engine ECU OK Check trouble symptom Measure at the engine ECU c...

Page 152: ...Wirings NG Measure at the engine ECU connector B 60 D Disconnect the connector and measure at the harness side D Check the A C condenser fan for operating condition Ignition switch ON OK A C condense...

Page 153: ...contact open or short circuited harness wire D Malfunction of engine ECU OK Replace the engine ECU Check the harness wire between engine ECUand oxygen sensor connector NG Repair NG OK Check trouble s...

Page 154: ...rness wire between oxygen sensor and engine ECU and repair if necessary OK Check trouble symptom OK Check trouble symptom NG Check the harness wire between engine ECU and oxygen sensor NG Repair OK Ch...

Page 155: ...stor unit system Refer to P 13 16 INSPECTION PROCEDURE FOR DIAGNOSIS CODE 44 INSPECTION PROCEDURE 33 Idle speed control ISC servo Stepper motor system Probable cause The engine ECU controls the intake...

Page 156: ...N OK System voltage Check the fuel pressure control valve NG Replace INSPECTION PROCEDURE 35 Waste gate solenoid valve Probable cause The waste gate solenoid valve controls the boost pressure introduc...

Page 157: ...n control relay and solenoid valve connector and repair if necessary OK Check trouble symptom OK Check the following connector B 59 NG Repair OK Measure at the engine ECU connector B 59 D Disconnect t...

Page 158: ...sensor system Refer to P 13 11 INSPECTION PROCEDURE FOR DIAGNOSIS CODE 22 OK MUT II Actuator test 07 Fuel pump Refer to P 13 61 NG Check the fuel pump system Refer to P 13 36 INSPECTION PROCEDURE 25 O...

Page 159: ...rature sensor system RefertoP 13 10 INSPECTIONPROCEDURESFORDIAGNOSIS CODE 21 OK MUT II Data list 18 Ignition switch ST Refer to P 13 57 NG Check the ignition switch ST system Refer to P 13 38 INSPECTI...

Page 160: ...00 mV during idling NG Check the fuel pressure Refer to P 13 30 OK MUT II Data list 11 Oxygen sensor OK 600 1 000 mV during sudden racing NG Check the oxygen sensor system Refer to P 13 42 INSPECTION...

Page 161: ...IS CODE 21 OK MUT II Data list 11 Oxygen sensor OK 600 1 000 mV during sudden racing NG Check the oxygen sensor system Refer to P 13 42 INSPECTION PROCEDURE 31 OK MUT II Data list 11 Oxygen sensor OK...

Page 162: ...ition sensor Refer to P 13 57 NG Check the throttle position sensor system Refer to P 13 9 IN SPECTION PROCEDURE FOR DIAGNOSIS CODE 14 OK MUT II Actuator test 12 Waste gate solenoid valve Refer to P 1...

Page 163: ...heck the engine coolant temperature sensor system Refer to P 13 10 INSPECTION PROCEDURE FOR DIAGNOSIS CODE 21 OK MUT II Data list 14 Throttle position sensor Refer to P 13 57 NG Check the throttle pos...

Page 164: ...gine ECU and earth and repair if necessary 5 NG OK Check the following connectors B 59 B 60 B 62 NG Repair OK Check trouble symptom NG Replace the engine ECU Check the following connectors B 65 B 49 B...

Page 165: ...p drive control circuit NG Check the harness wire between the fuel pump relay and engine ECU connector OK Check trouble symptom OK Check trouble symptom NG Check the harness wire between fuel pump rel...

Page 166: ...cessary INSPECTION PROCEDURE 49 Check throttle position sensor output circuit Measure at the engine ECU connector B 62 D Connect the connector D Voltage between 84 and earth Ignition switch ON OK 0 3...

Page 167: ...LU TION IV temperature 80 95_C D Lamps electric li f d ll 2 500 r min 46 86 Hz p cooling fan and all accessories OFF D Transmission Neutral A T P range Engine is raced Frequency increases in response...

Page 168: ...16 Power supply voltage Ignition switch ON System voltage Procedure No 24 13 35 18 Cranking signal Ignition switch ON Engine Stopped OFF Procedure No 27 13 38 g ignition switch ST Engine Cranking ON...

Page 169: ...ude of 600 m 95 kPa 25 At altitude of 1 200 m 88 kPa At altitude of 1 800 m 81 kPa 26 Idle position switch Ignition switch ON Check by operating accelerator pedal Throttle valve Set to idle position O...

Page 170: ...ral A T P range When engine is suddenly raced Increases 41 Injectors 1 EVOLU TION V VI Engine Cranking When engine coolant temperature is 0_C 27 40 ms When engine coolant temperature is 20_C 14 5 21 7...

Page 171: ...80 90_C D Lamps electric A C switch OFF 2 25 steps position D Lamps electric cooling fan and all accessories OFF D Transmission Neutral A T P range Idl iti A C switch OFF ON Increases by 10 70 steps g...

Page 172: ...ording to Pinch the return hose with fingers to feel the pulse of the fuel being recirculated Pulse is felt Procedure No 25 13 36 cording to both the above condi tions Listen near the fuel tank for th...

Page 173: ...ator and condenser 1 D Ignition switch ON D A C switch ON 1 Fan motors operate at low speed 36 2 Secondary air control solenoid valve Turn solenoid valve from OFF to ON Ignition switch ON Sound of ope...

Page 174: ...om system voltage 17 Stepper motor coil A2 for warming up from system voltage to 0 6 V and from 0 6 V to system 5 Stepper motor coil B1 6 V to system voltage 18 Stepper motor coil B2 6 Secondary air c...

Page 175: ...low System voltage EVOLUTION VI A C condenser fan at high speed A C switch ON coolant temperature 105_C or above 0 3 V 33 Alternator G terminal D Engine Warm idle radiator fan OFF D Headlamp OFF to ON...

Page 176: ...ake air tempera ture is 80_C 0 4 1 0 V 76 Oxygen sensor Engine Running at 2 000 r min after having been warmed up Check using a digital type voltmeter 0 0 8 V Changes repeatedly 80 Backup power supply...

Page 177: ...switch ON Set throttle valve to idle position 0 1 V Slightly open throttle valve 4 V or more 88 Camshaft position sensor Engine Cranking 0 4 3 0 V sensor Engine Idle speed 0 5 2 0 V 89 Crank angle se...

Page 178: ...0 12 Oxygen sensor heater EVOLUTION V VI 11 18 at 20_C 13 Body earth Engine ECU earth Continuity established 0 26 Body earth 72 92 Intake air temperature sensor 5 3 6 7 k When intake air temperature i...

Page 179: ...the preceding year models FUEL PUMP RELAY No 2 CONTINUITY CHECK EVOLUTION VI Battery voltage Terminal No 1 2 3 4 Not supplied Supplied ENGINE CONTROL RELAY AND FUEL PUMP RELAY CONTINUITY CHECK Battery...

Page 180: ...1 Removal steps 1 Fuel hose 2 Fuel pump gauge assembly 3 Packing AA 4 High pressure fuel hose 5 Fuel pipe assembly 6 Fuel gauge unit 7 Packing NOTE The service procedures other than those mentioned a...

Page 181: ...CH CONTENTS GENERAL 2 Outline of Change 2 SERVICE SPECIFICATIONS 2 LUBRICANTS 2 ON VEHICLE SERVICE 2 Clutch Pedal Inspection and Adjustment 2 Bleeding 3 CLUTCH PEDAL 4 CLUTCH CONTROL 5 Clutch Master C...

Page 182: ...UBRICANTS L H DRIVE VEHICLES Items Specified lubricants Quantity Clutch fluid Brake fluid DOT 3 or DOT 4 As required Push rod assembly Rubber grease Boot Release cylinder push rod MITSUBISHI genuine g...

Page 183: ...value ranges Standard value C 6 13 mm Standard value D 85 mm or more 7 If the clutch pedal free play and the distance between the clutch pedal and the toeboard when the clutch is disengaged do not ag...

Page 184: ...m 19 6 4 7 12 Nm 5 5 17 15 16 12 Removal steps 1 Clutch master cylinder installation nut 2 Master cylinder member bracket installation bolt 3 Clevis pin 4 Pedal support member and clutch pedal assembl...

Page 185: ...eeding Refer to P 21A 3 D Clutch Pedal Adjustment Refer to P 21A 2 15 Nm Specified grease MITSUBISHI genuine grease Part No 0101011 5 6 8 7 6 1 4 13 Nm 15 Nm 15 Nm 19 Nm 5 15 Nm 3 2 7 Release fork Clu...

Page 186: ...Disassembly steps 1 Piston stopper ring AA 2 Push rod assembly 3 Boot 4 Piston assembly 5 Reservoir cap 6 Spring pin 7 Reservoir tank 8 Clutch master cylinder body Caution Do not disassemble piston as...

Page 187: ...22B 1 MANUAL TRANSMISSION OVERHAUL CONTENTS GENERAL 2 Outline of Change 2 SPECIFICATIONS 3 TRANSMISSION 4 CLUTCH HOUSING 5 REVERSE IDLER GEAR 6...

Page 188: ...ON OVERHAUL General 22B 2 GENERAL OUTLINE OF CHANGE Of the newly introduced transmission model the service procedures for the following unit sections are described D Transmission D Clutch housing D Re...

Page 189: ...9 36 4 529 Available W5M51 1 X7A2 B 30 36 4 529 Not available W5M51 1 X7A3 B 30 36 4 529 Available EVOLUTION V Transmission model Gear ratio Speedometer gear ratio Final gear ratio Front LSD W5M51 2 X...

Page 190: ...Nm 69 Nm 18 Nm 69 Nm 3 9 Nm 32 Nm 32 Nm 3 Disassembly steps 1 Transfer JA 2 O ring 3 Roll stopper bracket 4 Insulator washer EVOLUTION IV only 5 Shift cable bracket IA 6 Select lever HA 7 Speedometer...

Page 191: ...ch release bearing retainer EA 2 Oil seal AA DA 3 Outer race AB CA 4 Outer race BA 5 Bushing AA 6 Cover A AA 7 Cover B 8 Clutch housing NOTE 1 Never remove the bushings from the clutch housing Only th...

Page 192: ...steps 1 Snap ring 2 Cone spring except EVOLUTION IV 3 Thrust washer 4 Steel ball except EVOLUTION IV 5 Reverse idler gear 6 Needle roller bearing 7 Reverse idler gear shaft INSPECTION NEEDLE ROLLER BE...

Page 193: ...rotors installed to B J outer race during removal and installation of the drive shaft Post installation Operation D Check the Dust Cover for Cracks or Damage by Pushing it with Finger 1 2 3 4 5 6 7 8...

Page 194: ...ed value exceeds the standard value replace the ball joint assembly 3 When the measured value is lower than the standard value check that the ball joint turns smoothly without excessive play If so it...

Page 195: ...Total Backlash Check 31 Gear Oil Level Check 31 Gear Oil Change 32 Fluid Level Check 33 Bleeding 34 AYC Operation Check 34 Hydraulic Pressure Check 35 Differential Carrier Oil Seal Replacement 36 Whee...

Page 196: ...nerated by hydraulic unit MPa 0 1 6 Wheel bearing axial play mm 0 05 Wheel bearing rotation starting torque Nm 1 0 or less LUBRICANT Vehicles with AYC Items Specified lubricant Capacity Gear oil Torqu...

Page 197: ...30 MD998331 Oil pressure gauge 2 942 kPa Hydraulic pressure measurement vehicles with AYC MB991705 Hose adapter MB990925 Bearing oil seal installer set Pressfitting of oil seal differential MB991115 O...

Page 198: ...leshooting procedure make sure that the following items have been checked okay D The correct steering wheel has been properly installed in the neutral position of the steering column shaft D Tire and...

Page 199: ...sensor ST N system short circuit 27 10 33 Steer sensor ST N system 27 11 34 Steer sensor ST 1 ST 2 system short circuit 27 11 41 TPS system open or short circuit 27 12 51 Longitudinal acceleration se...

Page 200: ...YC ECU OK Replace AYC ECU NG Repair Code Nos 21 22 23 24 Wheel speed sensor system Probable cause This code is output if any one of three wheel speed sensors fails to provide an input even after the o...

Page 201: ...onnectors B 95 B 52 B 17 A 26 A 50 D 04 D 14 D 19 NG Repair OK Measureat B 95 AYC ECUconnector D Disconnect the connector and measure at the harness side D Resistanceacross7 20 front LH 6 19 front RH...

Page 202: ...s side D Ignition switch ON D Turn tire at 1 2 to 1 revolution sec D Voltage across 6 7 8 9 and body ground OK 42 mV or more when mea sured with a circuit tester 120 mV P or more when measured with an...

Page 203: ...he harness side D Ignition switch ON D Turn tire at 1 2 to 1 revolution sec D Voltage across 6 7 8 9 and body ground OK 42 mV or more when mea sured with a circuit tester 120 mV P or more when measure...

Page 204: ...en the steering wheel is turned OK Check the following connector B 95 NG Repair NG Voltage alternates between 4 V or more and 0 5 V NG Voltage remains at 0 V Code No 32 Steer sensor ST N system Probab...

Page 205: ...om about 0 5 V or less to about 3 V NG Check the following connectors B 95 B 65 B 98 NG Repair Code No 34 Steer sensor ST 1 ST 2 system Probable cause This code is output if a turning condition is det...

Page 206: ...ective AYC ECU NG Replace the acceleration sensor OK Check the trouble symptom OK Checkand repairtheharnessbetween acceleration sensor and ignition switch OK Check the trouble symptom NG Checkand repa...

Page 207: ...und OK 2 4V to 2 6 V where vehicle in horizontal position NG Check the following connectors B 95 B 52 D 20 Check the acceleration sensor Refer to P 27 42 NG Replace NG Repair Code No 61 Stop lamp swit...

Page 208: ...Thiscodeisoutputwhentheproportioningvalvecontrolcircuitisopen orshort circuited D Defective proportioning valve D Defective harness or connector D Defective AYC ECU OK Checkand repairtheharnessbetween...

Page 209: ...ECU NG Checktheharnessbetweendirectional control valve right and AYC ECU NG Repair OK Check the trouble symptom OK Check the following connectors B 96 B 94 D 06 F 30 F 29 NG Repair OK Measure at F 29...

Page 210: ...U NG Checktheharnessbetweendirectional control valve left and AYC ECU NG Repair OK Check the trouble symptom OK Check the following connectors B 96 B 94 D 06 F 30 F 28 NG Repair OK Measure at F 28 dir...

Page 211: ...AYC relay and body ground OK Check the trouble symptom OK Replace AYC ECU NG ChecktheharnessbetweenAYCrelay and AYC ECU NG Repair NG Check the trouble symptom OK Check the following connectors B 96 B...

Page 212: ...C relay OK Check the trouble symp tom OK Replacethe hydraulicunit for a defective accumula tor pressure switch NO Repair the leak OK Check the trouble symptom NG Check the following connector A 126 NG...

Page 213: ...itch connector D Disconnect the connector and measure at the harness side D Ignition switch ON 1 Voltage across 2 and body ground OK System voltage 2 Continuity across 1 and body ground OK Conducting...

Page 214: ...E 1 Communication between MUT II and the whole system is not possible Probable cause The cause may be a malfunction of the power supply circuit or the ground circuit of the diagnosis connector D Defec...

Page 215: ...wing connectors B 96 B 94 B 49 B 75 B 76 NG Repair OK Measureat B 96 AYC ECUconnector D Disconnect the connector and measure at the harness side D Ignition switch ON D Voltageacross 31andbodyground OK...

Page 216: ...arning lamp OK Check the trouble symptom OK Replace combination meter NG Check the harness between AYC warning lamp and AYC ECU NG Repair OK Check the trouble symptom OK Replace AYC ECU OK Check the f...

Page 217: ...Unable to start or accelerate on slippery road surfaces Probable cause The hydraulic oil level is probably low there is an oil leak the hydraulic unit is defective or the torque transfer differential...

Page 218: ...NOTE This symptom is limited only when the diagnosis code is correct NG Replace the hydraulic unit NG Replacethetorquetransferdifferential Check the trouble symptom NG Replace AYC fluid OK Correct Che...

Page 219: ...tch ON Fully closed 300 1000mV tion switch ON Partially open Gradually increases from the above val ue Fully open 4500 5000mV 19 Longitudinal acceleration sensor Vehicle stands on level ground 2 4 2 6...

Page 220: ...rclock wise Ignition switch ON ON and OFF are indicated alternate ly 48 Steer sensor ST 2 Steering wheel position Turn slowly clockwise Ignition switch ON ON and OFF are indicated alternate ly 50 Stop...

Page 221: ...Check on P 27 34 14 Clutch operation right Let the directional valve operate to supply the maximum pressure to the right clutch The operation conditions are to be checked by the speed difference betwe...

Page 222: ...g wheel slowly 0 V approx 3 V flashing 5 Steer sensor ST 1 Engine Idle speed Turn steering wheel slowly 0 V approx 3 V flashing 6 1 FR wheel speed Vehicle stationary 1 V or less Forward vehicle slowly...

Page 223: ...mulator internal pressure Low 2 V or less Accumulator internal pressure High System voltage 26 ECU ground At all times 0 V 31 AYC ECU power supply Ignition switch ON System voltage Ignition switch OFF...

Page 224: ...gnal name Normally 2 body ground Longitudinal acceleration sensor ground lateral acceleration sensor ground Conducting 26 body ground ECU ground Conducting 35 body ground AYC motor relay Conducting 37...

Page 225: ...the propeller shaft fully counterclockwise and measure the deviation between the alignment marks Limit 5 mm 4 If the backlash exceeds the limit replace the differential carrier assembly GEAR OIL LEVEL...

Page 226: ...he filler plug and tighten it to the specified torque GEAR OIL CHANGE DIFFERENTIAL 1 Remove the drain plug to discharge the gear oil 2 Fit the drain plug and tighten it to the specified torque Tighten...

Page 227: ...allow more time to leave the vehicle to stand idle When MUT II is used Connect the MUT II to the 16 pin diagnosis connector Turn on the ignition switch Operate the MUT II Item No 11 to activate the h...

Page 228: ...ged with air 7 After air has been completely discharged tighten the bleeder screw Caution While the system is being bled of air add fluid as necessary to ensure that it is left in the oil reservoir du...

Page 229: ...peeds of the wheels are as shown below using the Data List Item Nos 07 and 08 Forced activation Item No 13 is being executed The speed of left rear wheel is more than 2 km h higher than that of right...

Page 230: ...er differential and tighten the flare nuts to the specified torque Specified torque 34 Nm 10 Pour the specified fluid in the oil reservoir up to the MAX mark Then bleed the system Specified fluid Dia...

Page 231: ...sed 200 mVp p or more 4 If the output voltage is lower than the above value it is probably attributable to the following faults Check or replace the wheel speed sensor as necessary D Excessive clearan...

Page 232: ...t or rear suspension it may be open circuited only when the vehicle is run on rough roads and not on ordinary road The wheel speed sensor output voltage waveform should therefore be checked also by ro...

Page 233: ...D Hydraulic Piping Fluid Filling and Bleeding Refer to P 27 32 34 D Trunk Side Trim Installation 1 2 3 4 5 6 7 8 9 10 11 12 13 14 12 Nm 4 12 Nm 18 Nm 12 Nm 12 Nm 18 Nm 34 Nm 34 Nm Removal steps 1 Dust...

Page 234: ...umulator be sure to wear safety goggles since drill chips may blow out together with the gas INSTALLATION SERVICE POINTS AA GROMMET INSTALLATION On the vehicle mounted with a sunroof mount the drain p...

Page 235: ...el and column cover AA 1 Steer sensor Acceleration sensor and AYC relay removal 2 Longitudinal acceleration sensor 3 Lateral acceleration sensor 4 AYC relay NOTE For the wheel speed sensor refer to GR...

Page 236: ...RATION SENSOR CHECK Refer to GROUP 35B Acceleration Sensor 2 AYC RELAY CONTINUITY CHECK Battery voltage Terminal No 1 3 4 5 When not energized When energized AYC ECU REMOVAL AND INSTALLATION Pre remov...

Page 237: ...should be first temporarily tightened then torqued to specification with the vehicle on the ground in unloaded condition Post installation Operation D Push the Dust Cover of the Lower Arm and Stabiliz...

Page 238: ...35A 1 BASIC BRAKE SYSTEM CONTENTS GENERAL 2 Outline of Change 2 ON VEHICLE SERVICE 2 Brake Pedal Check and Adjustment 2 BRAKE PEDAL 4 MASTER CYLINDER AND BRAKE BOOSTER 5 Master Cylinder 7 DISC BRAKE 9...

Page 239: ...the correct brake pedal height is obtained 3 Secure by tightening the lock nut of the operating rod 4 Push the stop lamp switch in the direction of the pedal stroke until it stops The switch will slid...

Page 240: ...rts as required 4 Start the engine depress the brake pedal with approximately 490 N of force and measure the clearance between the brake pedal and the floorboard Standard value 80 mm or more If the cl...

Page 241: ...Operation D Accelerator Pedal Installation D Steering Column Assembly Installation Refer to GROUP 37A Steering Wheel and Shaft D Instrument Under Cover Installation D Brake Pedal Adjustment Refer to...

Page 242: ...Line Bleeding D Brake Pedal Adjustment Refer to P 35A 2 D Air Intake Hose Installation 15 18 Nm 15 Nm Sealant 3M ATD Part No 8661 or equivalent 6 7 3 1 4 2 8 5 4 14 Nm 5 9 1 10 Nm Removal steps 1 Brak...

Page 243: ...l part of the fitting and then secure by using the hose clip BA CLEARANCE ADJUSTMENT BETWEEN BRAKE BOOSTER PUSH ROD AND PRIMARY PISTON Calculate clearance A from the B C and D measurements A B C D Sta...

Page 244: ...10 12 15 13 14 Brake fluid DOT3 or DOT4 11 Disassembly steps 1 Reservoir cap assembly 2 Reservoir cap 3 Diaphragm 4 Filter 5 Brake fluid level sensor 6 Float 7 Reservoir stopper bolt 8 Reservoir tank...

Page 245: ...stopper bolt while depressing the piston AB PISTON STOPPER RING DISASSEMBLY Remove the piston stopper ring while depressing the piston INSPECTION D Check the inner surface of master cylinder body for...

Page 246: ...MBLY Front Brake Seal boot kit Shim set Clip set Pad set Brake caliper kit 1 2 3 4 5 6 7 8 9 10 1 2 3 4 3 4 1 2 5 6 5 5 7 9 9 7 9 7 8 6 6 10 2 1 Disassembly steps 1 Pin 2 Cross spring 3 Pad wear indic...

Page 247: ...Clip set Pad set Brake caliper kit 1 2 3 4 5 6 7 8 9 10 2 6 1 6 7 8 9 10 2 1 7 9 7 9 3 4 3 4 2 1 6 5 5 5 Disassembly steps 1 Pin 2 Cross spring 3 Pad wear indicator assembly 4 Pad assembly 5 Shim 6 A...

Page 248: ...ce or maintenance of any SRS component or SRS related component must be performed only at an authorized MITSUBISHI dealer 3 MITSUBISHI dealer personnel must thoroughly review this manual and especiall...

Page 249: ...Cover Removal Post installation Operation D Instrument Under Cover Installation D Checking Steering Wheel Position with Wheels Straight Ahead Vehicles without SRS 5 Nm 17 Nm 11 Nm Vehicles with SRS 10...

Page 250: ...STALLATION SERVICE POINT AA CLOCK SPRING AND COLUMN SWITCH COLUMN SWITCH INSTALLATION Tighten the screws in an alphabetical order DISASSEMBLY AND REASSEMBLY 1 2 3 4 Disassembly steps AA AA 1 Special b...

Page 251: ...RING LOCK CYLINDER STEERING LOCK BRACKET SPECIAL BOLT INSTALLATION 1 When installing the steering lock cylinder and steering lock bracket to the column tube temporarily install the steering lock in al...

Page 252: ...Pipe Removal Post installation Operation D Front Exhaust Pipe Installation D Center Member Installation D Power Steering Fluid Supplying D Power Steering Fluid Line Bleeding D SteeringWheel Position...

Page 253: ...kage GEAR BOX TOTAL PINION TORQUE Using the special tools rotate the pinion gear at the rate of one rotation in approximately 4 to 6 seconds to check the total pinion torque Standard value 0 9 1 7 Nm...

Page 254: ...ack support and replace any parts if necessary CHECK THE TIE ROD FOR SWING RESISTANCE 1 Give 10 hard swings to the tie rod 2 Measure the tie rod swing resistance with a spring balance Standard value 5...

Page 255: ...e rod LA 9 Tab washer KA D Total pinion torque adjustment 10 Locking nut AA 11 Rack support cover 12 Rack support spring 13 Rack support JA 14 End plug 15 Self locking nut 16 Bolt 17 Valve assembly AB...

Page 256: ...DEXRON or DEXRON II Fluid Automatic transmission fluid DEXRON or DEXRON II Fluid Automatic transmission fluid DEXRON or DEXRON II Fluid Automatic transmission fluid DEXRON or DEXRON II Grease Repair k...

Page 257: ...e seal ring be careful not to damage the pinion and valve assembly or the rack AD BALL BEARING OIL SEAL REMOVAL Use a socket remove the oil seal and the ball bearing from the valve housing assembly si...

Page 258: ...special tool to remove the ball bearing from the gear housing AI NEEDLE ROLLER BEARING REMOVAL Use the special tool to remove the needle roller bearing from the rack housing Caution Do not open the sp...

Page 259: ...of the slit 2 Apply specified adhesive to the slit of the gear housing mounting rubber Specified adhesive 3M ATD Part No 8155 or equivalent BA OIL SEAL INSTALLATION CA NEEDLE ROLLER BEARING BALL BEARI...

Page 260: ...the oil seal inner surface and the O ring Specified fluid Automatic transmission fluid DEXRON or DEXRON II 3 Wrap the rack end with plastic tape and push the rack bushing onto the rack FA CIRCLIP INS...

Page 261: ...The upper surface of the oil seal should project outwards approx 1 mm from the housing edge surface Caution If the oil seal is flush with or lower than the housing edge it will cause oil leaks and req...

Page 262: ...heck or replace the rack support cover components 4 After adjusting lock the rack support cover with lock nut LA TAB WASHER TIE ROD INSTALLATION After installing the tie rod to the rack fold the tab w...

Page 263: ...following equation and use a new bellows band to repeat steps 2 to 3 W 5 5 mm A Example If A is 2 3 mm W is 3 2 mm NA TIE ROD END TIE ROD END LOCKING NUT INSTALLATION Screw in the tie rod end until t...

Page 264: ...aces for damage or wear D Check for worn or defective seal ring BEARING CHECK D Check for roughness or abnormal noise during bearing operation D Check the bearing for play D Check the needle roller be...

Page 265: ...CHANGE 2 KEYLESS ENTRY SYSTEM 2 SPECIAL TOOL 2 TROUBLESHOOTING 2 KEYLESS ENTRY SYSTEM 7 TRANSMITTER 7 SUNROOF 9 SERVICE SPECIFICATIONS 9 SEALANT 9 TROUBLESHOOTING 9 ON VEHICLE SERVICE 13 Water Test 1...

Page 266: ...PROCEDURE FOR TROUBLE SYMPTOMS INSPECTION PROCEDURE 1 None of the doors can be locked or unlocked using the transmitter Probable cause The cause may be a malfunction of the transmitter a malfunction o...

Page 267: ...r switch continuity check NG Replace OK Check trouble symptoms OK Measure at the receiver connector D 01 D Disconnect the connector and measure at harness side D Voltage between 12 and body earth D Vo...

Page 268: ...the receiver a malfunction of the earth circuit or a malfunction of the diagnosis output circuit D Malfunction of receiver D Malfunction of MUT II D Malfunction of connector or wiring harness NG Repai...

Page 269: ...and body earth OK System voltage NG Check the following connectors B 49 B 75 D 01 From previous page INSPECTION OF RECEIVER TERMINAL VOLTAGE Terminal Signal name Conditions Terminal voltage 2 Door sw...

Page 270: ...ut When activated 0 V When not activated System voltage 14 Door unlock output When activated 0 V When not activated System voltage 20 Earth At all times 0 V NOTE Values marked with should be measured...

Page 271: ...entry receiver removal steps D Front seat assembly driver s side 1 Keyless entry receiver ETACS ECU removal 2 ETACS ECU TRANSMITTER DISASSEMBLY AND REASSEMBLY Post assembly Operation D Transmitter ope...

Page 272: ...mode Caution Always turn the ignition switch to OFF before connecting and disconnecting the MUT II 2 Close all the doors 3 Turn the ignition switch to ACC and then back to OFF NOTE The doors will lock...

Page 273: ...d while the sunroof is closing 2 42 11 The timer does not operate for 30 seconds after the ignition switch is turned to OFF 3 42 11 Opening or closing of the sunroof is possible for 30 seconds after t...

Page 274: ...lowing connectors D 10 D 07 NG Repair OK Check trouble symptoms NG Check the harness wire between sun roof ECU and sunroof switch between sunroofswitch and theearth andrepair if necessary OK Check the...

Page 275: ...sunroof ECU connector D 10 D Disconnect the connector and measure at the harness side D Voltage between 7 and body earth OK System voltage NG Check the following connectors B 44 B 76 B 73 NG Repair OK...

Page 276: ...on switch ON System voltage 6 Motor output When sunroof is opening While sunroof is opening or moving down System voltage Other than the above 0 V 7 Timer operation power supply Always System voltage...

Page 277: ...ly close the roof lid glass 2 Fully open the sunshade 3 Remove the side decoration cover 4 To adjust the forward backward and sideways position of the roof lid glass loosen the six roof lid glass asse...

Page 278: ...teps AA 1 Side decoration cover 2 Roof lid glass assembly Sunroof switch removal steps 3 Sunroof switch cover 4 Sunroof switch Drain hose removal steps D Splash shield Front drain hose 5 Headlining AB...

Page 279: ...ot operate properly INSTALLATION SERVICE POINTS AA SUNROOF MOTOR INSTALLATION If the fully closed position of the sunroof motor is incorrect set the motor to the fully closed position by the procedure...

Page 280: ...h to the ON position and then measure the operation current in the intervals between the points when the sunroof starts to operate when it is fully open when it is fully closed and when it is fully ti...

Page 281: ...sunroof motor and then check the operation of the limit switches Switch position Terminal No 4 5 6 7 Limit switch 1 ON OFF Limit switch 2 ON OFF Limit switch 3 ON OFF 2 Check the identification colour...

Page 282: ...9 10 11 12 11 10 NOTE Clip position Disassembly steps 1 Side decoration cover Refer to P 42 15 2 Roof lid glass assembly 3 Sunroof motor 4 Drip rail assembly 5 Sunshade assembly 6 Cushion B assembly...

Page 283: ...51 1 EXTERIOR CONTENTS GENERAL 2 Outline of Change 2 SPECIAL TOOL 2 FRONT BUMPER 2 AERO PARTS 4 WASHER TANK AND HOSES 6 INTERCOOLER RADIATOR WATER SPRAY SYSTEM 7 MARKS 8...

Page 284: ...nd aero parts changed D Front and rear window washer tank relocated to the luggage compartment D Intercooler radiator water spray system changed D Marks changed SPECIAL TOOL Tool Number Name Use B9907...

Page 285: ...te garnish 3 Three diamond mark 4 Front fog lamp cover 5 Front fog lamp plate 6 Oil cooler duct 7 Bumper side stay 8 Air outlet garnish R H side only 9 Bumper side net 10 Bumper bolt plate AA 11 Clip...

Page 286: ...to pull up the center pin in the clip 2 Remove the clip AERO PARTS REMOVAL AND INSTALLATION 2 1 Front airdam removal steps 1 Air blow duct AA AA 2 Front airdam NOTE The removal and installation servi...

Page 287: ...EXTERIOR Aero Parts 51 5 2 1 3 5 Nm Adhesive tape double sided tape 1 6 mm thickness Rear spoiler removal steps 1 Rear spoiler 2 Packing 3 High mount stop lamp...

Page 288: ...5 5 6 Washer tank removal steps 1 Washer tank assembly 2 Washer tank bracket AA 3 Washer motor rear AA 4 Washer motor front Washer hose removal steps D Front seat and rear seat D Floor carpet 5 Washer...

Page 289: ...5 Nm 4 5 4 4 5 5 6 4 4 4 2 1 5 6 5 4 2 1 7 5 4 4 3 2 1 5 1 Clamp 2 Water spray nozzle 3 Water spray nozzle bracket AA 4 Water spray hose 5 Joint 6 Stop valve AA 7 Clip Water spray motor removal steps...

Page 290: ...1 8 MARKS REMOVAL AND INSTALLATION 2 1 3 AA 1 Three diamond mark AA 2 EVOLUTION VI mark AA 3 LANCER mark INSTALLATION SERVICE POINT AA MARK INSTALLATION Mounting Positions 1 Three diamond mark Center...

Page 291: ...2 Peel off the backing paper from the reverse side of the marks and then attach the marks to the vehicle body so that they fit properly into position Caution 1 When attaching the marks the surroundin...

Page 292: ...isposal Procedures 32 Deployed Air Bag Module Disposal Procedures 40 CAUTION D Carefully read and observe the information in the SERVICE PRECAUTIONS P 52B 3 prior to any service D For information conc...

Page 293: ...sensor and an analog G sensor The warning lamp on the instrument panel indicates the operational status of the SRS The clock spring is installed in the steering column Only authorized service personne...

Page 294: ...should only be replaced in accordance with the INDIVIDUAL COM PONENT SERVICE procedures in this manual starting at page 52B 22 4 After disconnecting the battery cable wait 60 seconds or more before pr...

Page 295: ...Body wiring harness Junction block fuse No 4 wiring harness 15 Body wiring harness SRS warning lamp 16 to 19 20 Body wiring harness Earth Correct or replace each wiring harness 21 NOTE Vehicles with f...

Page 296: ...al MB686560 SRS air bag adapter harness A D Deployment of air bag modules and seat belt with pre tensioner inside the vehicle D Deployment of air bag module front passenger s side outside the vehicle...

Page 297: ...SRS ECU 52B 7 21 22 61 62 Driver s side air bag module squib system 52B 8 24 25 64 65 Front passenger s side air bag module squib system 52B 9 31 32 SRS ECU capacitor system 52B 9 34 Connector lock s...

Page 298: ...istics of the analog G sensor are abnormal D When the output from the analog G sensor is abnormal D Malfunction of SRS ECU Replace the SRS ECU Code No 15 16 Safing G sensor system in the SRS ECU Proba...

Page 299: ...quib harness leading to the power supply 62 D Short in driver s side air bag module squib harness leading to the earth NOTE The connector in the squib circuit has a built in short bar which short circ...

Page 300: ...deployment possibly caused by static electricity etc Therefore malfunction of the connector can also be caused by this short bar which fails to be released even when the connector is reconnected if it...

Page 301: ...the earth is lower than the specified value for a continuous period of 5 seconds or more However if the vehicle condition returns to normal diagnosis code No 41 will be automatically erased and the SR...

Page 302: ...itch IG1 and repair if necessary OK Check trouble symptoms OK Replace the SRS ECU OK Measure at SRS check harness connector 5 D Disconnect SRS ECU connector B 51 D Connect SRS check harness connector...

Page 303: ...ector 5 D Disconnect SRS ECU connector B 51 D Connect SRS check harness connector 3 D Continuity between terminals 20 OK Continuity NG Check the following connectors B 51 B 78 B 80 NG Repair OK Measur...

Page 304: ...the SRS ECU Code No 51 or 52 Driver s side air bag module squib ignition drive circuit system Probable cause This diagnosis code is output if a short No 51 or an open circuit No 52 is detected in the...

Page 305: ...n with all systems is not possible 1 52B 14 Communication is not possible with SRS only 2 52B 15 When the ignition key is turned to ON engine stopped the SRS warning lamp does not illuminate Refer to...

Page 306: ...onnector 3 D Continuity between terminals 20 OK Continuity NG Check the following connectors B 51 B 78 B 80 NG Repair SRS check harness MB991613 3 5 OK Replace the SRS ECU OK Check the harness wire be...

Page 307: ...is not installed properly which could result in serious injury or death to the vehicle s driver or front passenger 2 Check connector for damage and terminals for deformation or rust Replace SRS ECU i...

Page 308: ...ion If the clock spring s mating mark is not properly aligned the steering wheel may not be completely rotational during a turn or the flat cable within the clock spring may be severed obstructing nor...

Page 309: ...52B 3 Caution The SRS may not activate if SRS harnesses or connectors are damaged or improperly connected which could result in serious injury or death to the vehicle s driver or front passenger POST...

Page 310: ...municate with the SRS ECU Inspect and if necessary repair the body wiring harness before proceeding further 3 Read the data list fault duration and how many times memories are erased using the MUT II...

Page 311: ...for deformation 2 Install air bag module to check fit or alignment with steering wheel 3 Check steering wheel for noise binds or difficult operation and excessive free play 3 Check harnesses for bind...

Page 312: ...terminals deformities and harness for binds 3 Check air bag inflator case for dents cracks or deformities 4 Install air bag module to steering wheel to check fit or alignment with the wheel Clock spr...

Page 313: ...connectors for damage poor connection and terminals for deformation Refer to P 52B 18 INDIVIDUAL COMPONENT SERVICE If the SRS components are to be removed or replaced as a result of maintenance troub...

Page 314: ...are found in the vehicle as shown in the following illustration Follow label instructions when servicing SRS If labels are dirty or damaged replace them Steering wheel Air bag module driver s side Cl...

Page 315: ...rop or subject the SRS ECU to impact or vibration If denting cracking deformation or rust are discovered in the SRS ECU replace it with a new SRS ECU Discard the old one 4 After deployment of an air b...

Page 316: ...AIR BAG MODULES AND CLOCK SPRING Caution 1 Disconnect the battery terminal and wait for 60 seconds or more before starting work Furthermore the disconnected battery terminal should be covered with ta...

Page 317: ...cover Claw Driver s side air bag module removal steps AA 1 Driver s side air bag module Clock spring removal steps AA 1 Driver s side air bag module AB 2 Steering wheel 3 Lower column cover AC 4 Cloc...

Page 318: ...SERVICE POINTS AA AIR BAG MODULE REMOVAL DRIVER S SIDE When disconnecting the connector of the clock spring from the air bag module press the air bag s lock towards the outer side to spread it open U...

Page 319: ...ose of air bag modules only according to the specified procedure Refer to P 52B 32 2 Connect the battery terminal 3 Connect the MUT II to the diagnosis connector Caution Make certain that the ignition...

Page 320: ...HEEL INSTALLATION 1 Before installation the steering wheel be sure to first turn the vehicle s front wheels to the straight ahead position and align the mating marks of the clock spring Caution Be sur...

Page 321: ...ctors for damage terminals for deformation and harness for binds 3 Check air bag inflator case for dents cracks or deformation 4 Install the air bag module to steering wheel to check fit or alignment...

Page 322: ...nnector No 4 respectively of the SRS check harness NOTE When joining SRS check harness connector No 4 align its white paint with the hollow portion of the No 4 connector of the clock spring 5 Check fo...

Page 323: ...nt of smoke is produced when the air bag is deployed avoid residential areas whenever possible 3 Since there is loud noise when the air bags are deployed avoid residential areas whenever possible If a...

Page 324: ...of the air bag 4 Connect the clock spring or air bag module front passenger s side 2 pin connector red to SRS air bag adapter harness A and pass the deployment wires out of the vehicle 5 Shut all the...

Page 325: ...w it to cool before attempting to handle it Although not poisonous do not inhale gas from air bag deployment See Deployed Air Bag Module Disposal Procedures P 52B 40 for post deployment handling instr...

Page 326: ...A and pass the deployment wires out of the vehicle 5 Shut all the doors with their window glasses closed and cover the vehicle with a body cover to suppress explosion noise leaks as much as possible...

Page 327: ...perform deployment outside if a strong wind is blowing and if there is even a slight breeze the air bag module should be placed and deployed downwind from the battery 1 Disconnect the negative and pos...

Page 328: ...embly and connect it to the air bag module 4 Pass the thick wire through the air bag module mounting hole and then secure the air bag module to an old tyre with a wheel in it so that the pad on the mo...

Page 329: ...inflator will be quite hot immediately following the deployment so wait at least 30 minutes to allow it to cool before attempting to handle it Although not poisonous do not inhale gas from air bag de...

Page 330: ...air bag adapter harness A and cover the connections with insulation tape The other ends of the two wires should be connected to each other short circuited to prevent sudden unexpected deployment of t...

Page 331: ...30 minutes to allow it to cool before attempting to handle it Although not poisonous do not inhale gas from air bag deployment See Deployed Air Bag Module Disposal Procedures P 52B 40 for post deploym...

Page 332: ...eployed air bag module IF AFTER FOLLOWING THESE PRECAUTIONS ANY MATERIAL DOES GET INTO THE EYES OR ON THE SKIN IMMEDIATELY RINSE THE AFFECTED AREA WITH A LARGE AMOUNT OF CLEAN WATER IF ANY IRRITATION...

Page 333: ...RESTRAINT SYSTEM SRS EQUIPPED VEHICLES WARNING 1 The service personnel must thoroughly review this manual and especially its GROUP 52B Supplemental Restraint System SRS before beginning any service o...

Page 334: ...SHOOTING 42 REAR COMBINATION LAMP 42 SIDE TURN SIGNAL LAMP 43 SPECIAL TOOL 43 SIDE TURN SIGNAL LAMP 43 HAZARD WARNING LAMP SWITCH CLOCK 44 SPECIAL TOOL 44 HAZARD WARNING LAMP SWITCH 44 RADIO AND TAPE...

Page 335: ...L and LOWER LEVEL marks 2 Use a hydrometer and thermometer to check the specific gravity of the battery fluid Standard value 1 220 1 290 20_C The specific gravity of the battery fluid varies with the...

Page 336: ...in amperes 4 Determining if charging is completed 1 If the specific gravity of the battery fluid reaches 1 250 1 290 and remains constant for at least one hour 2 If the voltage of each cell reaches 2...

Page 337: ...yattherecommendeddischargerate seeLOAD TEST RATE CHART 3 Read voltage after 15 seconds then remove load 4 Compare the measured value with the minimum voltage see LOAD TEST CHART OK Higher than minimum...

Page 338: ...54 7 While key hole illumination lamp is illuminated ignition key is turned to the ON position but key hole illumination lamp does not switch off However it switch off after 10 seconds 3 54 8 Key remi...

Page 339: ...bulb D Malfunction of connector D Malfunction of harness wire D Malfunction of ETACS ECU D Malfunction of buzzer ECU OK Replace ETACS ECU or buzzer ECU Vehicles with ETACS ECU MUT II Pulse check Driv...

Page 340: ...alfunction of fuse D Malfunction of connector D Malfunction of harness D Malfunction of ETACS ECU D Malfunction of buzzer ECU OK Replace ETACS ECU Vehicles with ETACS ECU MUT II Pulse check Ignition s...

Page 341: ...U or buzzer ECU and repair if necessary OK Check trouble symptom OK Replacethe ETACS ECU or the buzzer ECU OK NG Key reminder switch continuity inspec tion Refer to P 54 12 NG Replace Vehicles with ET...

Page 342: ...uity inspec tion Refer to P 54 12 NG Replace OK Inspect the harness between the key reminder switch and junction block NG Repair OK Replace the ETACS ECU OK Vehicles with ETACS ECU MUT II Pulse check...

Page 343: ...l steps 1 Cowl side trim R H 2 Junction block 3 Buzzer control unit ETACS ECU Ignition switch removal steps 4 Hood lock release handle 5 Driver side lower panel 6 Column cover lower 7 Column cover upp...

Page 344: ...lock cylinder INSPECTION IGNITION SWITCH CONTINUITY CHECK Disconncect the ignition switch connector without removing the ignition switch from the vehicle Then check the continuity between the followi...

Page 345: ...shooting Inspection Service Points DIAGNOSIS FUNCTION DIAGNOSIS CODES CHECK Refer to GROUP 00 How To Use Troubleshooting Inspection Service Points ERASING DIAGNOSIS CODES Refer to GROUP 00 How To Use...

Page 346: ...the immobilizer ECU NG Diagnosis codes check Code No 12 occurs To INSPECTION PROCEDURE FOR DIAGNOSIS CODE No 12 Refer to P 54 14 Code No 11 occurs Check the continuity of the ignition key ring antenn...

Page 347: ...54 being gener ated by the engine ECU NO Check the engine ECU power source and the earth circuit Refer to GROUP 13A Troubleshoot ing YES Check the following connectors B 100 B 65 B 61 NG Repair OK Ch...

Page 348: ...ble cause The cause is probably that a malfunction of the diagnosis line or the immobilizer ECU is not functioning D Malfunction of the diagnosis line D Malfunction of harness or connector D Malfuncti...

Page 349: ...PECTION PROCEDURE 4 OK Check trouble symptoms NG Replace the immobilizer ECU Inspection Procedure 3 Engine does not start cranking but no initial combustion Probable cause If the fuel injectors are no...

Page 350: ...gnition switch IG and immobilizer ECU NG OK Check trouble symptoms NG Check the ignition switch Refer to P 54 20 2 NG Check the following connectors B 65 B 100 NG Repair OK Check trouble symptoms NG C...

Page 351: ...drive vehicles R H drive vehicles 3 4 Immobilizer ECU removal steps 1 Hood lock release handle 2 Driver s side lower cover D Radio and tape player R H drive vehicles D Heater control assembly R H driv...

Page 352: ...ock cylinder inward and then pull the steering lock cylinder toward you INSPECTION IGNITION SWITCH CONTINUITY CHECK 1 Remove the column cover lower and upper 2 Disconnect the wiring connector from the...

Page 353: ...keys that have already been registered 1 Connect the MUT II to the diagnosis connector Caution Turn the ignition switch off before connecting or disconnecting the MUT II 2 Check that the diagnosis co...

Page 354: ...surable up to 9 000 rpm and meters measurable up to 10 000 rpm 325 125 6 000 Meters measurable up to 8 000 rpm 300 7 000 Meters measurable up to 9 000 rpm and meters measurable up to 10 000 rpm 400 10...

Page 355: ...dhesive nut locking No 4171 or equivalent Drying sealant SPECIAL TOOLS Tool Number Name Use A B C D MB991223 A MB991219 B MB991220 C MB991221 D MB991222 Harness set A Test harness B LED harness C LED...

Page 356: ...ity between the terminal No 11 and earth OK Continuity 2 VoltagebetweenterminalNo 51and earth OK 4 7 V or more 3 Voltagebetween the terminal No 22 and earth OK System voltage 1 NG OK Replace the speed...

Page 357: ...m voltage 1 NG Check the following connectors B 08 A 36 B 61 B 64 A 41 A 109 NG Repair OK Check trouble symptom NG Checktheharnessbetweenthe engine ECU and combination meter and repair if necessary 2...

Page 358: ...1 NG Check the following connectors A 19 B 64 NG Repair OK Check trouble symptom NG Check the harness wire between the vehicle speed sensor and multi purpose fuse 4 and repair if necessary 3 NG Check...

Page 359: ...peed rapidly while testing Standard values Vehicle speed km h Speedometer indication allowable errors km h 40 37 45 80 75 88 120 113 132 160 150 176 Limit Pointer fluctuation at vehicle speeds of high...

Page 360: ...GAUGE UNIT CHECK Remove the fuel gauge unit from the fuel tank FUEL GAUGE UNIT RESISTANCE 1 Check that resistance value between the fuel gauge unit terminal and earth terminal is at standard value wh...

Page 361: ...thermistor is immersed in water and goes on when it is taken out of water ENGINE COOLANT TEMPERATURE GAUGE SIMPLE CHECK Remove the engine coolant tempara ture gauge unit connector Connect a test lamp...

Page 362: ...the specified adhesive around the thread of engine coolant temperature gauge unit Then tighten the unit to the specified torque Specified sealant 3M Adhesive Nut Locking No 4171 or equivalent 5 Add en...

Page 363: ...g screw 2 Use a circuit tester to measure the resistance value between the terminals Standard value Unit Measurement terminal Resistance value Power supply Earth 187 18 7 Power supply Engine coolant t...

Page 364: ...ising section intersects vertical line V Headlamp intensity cd Center of high beam high intensity zone 15 000 or more per light Cautions in Handling Headlamp Assembly Each headlamp assembly has a plas...

Page 365: ...unction of the lighting switch input circuit system or a malfunction of ETACS ECU or buzzer ECU When the key reminder warning buzzer is sounding the lighting monitor warning buzzer does not sound even...

Page 366: ...evel D Set the vehicle unladen on a level floor D Place one person approximately 55 kg on the driver s seat 1 Position the tester so that its converging lens faces the high beam lamp f marked center t...

Page 367: ...e charged condition 3 Check that the high beam headlamp intensity at the center of the high intensity zone satisfies the limit value Limit 15 000 cd or more per headlamp Caution 1 Perform intensity me...

Page 368: ...ly POSITION LAMP BULB REPLACEMENT Remove the position lamp by turning it together with the lamp socket then replace its bulb HEADLAMP AND FRONT TURN SIGNAL LAMP REMOVAL AND INSTALLATION CAUTION SRS Be...

Page 369: ...hrust the front turn signal lamp in the direction of the vehicle 3 Unplug the connector and remove the front turn signal lamp INSTALLATION SERVICE POINT AA HEADLAMP INSTALLATION Tighten attaching bolt...

Page 370: ...CHASSIS ELECTRICAL Headlamp 54 38 HEADLAMP RELAY CONTINUITYCHECK Battery voltage Terminal No 1 3 4 5 Not supplied Supplied Headlamp relay...

Page 371: ...a level floor D Place one person approximately 55 kg on the driver s seat D Maintain an engine speed of 2 000 r min to keep the battery in the charged condition 1 Position the tester so that its conv...

Page 372: ...ht 2 Do not mask the outer lenses by taping or in any other way 3 Aiming adjustment must be completed with the aiming adjustment screws turned in the tightening direction FOG LAMP BULB REPLACEMENT 1 R...

Page 373: ...54 41 FOG LAMP REMOVAL AND INSTALLATION 3 1 4 2 1 Front fog lamp switch Fog lamp removal steps 2 Front bumper 3 Fog lamp bezel 4 Fog lamp assembly INSPECTION FOG LAMP SWITCH CONTINUITY CHECK Switch p...

Page 374: ...ION Caution SRS Before removal of air bag module and clock spring refer to GROUP 52B SRS Service Precautions and Air Bag Module and Clock Spring 2 1 3 1 Column switch Rear combination lamp removal ste...

Page 375: ...3 SIDE TURN SIGNAL LAMP SPECIAL TOOL Tool Number Name Use MB990784 Ornament remover Removal of side turn signal lamp SIDE TURN SIGNAL LAMP REMOVAL INSTALLATION Fit the hook side rearward Fender panel...

Page 376: ...r conditioner panel removal HAZARD WARNING LAMP SWITCH REMOVAL AND INSTALLATION 2 1 3 4 Hazard warning lamp switch removal steps 1 Air conditioner panel 2 Switch holder 3 Hazard warning lamp switch Cl...

Page 377: ...er is broken enters the glass antenna Repair the print heater AM FM Wiper motor noise Humming wheez ing Sound becomes faster with the increase of wiper speed and is lost when the wiper is stopped Caus...

Page 378: ...serted between a noise generating power line and earthing line to suppress noise by earthing noise components in AC or pulse signal to the vehicle body 2 Noise Filter The coil allows the passage of DC...

Page 379: ...7 RADIO AND TAPE PLAYER REMOVAL AND INSTALLATION 1 3 2 Removal steps 1 Radio panel 2 Radio and tape player 3 Radio bracket SPEAKER REMOVAL AND INSTALLATION 2 1 3 4 5 Removal steps 1 Door trim 2 Speake...

Page 380: ...val steps 6 Speaker garnish 7 Speaker ANTENNA POLE ANTENNA REMOVAL AND INSTALLATION 1 2 3 5 4 7 6 8 9 Removal steps 1 Pole 2 Radio panel 3 Radio and tape player 4 Hood lock release handle 5 Driver sid...

Page 381: ...drain pipe can be seen 3 Pass the cord through the hole in the end of the drain pipe and wrap it with vinyl tape Caution Wrap it securely so that the cord will not come off 4 Pull out the antenna asse...

Page 382: ...good if it indicates about 6V 3 If 12 V is indicated at A there is a break in the negative terminals from A Move test bar slowly to negative terminal to detect where voltage changes suddenly 0V 4 If...

Page 383: ...ILL IND ILL 54 51 REAR WINDOW DEFOGGER SWITCH VEHICLES WITH AUTOMATIC A C REMOVAL AND INSTALLATION Refer to GROUP Heater Control Assembly INSPECTION DEFOGGER SWITCH CONTINUITY CHECK Switch iti Termin...

Page 384: ...ing System 10 Discharging System 11 Performance Test 11 Dual Pressure Switch Simple Check 13 Power Relay Check 13 Idle up Operation Check 14 HEATER CONTROL ASSEMBLY AND A C SWITCH 15 HEATER UNIT AND B...

Page 385: ...VEHICLE SERVICE 56 Refrigerant Charging Level Check Addition and Removal Performance Test Dual Pressure Switch Simple Check 56 Power Relay Check 57 Idle up Operation Check 57 DAMPER CONTROL MOTOR ASSE...

Page 386: ...speed r min 850 50 Resistor for blower motor HI LO between terminals 3 and 2 2 81 10 HI ML between terminals 3 and 4 1 28 10 HI MH between terminals 3 and 1 0 33 10 Air gap Compressor mm 0 4 0 6 LUBR...

Page 387: ...m Failed Component Cross Reference Table Items to be checked 1 When the igni tion switch is ON the A C does not oper ate 2 When the A C is operating temperature inside the pas senger compartment does...

Page 388: ...efective Replace the condenser fan relay 55 14 is not emitted Condenser fan motor is defective Replace the condenser fan motor 55 29 Radiator fan relay HI LO is defective Replace the radiator fan rela...

Page 389: ...ntilated place 1 Recommended charging tools The following commercially available tools are recommended for discharging and charging refrigerant D Gas charging set No EA95 R134a D Gas charging set case...

Page 390: ...tor to the vacuum pump Caution To supply the power connect the power supply plug of the vacuum pump to the vacuum pump adapter and then the power supply plug of the vacuum pump adapter to a 100 V powe...

Page 391: ...nd puncture the service can 18 Turn the handle of the charging valve back valve open and tighten the handle of the adaptor valve 1 valve open to charge the system with refrigerant 19 If the refrigeran...

Page 392: ...speed at 1 500 r min 4 Check the refrigerant level bubble generation through the sight glass of the receiver Item Condition Proper level Bubbles are generated some times No bubbles appear when the en...

Page 393: ...he service can 6 Install the charging valve to the adapter valve 1 and turn back the handle all the way valve open 7 Start the engine 8 Operate the A C and set to the lowest temperature MAX COOL 9 Fix...

Page 394: ...TE Any oil remaining in the container should be returned to the A C system PERFORMANCE TEST 1 The vehicle to be tested should be placed in a place that is not exposed to direct sunlight 2 The ambient...

Page 395: ...er at the air outlet Caution 1 Set the dry bulb thermometer at a position where the temperature sensing section can be directly blown with cooled air 2 Place the dry bulb wet bulb thermometer at a pos...

Page 396: ...dual pressure switch terminals with the dual pressure switch in ON condition as shown in the graph at left the switch is in good condition If not it is faulty Replace the switch POWER RELAY CHECK BLOW...

Page 397: ...dle speed is the standard value Standard value 700 50 r min NOTE There is no necessity to make an adjustment because the idle speed is automatically adjusted by the ISC system If however there occurs...

Page 398: ...onsole Assembly Removal and Installation D Foot Duct Removal and Installation Refer to P 55 31 3 4 1 2 5 Removal steps AA AA 1 Heater control assembly 2 Rear window defogger switch 3 A C switch 4 Knob...

Page 399: ...nk pull the outer cable to the heater control assembly side and then fasten the outer cable to the clip of the heater unit 4 After installation operate the heater control knob to check if the mode cha...

Page 400: ...to the INSIDE position 3 After inserting the inner cable into the link pull the outer cable to the heater control assembly side and then fasten the outer cable to the clip of the blower unit 4 After i...

Page 401: ...Cover and Hose Removal and Installation D Floor Console and Instrument Panel Removal and Installation D Rear Seat Heater Duct Removal and Installation Vehicles for cold regions Refer to P 55 31 1 3 4...

Page 402: ...er to P 55 31 1 3 4 5 6 2 7 8 9 10 11 12 Piping connection O ring A C Compressor oil SUN PAG 56 Removal steps 1 Center reinforcement RH 2 Heater control assembly 3 Center reinforcement LH 4 Center ven...

Page 403: ...old regions D Glove box glove box frame 3 Resistor Evaporator removal steps Vehicles with A C D Discharging and Charging of refrigerant Refer to P 55 6 D Glove box glove box frame 4 Drain hose AA 5 Co...

Page 404: ...nd then remove the evaporator towards you being careful not to damage its core INSPECTION BLOWER MOTOR CHECK When battery voltage is applied between the terminals check that the motor operates Also ch...

Page 405: ...sure the resistance between the sensor terminals in two or more different temperature conditions The resistance values must conform to the values shown in the graph NOTE The temperatures at checking m...

Page 406: ...ischarging of Refrigerant Refer to P 55 6 Post installation Operation D Drive Belt Tension Adjustment D Charging of Refrigerant Refer to P 55 6 4 2 1 5 3 Piping connection O ring A C Compressor oil SU...

Page 407: ...holes 2 Remove the drive belt AB SUCTION HOSE DISCHARGE HOSE DISCONNECTION Plug the disconnected hose and the compressor nipple not to let foreign matter get into them Caution Seal the hoses complete...

Page 408: ...unt 120 to 140 m X m Y m NOTE 1 120 to 140 ml is the amount of oil filled in a new compressor 2 Y m indicates the amount of oil in the refrigerant line the condenser the cooling unit etc INSPECTION RE...

Page 409: ...g nut CA 2 Armature 3 Shims BA 4 Snap ring 5 Rotor AA 6 Field core DISASSEMBLY SERVICE POINT AA SELF LOCKING NUT REMOVAL REASSEMBLY SERVICE POINTS AA FIELD CORE INSTALLATION When installing the field...

Page 410: ...fit them together DA SELF LOCKING NUT INSTALLATION Use the special tool to hold the magnet clutch and tighten the self locking nut in the same manner as removal EA AIR GAP ADJUSTMENT Check whether or...

Page 411: ...connection O ring A C Compressor oil SUN PAG 56 Condenser fan removal steps D Front bumper AA 1 Condenser fan motor and shroud assembly 2 Fan 3 Motor assembly 4 Shroud Condenser removal steps D Discha...

Page 412: ...you AB DISCHARGE HOSE LIQUID PIPE A DISCONNECTION Plug the open end of the disconnected hose and the opening in the cooling unit not to let foreign matter get into them Caution Seal the hoses complet...

Page 413: ...tion A C Compressor oil SUN PAG 56 4 6 2 1 5 3 7 8 9 10 3 AA 1 Liquid pipe B 2 Clip 3 Clamp AA 4 Suction hose assembly AA 5 Liquid pipe A 6 Clip AA 7 Receiver 8 Dual pressure switch 9 Receiver bracket...

Page 414: ...air outlet assembly 2 Center ventilation duct Refer to P 55 18 19 3 Undercover Vehicles for cold regions Refer to P 55 20 4 Side air outlet assembly 5 Defroster nozzel 6 Distribution duct Rear heater...

Page 415: ...Ducts HEATER AND MANUAL AIR CONDITIONER 55 32 9 Rear ventilation duct removal steps D Rear bumper assembly D Trunk side trim 9 Rear ventilation duct...

Page 416: ...e k MAX HOT position 4 82 resistance k MAX COOL position 0 18 Outlet air changeover damper potentiometer resistance k DEF position 0 18 potentiometer resistance k FACE position 4 82 LUBRICANTS Items S...

Page 417: ...tem short circuit 55 36 21 Air thermo sensor system open circuit 55 37 22 Air thermo sensor system short circuit 55 37 31 Potentiometer system of air mix damper assembly 55 38 32 Potentiometer system...

Page 418: ...C ECU connector B 04 D Connect the connector D Voltage between terminal 7 and body earth OK 2 3 2 9 V NG Check the following connectors A 15 B 04 NG Repair OK Check the trouble symptom NG Check the h...

Page 419: ...CU connector B 04 D Connect the connector D Voltage between terminal 4 and body earth OK 2 3 2 9 V NG Check the following connector B 02 NG Repair OK Check the trouble symptom NG Check the harness bet...

Page 420: ...CU connector B 04 D Connect the connector D Voltage between terminal 8 and body earth OK 2 3 2 9 V NG Check the following connector B 03 NG Repair OK Check the trouble symptom NG Check the harness bet...

Page 421: ...nect the connector and measure at the harness side connector D Voltage between terminal 6 and body earth OK 5 V NG Check the following connector B 04 NG Repair OK Check the trouble symptom NG Check th...

Page 422: ...B 06 D Disconnect the connector and measure at the harness side connector D Voltage between terminal 2 and body earth OK 5 V NG Check the following connector B 04 NG Repair OK Check the trouble sympt...

Page 423: ...e harness between the air mix damper motor and the A C ECU OK Replace the A C ECU NG Repair Code No 42 Drive system of air outlet changeover damper motor assembly Probable cause This diagnosis code is...

Page 424: ...outlet air temperature does not increase 5 55 44 A C outlet air temperature does not decrease 6 55 44 Blower does not operate 7 55 45 Blower does not operate in HI mode 8 55 46 Blower air amount canno...

Page 425: ...Measure at the A C ECU connector B 04 D Connect the connector D Voltage between terminal 17 and body earth OK Indication fluctuates be tween 0 V and 12 V NG OK Check the following connector B 04 NG Ch...

Page 426: ...rigerant Refer to P 55 6 OK MUT II Self Diag code Is any of the codes 11 12 21 and 22 output YES INSPECTION CHART FOR DIAGNOSIS CODES Refer to P 55 34 NO D Magnetic clutch check Refer to P 55 25 D A C...

Page 427: ...ntiometer D Malfunction of air mix damper motor D Malfunction of air mix damper D Malfunction of connector or harness D Malfunction of thermostat D Malfunction of A C ECU MUT II Self Diag code Is any...

Page 428: ...ntinuity 2 Voltage between terminal 3 and body earth Ignition switch ON OK System voltage 3 Voltage between terminal 5 and body earth OK System voltage 1 NG Check the harness between the blower motor...

Page 429: ...e at the harness side connector 1 Connect terminal 1 to earth OK Blower operates 2 Continuity between terminal 3 and body earth OK Continuity 3 Voltage between terminal 4 and body earth Ignition switc...

Page 430: ...or 1 Voltage between terminal 1 and body earth Ignition switch ON OK Approx 7 V 2 Voltage between terminal 2 and body earth Ignition switch ON OK Approx 1 3 V NG Check the following connector B 04 NG...

Page 431: ...ion procedure 15 Refer to P 55 52 YES Inside outside air changeover damper motor check Refer to P 55 59 NG Replace OK Measure at the inside outside air changeover damper motor con nector B 36 D Discon...

Page 432: ...on of air conditioner drive system D Malfunction of air outlet changeover damper drive system D Malfunction of connector or harness D Malfunction of A C ECU Can an operating sound be heard when the de...

Page 433: ...ect the connector 1 Continuity between terminal 4 and body earth OK Continuity 2 Voltage between terminal 2 and body earth OK System voltage 3 Voltage between terminal 1 and body earth OK System volta...

Page 434: ...ouble symptom NG Check the harness between the condenser fan motor relay HI and the fusible link 2 and repair if necessary 3 NG Check the following connector A 114X OK Measure at the condenser fan mot...

Page 435: ...necessary NG Repair OK Measure at the A C ECU connector B 05 D Disconnect the connector and measure at the harness side connector D Continuity between terminal 29 and body earth OK Continuity D Contin...

Page 436: ...onnector and measure at the harness side connector D Voltage between terminal 2 and body earth OK System voltage NG Check the following connectors A 49 B 15 B 05 NG Repair OK Check the trouble symptom...

Page 437: ...mount of incident light is propor tional to voltage displayed on the MUT II Air mix damper potentiometer D MUT II 31 Ignition switch ON Damper position Opening degree D MUT II 31 MAX HOT Approx 100 MA...

Page 438: ...or less When blower switch is in a position other than HI System voltage 16 Rear defogger When rear defogger switch is ON 1 5 V or less When rear defogger switch is OFF System voltage 17 Diagnosis dat...

Page 439: ...air position 10 V When switch is set to outside air position Almost no voltage 0 5 V 28 IG2 power supply When ignition switch is ON System voltage 29 Earth At all times Continuity 30 ILL power supply...

Page 440: ...SPEED RELAY Battery voltage Terminal No 1 2 3 4 Power is not supplied Power is supplied IDLE UP OPERATION CHECK The idle up inspection procedures are the same as for the heater and manual air conditio...

Page 441: ...D Glove box glove box frame 1 Linkage connection 2 Inside outside air changeover damper motor Air outlet port changeover damper motor removal steps D Instrument lower panel 3 Linkage connection 4 Air...

Page 442: ...er is in the stop position AIR MIX DAMPER MOTOR CHECK Motor Battery connection terminal Lever operation 1 3 Moves to COOL position Moves to HOT position Caution Cut off the battery voltage when the le...

Page 443: ...es to DEF position Moves to FACE position Caution Cut off the battery voltage when the lever is in the stop position Potentiometer Check to ensure that the resistance value changes within the standard...

Page 444: ...nstallation Operation D Instrument Panel Removal and Installation 1 2 Removal step 1 Defroster nozzle 2 Photo sensor INSPECTION If the blower speed drops when the receiver section of the photo sensor...

Page 445: ...tallation Outside air temperature sensor INSPECTION When the resistance value between the sensor terminals is measured under two or more temperature conditions the resistance value should be close to...

Page 446: ...REMOVAL SERVICE POINT AA HEATER WATER TEMPERATURE SENSOR CLIP AND HEATER WATER TEMPERATURE SENSOR REMOVAL Pull out the heater water temperature sensor clip which is at the bottom of the heater unit an...

Page 447: ...HER MAINTENANCE SERVICE POINTS The following maintenance service points are the same as for the manual A C Items Reference page Dual Pressure Switch 55 13 Blower Relay A C Compressor Relay Condenser F...

Reviews: