background image


REV 1.0   

27


Geom

etr

y A
lig

nm
ent


8


FINE ADJUST 9x9 

Normally please adjust in the FINE ADJUST 5x5 mode.


If 

necessary, the setting can be fine tuned  in the FINE 
ADJUST 9x9 mode. 
  In this mode Grid  of  9x9  will be displayed on the 
screen. 


Be careful not to change into the  5x5 mode, once 
adjusting in the 9x9 mode.  Adjustment setting will 
be reset if readjusts in 5x5 mode after adjusting in 
9x9 mode. 


9


GEOM. RESET 

It  can  reset  geometry adjustment setting  to factory 
setting. 
 

Adjustment procedure 

Choose base monitor that is located in the center of 
multi-screen  and  adjust the geometry adjustment  of 
base monitor first. Adjust the geometry adjustment of 
neighboring monitors on the basis of base monitor one 
by one. Adjustment of each monitor is adjusted with 
the following procedures. 


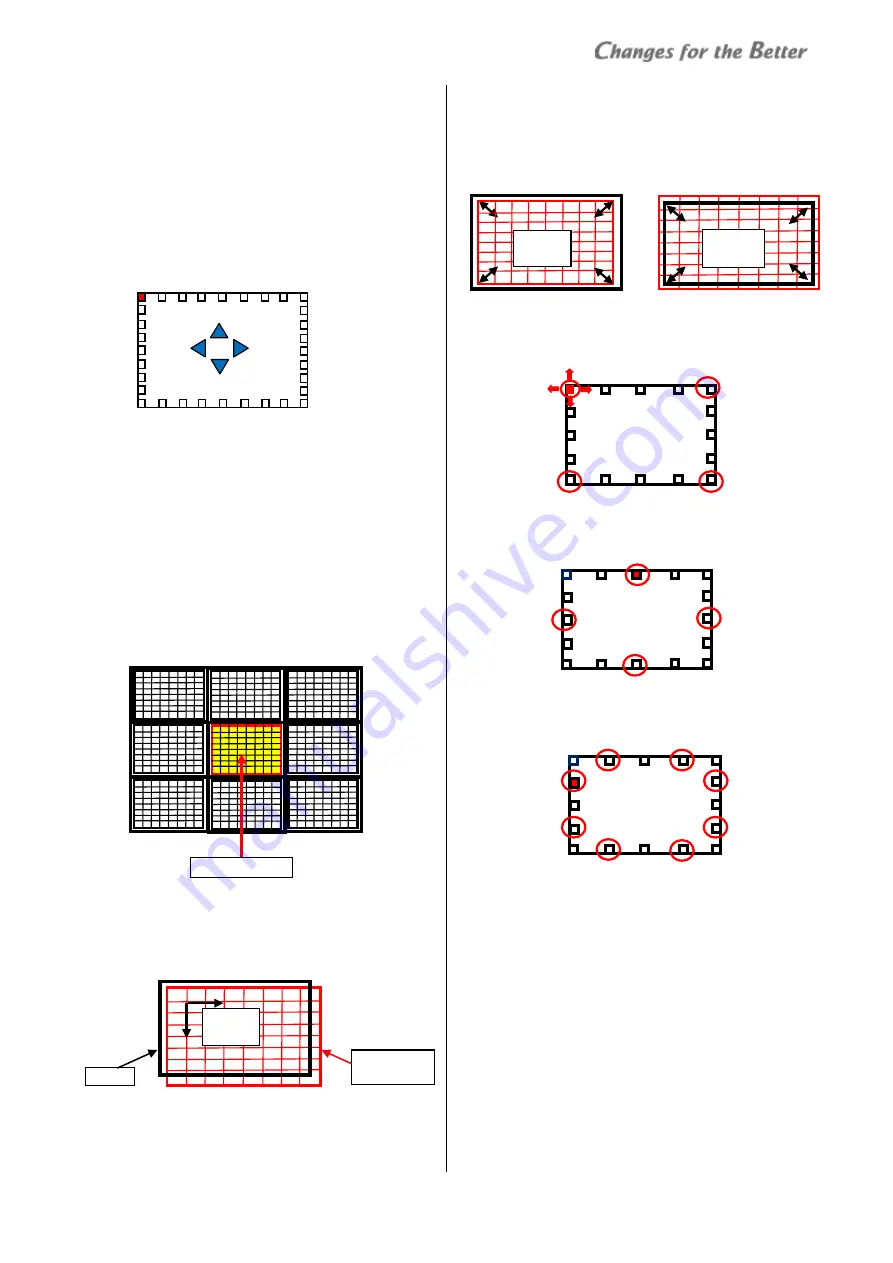
1.  If necessary, adjust H-POSITION and V-POSITION  to 
almost  fit  in the center of the screen at the center of 
the ‘GEOM CROSSHATCH’. 


2. When the shown area of the ‘GEOM CROSSHATCH’ is 
greatly shifted to the screen, adjust H-ZOOM, V-ZOOM 
so that the outline of the ‘GEOM CROSSHATCH’ fit to the 
screen.  If necessary, readjust H-POSITION and 
V-POSITION after this adjustment. 


3. Select Fine ADJUST 5x5, and adjust four grids of the 
corners in left, right, top and down direction.   


4. Adjust four grids of the center in left, right, top and 
down direction.   


5. Adjust remaining eight grids in left,  right, top and 
down direction.   


6. When the display position have shifted between the 
monitor of top and bottom right and left after 
adjustment in FINE ADJUST5x5 mode, readjust in FINE 
ADJUST9x9  mode.  Be careful not to change into the 
5x5 mode, once adjusting in the 9x9 mode. Adjustment 
setting will be reset if readjusts in 5x5 mode after 
adjusting in 9x9 mode. 


Base Monitor 


Screen 

Test Pattern 
(Cross Hatch) 
 

H Shift 
V Shift 


H Zoom 
V Zoom 

H Shrink 

V Shrink 


Summary of Contents for VS-60HS12U

Page 1: ...DLPTM Display Wall Cube VS 60HS12U Set up Manual REV 1 0 Dec 22 2014 ...

Page 2: ...tem memory saving 25 3 3 Geometry Alignment 26 3 4 Color balance adjustment 29 3 4 1 Preparation 29 3 4 2 BLACK LEVEL adjustment 29 3 4 3 CSC adjustment 30 3 4 4 Light source output adjustment 31 3 4 5 WHITE BALANCE adjustment 32 3 4 6 GRADATION adjustment 32 3 4 7 SENSOR 33 3 5 System memory setting custom 34 3 6 Input memory setting 37 3 6 1 Basic setting 37 3 6 2 Custom setting 39 3 6 3 Input m...

Page 3: ...REV 1 0 3 5 2 1 On screen menus 51 5 2 2 Wallaby menus 54 5 3 Connectors switches spec 60 5 4 Accessories 60 6 REVISION HISTORY 61 ...

Page 4: ...4 chips composition for the light source However if a part of LED chip breaks down VS 60HS12U becomes POWER OFF or the brightness of breakdown LED decreases Illumination information of LED can be confirmed with the status indicator page47 1 1 2 Optional products Optional products Product names Wireless wired remote control R XL50TX R XL51TX Power cords JC PC3MA for NorthAmerica JC PC3ME for Europe...

Page 5: ... ha ar rt t Cube installation page 12 Connecting Dipswitch setting Power on Focus adjustment Screen demounting page 14 Base stands and cubes assembling page 15 Screen gaps adjustment page 17 A1 Adjustment page 19 Initial setting page 19 Next page ...

Page 6: ... PHASE AMP GAIN etc Input signal allocation Window position size setting Crop zoom setting Window priority order setting etc H 1 V 1 H 2 V 2 H 1 V 2 H 2 V 1 ID 1 MASTER H 1 V 1 ID 2 slave H 2 V 1 ID 4 slave H 2 V 2 ID 3 slave H 1 V 2 ID 1 ID 2 ID 4 ID 3 Window1 System memory setting basic page 24 Geometry Alignment page 26 Color balance adjustment page 29 System memory setting custom page 34 Input...

Page 7: ... On screen indicator off available in light source off ENTER Enter Up down arrows Menu select cursor up down Left right arrows Option select value change R G B Primary color mute display 5 numbers Remote ID input after FUNC Recall display memory by number NORMAL Switch between normal and advanced mode Value reset FUNC Remote ID switch 6 Slide switch Switch the function between DISPLAY and MUTE 1 T...

Page 8: ...n screen mute WINDOW MUTE one of the windows is muted NO SIGNAL no signal on the foreground window No Description 6 Unit ID 7 Remote ID indicator It is shown when remote controlling is available by remote ID setting 8 Monitor status Adjustment values have been changed It appears when an adjustment value is changed by remote control as well as changed automatically by internal process Remote ID An ...

Page 9: ...emory in any of the windows is changed In INPUT MEMORY menu the mark appears when an input memory in the top window is changed In the menu displaying MENU1 button changes the menu GUI to the simple one The image area behind the menu can be observed widely Re pressing the same button restores the original menu Menus are not displayed when the monitors are controlled by Wallaby TOP menu The TOP menu...

Page 10: ...n select input ports to be displayed or adjusted page 37 Selected input signal will be displayed on top Short cut INPUTA button MEMORY CALL menu Registered input memories display memories can be called page 41 46 Short cut MEM LIST button INPUT MEMORY menu It can set input signals See on page 37 for detail Short cut INPUT B button DISPLAY MEMORY menu It can set display layouts See on page 42 for d...

Page 11: ...panel The control panel has the following functions Status indicator page 47 Digital Analog input page 19 Control ports page 19 Wired remote port page 7 Dipswitches page 20 Standby switch page 21 Network port page 19 RS 232 port page 19 ...

Page 12: ...uct with its intakes exhaust slots and ventilation holes blocked Inside the unit may overheat and cause a fire or breakdown Be sure that a lighting or sunlight does not leak into the screens Be sure to mount demount the screen by 2 or more people These works may be perilous particularly on a height or a narrow scaffold About one meter space is needed in front of the screens for the opening Prior t...

Page 13: ...creen frame or the corners when picking up the screen Holding the long sides of the frame may damage the screen edge due to its heavy weight LED Safety The light source within an equilateral triangle is intended to alert the user to the presence of dangerous light radiation 2 2 2 2 P Pr re ep pa ar ra at ti io on n Necessary tools Hex keys 3mm 4mm 5mm Phillips screwdrivers 2 Level Stepladder Wrenc...

Page 14: ...he frame of the cabinet after demounting the screen Demounting 1 Pull up the screen handles on both sides to draw the screen unit till locked and put the handles back to the original positions 2 While pressing the release buttons on both sides to the end open the lower part of the screen about 15 to pull it up on the skew 3 Put back the screen holding arms into the cabinet by pressing down the sli...

Page 15: ...r at 4 points with supplied hex socket head bolts spring washers and flat washers To access the rear fixing points open the covers on both sides by pulling the latches When making a curved display wall and you have to remove the connecting plates put substitute washers with equivalent strength on the holes 6 Place other cubes for the upper row on the row of cubes 7 Connect these cubes vertically a...

Page 16: ... screen unit onto the cabinet Lifting up the screen unit on a skew about 15 insert the pins in the u slot on both sides Push the lower part of screen down until the screen becomes upright 3 Push the screen unit along the rails till the end while pressing down the slide lock lever on the both side The screen unit may touch adjacent screens depending on the screen gap adjustment Adjust the gaps appr...

Page 17: ...ps until being appropriate Tighten the 5 fixing screws after the adjustment The screens can be rotated by different travel distance on both vertical adjustment screws 4 After the adjustment tighten the 3 fixing screws which have been loosened in the step 2 The screen unit may touch adjacent screens depending on the gap adjustment Adjust the gaps appropriately Gap adjustment In case of existing the...

Page 18: ...s of fixing brackets To prevent the cubes from falling due to unpredictable events such as earthquakes or shocks fix them firmly to the wall and floor Furthermore carefully confirm the strength of the fixing areas wall and floor of the installation room The fixing method differs depending on the number of cubes After the completion proceed to Adjustment page 19 Bolts Wall fixing brackets Bolts Anc...

Page 19: ...cables connection External controllers such as personal computers in which adjustment software Wallaby has been installed also can control monitors Through RS 232 Connect the external controller to the MASTER monitor page 20 with RS 232 cross over cable The controller will be able to control the monitors individually through the internal control loop Through network Connect network cables to all m...

Page 20: ...the screen area and fasten the cables with them 3 1 2 Dipswitch setting Adequately set the dipswitches on the control panel according to system configurations Change the switches while the power is off Turning on the main power switch renews the setting Normally there is no need to change the switches 1 and 2 No Name Function Default 1 ON RESERVED For factory setting ON 2 ON RESERVED For factory s...

Page 21: ...ON setting of SYSTEM SETTING MISC 1 AUTO POWER ON automatically starts the start up process page 35 2 Press POWER ON button on the remote control or press and hold the standby switch on the control panel It starts the start up process and cube will be in service in a few ten seconds Main power switch Power socket ...

Page 22: ...he messages to complete the installation Connection According to External control cables connection page 19 connect the control PC to a display wall To connect through network allocate an appropriate IP address onto the PC which can comminute with the monitors Unit ID IP address assignment Referring to System memory setting basic page 24 set unit IDs and IP addresses on the monitors on screen menu...

Page 23: ... allocated in a sequential order from the upper left panel in a horizontal direction If you click the Sequential Numbering button with Shift key it allocates the numbers in a vertical direction When you modify it individually select the target panel and enter or select a new ID number IP address Communication 1 Choose the communication method out of LAN or RS232C Set COM port and communication spe...

Page 24: ... can be assigned on each monitor for controlling through network The initial settings are below IPADDRESS 192 168 100 32 SUBNET MASK 255 255 255 0 DEFAULT GATEWAY 0 0 0 0 1 Make sure that the monitors to be given IP addresses already have their ID numbers 2 Set an initial address in IP ADDRESS menu for automatic assignment Set the same address on all monitors to be assigned 3 Select IP ADDRESS AUT...

Page 25: ...s Set 60Hz mode when the main content is a PC signal or NTSC Or set 50Hz when the main content is PAL signal The initial setting is 60 Hz The frequency of the entire display wall follows the sync setting in the MASTER monitor page 20 With FRAME LOCK setting page 35 you can set to synchronize with an input signal frequency Even in PAL areas set it 60Hz when 60Hz computer signals are mainly displaye...

Page 26: ...D menu and the internal test patterns except for the GEOM CROSSHATCH The display position and size of the OSD menu does not change by ON OFF of GEOM ALIGNMENT function 3 H ZOOM Horizontal size can be adjusted by left and right button 4 V ZOOM Vertical size can be adjusted by left and right button 5 H POSITION It can adjust the whole output position in the horizontal direction by left and right but...

Page 27: ...H POSITION and V POSITION to almost fit in the center of the screen at the center of the GEOM CROSSHATCH 2 When the shown area of the GEOM CROSSHATCH is greatly shifted to the screen adjust H ZOOM V ZOOM so that the outline of the GEOM CROSSHATCH fit to the screen If necessary readjust H POSITION and V POSITION after this adjustment 3 Select Fine ADJUST 5x5 and adjust four grids of the corners in ...

Page 28: ...2U Set up Manual Geometry Alignment Adjustment tips When it is necessary to adjust correctly in FINE ADJUST5x5 mode please put a mark on the screen according to the following figure 375 0mm 187 5mm 666 8mm 333 4mm ...

Page 29: ...RIGHT mode WHITE BALANCE adjustment chapter 3 4 5 as needed GRADATION adjustment chapter 3 4 6 SENSOR chapter 3 4 7 System memory saving chapter 3 2 2 3 4 1 Preparation Before adjustment make sure that the following items stay in their initial settings Menus Default SYSTEM SETTING INSTALLATION CONTRAST 100 BRIGHTNESS 0 WHITE BALANCE R GAIN G GAIN B GAIN 1000 each BOOST OFF SYSTEM SETTING MAINTENAN...

Page 30: ...ustment white in the internal test patterns page 8 55 3 Select 1 or 2 in CSC TABLE SELECTION menu Adjusted values will be applied to the selected memory table MENU1 button switches the adjustment menu to the simple one page 9 4 Display a single color with R G and B buttons Regardless of remote ID setting page 8 one of those buttons mutes switches off a color on all the monitors When muted un muted...

Page 31: ...alance it by increasing B G on dark blue monitors and increasing B R on light blue monitors 3 4 4 Light source output adjustment This adjustment is needed when ECO or BRIGHT mode is used in LED POWER page 34 It compensates the light source output level on each monitor which uniforms the luminance and tint in the display wall even when the mode is switched to ECO or BRIGHT This should be compensate...

Page 32: ... test patterns page 8 55 2 Select WHITE R G or B to open the gradation menu of each color to be adjusted MENU1 button switches the adjustment menu to the simple one page 9 3 With considering the uniformity on single screens tweak the luminance tint levels on the boundaries of screens gray area in the following figure by edge corrections to align with brighter areas 4 Correct the differences on the...

Page 33: ...ss in the range A monitor which gets dark to the preset limit will be separated from the brightness control group to avoid the situation that the dark monitor makes the entire display wall too dark The initial setting of the limit is 45 of the initial brightness This limit can be changed in THRESHOLD FOR FEEDBACK menu Lower setting keeps the brightness uniformity for a long time while the entire d...

Page 34: ...R Dithering MISC 2 AUTO SCAN Input signal scan setting FRAME LOCK External signal sync setting BAUD RATE RS 232 transmission speed setting TOP SYSTEM SETTING INSTALLATION CONTRAST Contrast adjustment BRIGHTNESS Brightness adjustment BOOST Medium colors boost AMP GAIN Analog Analog input gain correction MAINTENANCE SYSTEM SETTING SAVE System memory save page 25 LED POWER SYSTEM SETTING MISC 1 LED P...

Page 35: ...ivable contrast while greater values make middle tone areas brighter The initial setting is 1 DITHER SYSTEM SETTING MISC 1 DITHER It can set dithering The initial setting is ON which can increase gray scale rendering AUTO SCAN SYSTEM SETTING MISC 2 AUTO SCAN It can set automatic input signal scan for each input port The ON setting scans input signals to display precisely whenever input signals are...

Page 36: ...evels of analog signal from an external source such as a processor with multi output graphic boards Input memory 1 Bring the window to be adjusted to the top overlay order 2 Display a full white signal on the full window from an actual input source to be displayed 3 Select AUTO ADJUSTMENT START YES The optimum value will be automatically set Input an optimum full white signal It may show an error ...

Page 37: ... may not be displayed if the screen or windows are muted In Wallaby it can be selected in Input Input Selection Full screen display INPUT MEMORY WINDOW ARRANGEMENT You can display the full image of the input signal on a single monitor On TILE or DOT BY DOT menu selecting SET OK YES automatically arranges the window on that monitor The initial setting is TILE n TILE Selected image is resized to fit...

Page 38: ...t execute the function a few more times till the correct image will be displayed The signal frequency is selected among the preset signal list page 50 and registered input memories The ON setting of AUTO SCAN page 35 in system memory automatically scans input signals whenever the input signals are switched MEMORY CALL page 10 also can select your saved input memories CLOCK PHASE INPUT MEMORY CLOCK...

Page 39: ...en after H POSITION adjustment Display a window full screen in its native resolution by DOT BY DOT page 37 and adjust it so that the vertical stripe noises will be eliminated If the horizontal position shifts by this adjustment re tweak the H POSITION menu CONTRAST INPUT MEMORY CONTRAST It can adjust the contrast on each window The initial setting is 100 CONTRAST in system memory page 35 adjusts t...

Page 40: ...ilter is canceled CLAMP START CLAMPWIDTH INPUT MEMORY DETAIL CLAMP START CLAMP WIDTH Analog Clamp pulse start positions and the widths can be adjusted in accordance with the input signals Incorrect clamp setting may make whole image darkened and horizontal uneven tone lines may appear on the image MASK START MASK END INPUT MEMORY DETAIL MASK START MASK END Analog Synchronous mask start end positio...

Page 41: ...mend can be replaced with up to 16 letters Specify the input memory number to save the setting in and click Save 3 6 4 Input memory calling deleting Registered input memories can be called or deleted when needed MEM LIST button on the remote control shows MEMORY CALL menu Or select MEMORY CALL in TOP menu n Call Bring the target window on top and select INPUT MEMORY MEMORY CALL Designate a memory ...

Page 42: ...isplay wall can be treated as one big resolution monitor with the pixel map regardless of number of monitors page 25 3 7 1 Available layouts One window can be displayed on HS12 series TOP DISPLAY MEMORY WINDOW 1 WINDOW ARRANGEMENT Window auto arrangement PRIORITY Window priority order setting ENABLED Window non display setting INPUT Input signal allotment H POSITION V POSITION Window position sett...

Page 43: ...d when you save the display memory page 46 One out of 2 inputs DVI DIGITAL DVI ANALOG can be allocated on Window 1 Either DVI DIGITAL or DVI ANALOG signal on DVI I connector The DVI DIGITAL input has a digital equalizer function and the long distance transmission with the DVI D cable of up to 50m is possible However the equalizer function does not work for HDCP and the EDID In this case image may ...

Page 44: ...pacing menu The position and the size of the windows can be moved around aligning the grids Fit menu in the right click menu on a window can change the window to specified sizes Selecting x 2 magnifies the window as full size of 2x2 screens The x 1 2 shrinks it to the quarter size of a screen half width and half height The window will be placed fitting the area in which the top left corner of the ...

Page 45: ...ls the area definition Window disabling DISPLAY MEMORY WINDOW 1 ENABLED You can switch the windows disabled non displayed when needed The initial setting is ON displayed The priority order and the non display setting are shown in TOP DISPLAY MEMORY menu Order 1 means top and order 6 means last In Wallaby you can disable windows by checking off the windows in Window Enable menu The check boxes in t...

Page 46: ... be called or deleted when needed MEM LIST button on the remote control shows MEMORY CALL menu Or select MEMORY CALL in TOP menu n Call Select DISPLAY MEMORY MEMORY CALL and designate a memory number to be called Or it also can be called by 3 digit number with the remote control Press 001 for display memory 1 page 8 In Wallaby double click the display memory to be called in the display memory list...

Page 47: ...on Dot Standby state Starting up process counting up according to the process Normal mode Non display Window1 is active signal Upper Window 1 no signal L Normal mode LED Emergency mode Indicate non lighting LED in normal modes see error indication LED ERROR Dot blinking Shutting down process Error indicaiton Indication Error Description L LED light source error non lighting LED 1 R LED 2 G LED 4 B...

Page 48: ...er It indicates for 5 seconds in every 5 minutes Check surrounding ambient temperature or vents on the cubes Shutdown pre announcement If the light source temperature rises further and reaches abnormally high a flashing warning appears on screen and the monitor will shut down in 1 minute Abnormal internal temperature error will be shown on both on screen indicator and the error indicator ...

Page 49: ...loth or with a damp cloth if necessary Then add a finish the cleaning with a dry cloth Do not use solvents like thinner or benzene It may cause the coating to degenerate or peel off 4 4 3 3 R Re es se et tt ti in ng g These operations are normally unnecessary The following items can be reset as needed Light source timer reset SYSTEM SETTING MAINTENANCE LED TIMER RESET LED TIMER RESET Operating tim...

Page 50: ...63 9 85 1 77 5 640 x 400 70 1 31 5 84 1 37 9 Mac 1152 x 870 75 0 68 6 1024 x 768 74 9 60 2 832 x 624 74 5 49 7 640 x 480 66 7 35 0 Unix 1280 x 1024 59 9 64 6 71 2 75 1 72 0 78 1 76 1 81 1 HDTV 2 1920 x 1080 50 0 28 1 59 9 33 7 1280 x 720 50 0 37 5 59 9 45 0 Component video signals YCbCr YPbPr Computer signal Resolution Refresh rate Hz Line rate kHz 1125p 1080p 1920 x 1080 50 0 56 3 59 9 67 4 1125i...

Page 51: ...OM ALIGNMENT H ZOOM V ZOOM H POSITION V POSITION Geometry adjustment Zoom and shift 26 FINEADJUST 5x5 FINEADJUST 9x9 Fine adjustment GEOM RESET Geometry adjustment reset to factory setting LED TIMER RESET Light source operating time reset 49 MAX TEMPERATURE RESET Peak hold values reset in heat sensors 49 INSTALLATION BLACK LEVEL R G B LEVEL 0 127 0 Black level adjustment 29 WHITE BALANCE LOW MIDDL...

Page 52: ...ange default Description Page INPUT MEMORY WINDOW ARRANGEMENT RESET TILE DOT BY DOT TILE Window auto arrangement 37 MEMORY SCAN Input signal auto scan 38 H POSITION 0 1920 Horizontal signal position adjustment 39 V POSITION 0 1200 Vertical signal position adjustment H SIZE 640 1920 Horizontal size adjustment 39 V SIZE 200 1200 Vertical size adjustment CLOCK PHASE 64 63 Analog Sampling clock phase ...

Page 53: ...ontal position setting 43 V POSITION 117600 117599 0 Window vertical position setting H SIZE 32 188160 VS WE75U VS L55HM75U 16 188160 others Window width setting V SIZE 8 117600 Window height setting ASPECT RATIO KEEP FREE KEEP Aspect ratio maintaining setting 44 CROP H POSITION 0 1919 0 Horizontal crop position setting 45 V POSITION 0 1199 0 Vertical crop position setting H SIZE 16 1920 Crop widt...

Page 54: ... monitors to save in a designated folder The same number of files as selected monitors will be created in the folder with bku extension Open and Send Memories It sends back the memory data saved in Read and Save Memories menu to a designated monitor It can confine the memory types to be sent with check boxes in Target Memories Before sending the data make sure if Last Memory and Factory Memory in ...

Page 55: ...indow The send commands and their responses from monitors can be traced Unit ID IP address It can switch to show no show each unit ID and IP address in the panel area Settings menu Grid Snap settings By checking on the Snap to grid line menu the position and the size of the windows can be moved around aligning the grids page 43 for details Setting of Wallaby You can hide the following menus with a...

Page 56: ...56 VS 60HS12U Set up Manual Menu trees Adjustment menus System It sets the system memory page 24 34 Configuration Maintenance ...

Page 57: ...REV 1 0 57 Menu trees Installation Installation White Balance Detail Misc 1 ...

Page 58: ...58 VS 60HS12U Set up Manual Menu trees Misc 2 Input It sets the input memories page 37 Input A D Setting Other Setting ...

Page 59: ...REV 1 0 59 Menu trees Display It sets the display memories page 42 Information It displays detailed status information page 10 System status Error information ...

Page 60: ...cket head bolts M6 Flat washers for M6 Spring washers for M6 8 each Seals for Joint holes 1 sheet Control cable 1 User s manual 1 Cable ties 6 Pin No I O Signal 1 2 Input RD Receive Data 3 Output SD Send Data 4 Output ER Equipment Ready 5 SG Signal Ground 6 Input DR Data Set Ready 7 N C 8 N C 9 N C Pin No I O Signal IN OUT IN OUT 1 Input Output EXVIN EXVOUT 2 Output Output TXDS2 TXDM2 3 Input Inpu...

Page 61: ...REV 1 0 61 Revision history 6 6 R Re ev vi is si io on n h hi is st to or ry y Description Revision date Issue the first edition Dec 22 2014 Rev 1 0 ...

Page 62: ...ks of Texas Instruments Microsoft Windows and Windows NT are registered trademarks of Microsoft Corporation in the United States and or other countries The names of other products or companies mentioned are registered trademarks or corporate trademarks of the companies written herein ...

Page 63: ...REV 1 0 63 Revision history M E M O ...

Page 64: ......

Reviews: