– 16 –
(3) Checking the Gas Refrigerant Amount (Use this option to check for refrigerant leak from the outdoor unit. This option is available only
when AT-50A is set as a main controller.)
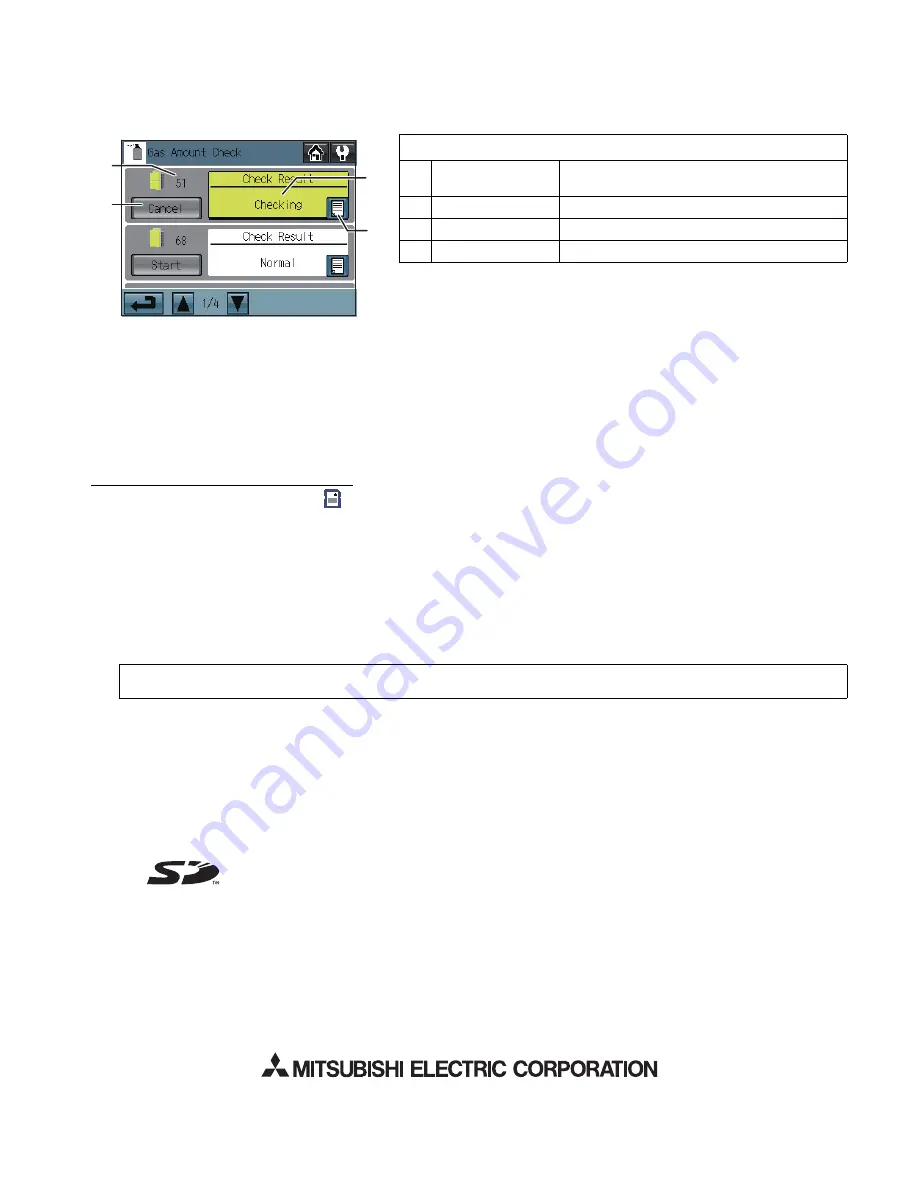
Touch the Gas Amount Check button on the Maintenance Menu.
A screen will appear that allows the user to check the gas refrigerant amount.
* Those outdoor units that do not support the gas refrigerant amount checking function will not appear on this screen.
* This check will be performed in a specific operation mode and takes from 30 minutes to 1 hour.
1. Start the gas refrigerant amount check.
Click the [Check start] button to check an individual unit. Click the [Check cancel] button to stop checking.
* When the [Check Start] button is clicked, it will change to the [Check cancel] button.
2. Check the results.
This check will be completed in 30 minutes to 1 hour, and check results will be displayed upon completion.
When the amount of refrigerant charge is normal, [Normal] will appear on the screen, and if the outdoor units are low on refrigerant
due to leaks, [Low] will appear.
* It is not necessary to keep this page open until checking is completed. Even if the screen is closed, the check results and the log will
be displayed next time this page is opened.
To Update The Software (as necessary)
1) Touch the Software Update button [
] on the Maintenance Menu.
2) Following the instructions on the screen, insert the SD memory card with the update program into the SD slot, and then touch the
OK button.
* If a message [Unable to read the SD card] appears, check to make sure that the SD memory card is properly inserted.
* If a message [Update file was not found] appears, check to make sure the SD memory card contains the updated program.
3) Following the instructions on the screen, remove the cover on the controller by unscrewing the screws at the bottom, turn DIP
switch 4 to ON, and then touch the OK button.
* If the message [The DIP switch 4 is set to OFF.] appears, check to make sure that the DIP switch 4 is turned to ON.
The DIP switch is located at the left bottom of the controller under the cover.
4) Touch the OK button on the confirmation screen.
5) Touch the OK button on the popup message to begin the update process.
6) The lit LEDs on the three buttons (F1, F2, and Collective ON/OFF) will indicate a successful completion of the update. While
update is in progress, the LEDs on the F1 and F2 buttons will alternately blink.
* Consult your dealer if the update is not completed in 10 minutes.
7) After the update has been completed, turn the DIP switch 4 to OFF to restart the AT-50A. When the initialization screen appears,
check that the software version that appears at the bottom right corner is correct. If it shows the old version, the update failed. Try
updating the software again.
* Only 1 GB and 2 GB SD memory cards by SanDisk are supported.
* SanDisk is a registered trademark of SanDisk Corporation in the United States and other countries.
The product is designed and intended for use in residential, commercial, and light-industrial environment.
This product at hand is based on the following EU regulations.
- Low Voltage Directive 2006/95/EC
- Electromagnetic Compatibility Directive 2004/108/EC
Display content
1
[Check Start] button
Touch to start checking the gas refrigerant
amount.
2
Outdoor unit address Outdoor unit address is displayed here.
3
Check results
Check results are displayed here.
4
Log
Touch to display the log (up to 10 results) here.
Note:
Software updates will take approximately five minutes. Do not remove the SD card or switch off the power while an update is in
progress. If the power is turned off during the update process, the program may be lost and the system will not be able to start.
4
3
2
1
“SD Logo is a trademark of SD-3C, LLC.”
HEAD OFFICE
: TOKYO BLDG., 2-7-3, MARUNOUCHI, CHIYODA-KU, TOKYO 100-8310, JAPAN
Authorized representative in EU
: MITSUBISHI ELECTRIC EUROPE B.V.
HARMAN HOUSE, 1 GEORGE STREET, UXBRIDGE, MIDDLESEX UB8 1QQ, U.K.


