spring tension on the spring-hooking
pulley. Too much tension could break the
scale.
You can get just the shutter-speed
scale as a replacement part. Alternately,
you can replace the complete shutter-
speed indicator assembly; the assembly
includes the scale and the pulleys w ith the
spring already tensioned. There's an ad
vantage in replacing the com plete
assembly — if you replace just the scale,
you may encounter tracking and align
ment problems. That is, when you get the
" 0 " calibration centered in its window,
you may find that the ‘ ‘1000'' calibration
does not center. However, if the scale
breaks, you can normally make a satisfac
tory repair w itho u t replacing parts.
The break usually occurs at the point
where the scale cements to the wire-
hooking pulley. Part of the scale then re
mains cemented in place. Simply butt the
loose end against the end still attached to
the pulley. Then cement the loose end
w ith super glue.
Now slip the knot in one end of the
tungsten wire through the slot in the
wire-hooking pulley, Fig. 114. W rap the
tungsten wire 2-1/2 turns around the
wire-hooking pulley in a clockwise direc
tion (as seen from the back). It's a little
tough to wrap the free end of the tung
sten wire around the wire-hooking pulley
— you do n 't have a lot of room. But
there's another technique you may find to
be easier.
Before you connect the
tungsten wire, rotate the wire-hooking
pulley fully clockwise (as seen from the
back). The scale then wraps around the
wire-hooking pulley, adding tension to
the spring.
Next, while holding the wire-hooking
pulley to maintain the spring tension,
connect the tungsten wire. You may have
to allow the wire-hooking pulley to rotate
slightly counterclockwise until you can
reach the slot. If you need both hands to
connect the tungsten wire, you might use
a piece of masking tape to hold the
spring-loaded pulley in place. Here, it's
critical that you d o n 't accidentally release
the pulleys. W ith so much tension on the
spring, the scale would definitely break.
A fter you connect one end of the tung
sten wire, hold the other end as shown in
Fig. 115. Now let go of the spring-loaded
pulley and allow the spring to slowly draw
the scale from right to left. The tungsten
wire should wrap itself tw o turns around
the wire-hooking pulley. You need then
wrap on only 1/2 additional turn.
You may wish to put a piece of mask
ing tape over the wire-hooking pulley to
keep the tungsten wire in place. Then
route the tungsten wire under pulley #2,
Fig. 116. Notice in Fig. 116 that we've
temporarily repositioned the flex circuit to
clear pulley #2. Normally the flex covers
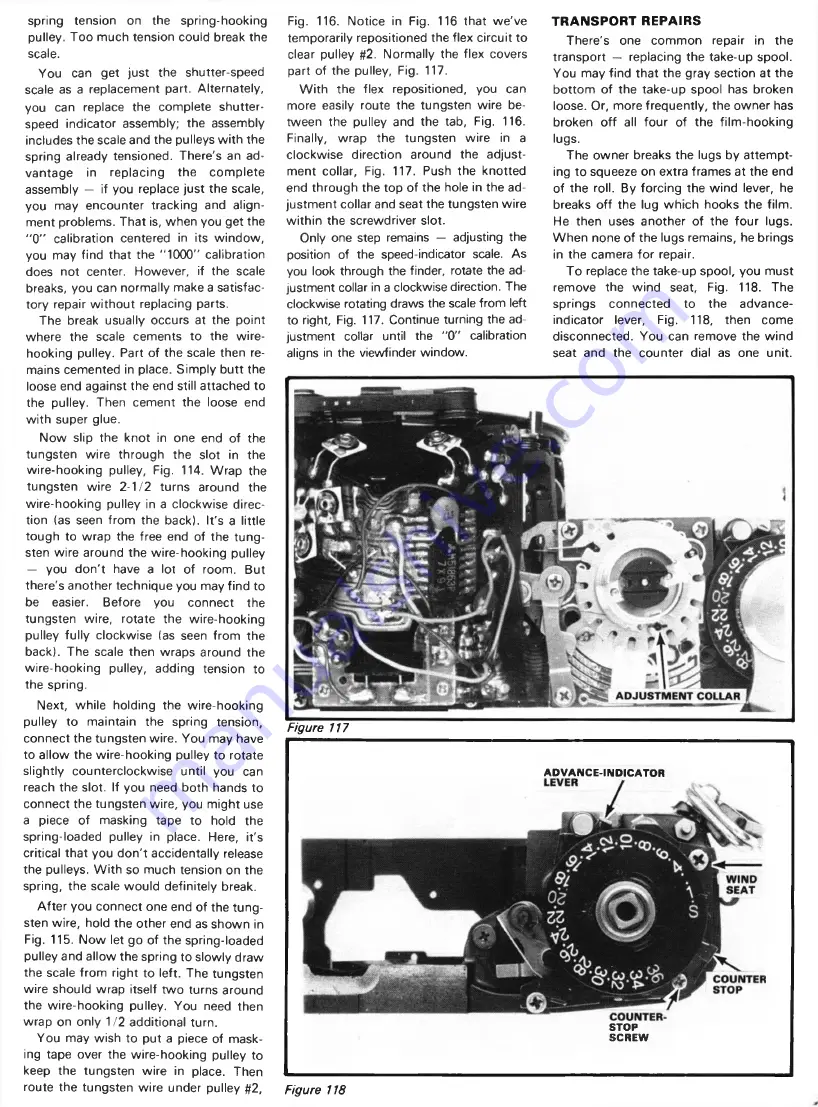
part of the pulley, Fig. 117.
W ith the flex repositioned, you can
more easily route the tungsten wire be
tween the pulley and the tab, Fig. 116.
Finally, wrap the tungsten wire in a
clockwise direction around the adjust
ment collar, Fig. 117. Push the knotted
end through the top of the hole in the ad
justm ent collar and seat the tungsten wire
w ithin the screwdriver slot.
Only one step remains — adjusting the
position of the speed-indicator scale. As
you look through the finder, rotate the ad
justment collar in a clockwise direction. The
clockwise rotating draws the scale from left
to right, Fig. 117. Continue turning the ad
justment collar until the "0 " calibration
aligns in the viewfinder window.
Figure 117
TRANSPORT REPAIRS
There's one common repair in the
transport — replacing the take-up spool.
You may find that the gray section at the
bottom of the take-up spool has broken
loose. Or, more frequently, the owner has
broken o ff all four of the film-hooking
lugs.
The owner breaks the lugs by attem pt
ing to squeeze on extra frames at the end
of the roll. By forcing the wind lever, he
breaks o ff the lug w hich hooks the film.
He then uses another of the four lugs.
W hen none of the lugs remains, he brings
in the camera fo r repair.
To replace the take-up spool, you must
remove the wind seat, Fig. 118. The
springs connected to the advance-
indicator lever. Fig. 118, then come
disconnected. You can remove the wind
seat and the counter dial as one unit.
ADVANCE-INDICATOR
STOP
SCREW
Figure 118


