


1 - 69
36 ADJUSTMENT
1 ADJUSTMENT
1.
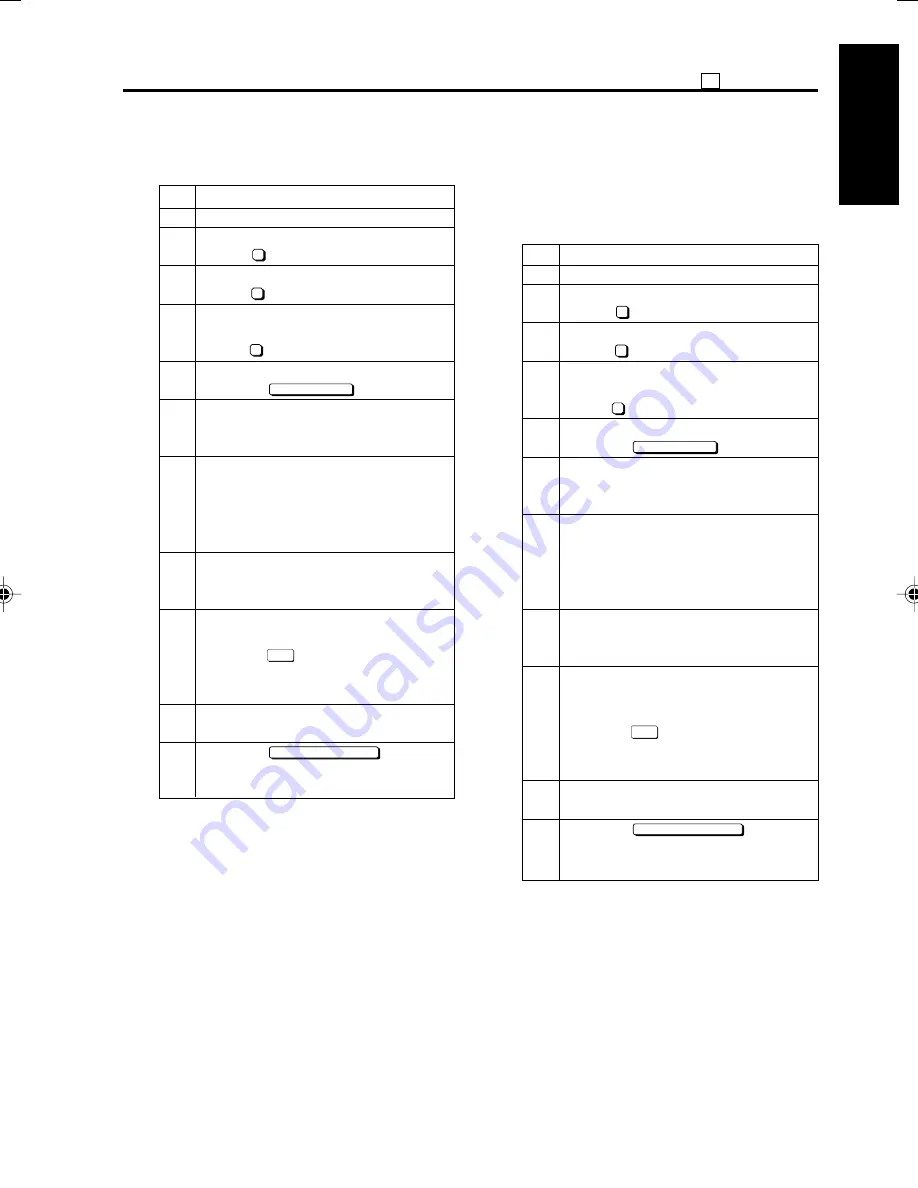
Printer Centering Adjustment
Adjusting the printer centering.
Step
Operation
1
Enter the 36 mode.
2
[36 Mode Menu Screen]
Press “
2
Image adjustment.”
3
[Image adjustment mode menu Screen]
Press “
5
Centering adjustment.”
4
[Centering adjustment mode menu
Screen]
Press “
1
Printer centering adjustment.”
5
[Printer centering adjustment Screen]
Press the
COPY SCREEN
key.
6
Select A3 (11x17) -size paper and press
the Start button to output the test pattern
(No.16).
7
Fold A3 (11x17) size paper in half in the
short edge (landscape) orientation and
check whether the lines on the left and
right overlap completely.
Specification: ±1mm
8
If the printed image is not appropriate,
press the C button while pressing the
Utility button.
9
[Printer Centering Adjustment Screen]
Enter a value with the numeric keys and
press the
SET
key.
Setting range: -64 to +63
1 step=0.1 mm
10
Repeat steps 5 to 9 until the offset is
within specification.
11
Press the
PREVIOUS SCREEN
key to re-
turn to the Centering adjustment mode
menu Screen.
2.
Scanner centering adjustment
Adjusting the scanner (platen) centering.
Preparation:
Printer centering adjustment must
be completed before performing
this adjustment.
Step
Operation
1
Enter the 36 mode.
2
[36 Mode Menu Screen]
Press “
2
Image adjustment.”
3
[Image adjustment mode menu Screen]
Press “
5
Centering adjustment.”
4
[Centering adjustment mode menu
Screen]
Press “
2
Scanner centering adjustment.”
5
[Scanner centering adjustment Screen]
Press the
COPY SCREEN
key.
6
Select A3 (11x17) -size paper, set a
pyramid chart on the original glass, and
press the Start button.
7
Fold A3 (11x17) size paper in half in the
short edge (landscape) orientation and
check whether the lines on the left and
right overlap completely.
Specification: ±2mm
8
If the offset is not within specification,
press the C button while pressing the
Utility button.
9
[Scanner Centering Adjustment
Screen]
Enter a value with the numeric keys and
press the
SET
key.
Setting range: -30 to +30
1 step=0.1 mm
10
Repeat steps 5 to 9 until the offset is
within specification.
11
Press the
PREVIOUS SCREEN
key to re-
turn to the Centering adjustment mode
menu Screen.
Di750Ver.3field01ae.p65
01/07/18, 17:43
69
Summary of Contents for DI750 - SERVICE
Page 1: ...L r 3 ...
Page 6: ...CONTENTS 1 ADJUSTMENT 2 ISW 3 SERVICE 4 ELECTRIC PARTS LIST Blank page ...
Page 20: ...1 ADJUSTMENT ADJUSTMENT 1 ...
Page 21: ...1 ADJUSTMENT Blank page ...
Page 124: ...1 103 OTHER ADJUSTMENT 1 ADJUSTMENT Blank page ...
Page 128: ...1 107 OTHER ADJUSTMENT 1 ADJUSTMENT Blank page ...
Page 162: ...1 141 OTHER ADJUSTMENT 1 ADJUSTMENT Blank page ...
Page 163: ...2 ISW ISW 2 ...
Page 164: ...2 ISW Blank page ...
Page 177: ...3 SERVICE SERVICE 3 ...
Page 178: ...3 SERVICE Blank page ...
Page 180: ...3 SERVICE Blank page ...
Page 203: ...4 ELECTRIC PARTS LIST ELECTRIC PARTS LIST 4 ...
Page 204: ...4 ELECTRIC PARTS LIST Blank page ...
Page 213: ...4 9 PARTS LAYOUT DRAWING 4 ELECTRIC PARTS LIST Blank page ...
Page 227: ...4 23 CONNECTOR LAYOUT DRAWING 4 ELECTRIC PARTS LIST Blank page ...
Page 233: ...4 29 JAM CODE LIST 4 ELECTRIC PARTS LIST Blank page ...
Page 246: ...4 42 JAM CODE LIST 4 ELECTRIC PARTS LIST Blank page ...
Page 276: ...4 72 ERROR CODE LIST 4 ELECTRIC PARTS LIST Blank page ...
Page 279: ......


